background image

ENG

ENGLISH

10

EZMANAGER

Manually for Setup

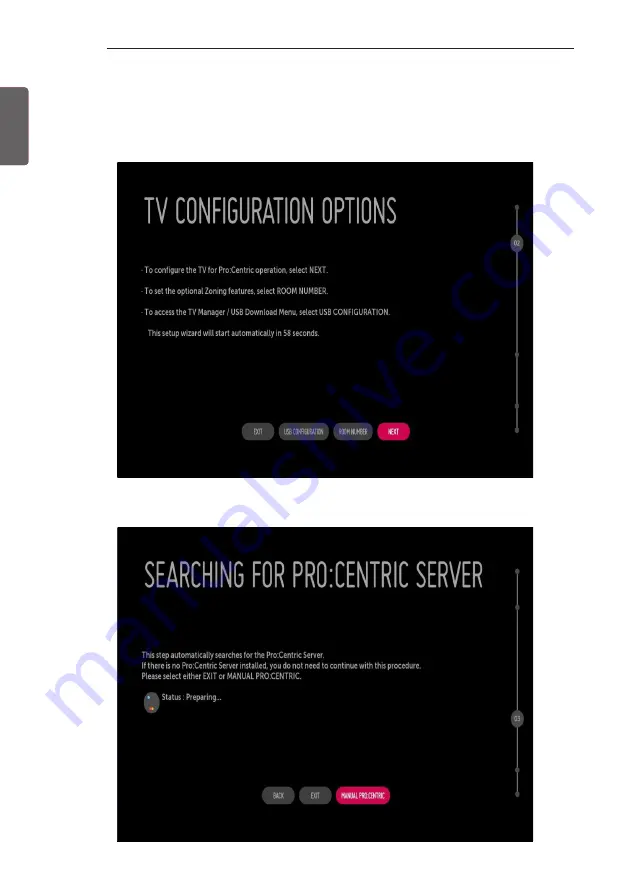
Select a Label and/or enter the Room Number using the numeric keypad on the remotes or using the virtual keyboard on the TV 
screen. To continue, move and select ‘

NEXT

’.

Please select the ‘

MANUAL PRO:CENTRIC

’.

Summary of Contents for 43LX761H

Page 1: ...INSTALLATION MANUAL LED TV Please read this manual carefully before operating your set and retain it for future reference www lg com LX76 LW76 ...

Page 2: ...imited Mode 20 DTV Programme Update 21 Power On Default 21 Power Management 21 RadioVideo Blank 21 Factory Reset 22 NETWORK 22 MAC Address 22 Network Setting 23 IP Stream Control 23 Wake On LAN 24 PRO CENTRIC 24 Mode 24 WORF 25 MediaType 25 Receive Data 25 Room Number Setting 25 Native EPG 25 26 GENERAL 26 Configuration Setup 29 External Speaker 29 Set ID Setup 29 Power Saving 30 HCEC Setup 31 Clo...

Page 3: ...ote control and Intelligent1 sensors Power Indicator 1 Intelligent sensor Adjusts the image quality and brightness based on the surrounding environment 2 Joystick Button This button is located below theTV screen NOTE y y You can set the power indicator light to on or off by selecting General in the main menus ...

Page 4: ...ENG ENGLISH 4 LOCATION AND FUNCTION OF CONTROLS LED Clock Connection Except for LW76 ThisTV can be connected to a LED Clock via the CLOCK port CLOCK LED Clock Not Provided ...

Page 5: ... will search the pre defined channel earlier than all channels Only DVB C The frequencies of pre defined channels are below Germany 51000 858000 778000 698000 618000 538000 458000 378000 298000 218000 138000 khz Philippines 6Mhz 57000 651000 591000 531000 471000 411000 351000 291000 231000 171000 111000 khz Other Country 50000 842000 762000 682000 602000 522000 442000 362000 282000 202000 122000 k...

Page 6: ...ENG ENGLISH 6 EZMANAGER LANGUAGE COUNTRY SELECTION Except for Iran Please select the Language and Country Some countries need to select the Time Zone Only Iran Please select the Language ...

Page 7: ...o set the Room Number on theTV If you intend to set Room Number as part of theTV configuration use the Room Number option to assign the Room for thisTV before you continue with additional configuration In the Label field use the Left Right arrow keys to specify a North South East orWest designation for thisTV In the Room Number field you can use the number keys on the Installer Remote to direct en...

Page 8: ...ENG ENGLISH 8 EZMANAGER 2 This step automatically searches for the Pro Centric Server If was found the Pro Centric data channel select the NEXT ...

Page 9: ...ENG ENGLISH 9 EZMANAGER 3 Downloading the Pro Centric application files takes few minutes 4 After the installation is completed the following screen will be displayed ...

Page 10: ...R Manually for Setup 1 Select a Label and or enter the Room Number using the numeric keypad on the remotes or using the virtual keyboard on theTV screen To continue move and select NEXT 2 Please select the MANUAL PRO CENTRIC ...

Page 11: ...ENG ENGLISH 11 EZMANAGER 3 Configure the appropriate Pro Centric settings in theTV ...

Page 12: ...ENG ENGLISH 12 EZMANAGER 4 Downloading the Pro Centric application files takes few minutes ...

Page 13: ...ENG ENGLISH 13 EZMANAGER 5 After the installation is completed the following screen will be displayed ...

Page 14: ...G ENGLISH 14 EZMANAGER USB LG Smart Install Utility 1 Select the USB CONFIGURATION TV MANAGER If you have USB Memory for LG_DTV or lg_dtv folder this step shows the USB file list for downloading the items ...

Page 15: ...ENG ENGLISH 15 EZMANAGER ...

Page 16: ...ENG ENGLISH 16 EZMANAGER 2 Downloading the Pro Centric application files takes few minutes 3 After the installation is completed the following screen will be displayed ...

Page 17: ...tures can be performed simply on additional window to enhance the LG hotelTV s easy installation and convenient operation for Hotelier and System Integrators TV 1 Press the Setting button for more than 5 seconds using the user remote control programme information will appear at top left on the screen 2 Enter a four digit password and press OK button TheTV is set with the initial password 1 1 0 5 3...

Page 18: ...by the external device ex SIMPLINK TVLink Tuner etc operates separately from the Hotel mode When it is set to Yes User Menu Option Factory Reset and Demo Mode are disabled When Hotel Mode Operation is set toYes Work all skipped programs are not tuned by number keys When Hotel Mode Operation is set toYes Work Detailed Information about the programme is not available in the EPG Power On Status Decid...

Page 19: ... up to higher than maximum volume is received that should be ignored The default value is 100 Minimum Volume y y This entry sets the minimum volume level the set will produce The level is specified as a number between 0 to MaximumVolume 0 Min Max If the command volume down to lower than minimum volume is received that should be ignored The default value is 0 Key Management Manage key usability of ...

Page 20: ...nu is available When selectYes Enter possible Menu works OSD Display y y Decide to display OSD or not by setting OSD Display asYes Display or No Do not Display When OSD Display is set to No Do not Display all OSD is not displayed except some exception Although select No Do not Display the action that press a Menu button for 5 seconds to enter Installation Menu and entering service menu are availab...

Page 21: ...gement feature will turn off the television receiver if no input control command is received from either the Local or IR Key within a selected hours Activity on either of these inputs shall reset the Power Management timer and prevent interruption ofTV viewing This entry can be set to a value which is corresponding to the desired hours 1Hour to 7Hours Default value is Off disabled Radio Video Blan...

Page 22: ...ed 1 Select a network connection eitherWired orWireless 2 When connecting viaWired Configures the IP settings of theTV set You can set the IP address subnet mask gateway and DNS server 3 When connecting viaWi Fi use the one of the following network connection methods AP List Connects to the network selected from the AP List Enter the SSID Connects to the wireless AP typed in WPS PBC Connects easil...

Page 23: ...video You can set the 500 500 Change step is 10 or 10 IGMP You can set IGMP version 2 or 3 Wake On LAN y y Sets theWake On LAN function to Enable or Disable TheWake On LAN feature enables theTV to receive software updates and or be powered ON upon receipt ofWake Up Frame packets and or Magic Packet data via the wired LAN To facilitate use of this feature note that the appropriate wired connection ...

Page 24: ...for Iran GEM or HTML using the button The default value is Off when it is set to Off all the sub items are disabled Except forWORF Room Number Setting WORF Press the OK button in WORF Setting item to go to the WORF menu WhenWORF is set to On Hour and Minute items are enabled and then theWORF function is enabled WhenWORF is set to Off Hour and Minute items are disabled and then theWORF function is ...

Page 25: ...the actual port number where the Pro Centric server is running Server Address is set to Domain Name Domain Name Sets the domain name where the Pro Centric server is running Port Sets the actual port or number where the Pro Centric server is running The default value of IP a b c d is 0 and the range is between 0 and 255 The default value of Port is 0 and the range is between 0 and 65535 Receive Dat...

Page 26: ...When Select RCU is set to Enable You can adjust Number of RCU menu Number of RCU It is a mode to set Number of RCU Number of RCU value range 1 9 When Select RCU is set to Enable Number of RCU value range 0 When Select RCU is set to Disable RCU Remote Control Unit It is special RCU that operates only setted number of RCU inTV ...

Page 27: ... Male Male connector on box viewed towards connector 1 5 6 9 No Signal Signal requirements 1 VCC 2 RX RS232 Standard RS232 specification 3 TX RS232 Standard RS232 specification 4 IR fromTV 5 GND Power ground 6 8 Not connected 7 2 A 5VDC 10 max 100mV ripple 9 1 5 A 12VDC 10 max 100mV ripple One Channel Map If One Channel Map is Yes theTV will operate as below A When the TV is auto scanning it searc...

Page 28: ...ived If Auto Sensing is set to Disable the input is not switched when the input signal is received SIMPLINK and Auto Sensing cannot work simultaneously If SIMPLINK is set to On Auto Sensing is automatically set to Disable If the signal is removed while Auto Sensing automatic input switch is enabled the input returns to the previous setting If the several input are connected by enabling Auto Sensin...

Page 29: ...ck Set the Set ID item in GENERAL Menu whether to activate or not Set toYes Work or No Do NotWork Set ID Set the Set ID ofTV Set with 1 99 Power Saving Static Saving It is the item for setting the level to reduce the backlight control from the items for saving the consuming power which is increased or decreased by 10 steps from 0 to 100 100 makes the consuming power set to the same one from theTV ...

Page 30: ... to Yes theTV decodes and changes it into a CEC Message and sends it to Command via the HDMI CEC Line The default value is No Device ID Sets the ID of a device Logical Address connected to the CEC Line You can choose between All and E The default value is All StandBy Set the sending and receiving scenario of OpStandBy 0x0c command Ths detailed scenario is described on the table below Send Receive ...

Page 31: ...eractive or HCAP API y y Input Depending on model You can select Input according to Clock Source You can select RF or IP when Clock Source is Pro Centric You can selectTV source when Clock Source is TV Input is set to None HCAP Protocol HTNG automatically when Clock Source is Admin y y Program Frequency Depending on model Sets the Frequency to get the time information when Clock Source is Pro Cent...

Page 32: ...ess the OK button 2 Enter four digit password 3 Input the password again for confirmation PreLoaded App 1 If you want to use a particular app you can choose from the menu you can setting each apps activation 2 You can check or uncheck by pressing OK button Lock Mode If Lock Mode is Yes the following features will be unavailable USB Enable Exclude S W update Factory Reset ...

Page 33: ...ia Service DMS contents through Smart Share app Screen Share Screen Share enablesWiFi p2p functions such as Miracast andWiDi If this value is enabled Screen Share app is displayed at launcher bar and User can connect toTV by user s Miracast enabled mobile phone orWiDi enabled laptop DMR DMR enables theTV to act as a Digital Media Renderer DMR device to receive content from DLNA Certifi ed devices ...

Page 34: ...ce ex smart phone desktop laptop searchingTV this string was displayed SoftAP If you want to use SoftAp menu on MEDIA SHARE menu you must select Yes in this item A SoftAP is a function ofTV which is used like Access Point Use Default If you want to use default password this password was generated randomly you must select yes in this item Security Key When guests want to useTV s SoftAP function the...

Page 35: ...ing process is divided into 2 main processes One is writing the previously savedTV data into theTV and one another is reading of currentTV data into USB memory card To avoid any confusion due to the words it is clearly specified as Import Clone File and Export Clone File in the whole process 2 DataTo Be Cloned The data cloned are the same data cloned by previous USB Cloning Details are explained i...

Page 36: ... EZ Download is launched Supported file type have to be shown and None checked when the is existed in USB And only one item should be checked on each file format when the page is opened If DZM file exist file will be selected previously download file NOTE y y If the DZM file is still in the USB after the download is complete An Ez Download pop up window will appear and list the file types such asT...

Page 37: ...Image UPDATE NOTE y y Splash Image update function supports only JEPG BMP format file of less than 8 MB filesize y y We recommend you that splash image resolution match theTV s panel resolution y y Max resolution of splash image Full HD 1920 x 1080 HD 1360 x 768 y y Min resolution of splash image Full HD 64 x 64 HD 64 x 64 y y TV keep splash image until you change a new splash image ...

Page 38: ...ware This feature update EPK ofTV through the hex file in USB The target file is located in LG_DTV folder If there are more than two USB memory Device It is possible to select the USB The download sequence is UpdateTV Software Select file EPK UPDATE ...

Page 39: ...e This feature update MICOM ofTV through the hex file in USB The target file is located in LG_DTV folder If there are more than two USB memory Device It is possible to select the USB The download sequence is Update Micom Software Select file Micom UPDATE ...

Page 40: ... the user can start Import Clone File process with the data file generated and stored in USB memory card As previously warned in Export Clone File process the user should not turnTV off nor unplug the USB memory card Detailed steps for Import Clone File are illustrated below The following images might be slightly different than the OSD image ...

Page 41: ...ore Import Clone File process as it generate the file to be used in Export Clone File While writing is in process the user must not turnTV off nor unplug the USB memory card The steps in Export Clone File are explained below The following images might be slightly different than the OSD image ...

Page 42: ......

Reviews: