


3
Remove the indicated tray.
4
Insert the tray.
5
Connect the power cord to the electrical outlet.
CAUTION—POTENTIAL INJURY:
To avoid the risk of fire or electrical shock, connect the
power cord to an appropriately rated and properly grounded electrical outlet that is near
the product and easily accessible.
6
Turn on the printer.
If the error occurs again, then:
1
Turn off the printer.
2
Unplug the power cord from the electrical outlet.
3
Remove the indicated tray.
4
Contact customer support.
•
From the control panel, select
Continue
to clear the message and resume printing.
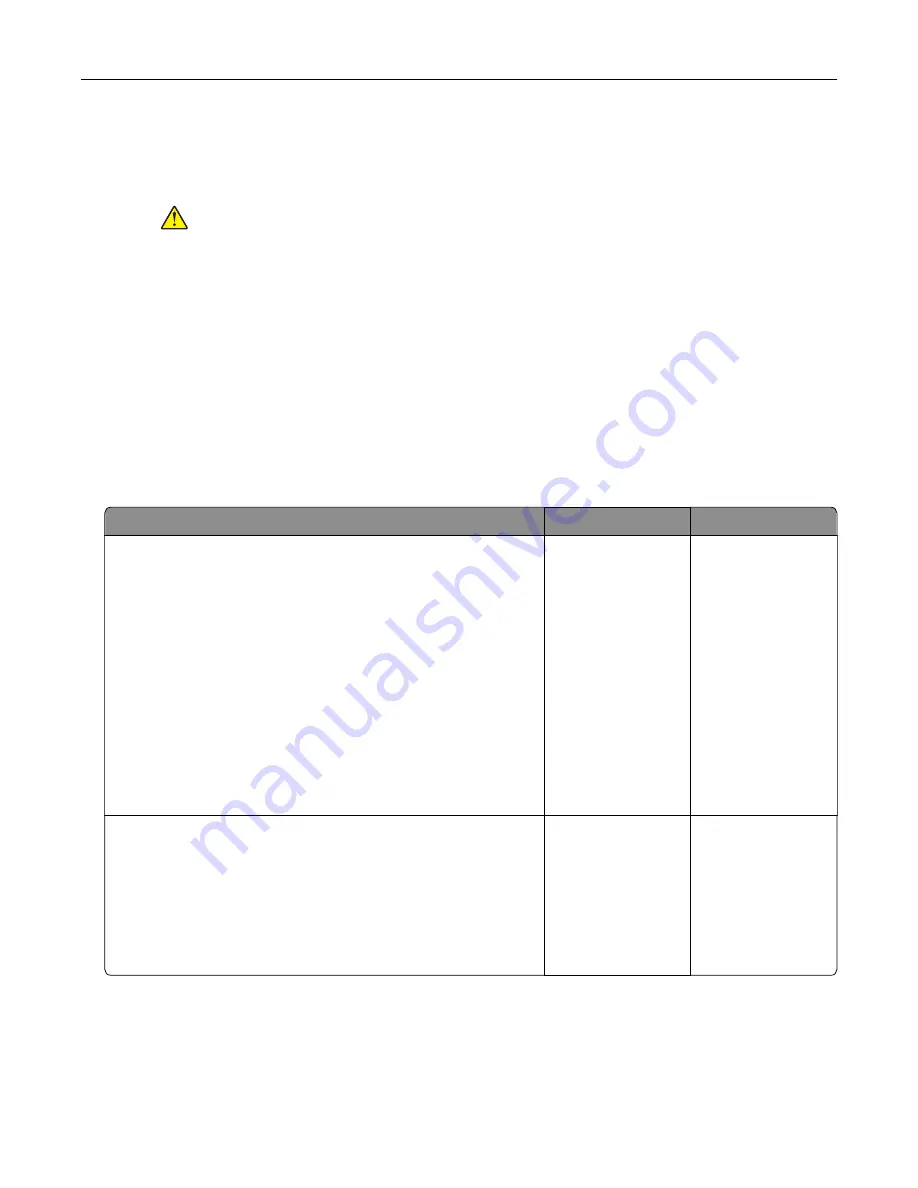
Paper frequently jams
Action
Yes
No
Step 1
a
Remove the tray.
b
Check if paper is loaded correctly.
Notes:
•
Make sure that the paper guides are positioned correctly.
•
Make sure that the stack height is below the maximum
paper fill indicator.
•
Make sure to print on recommended paper size and type.
c
Insert the tray.
d
Print the document.
Do paper jams occur frequently?
Go to step 2.
The problem is
solved.
Step 2
a
From the control panel, navigate to:
Settings
>
Paper
>
Tray Configuration
>
Paper Size/Type
b
Set the correct paper size and type.
c
Print the document.
Do paper jams occur frequently?
Go to step 3.
The problem is
solved.
Troubleshooting
234
Summary of Contents for XC9225
Page 168: ... Scanner glass Scanner glass pad 3 Close the scanner cover Maintaining the printer 168 ...
Page 176: ...5 Insert the new toner cartridge 6 Remove the waste toner bottle Maintaining the printer 176 ...
Page 181: ...8 Insert the waste toner bottle and then close the door Maintaining the printer 181 ...
Page 211: ... Below the fuser area Duplex area Clearing jams 211 ...
Page 216: ...2 Open door J Clearing jams 216 ...
Page 218: ... Areas H1 and H2 Area H6 Clearing jams 218 ...
Page 222: ...2 Remove the staple cartridge holder 3 Remove the loose staples Clearing jams 222 ...
Page 224: ...2 Remove the staple cartridge holder 3 Remove the loose staples Clearing jams 224 ...
Page 226: ...2 Remove the staple cartridge holder 3 Remove the loose staples Clearing jams 226 ...
Page 280: ...6 Remove the controller board shield Upgrading and migrating 280 ...
Page 283: ...4 Remove the controller board shield Upgrading and migrating 283 ...
Page 289: ...7 Connect the tray connector to the printer 8 Open trays 2 and 3 Upgrading and migrating 289 ...
Page 294: ...9 Remove the stabilizing feet from the tray Upgrading and migrating 294 ...
Page 298: ...17 Secure the tray cable with the clamp Upgrading and migrating 298 ...
Page 305: ...7 Remove the paper guides 8 Attach the sensor cover Upgrading and migrating 305 ...
Page 311: ...8 Attach the finisher to the printer Upgrading and migrating 311 ...


