


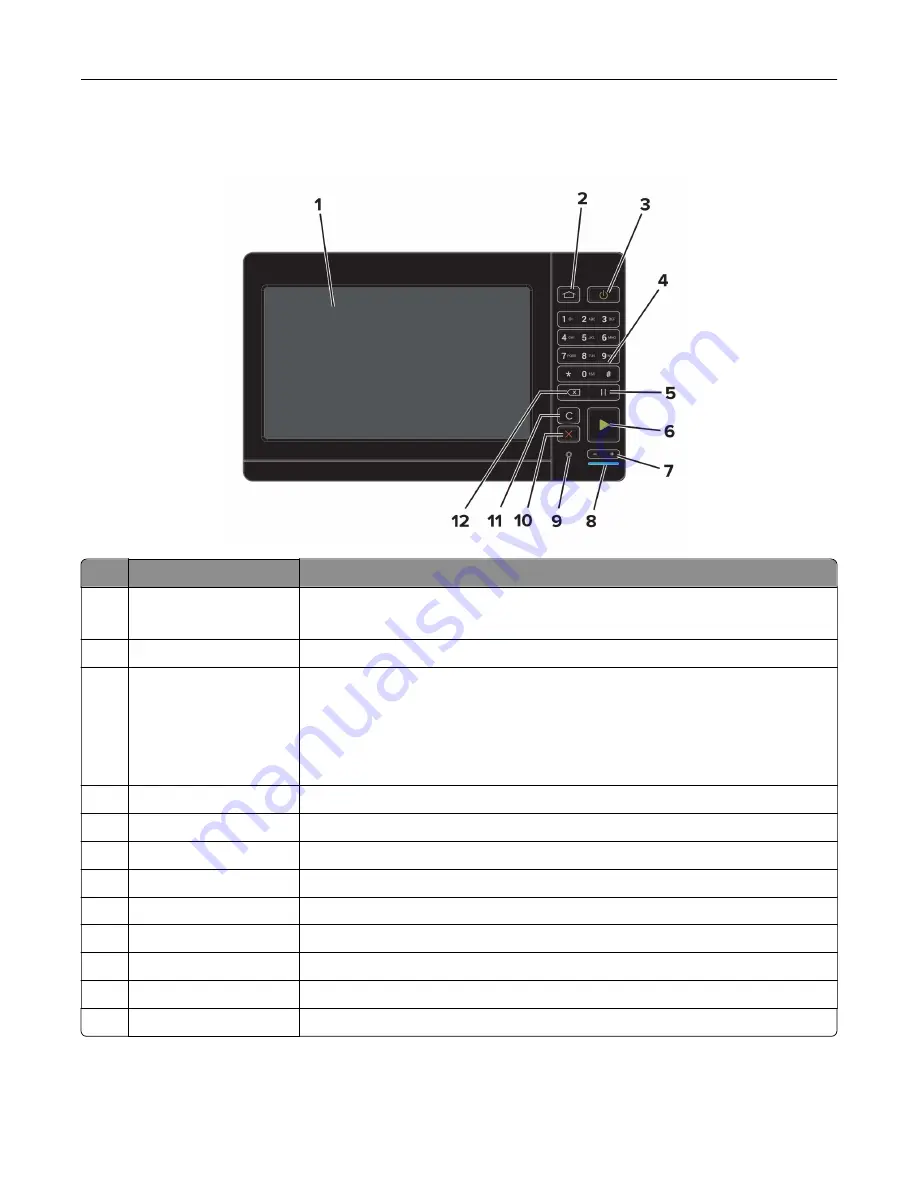
Using the control panel
Use the
To
1
Display
•
View the printer messages and supply status.
•
Set up and operate the printer.
2
Home button
Go to the home screen.
3
Power button
•
Turn on or turn off the printer.
Note:
To turn off the printer, press and hold the power button for five
seconds.
•
Set the printer to Sleep or Hibernate mode.
•
Wake the printer from Sleep or Hibernate mode.
4
Keypad
Enter numbers or symbols in an input field.
5
Pause button
Place a dial pause in a fax number.
6
Start button
Start a job, depending on which mode is selected.
7
Volume buttons
Adjust the volume of the headset or speaker.
8
Indicator light
Check the status of the printer.
9
Headset or speaker port Attach a headset or speaker.
10
Stop or Cancel button
Stop the current job.
11
Clear all or Reset button Reset the default settings of a function such as copying, faxing, or scanning.
12
Backspace button
Move the cursor backward and delete a character in an input field.
Learning about the printer
20
Summary of Contents for XC9225
Page 168: ... Scanner glass Scanner glass pad 3 Close the scanner cover Maintaining the printer 168 ...
Page 176: ...5 Insert the new toner cartridge 6 Remove the waste toner bottle Maintaining the printer 176 ...
Page 181: ...8 Insert the waste toner bottle and then close the door Maintaining the printer 181 ...
Page 211: ... Below the fuser area Duplex area Clearing jams 211 ...
Page 216: ...2 Open door J Clearing jams 216 ...
Page 218: ... Areas H1 and H2 Area H6 Clearing jams 218 ...
Page 222: ...2 Remove the staple cartridge holder 3 Remove the loose staples Clearing jams 222 ...
Page 224: ...2 Remove the staple cartridge holder 3 Remove the loose staples Clearing jams 224 ...
Page 226: ...2 Remove the staple cartridge holder 3 Remove the loose staples Clearing jams 226 ...
Page 280: ...6 Remove the controller board shield Upgrading and migrating 280 ...
Page 283: ...4 Remove the controller board shield Upgrading and migrating 283 ...
Page 289: ...7 Connect the tray connector to the printer 8 Open trays 2 and 3 Upgrading and migrating 289 ...
Page 294: ...9 Remove the stabilizing feet from the tray Upgrading and migrating 294 ...
Page 298: ...17 Secure the tray cable with the clamp Upgrading and migrating 298 ...
Page 305: ...7 Remove the paper guides 8 Attach the sensor cover Upgrading and migrating 305 ...
Page 311: ...8 Attach the finisher to the printer Upgrading and migrating 311 ...


