


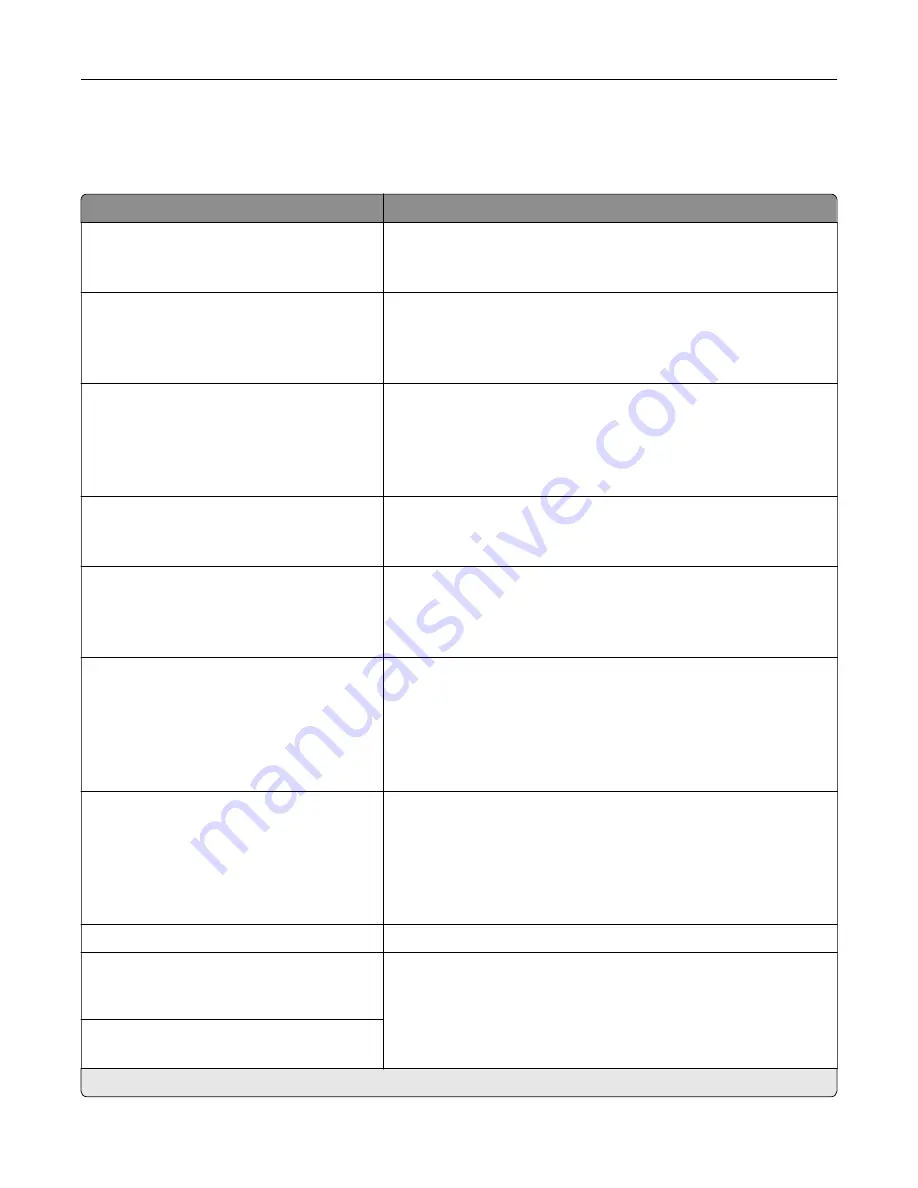
IPSec
Note:
This menu appears only in network printers or printers that are attached to print servers.
Menu item
Description
Enable IPSec
Off
On*
Enable Internet Protocol Security (IPSec).
Base Configuration
Default*
Compatibility
Secure
Set the IPSec base configuration.
DH (Diffie
‑
Hellman) Group Proposal
modp2048 (14)*
modp3072 (15)
modp4096 (16)
modp6144 (17)
Set the IPSec base configuration.
Note:
This menu item appears only when Base Configuration is set
to Compatibility.
Proposed Encryption Method
3DES
AES*
Set the encryption method.
Note:
This menu item appears only when Base Configuration is set
to Compatibility.
Proposed Authentication Method
SHA1
SHA256*
SHA512
Set the authentication method.
Note:
This menu item appears only when Base Configuration is set
to Compatibility.
IKE SA Lifetime (Hours)
1
2
4
8
24*
Specify the IKE SA expiry period.
Note:
This menu item appears only when Base Configuration is set
to Secure.
IPSec SA Lifetime (Hours)
1
2
4
8*
24
Specify the IPSec SA expiry period.
Note:
This menu item appears only when Base Configuration is set
to Secure.
IPSec Device Certificate
Specify an IPSec certificate.
Pre
‑
Shared Key Authenticated
Connections
Host [x]
Configure the authenticated connections of the printer.
Certificate Authenticated Connections
Host [x] Address[/subnet]
Note:
An asterisk (*) next to a value indicates the factory default setting.
Understanding the printer menus
145
Summary of Contents for XC9225
Page 168: ... Scanner glass Scanner glass pad 3 Close the scanner cover Maintaining the printer 168 ...
Page 176: ...5 Insert the new toner cartridge 6 Remove the waste toner bottle Maintaining the printer 176 ...
Page 181: ...8 Insert the waste toner bottle and then close the door Maintaining the printer 181 ...
Page 211: ... Below the fuser area Duplex area Clearing jams 211 ...
Page 216: ...2 Open door J Clearing jams 216 ...
Page 218: ... Areas H1 and H2 Area H6 Clearing jams 218 ...
Page 222: ...2 Remove the staple cartridge holder 3 Remove the loose staples Clearing jams 222 ...
Page 224: ...2 Remove the staple cartridge holder 3 Remove the loose staples Clearing jams 224 ...
Page 226: ...2 Remove the staple cartridge holder 3 Remove the loose staples Clearing jams 226 ...
Page 280: ...6 Remove the controller board shield Upgrading and migrating 280 ...
Page 283: ...4 Remove the controller board shield Upgrading and migrating 283 ...
Page 289: ...7 Connect the tray connector to the printer 8 Open trays 2 and 3 Upgrading and migrating 289 ...
Page 294: ...9 Remove the stabilizing feet from the tray Upgrading and migrating 294 ...
Page 298: ...17 Secure the tray cable with the clamp Upgrading and migrating 298 ...
Page 305: ...7 Remove the paper guides 8 Attach the sensor cover Upgrading and migrating 305 ...
Page 311: ...8 Attach the finisher to the printer Upgrading and migrating 311 ...


