Diagnostics information
2-7
7014-xxx
Understanding the home screen
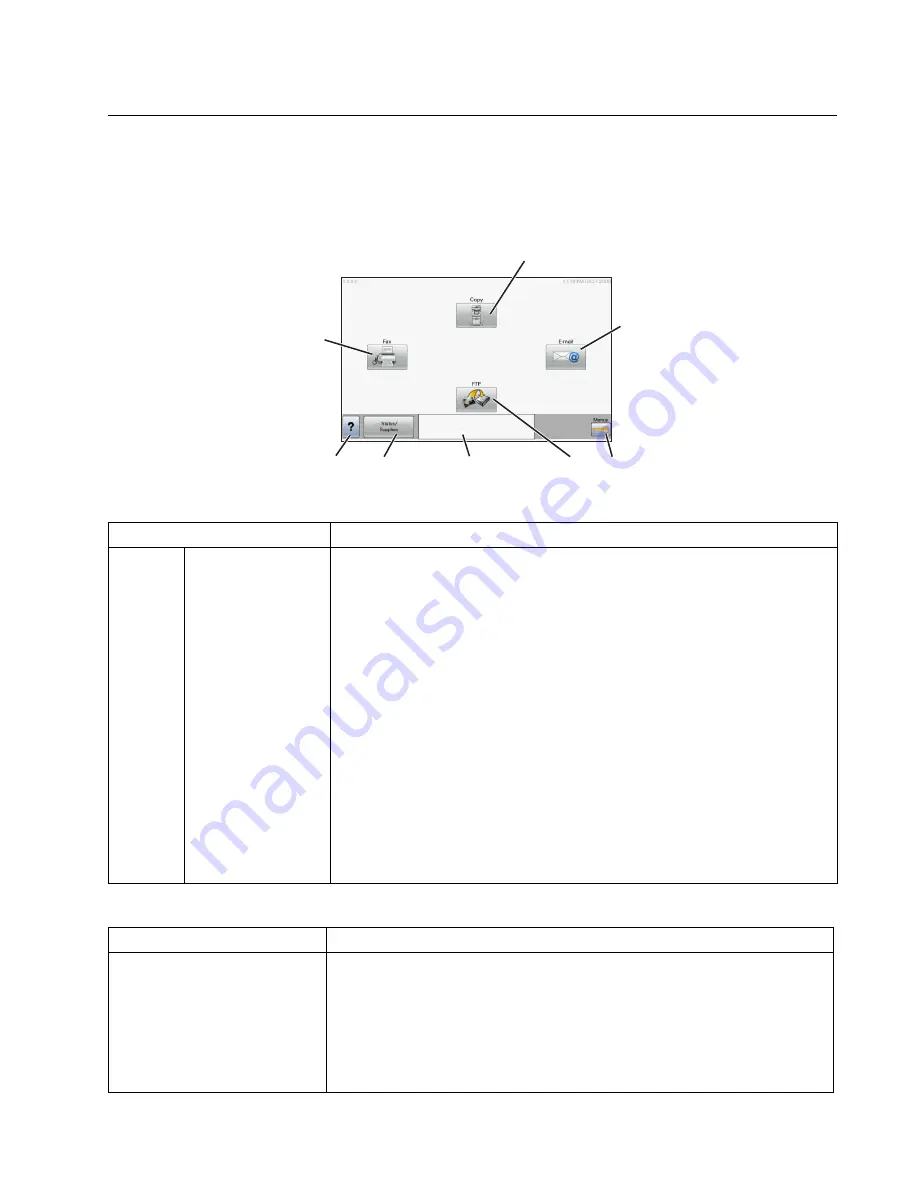
After the printer is turned on and a short warm-up period occurs, the display shows the following basic screen
which is referred to as the home screen. Use the home screen buttons to initiate an action such as copying,
faxing, or scanning; to open the menu screen; or to respond to messages.
Other buttons that may appear on the home screen:
Display item
Description
1
Copy
Opens the Copy menus
Note:
From the home screen, you can also access the Copy menus by pressing
a number on the keypad.
2
Opens the E-mail menu
3
Menus
Opens the menus
These menus are available only when the printer is in the
Ready
state.
4
FTP
Opens the File Transfer Protocol (FTP) menus
Note:
This function must be set up by your system support person. Once it is set
up, it appears as a display item.
5
Status message bar
• Shows the current printer status such as
Ready
or
Busy
.
• Shows printer conditions such as
Toner Low
.
• Shows intervention messages to give instructions on what you should do so
the printer can continue processing, such as
Close door
or
Insert print
cartridge
.
6
Status/Supplies
Appears on the display whenever the printer status includes a message requiring
intervention. Touch it to access the messages screen for more information on the
message, including how to clear it.
7
Tips
All menus have a Tips button. Tips is a context-sensitive Help feature within the
display touch screens.
8
Fax
Opens the Fax menus
Display item
Description
Release Held Faxes
If this button is shown, then there are held faxes with a scheduled hold time
previously set. To access the list of held faxes, touch this button.
Search Held Jobs
Searches on any of the following items and returns search results:
• User names for held or confidential print jobs
• Job names for held jobs, excluding confidential print jobs
• Profile names
• Bookmark container or job names
• USB container or job names for supported extensions only
1
2
3
4
5
6
7
8
Ready
Touch any button to begin.
Summary of Contents for X46 Series
Page 10: ...x Service Manual 7014 xxx...
Page 15: ...Notices and safety information xv 7014 xxx...
Page 16: ...xvi Service Manual 7014 xxx...
Page 22: ...xxii Service Manual 7014 xxx...
Page 162: ...3 56 Service Manual 7014 xxx...
Page 174: ...4 12 7014 xxx 2 Remove the three screws B securing the top of the controller shield B...
Page 184: ...4 22 7014 xxx 6 Remove the screw D from the gear E 7 Remove the plastic bushing F...
Page 194: ...4 32 7014 xxx 2 Carefully pull the scanner front cover away from the tub assembly...
Page 207: ...Repair information 4 45 7014 xxx 5 Remove the three screws B from the left door mount B...
Page 221: ...Repair information 4 59 7014 xxx 7 Open the front access door and remove the lower paper guide...
Page 256: ...4 94 7014 xxx 14 Remove the three screws A from the left rear frame assembly A A A...
Page 278: ...4 116 7014 xxx...
Page 290: ...7 2 Service Manual 7014 xxx Assembly 1 Covers 3 11 7 13 5 16 9 15 2 10 6 17 4 12 8 14 1 17 18...
Page 292: ...7 4 Service Manual 7014 xxx Assembly 2 Imaging 3 11 7 13 5 16 9 15 2 10 6 4 12 8 14 1...
Page 294: ...7 6 Service Manual 7014 xxx Assembly 3 Tray assemblies 3 2 1 5 4...
Page 296: ...7 8 Service Manual 7014 xxx Assembly 4 Electronics 2 1 10 11 12 7 13 9 6 14 2 5 8 3 4 16 15 17...
Page 302: ...7 14 Service Manual 7014 xxx...
Page 306: ...I 4 Service Manual 7014 xxx...
Page 309: ...Part number index I 7 7014 xxx 56P0558 RJ11 Cable w Toroids 7 12 7377732 Relocation Kit 7 12...
Page 310: ...I 8 Service Manual 7014 xxx...


