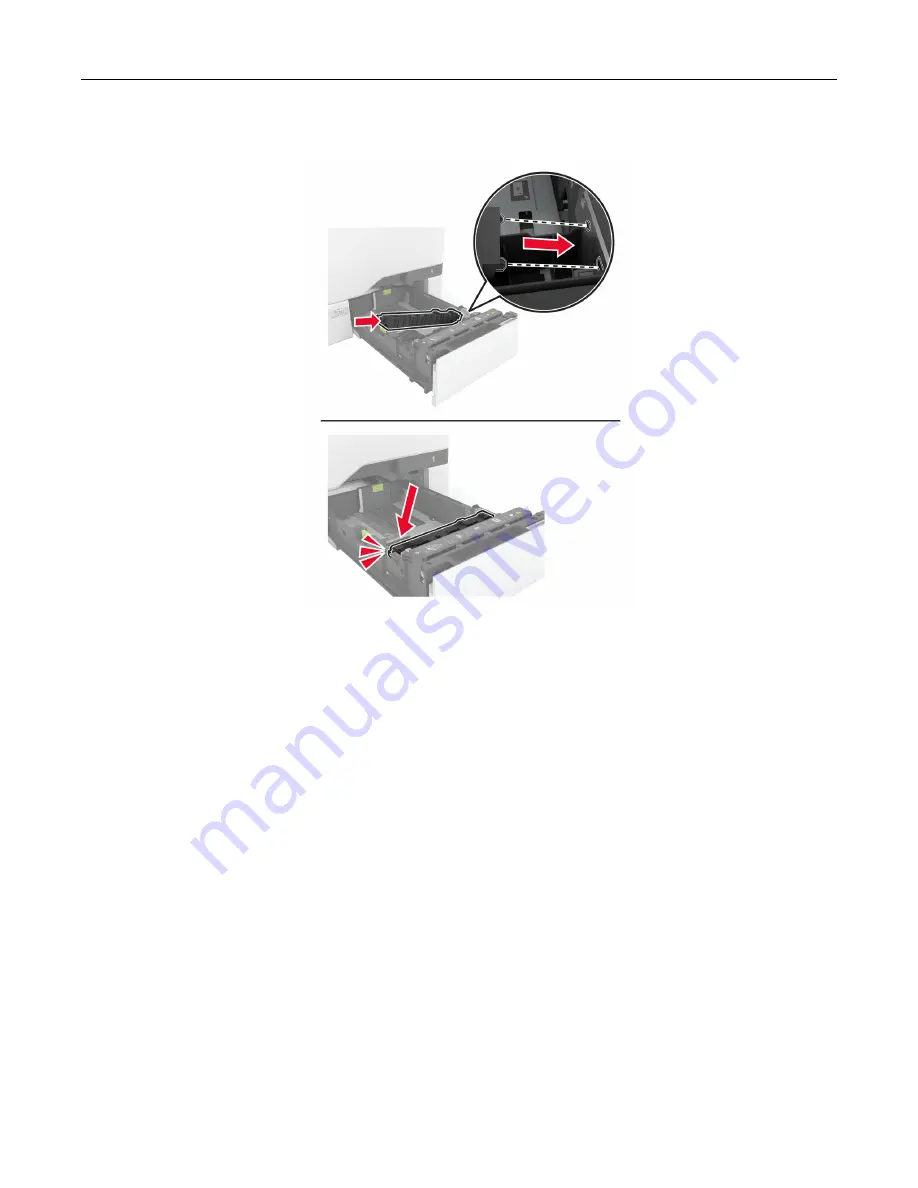
4
Insert the new separator bracket.
5
Insert the tray.
Resetting the maintenance counter
1
From the home screen, touch
Settings
>
Device
>
Maintenance
>
Configuration Menu
>
Supply Usage
And Counters
.
2
Touch
Reset Maintenance Counter
.
Resetting the supply usage counters
1
From the home screen, touch
Settings
>
Device
>
Maintenance
>
Configuration Menu
>
Supply Usage
And Counters
.
2
Select the counter that you want to reset.
Warning—Potential Damage:
Supplies and parts without Return Program agreement terms may be reset and
remanufactured. However, the manufacturer’s warranty does not cover any damage caused by non-genuine
supplies or parts. Resetting counters on the supply or part without proper remanufacturing can cause
damage to your printer. After resetting the supply or part counter, your printer may display an error indicating
the presence of the reset item.
Maintain the printer
154
Summary of Contents for C4342
Page 46: ...4 Install the ISP into its housing Set up install and configure 46 ...
Page 47: ...5 Attach the housing to the controller board shield Set up install and configure 47 ...
Page 52: ...Set up install and configure 52 ...
Page 55: ...Set up install and configure 55 ...
Page 56: ...3 Install the wireless module into its housing Set up install and configure 56 ...
Page 57: ...4 Attach the wireless module to the controller board shield Set up install and configure 57 ...
Page 123: ...2 Remove the used toner cartridge 3 Unpack the new toner cartridge Maintain the printer 123 ...
Page 124: ...4 Insert the new toner cartridge 5 Close door B Maintain the printer 124 ...
Page 125: ...Replacing the black imaging unit 1 Open door B Maintain the printer 125 ...
Page 127: ...3 Remove the toner cartridges Maintain the printer 127 ...
Page 128: ...4 Disconnect the imaging kit cable Maintain the printer 128 ...
Page 132: ...9 Insert the imaging kit Maintain the printer 132 ...
Page 134: ...Replacing the color imaging kit 1 Open door B Maintain the printer 134 ...
Page 136: ...3 Remove the toner cartridges Maintain the printer 136 ...
Page 137: ...4 Disconnect the imaging kit cable Maintain the printer 137 ...
Page 138: ...5 Remove the used imaging kit Maintain the printer 138 ...
Page 141: ...8 Insert the black imaging unit into the new imaging kit Maintain the printer 141 ...
Page 142: ...9 Insert the new imaging kit Maintain the printer 142 ...
Page 144: ...Replacing the waste toner bottle 1 Open door B Maintain the printer 144 ...


