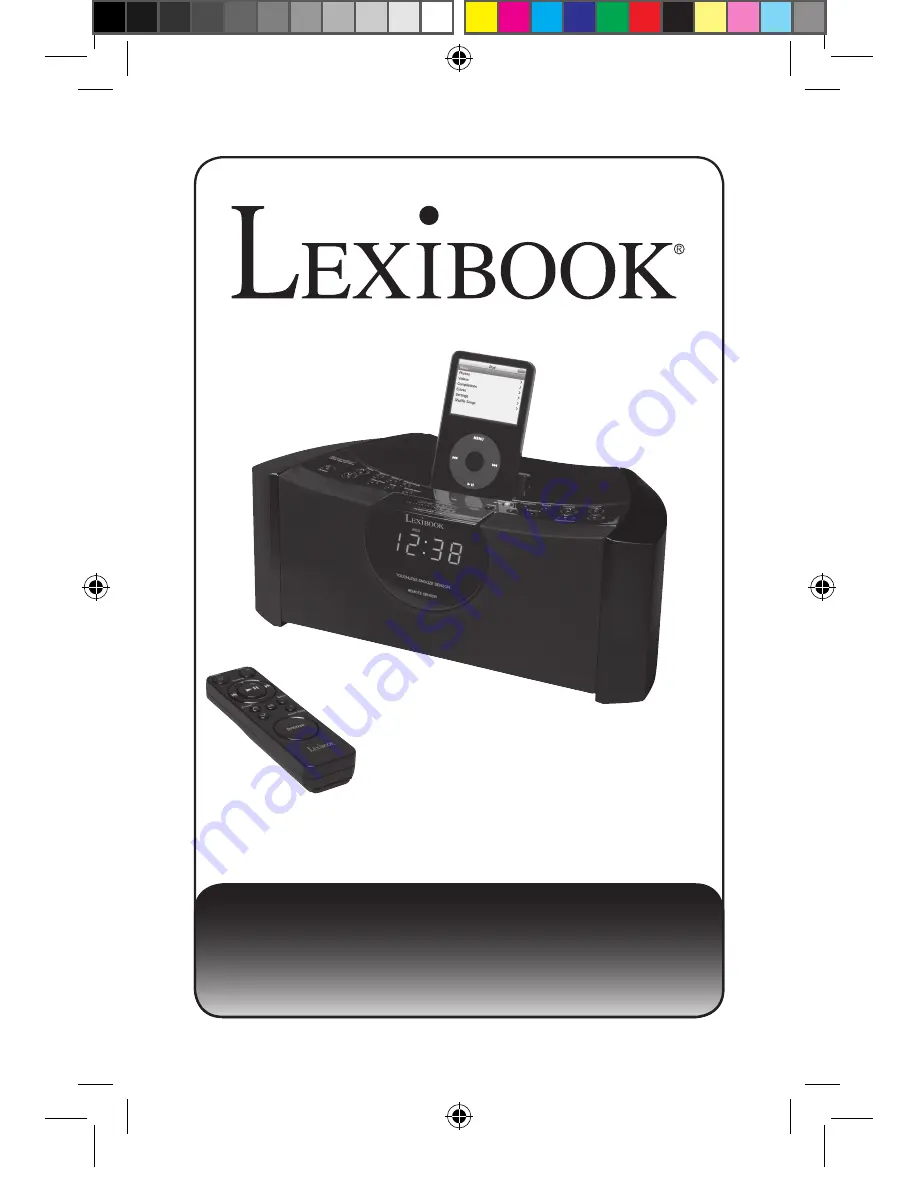
MP3 Music Station
Manuel d’instructions/User Guide
HPl500
HPI500FR-GBIM0236.indd 1
09/06/2006 16:37:14
Page 1: ...MP3 Music Station Manuel d instructions User Guide HPl500 HPI500FR GBIM0236 indd 1 09 06 2006 16 37 14...
Page 2: ...39 72 3 38 ENGLISH FRAN AIS HPI500FR GBIM0236 indd 2 09 06 2006 16 37 14...
Page 3: ...dans le cas o votre appareil devait tre retourn pour une r paration Le carton original et les mat riaux d emballage sont des l ments indispensables pour prot ger votre appareil contre tout dommage po...
Page 4: ...s du tuner lorsque l alimentation lectrique est interrompue Si l alimentation se coupe l af chage s teindra et le syst me ne fonctionnera plus Cependant une fois que le courant sera remis l horloge se...
Page 5: ...hiffon doux 4 Ne bloquez aucune ouverture de ventilation Proc dez l installation selon les instructions 5 Si vous ne parvenez pas ins rer compl tement la prise dans la prise lectrique murale contactez...
Page 6: ...d dockable avec les haut parleurs de ce syst me De plus lorsque votre iPod est plac sur la station d accueil la pile interne de l iPod se rechargera automatiquement Vous pouvez m me choisir de vous r...
Page 7: ...outon Snooze sur le dessus du panneau ou sur la t l commande ou vous pouvez simplement bouger votre main devant le CAPTEUR DE RAPPEL SANS TOUCHE situ sur le panneau avant La t l commande de 13 touches...
Page 8: ...d accueil R f rez vous au tableau ci dessous pour s lectionner l adaptateur appropri votre mod le d iPod et ins rez cet adaptateur dans la station d accueil avant d activer votre iPod FRAN AIS 8 Adap...
Page 9: ...FRAN AIS 9 EMPLACEMENT DES CONTROLES ET DES INDICATEURS Panneau avant Panneau arri re Panneau sup rieur Support Ipod HPI500FR GBIM0236 indd 9 09 06 2006 16 37 19...
Page 10: ...on Bande 15 Boutons Volume 16 Boutons R glage Saut Horloge Heure 17 Bouton M moire 18 Bouton Sieste 19 Bouton Endormissement 20 Bouton RAPPEL D ALARME Endormissement Sieste D sactiv 21 Bouton Date Moi...
Page 11: ...TUNER 11 Indicateur de s lection iPod 12 Indicateur de s lection AUX 13 Indicateur AL1 Alarme 1 1 Bouton preset D acc s aux stations pr r gl es 2 Bouton preset D acc s aux stations pr r gl es 3 Bouto...
Page 12: ...ent de la t l commande devient irr gulier ou si elle s arr te de fonctionner remplacez les piles aussi vite que possible Ne laissez jamais de piles faibles ou us es dans la t l commande durant une p r...
Page 13: ...ivez dans la zone horaire GMT 1 il n y aura rien d autre faire Votre horloge sera r gl e et fonctionnera Si vous ne vivez pas dans la zone horaire GMT 1 vous devez changer l af chage de la zone par d...
Page 14: ...ate et le mois jj mm Par exemple 21 5 appara tra signi ant le 21 mai Lorsque vous rel chez le bouton Date Month Date Mois l cran af che de nouveau l heure Af chage de l ann e Pour voir l ann e appuyez...
Page 15: ...re ou l af chage changera d une minute Si vous maintenez les boutons Tuning Skip R glage Saut Clock Time Horloge Heure ou l af chage changera tout d abord doucement d une minute chaque fois mais si vo...
Page 16: ...de r veil correctement en observant l indicateur AM Si l indicateur AM est On Activ l heure du r veil sera le matin Si l indicateur AM est Off D sactiv l heure du r veil sera l apr s midi 4 Lorsque l...
Page 17: ...ode d alarme jusqu ce que les indicateurs des jours indiquent le mode d sir les jours de la semaine uniquement les week ends uniquement ou tous les jours Rel chez les boutons de r glage Alarm Mode Mod...
Page 18: ...TELECOMMANDE situ sur le panneau avant de l appareil principal et appuyez sur le bouton d sir de la t l commande La distance de port e de la t l commande est approximativement de 15 pieds 4 50 m tres...
Page 19: ...r le panneau sup rieur ou avec les boutons de la t l commande jusqu ce que l af chage indique la fr quence de la station d sir e R glage automatique Maintenez appuy s les boutons Tuning Skip R glage S...
Page 20: ...orsque vous d sirez arr ter l coute de la radio appuyez sur le bouton Power Alimentation situ sur le panneau sup rieur ou sur la t l commande pour teindre le syst me L indicateur TUNER s teint REMARQU...
Page 21: ...M moire puis appuyez sur le bouton Preset Pr r glage pour s lectionner Memory 2 M moire 2 F 2 commencera clignoter sur l af chage 5 Appuyez de nouveau sur le bouton Memory M moire pour entrer votre s...
Page 22: ...puyez de nouveau sur le bouton Memory M moire La nouvelle station est maintenant stock e et la station pr c dente sera effac e de la m moire Informations concernant l antenne FM L antenne FM est int g...
Page 23: ...ion d accueil la pile interne de l iPod se recharge automatiquement REMARQUE Pour viter toute interf rence entre l iPod et le Tuner de ce syst me le circuit de pile de l iPod est automatiquement d sac...
Page 24: ...la station d accueil Apr s avoir enlev l adaptateur de l iPod nano souvenez vous de faire glisser le connecteur 30 ches de l iPod de nouveau vers la droite avant d installer un autre iPod 2 S lectionn...
Page 25: ...t l commande pour mettre le syst me en marche On Selon le r glage du minuteur du r tro clairage de votre iPod le r tro clairage de l af chage pourra s allumer et l indicateur Charging En charge ou Ch...
Page 26: ...utons ou de la t l commande 8 Les boutons Play pause Lecture Pause du panneau sup rieur ou de la t l commande de ce syst me ont la m me fonction que le bouton Play Pause Lecture Pause de votre iPod Ap...
Page 27: ...lez la station de radio d sir e pour vous r veiller r glez le contr le du Volume au niveau d sir puis d sactivez le syst me 2 Faites glisser l interrupteur de s lection de Alarm 1 Alarme 1 et ou Alarm...
Page 28: ...s lectionnez la chanson que vous d sirez entendre votre r veil et le niveau de volume d sir puis appuyez sur le bouton Power Alimentation pour teindre le syst me SE REVEILLER AVEC LA SONNERIE Note L...
Page 29: ...cet album si celui ci est d une dur e de moins d une heure 4 Pour arr ter l alarme de l iPod avant vous pouvez appuyer sur le bouton Power Alimentation ou le bouton appropri Alarm 1 Alarme 1 ou Alarm...
Page 30: ...nooze pour vous permettre un repos suppl mentaire de quelques minutes de plus La fonction de rappel d alarme arr te l alarme durant 9 minutes puis fait retentir de nouveau l alarme Il y a trois moyens...
Page 31: ...endormir mais souvenez vous que le niveau r gl sera le m me que le niveau de volume que vous entendrez lorsque l alarme vous r veillera avec la radio ou l iPod 2 Appuyez sur le bouton Sleep sur le pa...
Page 32: ...est en lecture teignez le 2 Appuyez sur le bouton Nap sur le panneau sup rieur L af chage indiquera bri vement n 30 et l indicateur Nap Sieste appara tra La sonnerie s activera 30 minutes apr s pour...
Page 33: ...e niveau du Volume du syst me sur un niveau moyen environ au niveau 30 du volume Faites fonctionner votre appareil externe normalement Proc dez un ajustement nal du niveau de volume du syst me et de v...
Page 34: ...s entre la date o l appareil a t fabriqu et le moment o vous avez mis votre appareil en marche et ceux ci d termineront la dur e de la pile avant de la remplacer Durant cette p riode initiale de stock...
Page 35: ...EZ GARDE A NE PAS PERDRE CETTE PETITE VIS 4 Enlevez la pile originale du support et ins rez la nouvelle pile de la m me fa on en respectant la polarit positive Faites glisser le support avec la pile n...
Page 36: ...d faut lorsque le courant sera r tabli Le r glage initial par d faut est 12 00 samedi 1er janvier 1 01 2005 Si vous remarquez que l heure de votre radio r veil SmartSet est compl tement fausse et que...
Page 37: ...ium maintiendra ce r glage durant les 5 8 ann es prochaines selon la fr quence et la dur e des pannes de courant que l appareil subira REMARQUE IMPORTANTE Apr s avoir r gl l horloge n oubliez pas de r...
Page 38: ...mportantes informations Dans un souci constant d am lioration nous pouvons tre amen s modi er les couleurs et les d tails du produit pr sent sur l emballage R f rence HPI500 Garantie 2 ans 2006 LEXIBO...
Page 39: ...ry power interruption It even adjusts for Summer Time changes and Leap Years automatically The unique dual alarm system allows you program one or both of the alarms for weekdays only week ends only or...
Page 40: ...emove all of the components from the carton and remove all packing materials from the components We recommend that you save the carton and packing materials if possible in the event that your system e...
Page 41: ...lost the display will go off and the system will not operate However once the power is restored the clock will again reset itself and all of your other settings will be correct The lithium battery tha...
Page 42: ...time 9 Refer all servicing to quali ed service personnel Servicing is required when the apparatus has been damaged in any way such as power supply cord or plug is damaged liquid has been spilled or ob...
Page 43: ...refer to the below table to make the selection according to your iPod model and insert this adaptor in the station Adaptator included Adaptator not included but iPod model compatible without adaptato...
Page 44: ...44 LOCATION OF CONTROLS AND INDICATORS Front Panel Back Panel Top Panel ENGLISH iPod Support Bracket HPI500FR GBIM0236 indd 44 09 06 2006 16 38 03...
Page 45: ...2 Play pause Button 13 Function Button 14 Band Button 15 Volume Buttons 16 Tuning Skip Clock Time Buttons 17 Memory Button 18 Nap Button 19 Sleep Button 20 SNOOZE Sleep Nap Off Button 21 Date Month Bu...
Page 46: ...reo Indicator 10 TUNER Select Indicator 11 iPod Select Indicator 12 AUX Select Indicator 13 AL1 Alarm 1 Indicator 1 Preset Button 2 Preset Button 3 Tuning Skip Reverse Button 4 Power On Off Button 5 I...
Page 47: ...he operation of the remote control becomes intermitted or stops working completely replace the batteries as soon as possible Never leave weak or exhausted batteries in the remote for an extended perio...
Page 48: ...nning If you do not live in the GMT 0 time zone you must change the default zone Time Zone setting according to Greenwich timetable GMT Greenwich zero time Warning If the following occurs The unit s b...
Page 49: ...e Adjustments Some people like to set their clocks 5 to 10 minutes earlier to make sure that they will always be on time Even though the SmartSet sets the time by itself you still have the option of a...
Page 50: ...and used independently You may use the alarms to wake two people at different times or you may use one alarm for weekdays and the other for weekend wake up times The procedure for adjusting the wake u...
Page 51: ...alarm mode which is selected If all 7 indicators are On the Everyday mode is selected If only the Monday through Friday indicators are On the Weekdays only mode is selected If only the Saturday and Su...
Page 52: ...g operations Switch the system On and Off Select the desired function iPod AUX TUNER Select the AM or FM bands Start and pause iPod playback or shut the iPod Off NOTE iPod Shuf e cannot be operated by...
Page 53: ...tation with the Tuning Skip or buttons on the top panel or the buttons on the remote control as follows Manual Tuning Repeatedly press either the Tuning Skip or buttons on the top panel or the buttons...
Page 54: ...he remote control to shut the system Off The TUNER indicator goes off NOTE The Tuner remembers the last station that you were listening to and the selected volume level and automatically returns to th...
Page 55: ...ory 7 Press the Band button to switch to the AM band and repeat the above procedure to store up to 10 AM stations in the tuner memory NOTES The FM memories are numbered F 1 through F 10 The AM memorie...
Page 56: ...cabinet of the main unit You may need to change the position of the main unit until you nd the position that provides the best reception for your favorite AM stations Listening To your Dockable iPod C...
Page 57: ...listen to your iPod We recommend that you start with the power to this system switched Off 1 Open the docking area cover by gently pressing downward on the cover and sliding it backward 2 Select the c...
Page 58: ...t position and then place the nano adapter into the docking area After removing the nano adapter remember to slide the 30 pin connector back to the right position before attempting to install any iPod...
Page 59: ...that was playing before it was shut off NOTE If the Power of this system is On and the iPod function is already selected then your iPod will begin to play as soon as it is connected to the dock as lo...
Page 60: ...king area NOTES If you remove your iPod from the docking connector during playback the power to this system is shut Off automatically If you have a power failure while the iPod is playing the iPod pow...
Page 61: ...that the alarms are On 2 At the selected wake up time the radio will turn on to the selected station It will play for one hour and then shut off automatically and reset itself for the following day T...
Page 62: ...to the Buzzer position The AL 1 and or AL 2 indicators will appear in the main display to con rm that the alarms are On 2 At the selected wake up time the electronic buzzer tone alarm will come on The...
Page 63: ...alarms are On 3 At the selected wake up time the system will turn on in the iPod mode to the song you selected NOTE If you selected the song from the iPod Songs menu playback will stop when that song...
Page 64: ...iate Alarm 1 and or Alarm 2 selector switches to their Off positions SNOOZE Alarm TOUCHLESS SNOOZE When the alarm turns on in the morning you can activate the SNOOZE control to catch a few minutes ext...
Page 65: ...e control to the desired level for falling asleep but remember that the level you set for falling asleep is that same level that you will hear in the morning if you are waking to radio or iPod 2 Press...
Page 66: ...s 1 If the system is playing shut the power Off 2 Press the Nap button on the top panel The display will brie y show n 30 and the Nap indicator appears After 30 minutes the buzzer alarm will turn on t...
Page 67: ...Set the Volume level control on this system to a medium level approximately 30 on the volume level display Operate your external device as usual Make nal adjustments to the volume controls of this sy...
Page 68: ...e you plugged it in for the rst time determine the amount of time before replacement During this initial storage period the lithium battery is supplying power to the SmartSet computer memory Once you...
Page 69: ...OSE THIS SMALL SCREW 4 Remove the original battery from the holder and insert the new battery into the holder the same way observing the positive direction Slide the holder with the new battery back i...
Page 70: ...ly the clock will reset itself to its initial default setting when the power is restored The initial default setting is 12 00 Saturday January 1st 1 01 2005 If you notice that the time on your SmartSe...
Page 71: ...ntain it for the next 5 to 8 years depending on the number and duration of the power outages you experience IMPORTANT NOTE After resetting the clock don t forget to reset your wake up times and alarm...
Page 72: ...Disclaimer In our constant concern for improvement the colours and details of the product may differ slightly from those shown on the packaging Reference HPI500 2 years warranty 2006 LEXIBOOK Designed...