Decora Plus Single Receptacle Outlet
Commercial Specification Grade, Tamper-Resistant
Cat. No. 16351-
SG
20A-125V Grounding
PK-A3292-10-02-0A
1
a
.
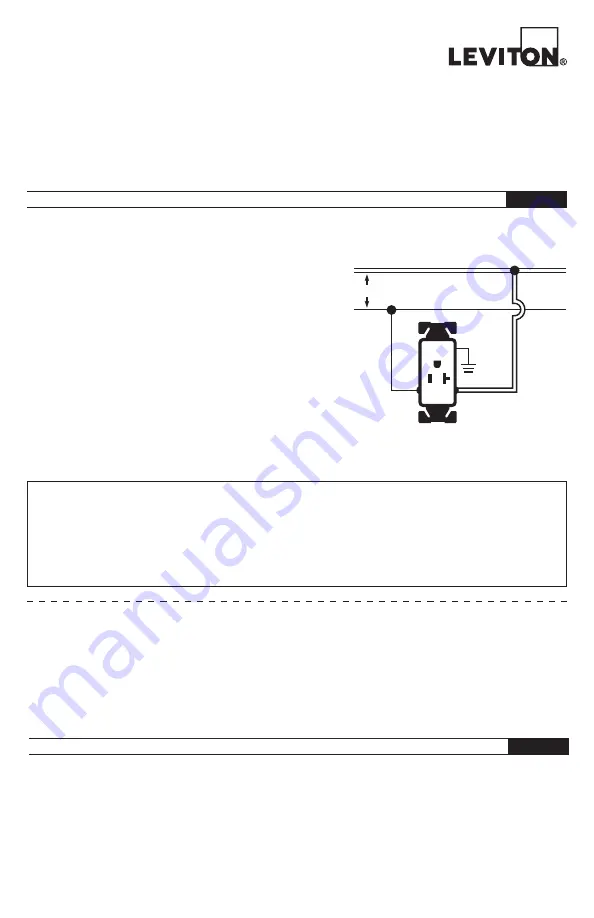
TO SIDE WIRE:
Strip wires 5/8 in (1.6 cm). Connect wires by looping stripped ends
clockwise 3/4 turn around terminal screws and tighten securely.
• Connect hot (black) wire to brass screw.
• Connect neutral (white) wire to silver screw.
• Connect green or bare copper wire to green screw.
NOTE
: This device must be properly grounded.
b
.
TO BACK WIRE:
Strip wire per gauge on back of receptacle. Depress screw to clear back
wire holes. Push stripped wires fully into hole and tighten securely.
•
Connect hot (black) wire to brass screw.
• Connect neutral (white) wire to silver screw.
• Connect green or bare copper wire to green screw.
NOTE
: This device must be properly grounded.
2
.
Mount device with mounting screws. Attach wall plate.
3
.
Restore power.
INSTALLATION
ENGLISH
For Technical Assistance Call: 1-800-824-3005 (USA Only) or 1 800 405-5320 (Canada only)www.leviton.com
LIMITED 1 YEAR WARRANTY AND EXCLUSIONS
Leviton warrants to the original consumer purchaser and not for the benefit of anyone else that this product at the time of its sale by Leviton is free of defects in materials
and workmanship under normal and proper use for one year from the purchase date. Leviton’s only obligation is to correct such defects by repair or replacement, at
its option.
For details visit www.leviton.com or call 1-800-824-3005.
This warranty excludes and there is disclaimed liability for labor for removal of this product
or reinstallation. This warranty is void if this product is installed improperly or in an improper environment, overloaded, misused, opened, abused, or altered in
any manner, or is not used under normal operating conditions or not in accordance with any labels or instructions.
There are no other or implied warranties
of any kind, including merchantability and fitness for a particular purpose
, but if any implied warranty is required by the applicable jurisdiction, the duration
of any such implied warranty, including merchantability and fitness for a particular purpose, is limited to one year.
Leviton is not liable for incidental, indirect,
special, or consequential damages, including without limitation, damage to, or loss of use of, any equipment, lost sales or profits or delay or failure to
perform this warranty obligation
. The remedies provided herein are the exclusive remedies under this warranty, whether based on contract, tort or otherwise.
FOR CANADA ONLY
For warranty information and/or product returns, residents of Canada should contact Leviton in writing at
Leviton Manufacturing of Canada ULC to the
attention of the Quality Assurance Department, 165 Hymus Blvd, Pointe-Claire (Quebec), Canada H9R 1E9
or by telephone at
1 800 405-5320.
WARNINGS:
• TO AVOID FIRE, SHOCK, OR DEATH; TURN OFF POWER
AT CIRCUIT BREAKER OR FUSE AND TEST THAT THE
POWER IS OFF BEFORE WIRING!
• To be installed and/or used in accordance with appropriate
electrical codes and regulations.
• If you are not sure about any part of these instructions, consult
an electrician.
• Use this device only with
copper
or
copper clad
wire.
Silver
Argent
Plateado
Green
Vert
Verde
125V
Brass
Laiton
Latón
Prise Decora Plus à une sortie
Inviolable, de qualité commerciale spécifiée
No de cat. 16351-SG
20 A-125 V, avec mise à la terre
AVERTISSEMENTS: POUR ÉVITER LES RISQUES D’INCENDIE, DE
DÉCHARGE OU D’ÉLECTROCUTION, COUPER LE COURANT
AU FUSIBLE
OU AU DISJONCTEUR ET S’ASSURER QUE LE CIRCUIT EST BIEN COUPÉ
AVANT DE PROCÉDER À L’INSTALLATION!
REMARQUE
: les bornes acceptent les fils d’un calibre de 14 à 10 AWG
1
a
.
CÂBLAGE LATÉRAL :
Dénuder les fils sur 5/8 po (1,6 cm). Relier les fils aux bornes en
les enroulant autour de trois quarts de tour vers la droite; serrer
fermement les vis.
• Relier le fil actif (noir) à la borne laitonnée.
• Relier le fil neutre (blanc) à la borne argentée.
• Relier le fil de terre (vert ou dénudé) à la borne verte.
AVERTISSEMENTS:
• POUR ÉVITER LES RISQUES D’INCENDIE, DE DÉCHARGE
OU D’ÉLECTROCUTION, COUPER LE COURANT
AU
FUSIBLE OU AU DISJONCTEUR ET S’ASSURER QUE
LE CIRCUIT EST BIEN COUPÉ AVANT DE PROCÉDER À
L’INSTALLATION!
• Le produit décrit aux présentes doit être installé et utilisé
conformément aux codes de l’électricité en vigueur.
• À défaut de bien comprendre les présentes directives, en tout
ou en partie, on doit faire appel à un électricien.
• N’utiliser ce dispositif qu’avec du fil de
cuivre ou
plaqué cuivre
.
REMARQUE
: ce dispositif doit être mis à la terre
adéquatement.
b
.
CÂBLAGE ARRIÈRE :
Dénuder les fils conformément au gabarit à l’arrière de la
prise. Enfoncer les vis pour dégager les orifices de câblage.
Relier les fils aux bornes en les insérant dans les orifices;
serrer fermement les vis.
• Relier le fil actif (noir) à la borne laitonnée.
• Relier le fil neutre (blanc) à la borne argentée.
• Relier le fil de terre (vert ou dénudé) à la borne verte.
REMARQUE
: ce dispositif doit être mis à la terre adéquatement.
2.
Fixer le dispositif au moyen des vis. Poser la plaque murale.
3.
Rétablir le courant.
WARNING:
TO AVOID FIRE, SHOCK, OR DEATH; TURN OFF POWER
AT CIRCUIT BREAKER OR FUSE AND TEST THAT THE
POWER IS OFF BEFORE WIRING!
NOTE: Terminals accept #14-10 AWG wire.
INSTALLATION
FRANÇAIS
WEB
VERSION


