capacity over memory frequency, 3DPC (three DIMMs per channel) configuration is not recommended since
3DPC configuration forces the memory subsystem to run at a lower frequency (1600 MHz).
Refer to the Understanding and Optimizing Memory Performance for Intel Xeon Processor E5-2600 v3 Series
in IBM Flex System, System x, and BladeCenter Platforms white paper for the detail.
Memory mirrored channel
Memory mirrored channel mode replicates and stores data on two pairs of DIMMs within two channels
simultaneously.
If a failure occurs, the memory controller switches from the primary pair of memory DIMMs to the backup
pair of DIMMs. To enable memory mirrored channel through the Setup Utility, select
System Settings
➙
Memory
. For more information, see “Using the Setup Utility” on page 52. When you use the memory
mirrored channel feature, consider the following information:
• When you use memory mirrored channel, you must install a pair of DIMMs at a time. The two DIMMs in
each pair must be identical in size, type, and rank (single, dual, or quad), and organization, but not in
speed. The channels run at the speed of the slowest DIMM in any of the channels.
• The maximum available memory is reduced to half of the installed memory when memory mirrored
channel is enabled. For example, if you install 64 GB of memory using RDIMMs, only 32 GB of
addressable memory is available when you use memory mirrored channel.
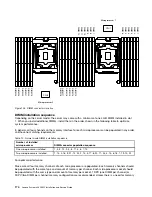
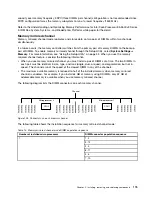
The following diagram lists the DIMM connectors on each memory channel.
DIMM 3
DIMM 9
DIMM 6
DIMM 12
DIMM 2
DIMM 8
DIMM 5
DIMM 11
DIMM 1
DIMM 7
DIMM 4
DIMM 10
Microprocessor 1
Channel
CPU1
DIMM 15
DIMM 21
DIMM 18
DIMM 24
DIMM 14
DIMM 20
DIMM 17
DIMM 23
DIMM 13
DIMM 19
DIMM 16
DIMM 22
Microprocessor 2
CPU2
Figure 105. Connectors on each memory channel
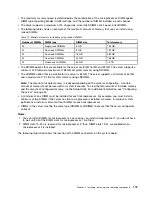
The following table shows the installation sequence for memory mirrored channel mode:
Table 13. Memory mirrored channel mode DIMM population sequence
Number of installed microprocessors
DIMM connector population sequence
1, 4
9, 12
2, 5
8, 11
3, 6
1
7, 10
Installing, removing, and replacing components
175
Summary of Contents for x3650 M5
Page 1: ...Lenovo System x3650 M5 Installation and Service Guide Machine Type 8871 ...
Page 47: ...Figure 35 System board switches jumpers and buttons Chapter 1 The System x3650 M5 server 35 ...
Page 60: ...48 Lenovo System x3650 M5 Installation and Service Guide ...
Page 80: ...68 Lenovo System x3650 M5 Installation and Service Guide ...
Page 124: ...112 Lenovo System x3650 M5 Installation and Service Guide ...
Page 146: ...134 Lenovo System x3650 M5 Installation and Service Guide ...
Page 1322: ...1310 Lenovo System x3650 M5 Installation and Service Guide ...
Page 1330: ...Taiwan BSMI RoHS declaration 1318 Lenovo System x3650 M5 Installation and Service Guide ...
Page 1339: ......
Page 1340: ......

