background image

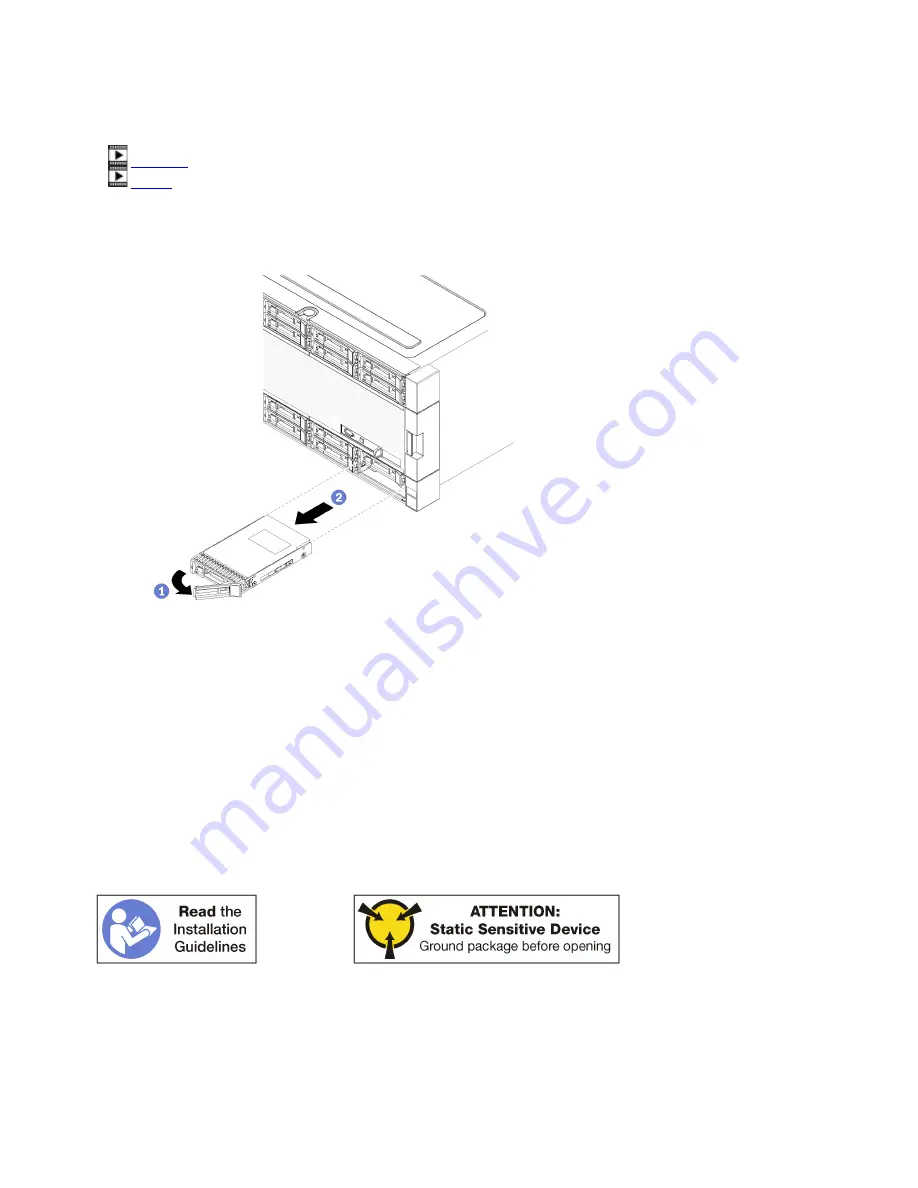
Complete the following steps to remove a hard disk drive.

Watch the procedure

. A video of the installation process is available: 

• 

YouTube

• 

Youku

Step 1.  Make a note of the bay where the hard disk drive is installed: drives must be installed in the bay 

from which they were removed.

Step 2.  Remove the hard disk drive. 

Figure 89. Hard disk drive installation

a.  Slide the release latch to unlock the drive handle; then, rotate the handle outward.
b.  Pull the handle to remove the drive from the drive bay.

After you remove the hard disk drive: 

1.  Install a replacement hard disk drive or filler in the empty drive bay.
2.  If you are instructed to return the drive assembly, follow all packaging instructions, and use any 

packaging materials for shipping that are supplied to you.

Install a hard disk drive

Insert the hard disk drive in its bay and close the latch handle to lock the drive in place. Hard disk drives are 

hot-swap devices that can be installed while the server is powered on.

” on page 56 

” on page 57

Before you install a hard disk drive, if the hard disk drive bay contains a filler, press the release tab and pull 
the filler from the bay. 

Hard disk drive fillers can be of two types: single-bay fillers and four-bay fillers. If you remove a four-bay filler 
and are not installing four hard disk drives, you must install single-bay fillers in each of the empty drive bays.

324

ThinkSystem SR950 Setup Guide

Summary of Contents for ThinkSystem SR950

Page 1: ...ThinkSystem SR950 Setup Guide Machine Types 7X12 7X11 and 7X13 ...

Page 2: ...ere children are likely to be present In addition be sure that you are familiar with the terms and conditions of the Lenovo warranty for your server which can be found at http datacentersupport lenovo com warrantylookup Twentieth Edition December 2021 Copyright Lenovo 2017 2021 LIMITED AND RESTRICTED RIGHTS NOTICE If data or software is delivered pursuant to a General Services Administration GSA c...

Page 3: ...8 Install a riser 237 Install a power supply 245 Installing the 4S Performance to 8S Upgrade Kit 248 Install the server in a rack 253 Cable the server 253 Power on the server connect input power 253 Validate server setup 253 Power off the server disconnect input power 254 Chapter 4 System configuration 255 Set the network connection for the Lenovo XClarity Controller 255 Update the firmware 256 Co...

Page 4: ...323 Hard disk drive backplane replacement 327 I O tray replacement 334 M 2 backplane replacement 342 M 2 drive replacement 346 Memory air baffle replacement 350 Memory module replacement 353 Riser replacement 358 Storage interposer replacement 369 Storage tray replacement 375 Index 379 ii ThinkSystem SR950 Setup Guide ...

Page 5: ...se rails are in the Rack Installation Instructions document packaged with your server Material box including items such as the power cords printed documentation and an accessory kit If any item is missing or damaged contact your place of purchase Ensure that you retain your proof of purchase and packing material They might be required to receive warranty service Features Performance ease of use re...

Page 6: ...the primary pair of memory DIMMs to the backup pair of DIMMs Large system memory capacity The server supports synchronous dynamic random access memory SDRAM registered dual inline memory modules DIMMs with error correcting code ECC The server also supports Intel Optane DC persistent memory modules DCPMMs For more information about the specific types and maximum amount of memory see Specifications ...

Page 7: ...et traffic that is associated with the primary connection is automatically switched to the optional redundant Ethernet connection If the applicable device drivers are installed this switching occurs without data loss and without user intervention Redundant cooling and optional power capabilities The server supports a maximum of four 1100 watt 110V or 220V ac 1600 watt 220V ac or 2000 watt 220V ac ...

Page 8: ... before upgrading the fans from 16K to 19K Memory See Memory module installation rules and order on page 58 for detailed information about memory configuration and setup Minimum 32 GB Maximum 6 2 TB using registered DIMMs RDIMMs or load reduction DIMMs LRDIMMs 24 6 TB using three dimensional stacking registered DIMMs 3DS RDIMMs 36 9 TB using Intel OptaneTM DC persistent memory modules PMMs Type PC...

Page 9: ...3 0 x16 3 x16 x16 x16 x16 PCIe full height riser kit 8 processor systems only provides Slot 1 PCI Express 3 0 x16 Slot 2 PCI Express 3 0 x16 Slot 3 PCI Express 3 0 x16 Slot 4 PCI Express 3 0 x16 Slot 5 PCI Express 3 0 x16 low profile Slot 6 PCI Express 3 0 x16 low profile Slot 7 PCI Express 3 0 x8 low profile Note You should not install a RAID or Host Bus Adapter card in this slot Slot 8 ML2 x16 n...

Page 10: ...is connector is dedicated for Lenovo XClarity Controller functions and runs at 1 gigabit Gb speed USB 3 0 ports two RAID controller depending on the model The following RAID options are available for this server ThinkSystem 430 8i Basic Hardware RAID PCIe Adapter supports RAID levels 0 1 10 5 cacheless ThinkSystem 430 16i Basic Hardware RAID PCIe Adapter supports RAID levels 0 1 10 5 cacheless Thi...

Page 11: ...t swap power supply units 1100 watt power supply input voltage 110V 220V or 240V ac 1600 watt power supply input voltage 220V or 240V ac 2000 watt power supply input voltage 220V ac The power subsystem supports balanced N N redundancy operation where N 1 or 2 CAUTION 1 240 V dc input input range 180 300 V dc is ONLY supported in Chinese Mainland 2 Power supplies with 240 V dc are not hot swappable...

Page 12: ...required by these options will increase the fan speed and generated sound level The actual sound pressure levels measured in your installation depend upon a variety of factors including the number of racks in the installation the size materials and configuration of the room the noise levels of other equipment the room ambient temperature and barometric pressure and the location of employees in rel...

Page 13: ...om LP0647 for specific ASHRAE compliance levels for each server configuration The server is designed for thermal compliance in ASHRAE A4 ambient environments Certain processor and adapter configurations will limit product environmental support to ASHRAE A2 ambient conditions If 82xx processors are installed 60 mm x 38mm 19K internal hot swap fans 01PG490 must also be installed to meet CPU cooling ...

Page 14: ...out airside economizer the ISO 14644 1 class 8 cleanliness might be met by choosing one of the following filtration methods The room air might be continuously filtered with MERV 8 filters Air entering a data center might be filtered with MERV 11 or preferably MERV 13 filters For data centers with airside economizers the choice of filters to achieve ISO class 8 cleanliness depends on the specific c...

Page 15: ...s Fan 1 to 6 are required to be installed The upper tray filler is installed in the upper tray slot Up to 12 drives bay 0 11 are supported See the following for the support variations depending on number of processors that are installed Four socket performance two processors on page 12 Four socket performance three processors on page 12 Four socket performance four processors on page 13 Notes 5100...

Page 16: ...e slots viewed from the front Upper tray filler Not populated Not populated CPU 1 and DIMM 1 12 CPU 2 and DIMM 13 24 Table 5 Location of the six supported PCIe slots viewed from the rear PCIe 5 PCIe 6 PCIe 7 PCIe 8 ML2 PCIe 9 LOM PCIe 17 Four socket performance three processors This configuration comes with three processors requires at least two 1100 1600 watt PSUs and supports up to 36 memory mod...

Page 17: ...13 24 Table 9 Location of the 15 supported PCIe slots viewed from the rear PCIe 12 PCIe 10 2 PCIe 16 PCIe 22 PCIe 11 2 PCIe 3 PCIe 12 PCIe 4 PCIe 13 PCIe 5 PCIe 6 PCIe 7 PCIe 8 ML2 PCIe 9 LOM PCIe 17 Four socket performance storage rich These configurations meet the expectations of high performance and low costs while support up to 24 drives and 13 rear PCIe slots The four socket performance stora...

Page 18: ...com help topic 7X12 installing_the_4S to 8S_upgrade_option html Four socket performance storage rich two processors This configuration comes with two processors requires at least one 1100 1600 watt PSU and supports up to 24 memory modules five rear PCIe slots See the following tables for the location of the supported components Table 10 Location of the two processors and 24 supported memory module...

Page 19: ... See the following tables for the location of the supported components Table 14 Location of the four processors and 48 supported memory module slots viewed from the front Upper tray filler CPU 3 and DIMM 25 36 CPU 4 and DIMM 37 48 CPU 1 and DIMM 1 12 CPU 2 and DIMM 13 24 Table 15 Location of the 13 supported PCIe slots viewed from the rear PCIe 13 PCIe 10 PCIe 23 PCIe 11 PCIe 3 PCIe 12 PCIe 4 PCIe...

Page 20: ...r details about 8 socket configurations Four socket upgradable two processors This configuration comes with two processors requires at least one 1100 1600 watt PSU and supports up to 24 memory modules six rear PCIe slots See the following tables for the location of the supported components Table 16 Location of the two processors and 24 supported memory module slots viewed from the front Upper tray...

Page 21: ...ties Only 8100 series processors are supported and they must be configured in a ring topology The upper compute tray is installed in the upper tray slot All 12 fans are required to be installed Up to 24 drives are supported Note This configuration allows a simple upgrade to 8 socket ones See Eight socket storage rich on page 18 for details about 8 socket configurations This configuration comes wit...

Page 22: ...hat are installed Eight socket storage rich six processors on page 18 Eight socket storage rich eight processors on page 19 Eight socket storage rich six processors This configuration comes with six processors requires at least four 1100 watt or two 1600 watt PSUs and supports up to 72 memory modules 13 rear PCIe slots See the following tables for the location of the supported components Table 22 ...

Page 23: ...emory module slots viewed from the front CPU 7 and DIMM 73 84 CPU 8 and DIMM 85 96 CPU 5 and DIMM 49 60 CPU 6 and DIMM 61 72 CPU 3 and DIMM 25 36 CPU 4 and DIMM 37 48 CPU 1 and DIMM 1 12 CPU 2 and DIMM 13 24 Table 25 Location of the 17 supported PCIe slots viewed from the rear PCIe 1 PCIe 10 PCIe 16 PCIe 2 PCIe 11 PCIe 3 PCIe 12 PCIe 4 PCIe 13 PCIe 5 PCIe 6 PCIe 7 PCIe 8 ML2 PCIe 9 LOM PCIe 14 PCI...

Page 24: ... Centralized interface for multi server management Interface Web GUI interface Mobile application REST API Usage and downloads http sysmgt lenovofiles com help topic com lenovo lxca doc aug_product_page html Lenovo XClarity Essentials toolset Portable and light toolset for server configuration data collection and firmware updates Suitable both for single server or multi server management contexts ...

Page 25: ... html Lenovo XClarity Integrator Series of applications that integrate the management and monitoring functionalities of the Lenovo physical servers with the software used in a certain deployment infrastructure such as VMware vCenter Microsoft Admin Center or Microsoft System Center while delivering additional workload resiliency Interface GUI application Usage and downloads https sysmgt lenovofile...

Page 26: ...Lenovo XClarity Essentials or Lenovo XClarity Controller 3 Firmware updates are limited to Lenovo XClarity Provisioning Manager Lenovo XClarity Controller and UEFI updates only Firmware updates for optional devices such as adapters are not supported 4 The server UEFI settings for option ROM must be set to Auto or UEFI for detailed adapter card information such as model name and firmware levels to ...

Page 27: ...erver in the customer label spaces 1 in the following illustration Note If any customer labels are placed on the removable front cover make sure that the cover is installed on the same server where the labels were originally added Figure 1 Location of the ID label for the ThinkSystem SR950 QR code In addition the service label that is located at the top rear of the system board inside the server p...

Page 28: ... server and must be removed before operating the system The label provides the default IPv4 host name and default IPv6 link local address of the XCC Figure 3 Network access tag Front view The front view of the server varies slightly by the model In some models components are replaced by fillers 24 ThinkSystem SR950 Setup Guide ...

Page 29: ...ive bays 12 23 on some models 7 Power button and power LED 2 Fan slots 1 12 8 Front operator panel with pull out LCD display 3 2 5 inch drive bays 0 11 9 USB 2 0 port 4 System error LED 10 USB 2 0 Lenovo XClarity Controller management port 5 System ID button LED 11 VGA Video port 6 Network activity LED 1 2 5 inch drive bays 12 23 on some models The drive bays are used to install 2 5 inch drives Wh...

Page 30: ...play panel on page 28 9 USB 2 0 port Connect a USB device such as a mouse keyboard or other devices to either of these connectors 10 USB 2 0 Lenovo XClarity Controller management port Connection to XClarity Controller is primarily intended for users with a mobile device running the XClarity Controller mobile application When a mobile device is connected to this USB port an Ethernet over USB connec...

Page 31: ...iting data If the LED is flashing the drive is being accessed 2 Drive status LED yellow These LEDs are on SAS or SATA hard disk drives and solid state drives When one of these LEDs is lit it indicates that the drive has failed When this LED is flashing slowly one flash per second it indicates that the drive is being rebuilt When the LED is flashing rapidly three flashes per second it indicates tha...

Page 32: ...n You can use Lenovo XClarity Administrator to light this LED remotely 4 System error LED When this yellow LED is lit it indicates that a system error has occurred A system error LED is also on the rear of the server Messages on the LCD system information display panel and LEDs on other server components might also be lit to help isolate the error This LED is controlled by the Lenovo XClarity Cont...

Page 33: ...ant displayed 3 Select button Press this button to make your selection from the menu options 4 Scroll down button Press this button to scroll down or scroll to the right in the main menu to location and select the system information that you want displayed Following is an example of the information on the display panel Table 30 LCD system information display information Callout Callout 1 System na...

Page 34: ...r the no error menu will be available for navigation To move within the menu options use the Scroll up or Scroll down buttons then the Select button to enter a submenu set The LCD system information display panel displays the following types of information about the server Lenovo XClarity Controller LXCC system error log Note The Scroll Down button will only function for this menu option when erro...

Page 35: ...e server Table 31 Components on the rear of the server Callout Callout 1 PCIe slot 1 on riser 1 15 PCIe slot 15 on riser 2 for ML2 x16 network adapter 2 PCIe slot 2 on riser 1 16 PCIe slot 16 on riser 3 3 PCIe slot 3 on riser 1 17 PCIe slot 17 on riser 3 4 PCIe slot 4 on riser 1 18 Power supply 4 optional 5 PCIe slot 5 19 Power supply 3 optional 6 PCIe slot 6 20 Power supply 2 optional 7 PCIe slot...

Page 36: ...slot 10 15 on riser 2 Install PCIe adapters into these slots Note Install ML2 x16 network adapter into PCIe slot 15 on riser 2 16 17 PCIe slot 16 17 on riser 3 Install PCIe adapters into these slots 18 19 20 21 Power supply 1 4 Note Power supply 2 4 are optional The hot swap redundant power supplies help you avoid significant interruption to the operation of the system when a power supply or an in...

Page 37: ...or Connect a 9 pin serial device to this connector The serial port is shared with the XCC The XCC can take control of the shared serial port to redirect serial traffic using Serial over LAN SOL 25 USB 3 0 connectors 2 Used to attach a device that requires a USB 2 0 or USB 3 0 connection such as a keyboard a mouse or a USB flash drive 26 VGA video port Used to attach a VGA compatible video device s...

Page 38: ...Power LED green The states of the power LED are as follows Off Power is not present or the power supply or the LED itself has failed Flashing rapidly 4 times per second The server is turned off and is not ready to be turned on The power button is disabled This will last approximately 5 to 10 seconds Flashing slowly once per second The server is turned off and is ready to be turned on You can press...

Page 39: ...nectors when you disconnect cables Failing to release them before removing the cables will damage the cable connectors or the cable sockets on circuit boards which are fragile Any damage to the cable connectors or cable sockets might require replacing the cables or circuit boards Some options such as RAID controllers might require additional internal cabling See the documentation that is provided ...

Page 40: ... that come with the server and optional devices Use these identifiers to connect the cables to the correct connectors Ensure that the cable is not pinched and does not cover any connectors or obstruct any components on the system board Ensure that the relevant cables pass through the cable clips Note Disengage all latches release tabs or locks on cable connectors when you disconnect cables from th...

Page 41: ...n cable routing upper tray on page 39 Notes Make sure that all the cables go through the cable guides as shown in the illustrations See Cable guides on page 35 for cable guide locations and descriptions Some cable connectors have locks or latches that must be disengaged to disconnect the cable Common cable routing lower tray The following illustration shows cable routing for common components in t...

Page 42: ...el video port From Front panel video port To Lower system board in lower compute tray Front video connector see System board connectors on page 283 2 Front panel USB ports From Front USB ports To Lower system board in lower compute tray USB connector see System board connectors on page 283 38 ThinkSystem SR950 Setup Guide ...

Page 43: ...le from pinching when the compute tray is fully assembled 4 Fan cage cable From Fan cage connector underside of fan cage To Lower system board in lower compute tray Fan board power J56 and signal J40 connectors see System board connectors on page 283 Common cable routing upper tray The following illustration shows cable routing for common components in the upper tray Note In this illustration the ...

Page 44: ...ard assembly in upper tray fan power J3 and signal J5 connectors see Storage board assembly connectors on page 284 Note Do not route the fan cage cable in the upper tray through any cable guides Cable routing for drives Use this section to understand how to route cables for drives and related components Cable routing for drive components is different for the lower and upper trays Drive cable routi...

Page 45: ...hat must be disengaged to disconnect the cable Drive cable routing lower tray Cable routing for drive components is different for SAS and NVMe drives Common drive cables lower tray SAS drive cables lower tray NVMe drive cables lower tray Common drive cables lower tray Common drive cables are used by both SAS and NVMe drives Figure 13 Cable routing common drive cables lower tray Chapter 2 Server co...

Page 46: ...ule From RAID flash power module connector To RAID card flash power module J14 connector see RAID card connectors on page 290 3 Drive power From Lower system board in lower compute tray POWER connector see System board connectors on page 283 To Storage interposer POWER connector see Storage interposer connectors on page 289 4 Drive signal From Lower system board in lower compute tray Signal connec...

Page 47: ...e 1 From RAID card C3 connector see RAID card connectors on page 290 To Drive backplane connector SAS see Drive backplane connectors on page 291 3 RAID interface for drive backplane 2 From RAID card C2 connector see RAID card connectors on page 290 To Drive backplane connector SAS see Drive backplane connectors on page 291 4 RAID interface for drive backplane 3 From RAID card C1 connector see RAID...

Page 48: ...tors on page 291 2 Drive backplane 2 NVMe From Upper system board in lower compute tray NVMe connector see System board connectors on page 283 To Drive backplane 2 connector NVMe see Drive backplane connectors on page 291 3 Drive backplane 3 NVMe From Lower system board in lower compute tray NVMe connector see System board connectors on page 283 To Drive backplane 3 connector NVMe see Drive backpl...

Page 49: ...upper tray Common drive cables are used by both SAS and NVMe drives Note In this illustration the image on the left shows the tray right side up and the image on the right shows the tray upside down Figure 16 Cable routing common drive cables upper tray with compute system board Chapter 2 Server components 45 ...

Page 50: ...lanes 4 5 and 6 From Storage interposer see Storage interposer connectors on page 289 For drive backplane 4 use interposer BP 3 4 connector For drive backplane 5 use interposer BP 2 5 connector For drive backplane 6 use interposer BP 1 6 connector To Drive backplane connector Power see Drive backplane connectors on page 291 2 RAID flash power module From RAID flash power module connector To RAID c...

Page 51: ...om Lower system board in upper compute tray Signal connector see System board connectors on page 283 Storage board assembly in upper tray hard disk drive signal J13 connector see Storage board assembly connectors on page 284 To Storage interposer SIDEBAND connector see Storage interposer connectors on page 289 SAS drive cables upper tray Common drive cables are used by only SAS drives Note In this...

Page 52: ...terposer PCIe connector see Storage interposer connectors on page 289 2 RAID interface for drive backplane 4 From RAID card C3 connector see RAID card connectors on page 290 To Drive backplane connector SAS see Drive backplane connectors on page 291 3 RAID interface for drive backplane 5 From RAID card C2 connector see RAID card connectors on page 290 To Drive backplane connector SAS see Drive bac...

Page 53: ...side down Figure 20 Cable routing NVMe drive cables upper tray with system board Note In this illustration the image on the left shows the tray right side up and the image on the right shows the tray upside down Figure 21 Cable routing NVMe drive cables upper tray with storage board assembly Chapter 2 Server components 49 ...

Page 54: ...page 284 To Drive backplane 5 connector NVMe see Drive backplane connectors on page 291 3 Drive backplane 4 NVMe From Upper system board in upper compute tray NVMe connector see System board connectors on page 283 Storage board assembly in upper tray NVMe connector see Storage board assembly connectors on page 284 To Drive backplane 4 connector NVMe see Drive backplane connectors on page 291 Parts...

Page 55: ...Figure 22 Server components Chapter 2 Server components 51 ...

Page 56: ...or installs a structural component at your request you will be charged for the service Table 43 Parts listing Index Description Tier 1 CRU Tier 2 CRU FRU Consuma ble and Structural part For more information about ordering the parts shown in Figure 22 Server components on page 51 http datacentersupport lenovo com us en products servers thinksystem sr950 7X12 parts It is highly recommended that you ...

Page 57: ... 16 to 17 27 PCIe filler four slot 28 Riser bracket slot 14 to 15 28 PCIe filler two slot 28 Riser bracket filler slot 14 to 15 29 PCIe filler single slot 30 Riser 1 slot 1 to 4 Riser 2 slot 10 to 13 31 Bezel front 32 Cover front 33 Storage drive 34 Drive filler single bay or four bay 35 Chassis 36 Cable covers 37 System battery CR2032 38 M 2 retainer 39 M 2 backplane 40 M 2 drive 41 I O tray 42 A...

Page 58: ...Standards Association CSA For units intended to be operated at 115 volts Use a UL listed and CSA certified cord set consisting of a minimum 18 AWG Type SVT or SJT three conductor cord a maximum of 15 feet in length and a parallel blade grounding type attachment plug rated 15 amperes 125 volts For units intended to be operated at 230 volts U S use Use a UL listed and CSA certified cord set consisti...

Page 59: ...te the connectors See Cable the server on page 253 for cabling best practices d Power on the server See Power on the server connect input power on page 253 Note You can access the management processor interface to configure the system without powering on the server Whenever the server is connected to power the management processor interface is available For details about accessing the management s...

Page 60: ...t does not shake or tilt Do not attempt to lift an object that might be too heavy for you If you have to lift a heavy object read the following precautions carefully Make sure that you can stand steadily without slipping Distribute the weight of the object equally between your feet Use a slow lifting force Never move suddenly or twist when you lift a heavy object To avoid straining the muscles in ...

Page 61: ...oved hot swap power supply must be replaced within two minutes after removal Every air baffle that comes with the server must be installed when the server starts some servers might come with more than one air baffle Operating the server with a missing air baffle might damage the processor All processor sockets must contain either a socket cover or a processor with heat sink When more than one proc...

Page 62: ...lation order memory sparing with two processors on page 140 Installation order memory sparing with three processors on page 141 Installation order memory sparing with four processors on page 145 Installation order memory sparing with six processors on page 149 Installation order memory sparing with eight processors on page 161 For information about criteria that must be followed when selecting and...

Page 63: ...ee Management options on page 19 for a description of each management method and how each method applies to various deployment situations When you replace a DIMM the server provides automatic DIMM enablement capability without requiring you to use the Lenovo XClarity Provisioning Manager to enable the new DIMM manually Memory architecture The relationship between memory controllers channels and co...

Page 64: ...he memory architecture related to system board processor 1 For system board processor 2 substitute memory channels G H J K L M for processor 1 memory channels A B C D E F in the discussion Install memory modules following only the sequences shown in Memory module installation rules and order on page 58 Do not mix R DIMMs LR DIMMs and 3DS DIMMs in a server 60 ThinkSystem SR950 Setup Guide ...

Page 65: ...substitute memory channels G H J K L M for processor 1 memory channels A B C D E F in the discussion When multiple processors are installed all processors within the server must have identical memory population Populate all memory channels for optimal performance If a processor has only three DIMMs that are identical same Lenovo part number populate all of them in memory controller 1 IMC1 Addition...

Page 66: ...ry populated memory channel must have at least two ranks of DIMMs If a memory channel has only single rank DIMMs populate both single rank DIMMs on one channel Single DIMM per channel systems do not support single rank DIMMs in sparing mode DRAM DIMM installation order This section contains information of how to install DRAM DIMMs properly 62 ThinkSystem SR950 Setup Guide ...

Page 67: ...ry channel populate slot 0 first If a memory channel has two DIMMs installed populate the DIMM with a higher number of ranks in slot 0 The independent memory mode DIMM population sequences for each supported processor configuration are Installation order independent memory mode with two processors on page 64 Installation order independent memory mode with three processors on page 65 Installation o...

Page 68: ...2 3 5 8 20 3 4 5 8 17 20 4 5 5 8 10 17 20 5 6 5 8 10 17 20 22 6 7 3 5 8 10 17 20 22 7 8 3 5 8 10 15 17 20 22 8 9 3 5 8 10 12 15 17 20 22 9 10 3 5 8 10 12 15 17 20 22 24 10 11 1 3 5 8 10 12 15 17 20 22 24 11 12 1 3 5 8 10 12 13 15 17 20 22 24 12 13 1 3 5 7 8 9 10 13 15 17 20 22 24 13 14 1 3 5 7 8 9 10 13 15 17 19 20 21 22 14 15 3 4 5 6 7 8 9 10 13 15 17 19 20 21 22 15 16 3 4 5 6 7 8 9 10 15 16 17 1...

Page 69: ...6 5 8 17 20 6 7 5 8 10 17 20 7 8 5 8 10 17 20 22 8 9 5 8 10 17 20 22 9 10 3 5 8 10 17 20 22 10 11 3 5 8 10 15 17 20 22 11 12 3 5 8 10 15 17 20 22 12 13 3 5 8 10 12 15 17 20 22 13 14 3 5 8 10 12 15 17 20 22 24 14 15 3 5 8 10 12 15 17 20 22 24 15 16 1 3 5 8 10 12 15 17 20 22 24 16 17 1 3 5 8 10 12 13 15 17 20 22 24 17 18 1 3 5 8 10 12 13 15 17 20 22 24 18 19 1 3 5 7 8 9 10 13 15 17 20 22 24 19 20 1 ...

Page 70: ... 24 31 32 1 2 3 4 5 6 7 8 9 10 11 12 15 16 17 18 19 20 21 22 23 24 32 33 1 3 4 5 6 7 8 9 10 11 12 13 15 16 17 18 19 20 21 22 23 24 33 34 1 2 3 4 5 6 7 8 9 10 11 12 13 14 15 16 17 18 19 20 21 22 23 24 34 35 1 2 3 4 5 6 7 8 9 10 11 12 13 14 15 16 17 18 19 20 21 22 23 24 35 36 1 2 3 4 5 6 7 8 9 10 11 12 13 14 15 16 17 18 19 20 21 22 23 24 36 Related DIMM population sequences for three processor syste...

Page 71: ...1 3 5 8 10 12 20 21 1 3 5 7 8 9 10 21 22 1 3 5 7 8 9 10 22 23 1 3 5 7 8 9 10 23 24 3 4 5 6 7 8 9 10 24 Related DIMM population sequences for three processor systems Processor 3 DIMM population sequence for systems with 25 to 36 DIMMs see Table 48 Independent mode with three processors Processors 3 25 to 36 total DIMMs installed in server on page 68 To continue populating processor 1 and 2 DIMMs fo...

Page 72: ...4 5 6 7 8 9 10 11 12 33 34 3 4 5 6 7 8 9 10 11 12 34 35 1 3 4 5 6 7 8 9 10 11 12 35 36 1 2 3 4 5 6 7 8 9 10 11 12 36 Related DIMM population sequences for three processor systems Processor 3 DIMM population sequences for 3 to 24 DIMMs see Table 47 Independent mode with three processors Processor 3 3 to 24 total DIMMs installed in server on page 67 To continue populating processor 1 and 2 DIMMs for...

Page 73: ... 19 20 21 22 23 24 DIMMs 4 8 20 4 5 5 8 20 5 6 5 8 17 20 6 7 5 8 17 20 7 8 5 8 17 20 8 9 5 8 10 17 20 9 10 5 8 10 17 20 22 10 11 5 8 10 17 20 22 11 12 5 8 10 17 20 22 12 13 3 5 8 10 17 20 22 13 14 3 5 8 10 15 17 20 22 14 15 3 5 8 10 15 17 20 22 15 16 3 5 8 10 15 17 20 22 16 17 3 5 8 10 12 15 17 20 22 17 18 3 5 8 10 12 15 17 20 22 24 18 19 3 5 8 10 12 15 17 20 22 24 19 20 3 5 8 10 12 15 17 20 22 24...

Page 74: ...0 11 12 15 16 17 18 19 20 21 22 23 24 39 40 3 4 5 6 7 8 9 10 11 12 15 16 17 18 19 20 21 22 23 24 40 41 1 2 3 4 5 6 7 8 9 10 11 12 13 15 17 19 20 21 22 23 24 41 42 1 2 3 4 5 6 7 8 9 10 11 12 13 14 15 16 17 18 19 20 21 22 23 24 42 43 1 2 3 4 5 6 7 8 9 10 11 12 13 14 15 16 17 18 19 20 21 22 23 24 43 44 1 3 4 5 6 7 8 9 10 11 12 13 15 16 17 18 19 20 21 22 23 24 44 45 1 2 3 4 5 6 7 8 9 10 11 12 13 14 15...

Page 75: ... 3 5 8 10 12 15 17 20 22 19 20 3 5 8 10 12 15 17 20 22 24 20 21 3 5 8 10 12 15 17 20 22 24 21 22 3 5 8 10 12 15 17 20 22 24 22 23 1 3 5 8 10 12 15 17 20 22 24 23 24 1 3 5 8 10 12 13 15 17 20 22 24 24 Related DIMM population sequences for four processor systems Processor 3 and 4 DIMM population sequences for systems with 25 to 48 DIMMs see Table 52 Independent mode with four processors Processors 3...

Page 76: ...8 9 10 11 12 13 15 17 19 20 21 22 23 24 39 40 3 4 5 6 7 8 9 10 11 12 15 16 17 18 19 20 21 22 23 24 40 41 3 4 5 6 7 8 9 10 11 12 15 16 17 18 19 20 21 22 23 24 41 42 1 3 5 7 8 9 10 11 12 13 15 17 19 20 21 22 23 24 42 43 3 4 5 6 7 8 9 10 11 12 13 15 17 19 20 21 22 23 24 43 44 1 3 4 5 6 7 8 9 10 11 12 13 15 16 17 18 19 20 21 22 23 24 44 45 1 2 3 4 5 6 7 8 9 10 11 12 13 15 17 19 20 21 22 23 24 45 46 1 ...

Page 77: ...2 Total DIMMs 1 2 3 4 5 6 7 8 9 10 11 12 13 14 15 16 17 18 19 20 21 22 23 24 DIMMs 6 8 20 6 7 5 8 20 7 8 5 8 17 20 8 9 5 8 17 20 9 10 5 8 17 20 10 11 5 8 17 20 11 12 5 8 10 17 20 12 13 5 8 10 17 20 22 13 14 5 8 10 17 20 22 14 15 5 8 10 17 20 22 15 16 5 8 10 17 20 22 16 17 5 8 10 17 20 22 17 18 3 5 8 10 17 20 22 18 19 3 5 8 10 15 17 20 22 19 20 3 5 8 10 15 17 20 22 20 21 3 5 8 10 15 17 20 22 21 22 ...

Page 78: ...six processors Processors 3 and 4 6 to 24 total DIMMs installed in server on page 77 Table 59 Independent mode with six processors Processors 5 and 6 6 to 24 total DIMMs installed in server on page 80 74 ThinkSystem SR950 Setup Guide ...

Page 79: ...20 21 22 42 43 3 4 5 6 7 8 9 10 13 15 17 19 20 21 22 43 44 3 4 5 6 7 8 9 10 15 16 17 18 19 20 21 22 44 45 3 4 5 6 7 8 9 10 15 16 17 18 19 20 21 22 45 46 3 4 5 6 7 8 9 10 15 16 17 18 19 20 21 22 46 47 3 4 5 6 7 8 9 10 15 16 17 18 19 20 21 22 47 48 3 4 5 6 7 8 9 10 15 16 17 18 19 20 21 22 48 Related DIMM population sequences for six processor systems Processor 1 and 2 DIMM population sequences Table...

Page 80: ... 23 24 64 65 1 2 3 4 5 6 7 8 9 10 11 12 13 14 15 16 17 18 19 20 21 22 23 24 65 66 1 3 4 5 6 7 8 9 10 11 12 13 15 16 17 18 19 20 21 22 23 24 66 67 1 2 3 4 5 6 7 8 9 10 11 12 13 14 15 16 17 18 19 20 21 22 23 24 67 68 1 2 3 4 5 6 7 8 9 10 11 12 13 14 15 16 17 18 19 20 21 22 23 24 68 69 1 2 3 4 5 6 7 8 9 10 11 12 13 14 15 16 17 18 19 20 21 22 23 24 69 70 1 2 3 4 5 6 7 8 9 10 11 12 13 14 15 16 17 18 19...

Page 81: ...ated DIMM population sequences for six processor systems Processor 3 and 4 DIMM population sequences Table 56 Independent mode with six processors Processors 3 and 4 6 to 24 total DIMMs installed in server on page 77 Table 57 Independent mode with six processors Processors 3 and 4 25 to 48 total DIMMs installed in server on page 78 Table 58 Independent mode with six processors Processors 3 and 4 4...

Page 82: ...42 43 1 3 5 7 8 9 10 13 15 17 19 20 21 22 43 44 1 3 5 7 8 9 10 13 15 17 19 20 21 22 44 45 3 4 5 6 7 8 9 10 13 15 17 19 20 21 22 45 46 3 4 5 6 7 8 9 10 15 16 17 18 19 20 21 22 46 47 3 4 5 6 7 8 9 10 15 16 17 18 19 20 21 22 47 48 3 4 5 6 7 8 9 10 15 16 17 18 19 20 21 22 48 Related DIMM population sequences for six processor systems Processor 3 and 4 DIMM population sequences Table 56 Independent mod...

Page 83: ...5 6 7 8 9 10 11 12 15 16 17 18 19 20 21 22 23 24 65 66 1 3 4 5 6 7 8 9 10 11 12 13 15 16 17 18 19 20 21 22 23 24 66 67 1 2 3 4 5 6 7 8 9 10 11 12 13 14 15 16 17 18 19 20 21 22 23 24 67 68 1 2 3 4 5 6 7 8 9 10 11 12 13 14 15 16 17 18 19 20 21 22 23 24 68 69 1 2 3 4 5 6 7 8 9 10 11 12 13 14 15 16 17 18 19 20 21 22 23 24 69 70 1 2 3 4 5 6 7 8 9 10 11 12 13 14 15 16 17 18 19 20 21 22 23 24 70 71 1 2 3...

Page 84: ... 17 20 22 23 24 3 5 8 10 15 17 20 22 24 Related DIMM population sequences for six processor systems Processor 5 and 6 DIMM population sequences Table 60 Independent mode with six processors Processors 5 and 6 25 to 48 total DIMMs installed in server on page 81 Table 61 Independent mode with six processors Processors 5 and 6 49 to 72 total DIMMs installed in server on page 82 To continue populating...

Page 85: ...22 24 41 42 1 3 5 7 8 9 10 13 15 17 19 20 21 22 42 43 1 3 5 7 8 9 10 13 15 17 19 20 21 22 43 44 1 3 5 7 8 9 10 13 15 17 19 20 21 22 44 45 1 3 5 7 8 9 10 13 15 17 19 20 21 22 45 46 1 3 5 7 8 9 10 13 15 17 19 20 21 22 46 47 3 4 5 6 7 8 9 10 13 15 17 19 20 21 22 47 48 3 4 5 6 7 8 9 10 15 16 17 18 19 20 21 22 48 Related DIMM population sequences for six processor systems Processor 5 and 6 DIMM populat...

Page 86: ...5 3 4 5 6 7 8 9 10 11 12 13 15 17 19 20 21 22 23 24 65 66 1 3 4 5 6 7 8 9 10 11 12 13 15 16 17 18 19 20 21 22 23 24 66 67 3 4 5 6 7 8 9 10 11 12 13 15 17 19 20 21 22 23 24 67 68 3 4 5 6 7 8 9 10 11 12 15 16 17 18 19 20 21 22 23 24 68 69 1 2 3 4 5 6 7 8 9 10 11 12 13 15 17 19 20 21 22 23 24 69 70 1 2 3 4 5 6 7 8 9 10 11 12 15 16 17 18 19 20 21 22 23 24 70 71 1 2 3 4 5 6 7 8 9 10 11 12 13 15 16 17 1...

Page 87: ...Total Processor 1 Processor 2 Total DIMMs 1 2 3 4 5 6 7 8 9 10 11 12 13 14 15 16 17 18 19 20 21 22 23 24 DIMMs 8 8 20 8 9 5 8 20 9 10 5 8 17 20 10 11 5 8 17 20 11 12 5 8 17 20 12 13 5 8 17 20 13 14 5 8 17 20 14 15 5 8 17 20 15 16 5 8 17 20 16 17 5 8 10 17 20 17 18 5 8 10 17 20 22 18 19 5 8 10 17 20 22 19 20 5 8 10 17 20 22 20 21 5 8 10 17 20 22 21 22 5 8 10 17 20 22 22 23 5 8 10 17 20 22 23 24 5 8...

Page 88: ...ght processors Processors 5 and 6 8 to 24 total DIMMs installed in server on page 92 Table 74 Independent mode with eight processors Processors 7 and 8 8 to 24 total DIMMs installed in server on page 96 84 ThinkSystem SR950 Setup Guide ...

Page 89: ...0 12 13 15 17 20 22 24 45 46 1 3 5 8 10 12 13 15 17 20 22 24 46 47 1 3 5 8 10 12 13 15 17 20 22 24 47 48 1 3 5 8 10 12 13 15 17 20 22 24 48 Related DIMM population sequences for eight processor systems Processor 1 and 2 DIMM population sequences Table 62 Independent mode with eight processors Processors 1 and 2 8 to 24 total DIMMs installed in server on page 83 Table 64 Independent mode with eight...

Page 90: ...1 3 5 7 8 9 10 11 12 13 15 17 19 20 21 22 23 24 67 68 1 3 5 7 8 9 10 11 12 13 15 17 19 20 21 22 23 24 68 69 1 3 5 7 8 9 10 11 12 13 15 17 19 20 21 22 23 24 69 70 1 3 5 7 8 9 10 11 12 13 15 17 19 20 21 22 23 24 70 71 1 3 5 7 8 9 10 11 12 13 15 17 19 20 21 22 23 24 71 72 1 3 5 7 8 9 10 11 12 13 15 17 19 20 21 22 23 24 72 Related DIMM population sequences for eight processor systems Processor 1 and 2...

Page 91: ...10 11 12 13 14 15 16 17 18 19 20 21 22 23 24 89 90 1 2 3 4 5 6 7 8 9 10 11 12 13 14 15 16 17 18 19 20 21 22 23 24 90 91 1 2 3 4 5 6 7 8 9 10 11 12 13 14 15 16 17 18 19 20 21 22 23 24 91 92 1 2 3 4 5 6 7 8 9 10 11 12 13 14 15 16 17 18 19 20 21 22 23 24 92 93 1 2 3 4 5 6 7 8 9 10 11 12 13 14 15 16 17 18 19 20 21 22 23 24 93 94 1 2 3 4 5 6 7 8 9 10 11 12 13 14 15 16 17 18 19 20 21 22 23 24 94 95 1 2 ...

Page 92: ...s Table 67 Independent mode with eight processors Processors 3 and 4 25 to 48 total DIMMs installed in server on page 89 Table 68 Independent mode with eight processors Processors 3 and 4 49 to 72 total DIMMs installed in server on page 90 Table 69 Independent mode with eight processors Processors 3 and 4 73 to 96 total DIMMs installed in server on page 91 To continue populating DIMMs for a system...

Page 93: ... 22 24 45 46 1 3 5 8 10 12 13 15 17 20 22 24 46 47 1 3 5 8 10 12 13 15 17 20 22 24 47 48 1 3 5 8 10 12 13 15 17 20 22 24 48 Related DIMM population sequences for eight processor systems Processor 3 and 4 DIMM population sequences Table 66 Independent mode with eight processors Processors 3 and 4 8 to 24 total DIMMs installed in server on page 88 Table 68 Independent mode with eight processors Proc...

Page 94: ...0 11 12 15 16 17 18 19 20 21 22 67 68 1 3 5 7 8 9 10 11 12 13 15 17 19 20 21 22 23 24 68 69 1 3 5 7 8 9 10 11 12 13 15 17 19 20 21 22 23 24 69 70 1 3 5 7 8 9 10 11 12 13 15 17 19 20 21 22 23 24 70 71 1 3 5 7 8 9 10 11 12 13 15 17 19 20 21 22 23 24 71 72 1 3 5 7 8 9 10 11 12 13 15 17 19 20 21 22 23 24 72 Related DIMM population sequences for eight processor systems Processor 3 and 4 DIMM population...

Page 95: ...8 19 20 21 22 23 24 89 90 1 2 3 4 5 6 7 8 9 10 11 12 13 14 15 16 17 18 19 20 21 22 23 24 90 91 1 2 3 4 5 6 7 8 9 10 11 12 13 14 15 16 17 18 19 20 21 22 23 24 91 92 1 2 3 4 5 6 7 8 9 10 11 12 13 14 15 16 17 18 19 20 21 22 23 24 92 93 1 2 3 4 5 6 7 8 9 10 11 12 13 14 15 16 17 18 19 20 21 22 23 24 93 94 1 2 3 4 5 6 7 8 9 10 11 12 13 14 15 16 17 18 19 20 21 22 23 24 94 95 1 2 3 4 5 6 7 8 9 10 11 12 13...

Page 96: ...Independent mode with eight processors Processors 5 and 6 25 to 48 total DIMMs installed in server on page 93 Table 72 Independent mode with eight processors Processors 5 and 6 49 to 72 total DIMMs installed in server on page 94 Table 73 Independent mode with eight processors Processors 5 and 6 73 to 96 total DIMMs installed in server on page 95 To continue populating DIMMs for a system with 8 to ...

Page 97: ... 5 8 10 12 13 15 17 20 22 24 46 47 1 3 5 8 10 12 13 15 17 20 22 24 47 48 1 3 5 8 10 12 13 15 17 20 22 24 48 Related DIMM population sequences for eight processor systems Processor 5 and 6 DIMM population sequences Table 70 Independent mode with eight processors Processors 5 and 6 8 to 24 total DIMMs installed in server on page 92 Table 72 Independent mode with eight processors Processors 5 and 6 4...

Page 98: ...0 15 16 17 18 19 20 21 22 67 68 3 4 5 6 7 8 9 10 15 16 17 18 19 20 21 22 68 69 1 3 5 7 8 9 10 11 12 15 16 17 18 19 20 21 22 69 70 1 3 5 7 8 9 10 11 12 13 15 17 19 20 21 22 23 24 70 71 1 3 5 7 8 9 10 11 12 13 15 17 19 20 21 22 23 24 71 72 1 3 5 7 8 9 10 11 12 13 15 17 19 20 21 22 23 24 72 Related DIMM population sequences for eight processor systems Processor 5 and 6 DIMM population sequences Table...

Page 99: ...23 24 89 90 1 2 3 4 5 6 7 8 9 10 11 12 15 16 17 18 19 20 21 22 23 24 90 91 1 2 3 4 5 6 7 8 9 10 11 12 13 14 15 16 17 18 19 20 21 22 23 24 91 92 1 2 3 4 5 6 7 8 9 10 11 12 13 14 15 16 17 18 19 20 21 22 23 24 92 93 1 2 3 4 5 6 7 8 9 10 11 12 13 14 15 16 17 18 19 20 21 22 23 24 93 94 1 2 3 4 5 6 7 8 9 10 11 12 13 14 15 16 17 18 19 20 21 22 23 24 94 95 1 2 3 4 5 6 7 8 9 10 11 12 13 14 15 16 17 18 19 2...

Page 100: ... mode with eight processors Processors 7 and 8 25 to 48 total DIMMs installed in server on page 97 Table 76 Independent mode with eight processors Processors 7 and 8 49 to 72 total DIMMs installed in server on page 98 Table 77 Independent mode with eight processors Processors 7 and 8 73 to 96 total DIMMs installed in server on page 99 To continue populating DIMMs for a system with 8 to 24 DIMMs Ta...

Page 101: ... 15 17 20 22 24 46 47 1 3 5 8 10 12 15 17 20 22 24 47 48 1 3 5 8 10 12 13 15 17 20 22 24 48 Related DIMM population sequences for eight processor systems Processor 7 and 8 DIMM population sequences Table 74 Independent mode with eight processors Processors 7 and 8 8 to 24 total DIMMs installed in server on page 96 Table 76 Independent mode with eight processors Processors 7 and 8 49 to 72 total DI...

Page 102: ...15 16 17 18 19 20 21 22 67 68 3 4 5 6 7 8 9 10 15 16 17 18 19 20 21 22 68 69 3 4 5 6 7 8 9 10 15 16 17 18 19 20 21 22 69 70 3 4 5 6 7 8 9 10 15 16 17 18 19 20 21 22 70 71 1 3 5 7 8 9 10 11 12 15 16 17 18 19 20 21 22 71 72 1 3 5 7 8 9 10 11 12 13 15 17 19 20 21 22 23 24 72 Related DIMM population sequences for eight processor systems Processor 7 and 8 DIMM population sequences Table 74 Independent ...

Page 103: ...0 21 22 23 24 89 90 3 4 5 6 7 8 9 10 11 12 15 16 17 18 19 20 21 22 23 24 90 91 3 4 5 6 7 8 9 10 11 12 13 15 17 19 20 21 22 23 24 91 92 3 4 5 6 7 8 9 10 11 12 15 16 17 18 19 20 21 22 23 24 92 93 1 2 3 4 5 6 7 8 9 10 11 12 13 15 17 19 20 21 22 23 24 93 94 1 2 3 4 5 6 7 8 9 10 11 12 15 16 17 18 19 20 21 22 23 24 94 95 1 2 3 4 5 6 7 8 9 10 11 12 13 15 16 17 18 19 20 21 22 23 24 95 96 1 2 3 4 5 6 7 8 9...

Page 104: ...el must be of equal density If two memory channels have DIMMs mirroring occurs across two DIMMs channels 0 1 will both contain the primary secondary memory caches If three memory channels have DIMMs mirroring occurs across all three DIMMs channels 0 1 channels 1 2 and channels 2 0 will all contain primary secondary memory caches Figure 25 Processor and memory module layout Memory mirroring DIMM po...

Page 105: ...2 15 17 20 22 10 11 11 DIMM memory mirroring configuration is not supported 11 DIMM memory mirroring configuration is not supported 11 12 1 3 5 8 10 12 13 15 17 20 22 24 12 13 1 3 5 7 8 9 10 11 12 15 17 20 22 13 14 1 3 5 8 10 12 15 16 17 18 19 20 21 22 14 15 1 3 5 7 8 9 10 11 12 13 15 17 20 22 24 15 16 3 4 5 6 7 8 9 10 15 16 17 18 19 20 21 22 16 17 1 3 5 7 8 9 10 11 12 15 16 17 18 19 20 21 22 17 1...

Page 106: ...DIMM memory mirroring configuration is not supported 13 14 1 3 5 8 10 12 15 17 20 22 14 15 1 3 5 8 10 12 13 15 17 20 22 24 15 16 1 3 5 8 10 12 13 15 17 20 22 16 17 17 DIMM memory mirroring configuration is not supported 17 DIMM memory mirroring configuration is not supported 17 18 1 3 5 8 10 12 13 15 17 20 22 24 18 19 19 DIMM memory mirroring configuration is not supported 19 DIMM memory mirroring...

Page 107: ... 9 10 11 12 13 14 15 16 17 18 19 20 21 22 23 24 32 33 1 2 3 4 5 6 7 8 9 10 11 12 13 14 15 16 17 18 19 20 21 22 23 24 33 34 34 DIMM memory mirroring configuration is not supported 34 DIMM memory mirroring configuration is not supported 34 35 35 DIMM memory mirroring configuration is not supported 35 DIMM memory mirroring configuration is not supported 35 36 1 2 3 4 5 6 7 8 9 10 11 12 13 14 15 16 17...

Page 108: ...upported 17 18 13 15 17 20 22 24 18 19 19 DIMM memory mirroring configuration is not supported 19 20 13 15 17 20 22 24 20 21 21 DIMM memory mirroring configuration is not supported 21 22 13 15 17 20 22 24 22 23 23 DIMM memory mirroring configuration is not supported 23 24 15 16 17 18 19 20 21 22 24 Related DIMM population sequences for three processor systems Processor 3 DIMM population sequences ...

Page 109: ...roring configuration is not supported 31 32 15 16 17 18 19 20 32 33 13 15 17 19 20 21 22 23 24 33 34 34 DIMM memory mirroring configuration is not supported 34 35 35 DIMM memory mirroring configuration is not supported 35 36 13 14 15 16 17 18 19 20 21 22 23 24 36 Related DIMM population sequences for three processor systems Processor 3 population sequences for 6 to 24 DIMMs see Table 81 Memory mir...

Page 110: ...12 13 3 5 8 10 20 22 24 13 14 3 5 8 10 20 22 24 14 15 3 5 8 10 15 17 20 22 15 16 3 5 8 10 15 17 20 22 16 17 17 DIMM memory mirroring configuration is not supported 17 DIMM memory mirroring configuration is not supported 17 18 1 3 5 8 10 12 15 17 20 22 18 19 19 DIMM memory mirroring configuration is not supported 19 DIMM memory mirroring configuration is not supported 19 20 1 3 5 8 10 12 15 17 20 2...

Page 111: ... 12 13 14 15 16 17 18 19 20 21 22 23 24 38 39 1 2 3 4 5 6 7 8 9 10 11 12 13 15 17 19 20 21 22 23 24 39 40 1 2 3 4 5 6 7 8 9 10 11 12 13 14 15 16 17 18 19 20 21 22 23 24 40 41 1 2 3 4 5 6 7 8 9 10 11 12 13 14 15 16 17 18 19 20 21 22 23 24 41 42 1 2 3 4 5 6 7 8 9 10 11 12 13 14 15 16 17 18 19 20 21 22 23 24 42 43 1 2 3 4 5 6 7 8 9 10 11 12 13 15 17 19 20 21 22 23 24 43 44 1 2 3 4 5 6 7 8 9 10 11 12 ...

Page 112: ...orted 19 DIMM memory mirroring configuration is not supported 19 20 1 3 5 8 10 12 15 17 20 22 20 21 1 3 5 8 10 12 20 22 24 21 22 1 3 5 8 10 12 15 17 20 22 22 23 23 DIMM memory mirroring configuration is not supported 23 DIMM memory mirroring configuration is not supported 23 24 1 3 5 8 10 12 13 15 17 20 22 24 24 Related DIMM population sequences for four processor systems Processor 3 and 4 DIMM po...

Page 113: ... 22 37 38 3 4 5 6 7 8 9 10 13 15 17 20 22 24 38 39 1 3 5 7 8 9 10 11 12 13 15 17 19 20 21 22 23 24 39 40 3 4 5 6 7 8 9 10 15 16 17 18 19 20 21 22 40 41 1 3 5 7 8 9 10 11 12 15 16 17 18 19 20 21 22 41 42 1 2 3 4 5 6 7 8 9 10 11 12 13 15 17 20 22 24 42 43 1 2 3 4 5 6 7 8 9 10 11 12 13 15 17 19 20 21 22 23 24 43 44 1 2 3 4 5 6 7 8 9 10 11 12 15 16 17 18 19 20 21 22 44 45 1 2 3 4 5 6 7 8 9 10 11 12 13...

Page 114: ...18 19 20 21 22 23 24 DIMMs 12 8 10 20 22 12 13 8 10 12 20 22 13 14 8 10 12 20 22 24 14 15 8 10 12 20 22 24 15 16 8 10 12 20 22 24 16 17 8 10 12 20 22 24 17 18 8 10 12 20 22 24 18 19 3 5 8 10 20 22 24 19 20 3 5 8 10 15 17 20 22 20 21 3 5 8 10 15 17 20 22 21 22 3 5 8 10 15 17 20 22 22 23 3 5 8 10 15 17 20 22 23 24 3 5 8 10 15 17 20 22 24 Related DIMM population sequences for six processor systems Pr...

Page 115: ...0 15 16 17 18 19 20 21 22 42 43 1 3 5 7 8 9 10 11 12 15 16 17 18 19 20 21 22 43 44 3 4 5 6 7 8 9 10 15 16 17 18 19 20 21 22 44 45 1 3 5 7 8 9 10 11 12 15 16 17 18 19 20 21 22 45 46 3 4 5 6 7 8 9 10 15 16 17 18 19 20 21 22 46 47 1 3 5 7 8 9 10 11 12 15 16 17 18 19 20 21 22 47 48 3 4 5 6 7 8 9 10 15 16 17 18 19 20 21 22 48 Related DIMM population sequences for six processor systems Processor 1 and 2...

Page 116: ... 16 17 18 19 20 21 22 23 24 64 65 1 2 3 4 5 6 7 8 9 10 11 12 13 14 15 16 17 18 19 20 21 22 23 24 65 66 1 2 3 4 5 6 7 8 9 10 11 12 13 14 15 16 17 18 19 20 21 22 23 24 66 67 1 2 3 4 5 6 7 8 9 10 11 12 13 14 15 16 17 18 19 20 21 22 23 24 67 68 1 2 3 4 5 6 7 8 9 10 11 12 13 14 15 16 17 18 19 20 21 22 23 24 68 69 1 2 3 4 5 6 7 8 9 10 11 12 13 14 15 16 17 18 19 20 21 22 23 24 69 70 1 2 3 4 5 6 7 8 9 10 ...

Page 117: ... processor systems Processor 3 and 4 DIMM population sequences Table 91 Memory mirroring with six processors Processors 3 and 4 25 to 48 total DIMMs installed in server on page 114 Table 92 Memory mirroring with six processors Processors 3 and 4 49 to 72 total DIMMs installed in server on page 115 To continue populating DIMMs for a system with 12 to 24 DIMMs Table 87 Memory mirroring with six proc...

Page 118: ...22 24 42 43 3 4 5 6 7 8 9 10 13 15 17 20 22 24 43 44 3 4 5 6 7 8 9 10 15 16 17 18 19 20 21 22 44 45 3 4 5 6 7 8 9 10 15 16 17 18 19 20 21 22 45 46 3 4 5 6 7 8 9 10 15 16 17 18 19 20 21 22 46 47 3 4 5 6 7 8 9 10 15 16 17 18 19 20 21 22 47 48 3 4 5 6 7 8 9 10 15 16 17 18 19 20 21 22 48 Related DIMM population sequences for six processor systems Processor 3 and 4 DIMM population sequences Table 90 Me...

Page 119: ...9 10 11 12 13 14 15 16 17 18 19 20 21 22 23 24 65 66 1 2 3 4 5 6 7 8 9 10 11 12 13 14 15 16 17 18 19 20 21 22 23 24 66 67 67 DIMM memory mirroring configuration is not supported 67 68 1 2 3 4 5 6 7 8 9 10 11 12 13 14 15 16 17 18 19 20 21 22 23 24 68 69 1 2 3 4 5 6 7 8 9 10 11 12 13 14 15 16 17 18 19 20 21 22 23 24 69 70 1 2 3 4 5 6 7 8 9 10 11 12 13 14 15 16 17 18 19 20 21 22 23 24 70 71 1 2 3 4 5...

Page 120: ...sequences Table 94 Memory mirroring with six processors Processors 5 and 6 25 to 48 total DIMMs installed in server on page 117 Table 95 Memory mirroring with six processors Processors 5 and 6 49 to 72 total DIMMs installed in server on page 118 To continue populating DIMMs for a system with 12 to 24 DIMMs Table 87 Memory mirroring with six processors Processors 1 and 2 12 to 24 total DIMMs instal...

Page 121: ...0 12 44 45 1 3 5 8 10 12 45 46 3 4 5 6 7 8 9 10 46 47 3 4 5 6 7 8 9 10 47 48 3 4 5 6 7 8 9 10 48 Related DIMM population sequences for six processor systems Processor 5 and 6 DIMM population sequences Table 93 Memory mirroring with six processors Processors 5 and 6 12 to 24 total DIMMs installed in server on page 116 Table 95 Memory mirroring with six processors Processors 5 and 6 49 to 72 total D...

Page 122: ...ion is not supported 67 68 1 2 3 4 5 6 7 8 9 10 11 12 68 69 1 2 3 4 5 6 7 8 9 10 11 12 69 70 70 DIMM memory mirroring configuration is not supported 70 71 71 DIMM memory mirroring configuration is not supported 71 72 1 2 3 4 5 6 7 8 9 10 11 12 72 Related DIMM population sequences for six processor systems Processor 5 and 6 DIMM population sequences Table 93 Memory mirroring with six processors Pro...

Page 123: ...ted DIMM population sequences for six processor systems Processor 7 and 8 DIMM population sequences Table 97 Memory mirroring with six processors Processors 7 and 8 25 to 48 total DIMMs installed in server on page 120 Table 98 Memory mirroring with six processors Processors 7 and 8 49 to 72 total DIMMs installed in server on page 121 To continue populating DIMMs for a system with 12 to 24 DIMMs Ta...

Page 124: ... 10 12 46 47 1 3 5 8 10 12 47 48 3 4 5 6 7 8 9 10 48 Related DIMM population sequences for six processor systems Processor 7 and 8 DIMM population sequences Table 96 Memory mirroring with six processors Processors 7 and 8 12 to 24 total DIMMs installed in server on page 119 Table 98 Memory mirroring with six processors Processors 7 and 8 49 to 72 total DIMMs installed in server on page 121 To cont...

Page 125: ...8 9 10 11 12 69 70 70 DIMM memory mirroring configuration is not supported 70 71 71 DIMM memory mirroring configuration is not supported 71 72 1 2 3 4 5 6 7 8 9 10 11 12 72 Related DIMM population sequences for six processor systems Processor 7 and 8 DIMM population sequences Table 96 Memory mirroring with six processors Processors 7 and 8 12 to 24 total DIMMs installed in server on page 119 Table...

Page 126: ... 20 21 22 23 24 DIMMs 16 8 10 20 22 16 17 8 10 12 20 22 17 18 8 10 12 20 22 24 18 19 8 10 12 20 22 24 19 20 8 10 12 20 22 24 20 21 8 10 12 20 22 24 21 22 8 10 12 20 22 24 22 23 8 10 12 20 22 24 23 24 8 10 12 20 22 24 24 Related DIMM population sequences for eight processor systems Processor 1 and 2 DIMM population sequences Table 100 Memory mirroring with eight processors Processors 1 and 2 25 to ...

Page 127: ...4 44 45 1 3 5 7 8 9 10 11 12 13 15 17 20 22 24 45 46 1 3 5 8 10 12 13 15 17 20 22 24 46 47 1 3 5 7 8 9 10 11 12 13 15 17 20 22 24 47 48 1 3 5 8 10 12 13 15 17 20 22 24 48 Related DIMM population sequences for eight processor systems Processor 1 and 2 DIMM population sequences Table 99 Memory mirroring with eight processors Processors 1 and 2 16 to 24 total DIMMs installed in server on page 122 Tab...

Page 128: ...9 20 21 22 66 67 1 3 5 7 8 9 10 11 12 13 15 17 19 20 21 22 23 24 67 68 1 2 3 4 5 6 7 8 9 10 11 12 15 16 17 18 19 20 21 22 68 69 1 3 5 7 8 9 10 11 12 13 15 17 19 20 21 22 23 24 69 70 1 2 3 4 5 6 7 8 9 10 11 12 13 14 15 16 17 18 19 20 21 22 23 24 70 71 1 3 5 7 8 9 10 11 12 13 15 17 19 20 21 22 23 24 71 72 1 3 5 7 8 9 10 11 12 13 15 17 19 20 21 22 23 24 72 Related DIMM population sequences for eight ...

Page 129: ... 89 1 2 3 4 5 6 7 8 9 10 11 12 13 14 15 16 17 18 19 20 21 22 23 24 89 90 1 2 3 4 5 6 7 8 9 10 11 12 13 14 15 16 17 18 19 20 21 22 23 24 90 91 91 DIMM memory mirroring configuration is not supported 91 DIMM memory mirroring configuration is not supported 91 92 1 2 3 4 5 6 7 8 9 10 11 12 13 14 15 16 17 18 19 20 21 22 23 24 92 93 1 2 3 4 5 6 7 8 9 10 11 12 13 14 15 16 17 18 19 20 21 22 23 24 93 94 94...

Page 130: ...quences Table 104 Memory mirroring with eight processors Processors 3 and 4 25 to 48 total DIMMs installed in server on page 127 Table 105 Memory mirroring with eight processors Processors 3 and 4 49 to 72 total DIMMs installed in server on page 128 Table 106 Memory mirroring with eight processors Processors 3 and 4 73 to 96 total DIMMs installed in server on page 129 To continue populating DIMMs ...

Page 131: ...46 1 3 5 8 10 12 13 15 17 20 22 24 46 47 1 3 5 8 10 12 13 15 17 20 22 24 47 48 1 3 5 8 10 12 13 15 17 20 22 24 48 Related DIMM population sequences for eight processor systems Processor 3 and 4 DIMM population sequences Table 103 Memory mirroring with eight processors Processors 3 and 4 16 to 24 total DIMMs installed in server on page 126 Table 105 Memory mirroring with eight processors Processors...

Page 132: ... 9 10 11 12 15 16 17 18 19 20 21 22 67 68 3 4 5 6 7 8 9 10 15 16 17 18 19 20 21 22 68 69 1 3 5 7 8 9 10 11 12 13 15 17 19 20 21 22 23 24 69 70 3 4 5 6 7 8 9 10 15 16 17 18 19 20 21 22 70 71 1 3 5 7 8 9 10 11 12 13 15 17 19 20 21 22 23 24 71 72 1 3 5 7 8 9 10 11 12 13 15 17 19 20 21 22 23 24 72 Related DIMM population sequences for eight processor systems Processor 3 and 4 DIMM population sequences...

Page 133: ...4 15 16 17 18 19 20 21 22 23 24 89 90 1 2 3 4 5 6 7 8 9 10 11 12 13 14 15 16 17 18 19 20 21 22 23 24 90 91 91 DIMM memory mirroring configuration is not supported 91 DIMM memory mirroring configuration is not supported 91 92 1 2 3 4 5 6 7 8 9 10 11 12 13 14 15 16 17 18 19 20 21 22 23 24 92 93 1 2 3 4 5 6 7 8 9 10 11 12 13 14 15 16 17 18 19 20 21 22 23 24 93 94 94 DIMM memory mirroring configuratio...

Page 134: ...s Table 108 Memory mirroring with eight processors Processors 5 and 6 25 to 48 total DIMMs installed in server on page 131 Table 109 Memory mirroring with eight processors Processors 5 and 6 49 to 72 total DIMMs installed in server on page 132 Table 110 Memory mirroring with eight processors Processors 5 and 6 73 to 96 total DIMMs installed in server on page 133 To continue populating DIMMs for a ...

Page 135: ...20 22 24 46 47 1 3 5 8 10 12 13 15 17 20 22 24 47 48 1 3 5 8 10 12 13 15 17 20 22 24 48 Related DIMM population sequences for eight processor systems Processor 5 and 6 DIMM population sequences Table 107 Memory mirroring with eight processors Processors 5 and 6 16 to 24 total DIMMs installed in server on page 130 Table 109 Memory mirroring with eight processors Processors 5 and 6 49 to 72 total DI...

Page 136: ... 18 19 20 21 22 67 68 3 4 5 6 7 8 9 10 15 16 17 18 19 20 21 22 68 69 1 3 5 7 8 9 10 11 12 13 15 16 17 18 19 20 21 22 69 70 3 4 5 6 7 8 9 10 15 16 17 18 19 20 21 22 70 71 1 3 5 7 8 9 10 11 12 13 15 17 19 20 21 22 23 24 71 72 1 3 5 7 8 9 10 11 12 13 15 17 19 20 21 22 23 24 72 Related DIMM population sequences for eight processor systems Processor 5 and 6 DIMM population sequences Table 107 Memory mi...

Page 137: ... 14 15 16 17 18 19 20 21 22 23 24 90 91 91 DIMM memory mirroring configuration is not supported 91 DIMM memory mirroring configuration is not supported 91 92 1 2 3 4 5 6 7 8 9 10 11 12 13 14 15 16 17 18 19 20 21 22 23 24 92 93 1 2 3 4 5 6 7 8 9 10 11 12 13 14 15 16 17 18 19 20 21 22 23 24 93 94 94 DIMM memory mirroring configuration is not supported 94 DIMM memory mirroring configuration is not su...

Page 138: ...e 112 Memory mirroring with eight processors Processors 7 and 8 25 to 48 total DIMMs installed in server on page 135 Table 113 Memory mirroring with eight processors Processors 7 and 8 49 to 72 total DIMMs installed in server on page 136 Table 114 Memory mirroring with eight processors Processors 7 and 8 73 to 96 total DIMMs installed in server on page 137 To continue populating DIMMs for a system...

Page 139: ...3 5 8 10 15 17 20 22 47 48 1 3 5 8 10 12 13 15 17 20 22 24 48 Related DIMM population sequences for eight processor systems Processor 7 and 8 DIMM population sequences Table 111 Memory mirroring with eight processors Processors 7 and 8 16 to 24 total DIMMs installed in server on page 134 Table 113 Memory mirroring with eight processors Processors 7 and 8 49 to 72 total DIMMs installed in server on...

Page 140: ...7 68 3 4 5 6 7 8 9 10 15 16 17 18 19 20 21 22 68 69 3 4 5 6 7 8 9 10 15 16 17 18 19 20 21 22 69 70 3 4 5 6 7 8 9 10 13 15 17 20 22 24 70 71 1 3 5 7 8 9 10 11 12 15 16 17 18 19 20 21 22 71 72 1 3 5 7 8 9 10 11 12 13 15 17 19 20 21 22 23 24 72 Related DIMM population sequences for eight processor systems Processor 7 and 8 DIMM population sequences Table 111 Memory mirroring with eight processors Pro...

Page 141: ...uration is not supported 91 DIMM memory mirroring configuration is not supported 91 92 1 2 3 4 5 6 7 8 9 10 11 12 15 16 17 18 19 20 21 22 92 93 1 2 3 4 5 6 7 8 9 10 11 12 13 15 17 19 20 21 22 23 24 93 94 94 DIMM memory mirroring configuration is not supported 94 DIMM memory mirroring configuration is not supported 94 95 95 DIMM memory mirroring configuration is not supported 95 DIMM memory mirrori...

Page 142: ... Table 110 Memory mirroring with eight processors Processors 5 and 6 73 to 96 total DIMMs installed in server on page 133 138 ThinkSystem SR950 Setup Guide ...

Page 143: ...erred failure protection choice for critical applications Figure 26 Processor and memory module layout Memory sparing guidelines The spare rank must have identical or larger memory capacity than all of the other active memory ranks on the same channel If installing DIMMs that are one rank follow the population sequences listed below If installing DIMMs with more than one rank follow population seq...

Page 144: ...ors 4 to 24 total DIMMs installed in server Total Processor 1 Processor 2 Total DIM Ms 1 2 3 4 5 6 7 8 9 10 11 12 13 14 15 16 17 18 19 20 21 22 23 24 DIMMs 4 7 8 19 20 4 6 5 6 7 8 19 20 6 8 5 6 7 8 17 18 19 20 8 10 5 6 7 8 9 10 17 18 19 20 10 12 5 6 7 8 9 10 17 18 19 20 21 22 12 14 3 4 5 6 7 8 9 10 17 18 19 20 21 22 14 16 3 4 5 6 7 8 9 10 15 16 17 18 19 20 21 22 16 18 3 4 5 6 7 8 9 10 11 12 15 16 ...

Page 145: ...al DIMMs 1 2 3 4 5 6 7 8 9 10 11 12 13 14 15 16 17 18 19 20 21 22 23 24 DIMMs 6 7 8 19 20 6 8 5 6 7 8 19 20 8 10 5 6 7 8 17 18 19 20 10 12 5 6 7 8 17 18 19 20 12 14 5 6 7 8 9 10 17 18 19 20 14 16 5 6 7 8 9 10 17 18 19 20 21 22 16 18 5 6 7 8 9 10 17 18 19 20 21 22 18 20 3 4 5 6 7 8 9 10 17 18 19 20 21 22 20 22 3 4 5 6 7 8 9 10 15 16 17 18 19 20 21 22 22 24 3 4 5 6 7 8 9 10 15 16 17 18 19 20 21 22 2...

Page 146: ...6 17 18 19 20 21 22 32 34 3 4 5 6 7 8 9 10 11 12 15 16 17 18 19 20 21 22 23 24 34 36 1 2 3 4 5 6 7 8 9 10 11 12 13 13 15 16 17 18 19 20 21 22 23 24 36 Related DIMM population sequences for three processor systems Processor 1 and 2 DIMM population sequences for 6 to 24 DIMMs see Table 116 Memory sparing with three processors Processors 1 and 2 6 to 24 total DIMMs installed in server on page 141 To ...

Page 147: ... 17 18 19 20 21 22 20 22 17 18 19 20 21 22 22 24 15 16 17 18 19 20 21 22 24 Related DIMM population sequences for three processor systems Processor 3 population sequence for systems with 26 to 48 DIMMs see Table 119 Memory sparing with three processors Processor 3 26 to 48 total DIMMs installed in server on page 144 To continue populating processor 1 and 2 DIMMs for a system with 6 to 24 DIMMs see...

Page 148: ...21 22 23 24 32 34 15 16 17 18 19 20 21 22 23 24 34 36 13 14 15 16 17 18 19 20 21 22 23 24 36 Related DIMM population sequences for three processor systems Processor 3 DIMM population sequence for 6 to 24 DIMMs see Table 118 Memory sparing with three processors Processor 3 6 to 24 total DIMMs installed in server on page 143 To continue populating processor 1 and 2 DIMMs for a system with 26 to 48 D...

Page 149: ...essor 1 Processor 2 Total DIMMs 1 2 3 4 5 6 7 8 9 10 11 12 13 14 15 16 17 18 19 20 21 22 23 24 DIMMs 8 7 8 19 20 8 10 5 6 7 8 19 20 10 12 5 6 7 8 17 18 19 20 12 14 5 6 7 8 17 18 19 20 14 16 5 6 7 8 17 18 19 20 16 18 5 6 7 8 9 10 17 18 19 20 18 20 5 6 7 8 9 10 17 18 19 20 21 22 20 22 5 6 7 8 9 10 17 18 19 20 21 22 22 24 5 6 7 8 9 10 17 18 19 20 21 22 24 Related DIMM population sequences for four pr...

Page 150: ...0 11 12 15 16 17 18 19 20 21 22 23 24 40 42 1 2 3 4 5 6 7 8 9 10 11 12 15 16 17 18 19 20 21 22 23 24 42 44 1 2 3 4 5 6 7 8 9 10 11 12 13 14 15 16 17 18 19 20 21 22 23 24 44 46 1 2 3 4 5 6 7 8 9 10 11 12 13 14 15 16 17 18 19 20 21 22 23 24 46 48 1 2 3 4 5 6 7 8 9 10 11 12 13 14 15 16 17 18 19 20 21 22 23 24 48 Related DIMM population sequences for four processor systems Processor 1 and 2 DIMM popul...

Page 151: ...22 5 6 7 8 9 10 17 18 19 20 22 24 5 6 7 8 9 10 17 18 19 20 21 22 24 Related DIMM population sequences for four processor systems Processor 3 and 4 DIMM population sequences for systems with 26 to 48 DIMMs see Table 123 Memory sparing with four processors Processors 3 and 4 26 to 48 total DIMMs installed in server on page 148 To continue populating processor 1 and 2 DIMMs for a system with 8 to 24 ...

Page 152: ...6 17 18 19 20 21 22 23 24 40 42 3 4 5 6 7 8 9 10 11 12 15 16 17 18 19 20 21 22 23 24 42 44 3 4 5 6 7 8 9 10 11 12 15 16 17 18 19 20 21 22 23 24 44 46 1 2 3 4 5 6 7 8 9 10 11 12 15 16 17 18 19 20 21 22 23 24 46 48 1 2 3 4 5 6 7 8 9 10 11 12 13 14 15 16 17 18 19 20 21 22 23 24 48 Related DIMM population sequences for four processor systems Processor 3 and 4 DIMM population sequences for 8 to 24 DIMM...

Page 153: ...10 11 12 13 14 15 16 17 18 19 20 21 22 23 24 DIMMs 12 7 8 19 20 12 14 5 6 7 8 19 20 14 16 5 6 7 8 17 18 19 20 16 18 5 6 7 8 17 18 19 20 18 20 5 6 7 8 17 18 19 20 20 22 5 6 7 8 17 18 19 20 22 24 5 6 7 8 17 18 19 20 24 Related DIMM population sequences for six processor systems Processor 1 and 2 DIMM population sequences Table 125 Memory sparing with six processors Processors 1 and 2 26 to 48 total ...

Page 154: ...6 48 3 4 5 6 7 8 9 10 15 16 17 18 19 20 21 22 48 Related DIMM population sequences for six processor systems Processor 1 and 2 DIMM population sequences Table 124 Memory sparing with six processors Processors 1 and 2 12 to 24 total DIMMs installed in server on page 149 Table 126 Memory sparing with six processors Processors 1 and 2 50 to 72 total DIMMs installed in server on page 151 To continue p...

Page 155: ...12 13 14 15 16 17 18 19 20 21 22 23 24 68 70 1 2 3 4 5 6 7 8 9 10 11 12 13 14 15 16 17 18 19 20 21 22 23 24 70 72 1 2 3 4 5 6 7 8 9 10 11 12 13 14 15 16 17 18 19 20 21 22 23 24 72 Related DIMM population sequences for six processor systems Processor 1 and 2 DIMM population sequences Table 124 Memory sparing with six processors Processors 1 and 2 12 to 24 total DIMMs installed in server on page 149...

Page 156: ...sparing with six processors Processors 3 and 4 26 to 48 total DIMMs installed in server on page 153 Table 129 Memory sparing with six processors Processors 3 and 4 50 to 72 total DIMMs installed in server on page 154 To continue populating DIMMs for a system with 16 to 24 DIMMs Table 124 Memory sparing with six processors Processors 1 and 2 12 to 24 total DIMMs installed in server on page 149 Tabl...

Page 157: ...15 16 17 18 19 20 21 22 48 Related DIMM population sequences for six processor systems Processor 3 and 4 DIMM population sequences Table 127 Memory sparing with six processors Processors 3 and 4 12 to 24 total DIMMs installed in server on page 152 Table 129 Memory sparing with six processors Processors 3 and 4 50 to 72 total DIMMs installed in server on page 154 To continue populating DIMMs for a ...

Page 158: ...19 20 21 22 23 24 68 70 1 2 3 4 5 6 7 8 9 10 11 12 13 14 15 16 17 18 19 20 21 22 23 24 70 72 1 2 3 4 5 6 7 8 9 10 11 12 13 14 15 16 17 18 19 20 21 22 23 24 72 Related DIMM population sequences for six processor systems Processor 3 and 4 DIMM population sequences Table 127 Memory sparing with six processors Processors 3 and 4 12 to 24 total DIMMs installed in server on page 152 Table 128 Memory spa...

Page 159: ...ring with six processors Processors 5 and 6 26 to 48 total DIMMs installed in server on page 156 Table 132 Memory sparing with six processors Processors 5 and 6 50 to 72 total DIMMs installed in server on page 157 To continue populating DIMMs for a system with 16 to 24 DIMMs Table 124 Memory sparing with six processors Processors 1 and 2 12 to 24 total DIMMs installed in server on page 149 Table 1...

Page 160: ...IMM population sequences Table 130 Memory sparing with six processors Processors 5 12 to 24 total DIMMs installed in server on page 155 Table 132 Memory sparing with six processors Processors 5 and 6 50 to 72 total DIMMs installed in server on page 157 To continue populating DIMMs for a system with 26 to 48 DIMMs Table 125 Memory sparing with six processors Processors 1 and 2 26 to 48 total DIMMs ...

Page 161: ...n sequences for six processor systems Processor 5 and 6 DIMM population sequences Table 130 Memory sparing with six processors Processors 5 12 to 24 total DIMMs installed in server on page 155 Table 131 Memory sparing with six processors Processors 5 and 6 26 to 48 total DIMMs installed in server on page 156 To continue populating DIMMs for a system with 50 to 72 DIMMs Table 126 Memory sparing wit...

Page 162: ...ory sparing with six processors Processor 7 slot which is actually Processor 6 26 to 48 total DIMMs installed in server on page 159 Table 135 Memory sparing with six processors Processor 7 slot which is actually Processor 6 50 to 72 total DIMMs installed in server on page 160 To continue populating DIMMs for a system with 16 to 24 DIMMs Table 124 Memory sparing with six processors Processors 1 and...

Page 163: ...ulation sequences Table 133 Memory sparing with six processors Processor 7 slot which is actually Processor 6 12 to 24 total DIMMs installed in server on page 158 Table 135 Memory sparing with six processors Processor 7 slot which is actually Processor 6 50 to 72 total DIMMs installed in server on page 160 To continue populating DIMMs for a system with 26 to 48 DIMMs Table 125 Memory sparing with ...

Page 164: ...ences for six processor systems Processor 7 and 8 DIMM population sequences Table 133 Memory sparing with six processors Processor 7 slot which is actually Processor 6 12 to 24 total DIMMs installed in server on page 158 Table 134 Memory sparing with six processors Processor 7 slot which is actually Processor 6 26 to 48 total DIMMs installed in server on page 159 To continue populating DIMMs for a...

Page 165: ...7 18 19 20 21 22 23 24 DIMMs 16 7 8 19 20 16 18 5 6 7 8 19 20 18 20 5 6 7 8 19 20 20 22 5 6 7 8 17 18 19 20 22 24 5 6 7 8 17 18 19 20 24 Related DIMM population sequences for eight processor systems Processor 1 and 2 DIMM population sequences Table 137 Memory sparing with eight processors Processors 1 and 2 26 to 48 total DIMMs installed in server on page 162 Table 138 Memory sparing with eight pr...

Page 166: ...or systems Processor 1 and 2 DIMM population sequences Table 136 Memory sparing with eight processors Processors 1 and 2 16 to 24 total DIMMs installed in server on page 161 Table 138 Memory sparing with eight processors Processors 1 and 2 50 to 72 total DIMMs installed in server on page 163 Table 139 Memory sparing with eight processors Processors 1 and 2 74 to 96 total DIMMs installed in server ...

Page 167: ... 6 7 8 9 10 11 12 15 16 17 18 19 20 21 22 23 24 72 Related DIMM population sequences for eight processor systems Processor 1 and 2 DIMM population sequences Table 136 Memory sparing with eight processors Processors 1 and 2 16 to 24 total DIMMs installed in server on page 161 Table 137 Memory sparing with eight processors Processors 1 and 2 26 to 48 total DIMMs installed in server on page 162 Table...

Page 168: ...4 92 94 1 2 3 4 5 6 7 8 9 10 11 12 13 14 15 16 17 18 19 20 21 22 23 24 94 96 1 2 3 4 5 6 7 8 9 10 11 12 13 14 15 16 17 18 19 20 21 22 23 24 96 Related DIMM population sequences for eight processor systems Processor 1 and 2 DIMM population sequences Table 136 Memory sparing with eight processors Processors 1 and 2 16 to 24 total DIMMs installed in server on page 161 Table 137 Memory sparing with ei...

Page 169: ... in server on page 166 Table 142 Memory sparing with eight processors Processors 3 and 4 50 to 72 total DIMMs installed in server on page 167 Table 143 Memory sparing with eight processors Processors 3 and 4 74 to 96 total DIMMs installed in server on page 168 To continue populating DIMMs for a system with 16 to 24 DIMMs Table 136 Memory sparing with eight processors Processors 1 and 2 16 to 24 to...

Page 170: ...Processor 3 and 4 DIMM population sequences Table 140 Memory sparing with eight processors Processors 3 and 4 16 to 24 total DIMMs installed in server on page 165 Table 142 Memory sparing with eight processors Processors 3 and 4 50 to 72 total DIMMs installed in server on page 167 Table 143 Memory sparing with eight processors Processors 3 and 4 74 to 96 total DIMMs installed in server on page 168...

Page 171: ...6 17 18 19 20 21 22 23 24 72 Related DIMM population sequences for eight processor systems Processor 3 and 4 DIMM population sequences Table 140 Memory sparing with eight processors Processors 3 and 4 16 to 24 total DIMMs installed in server on page 165 Table 141 Memory sparing with eight processors Processors 3 and 4 26 to 48 total DIMMs installed in server on page 166 Table 143 Memory sparing wi...

Page 172: ...2 3 4 5 6 7 8 9 10 11 12 13 14 15 16 17 18 19 20 21 22 23 24 94 96 1 2 3 4 5 6 7 8 9 10 11 12 13 14 15 16 17 18 19 20 21 22 23 24 96 Related DIMM population sequences for eight processor systems Processor 3 and 4 DIMM population sequences Table 140 Memory sparing with eight processors Processors 3 and 4 16 to 24 total DIMMs installed in server on page 165 Table 141 Memory sparing with eight proces...

Page 173: ...ver on page 170 Table 146 Memory sparing with eight processors Processors 5 and 6 50 to 72 total DIMMs installed in server on page 171 Table 147 Memory sparing with eight processors Processors 5 and 6 74 to 96 total DIMMs installed in server on page 172 To continue populating DIMMs for a system with 16 to 24 DIMMs Table 136 Memory sparing with eight processors Processors 1 and 2 16 to 24 total DIM...

Page 174: ...d 6 DIMM population sequences Table 144 Memory sparing with eight processors Processors 5 and 6 16 to 24 total DIMMs installed in server on page 169 Table 146 Memory sparing with eight processors Processors 5 and 6 50 to 72 total DIMMs installed in server on page 171 Table 147 Memory sparing with eight processors Processors 5 and 6 74 to 96 total DIMMs installed in server on page 172 To continue p...

Page 175: ... 21 22 72 Related DIMM population sequences for eight processor systems Processor 5 and 6 DIMM population sequences Table 144 Memory sparing with eight processors Processors 5 and 6 16 to 24 total DIMMs installed in server on page 169 Table 145 Memory sparing with eight processors Processors 5 and 6 26 to 48 total DIMMs installed in server on page 170 Table 147 Memory sparing with eight processors...

Page 176: ... 9 10 11 12 13 14 15 16 17 18 19 20 21 22 23 24 94 96 1 2 3 4 5 6 7 8 9 10 11 12 13 14 15 16 17 18 19 20 21 22 23 24 96 Related DIMM population sequences for eight processor systems Processor 5 and 6 DIMM population sequences Table 144 Memory sparing with eight processors Processors 5 and 6 16 to 24 total DIMMs installed in server on page 169 Table 145 Memory sparing with eight processors Processo...

Page 177: ...ver on page 174 Table 150 Memory sparing with eight processors Processors 7 and 8 50 to 72 total DIMMs installed in server on page 175 Table 151 Memory sparing with eight processors Processors 7 and 8 74 to 96 total DIMMs installed in server on page 176 To continue populating DIMMs for a system with 16 to 24 DIMMs Table 136 Memory sparing with eight processors Processors 1 and 2 16 to 24 total DIM...

Page 178: ...equences Table 148 Memory sparing with eight processors Processors 7 and 8 16 to 24 total DIMMs installed in server on page 173 Table 150 Memory sparing with eight processors Processors 7 and 8 50 to 72 total DIMMs installed in server on page 175 Table 151 Memory sparing with eight processors Processors 7 and 8 74 to 96 total DIMMs installed in server on page 176 To continue populating DIMMs for a...

Page 179: ...Related DIMM population sequences for eight processor systems Processor 7 and 8 DIMM population sequences Table 148 Memory sparing with eight processors Processors 7 and 8 16 to 24 total DIMMs installed in server on page 173 Table 149 Memory sparing with eight processors Processors 7 and 8 26 to 48 total DIMMs installed in server on page 174 Table 151 Memory sparing with eight processors Processor...

Page 180: ...eight processors Processors 7 and 8 26 to 48 total DIMMs installed in server on page 174 Table 150 Memory sparing with eight processors Processors 7 and 8 50 to 72 total DIMMs installed in server on page 175 To continue populating DIMMs for a system with 74 to 96 DIMMs Table 139 Memory sparing with eight processors Processors 1 and 2 74 to 96 total DIMMs installed in server on page 164 Table 143 M...

Page 181: ...M DIMMs that are installed must be of the same type rank and capacity with minimum capacity of 16 GB It is recommended to use Lenovo DRAM DIMMs of the same part number 3 Refer to DCPMM installation order on page 176 to determine the most suitable combination and the following Number and capacity of the DCPMMs and DRAM DIMMs to install Check if the presently installed processors support the combina...

Page 182: ...tem b Perform secure erase on all the DCPMMs that are installed Go to Intel Optane DCPMMs Security Press to Secure Erase to perform secure erase Note If one or more DCPMMs are secured with passphrase make sure security of every unit is disabled before performing secure erase In case the passphrase is lost or forgotten contact Lenovo service 7 Follow the slot combination in DCPMM installation order...

Page 183: ...2 App Direct mode with 6 DCPMMs and 6 DRAM DIMMs per processor 2 processors In the table below P DCPMM D DRAM DIMM Processor 1 Processor 2 1 2 3 4 5 6 7 8 9 10 11 12 13 14 15 16 17 18 19 20 21 22 23 24 D P D P D P P D P D P D D P D P D P P D P D P D 4 DCPMMs 6 DRAM DIMMs per processor Table 153 App Direct mode with 4 DCPMMs and 6 DRAM DIMMs per processor 2 processors In the table below P DCPMM D D...

Page 184: ... DRAM DIMM Processor 1 Processor 2 1 2 3 4 5 6 7 8 9 10 11 12 13 14 15 16 17 18 19 20 21 22 23 24 P D D D D P P D D D D P 1 DCPMM 6 DRAM DIMMs per processor Table 157 App Direct mode with 1 DCPMMs and 6 DRAM DIMMs In the table below P DCPMM D DRAM DIMM Processor 1 Processor 2 1 2 3 4 5 6 7 8 9 10 11 12 13 14 15 16 17 18 19 20 21 22 23 24 D D D P D D D D D D P D D D 1 DCPMM in the system Table 158 ...

Page 185: ... the system 6 DCPMMs 6 DRAM DIMMs per processor Table 159 App Direct mode with 6 DCPMMs and 6 DRAM DIMMs per processor 4 processors In the table below P DCPMM D DRAM DIMM Processor 1 Processor 2 1 2 3 4 5 6 7 8 9 10 11 12 13 14 15 16 17 18 19 20 21 22 23 24 D P D P D P P D P D P D D P D P D P P D P D P D Processor 3 Processor 4 1 2 3 4 5 6 7 8 9 10 11 12 13 14 15 16 17 18 19 20 21 22 23 24 D P D P...

Page 186: ...DIMM Processor 1 Processor 2 1 2 3 4 5 6 7 8 9 10 11 12 13 14 15 16 17 18 19 20 21 22 23 24 D D D P P D D D D D D P P D D D Processor 3 Processor 4 1 2 3 4 5 6 7 8 9 10 11 12 13 14 15 16 17 18 19 20 21 22 23 24 D D D P P D D D D D D P P D D D 2 DCPMMs 4 DRAM DIMMs per processor Table 163 App Direct mode with 2 DCPMMs and 4 DRAM DIMMs per processor 4 processors In the table below P DCPMM D DRAM DIM...

Page 187: ...10 11 12 13 14 15 16 17 18 19 20 21 22 23 24 D D D P D D D D D D P D D D 1 DCPMM in the system Table 165 App Direct mode with 1 DCPMM in the system In the table below P DCPMM D DRAM DIMM Processor 1 Processor 2 1 2 3 4 5 6 7 8 9 10 11 12 13 14 15 16 17 18 19 20 21 22 23 24 D D D P D D D D D D D D D Processor 3 Processor 4 1 2 3 4 5 6 7 8 9 10 11 12 13 14 15 16 17 18 19 20 21 22 23 24 D D D D D D D...

Page 188: ...Ms per processor 1 DCPMM in the system 6 DCPMMs 6 DRAM DIMMs per processor Table 166 App Direct mode with 6 DCPMMs and 6 DRAM DIMMs per processor 6 processors In the table below P DCPMM D DRAM DIMM Processor 1 Processor 2 1 2 3 4 5 6 7 8 9 10 11 12 13 14 15 16 17 18 19 20 21 22 23 24 D P D P D P P D P D P D D P D P D P P D P D P D Processor 3 Processor 4 1 2 3 4 5 6 7 8 9 10 11 12 13 14 15 16 17 1...

Page 189: ...18 19 20 21 22 23 24 P D D D D D D D D P P D D D D D D D D P Processor 5 Processor 6 1 2 3 4 5 6 7 8 9 10 11 12 13 14 15 16 17 18 19 20 21 22 23 24 P D D D D D D D D P P D D D D D D D D P 2 DCPMMs 6 DRAM DIMMs per processor Table 169 App Direct mode with 2 DCPMMs and 6 DRAM DIMMs per processor 6 processors In the table below P DCPMM D DRAM DIMM Processor 1 Processor 2 1 2 3 4 5 6 7 8 9 10 11 12 13...

Page 190: ...table below P DCPMM D DRAM DIMM Processor 1 Processor 2 1 2 3 4 5 6 7 8 9 10 11 12 13 14 15 16 17 18 19 20 21 22 23 24 D D D P D D D D D D P D D D Processor 3 Processor 4 1 2 3 4 5 6 7 8 9 10 11 12 13 14 15 16 17 18 19 20 21 22 23 24 D D D P D D D D D D P D D D Processor 5 Processor 6 1 2 3 4 5 6 7 8 9 10 11 12 13 14 15 16 17 18 19 20 21 22 23 24 D D D P D D D D D D P D D D 1 DCPMM in the system T...

Page 191: ...e 172 App Direct mode with 1 DCPMM in the system continued Processor 5 Processor 6 1 2 3 4 5 6 7 8 9 10 11 12 13 14 15 16 17 18 19 20 21 22 23 24 D D D D D D D D D D D D Chapter 3 Server hardware setup 187 ...

Page 192: ...CPMMs 4 DRAM DIMMs per processor 1 DCPMM 6 DRAM DIMMs per processor 1 DCPMM in the system 6 DCPMMs 6 DRAM DIMMs per processor Table 173 App Direct mode with 6 DCPMMs and 6 DRAM DIMMs per processor 8 processors In the table below P DCPMM D DRAM DIMM Processor 1 Processor 2 1 2 3 4 5 6 7 8 9 10 11 12 13 14 15 16 17 18 19 20 21 22 23 24 D P D P D P P D P D P D D P D P D P P D P D P D Processor 3 Proc...

Page 193: ...MMs and 8 DRAM DIMMs per processor 8 processors In the table below P DCPMM D DRAM DIMM Processor 1 Processor 2 1 2 3 4 5 6 7 8 9 10 11 12 13 14 15 16 17 18 19 20 21 22 23 24 P D D D D D D D D P P D D D D D D D D P Processor 3 Processor 4 1 2 3 4 5 6 7 8 9 10 11 12 13 14 15 16 17 18 19 20 21 22 23 24 P D D D D D D D D P P D D D D D D D D P Processor 5 Processor 6 1 2 3 4 5 6 7 8 9 10 11 12 13 14 15...

Page 194: ...ocessor 8 processors In the table below P DCPMM D DRAM DIMM Processor 1 Processor 2 1 2 3 4 5 6 7 8 9 10 11 12 13 14 15 16 17 18 19 20 21 22 23 24 P D D D D P P D D D D P Processor 3 Processor 4 1 2 3 4 5 6 7 8 9 10 11 12 13 14 15 16 17 18 19 20 21 22 23 24 P D D D D P P D D D D P Processor 5 Processor 6 1 2 3 4 5 6 7 8 9 10 11 12 13 14 15 16 17 18 19 20 21 22 23 24 P D D D D P P D D D D P Process...

Page 195: ...essor 3 Processor 4 1 2 3 4 5 6 7 8 9 10 11 12 13 14 15 16 17 18 19 20 21 22 23 24 D D D D D D D D D D D D Processor 5 Processor 6 1 2 3 4 5 6 7 8 9 10 11 12 13 14 15 16 17 18 19 20 21 22 23 24 D D D D D D D D D D D D Processor 7 Processor 8 1 2 3 4 5 6 7 8 9 10 11 12 13 14 15 16 17 18 19 20 21 22 23 24 D D D D D D D D D D D D Mixed Memory Mode In Mixed Memory Mode 1 99 of DCPMM capacity acts as s...

Page 196: ...essors In the table below P DCPMM D DRAM DIMM Processor 1 Processor 2 1 2 3 4 5 6 7 8 9 10 11 12 13 14 15 16 17 18 19 20 21 22 23 24 D P D P D P P D P D P D D P D P D P P D P D P D 4 DCPMMs 6 DRAM DIMMs per processor Table 181 Mixed Memory mode with 4 DCPMMs and 6 DRAM DIMMs per processor 2 processors In the table below P DCPMM D DRAM DIMM Processor 1 Processor 2 1 2 3 4 5 6 7 8 9 10 11 12 13 14 1...

Page 197: ...emory mode with 2 DCPMMs and 4 DRAM DIMMs per processor 2 processors In the table below P DCPMM D DRAM DIMM Processor 1 Processor 2 1 2 3 4 5 6 7 8 9 10 11 12 13 14 15 16 17 18 19 20 21 22 23 24 P D D D D P P D D D D P Chapter 3 Server hardware setup 193 ...

Page 198: ...e below P DCPMM D DRAM DIMM Processor 1 Processor 2 1 2 3 4 5 6 7 8 9 10 11 12 13 14 15 16 17 18 19 20 21 22 23 24 D P D P D P P D P D P D D P D P D P P D P D P D Processor 3 Processor 4 1 2 3 4 5 6 7 8 9 10 11 12 13 14 15 16 17 18 19 20 21 22 23 24 D P D P D P P D P D P D D P D P D P P D P D P D 4 DCPMMs 6 DRAM DIMMs per processor Table 185 Mixed Memory mode with 4 DCPMMs and 6 DRAM DIMMs per pro...

Page 199: ... 13 14 15 16 17 18 19 20 21 22 23 24 D D D P P D D D D D D P P D D D 2 DCPMMs 4 DRAM DIMMs per processor Table 187 Mixed Memory mode with 2 DCPMMs and 4 DRAM DIMMs per processor 4 processors In the table below P DCPMM D DRAM DIMM Processor 1 Processor 2 1 2 3 4 5 6 7 8 9 10 11 12 13 14 15 16 17 18 19 20 21 22 23 24 P D D D D P P D D D D P Processor 3 Processor 4 1 2 3 4 5 6 7 8 9 10 11 12 13 14 15...

Page 200: ...CPMMs and 6 DRAM DIMMs per processor 6 processors In the table below P DCPMM D DRAM DIMM Processor 1 Processor 2 1 2 3 4 5 6 7 8 9 10 11 12 13 14 15 16 17 18 19 20 21 22 23 24 D P D P D P P D P D P D D P D P D P P D P D P D Processor 3 Processor 4 1 2 3 4 5 6 7 8 9 10 11 12 13 14 15 16 17 18 19 20 21 22 23 24 D P D P D P P D P D P D D P D P D P P D P D P D Processor 5 Processor 6 1 2 3 4 5 6 7 8 9...

Page 201: ...cessor 4 1 2 3 4 5 6 7 8 9 10 11 12 13 14 15 16 17 18 19 20 21 22 23 24 D D D P P D D D D D D P P D D D Processor 5 Processor 6 1 2 3 4 5 6 7 8 9 10 11 12 13 14 15 16 17 18 19 20 21 22 23 24 D D D P P D D D D D D P P D D D 2 DCPMMs 4 DRAM DIMMs per processor Table 191 Mixed Memory mode with 2 DCPMMs and 4 DRAM DIMMs per processor 6 processors In the table below P DCPMM D DRAM DIMM Processor 1 Proc...

Page 202: ...ssor Table 192 Mixed Memory mode with 6 DCPMMs and 6 DRAM DIMMs per processor 8 processors In the table below P DCPMM D DRAM DIMM Processor 1 Processor 2 1 2 3 4 5 6 7 8 9 10 11 12 13 14 15 16 17 18 19 20 21 22 23 24 D P D P D P P D P D P D D P D P D P P D P D P D Processor 3 Processor 4 1 2 3 4 5 6 7 8 9 10 11 12 13 14 15 16 17 18 19 20 21 22 23 24 D P D P D P P D P D P D D P D P D P P D P D P D ...

Page 203: ...table below P DCPMM D DRAM DIMM Processor 1 Processor 2 1 2 3 4 5 6 7 8 9 10 11 12 13 14 15 16 17 18 19 20 21 22 23 24 D D D P P D D D D D D P P D D D Processor 3 Processor 4 1 2 3 4 5 6 7 8 9 10 11 12 13 14 15 16 17 18 19 20 21 22 23 24 D D D P P D D D D D D P P D D D Processor 5 Processor 6 1 2 3 4 5 6 7 8 9 10 11 12 13 14 15 16 17 18 19 20 21 22 23 24 D D D P P D D D D D D P P D D D Processor 7...

Page 204: ...2 3 4 5 6 7 8 9 10 11 12 13 14 15 16 17 18 19 20 21 22 23 24 P D D D D P P D D D D P Processor 7 Processor 8 1 2 3 4 5 6 7 8 9 10 11 12 13 14 15 16 17 18 19 20 21 22 23 24 P D D D D P P D D D D P Memory Mode In Memory Mode 100 of DCPMM capacity acts as system memory The DRAM DIMMs act as cache When implementing Memory Mode any supported DIMMs in any capacity can be installed 200 ThinkSystem SR950 ...

Page 205: ... processor 2 processors In the table below P DCPMM D DRAM DIMM Processor 1 Processor 2 1 2 3 4 5 6 7 8 9 10 11 12 13 14 15 16 17 18 19 20 21 22 23 24 D P D P D P P D P D P D D P D P D P P D P D P D 4 DCPMMs 6 DRAM DIMMs per processor Table 197 Memory mode with 4 DCPMMs and 6 DRAM DIMMs per processor 2 processors In the table below P DCPMM D DRAM DIMM Processor 1 Processor 2 1 2 3 4 5 6 7 8 9 10 11...

Page 206: ...MMs Processor 1 Processor 2 1 2 3 4 5 6 7 8 9 10 11 12 13 14 15 16 17 18 19 20 21 22 23 24 D D D P P D D D D D D P P D D D 2 DCPMMs 4 DRAM DIMMs per processor Table 200 App Direct mode with 2 DCPMMs and 4 DRAM DIMMs per processor 2 processors In the table below P DCPMM D DRAM DIMM Processor 1 Processor 2 1 2 3 4 5 6 7 8 9 10 11 12 13 14 15 16 17 18 19 20 21 22 23 24 P D D D D P P D D D D P 202 Thi...

Page 207: ... 6 DRAM DIMMs per processor 4 processors In the table below P DCPMM D DRAM DIMM Processor 1 Processor 2 1 2 3 4 5 6 7 8 9 10 11 12 13 14 15 16 17 18 19 20 21 22 23 24 D P D P D P P D P D P D D P D P D P P D P D P D Processor 3 Processor 4 1 2 3 4 5 6 7 8 9 10 11 12 13 14 15 16 17 18 19 20 21 22 23 24 D P D P D P P D P D P D D P D P D P P D P D P D 4 DCPMMs 6 DRAM DIMMs per processor Table 202 Memo...

Page 208: ... this configuration only RDIMMs are recommended for the DRAM DIMMs Processor 1 Processor 2 1 2 3 4 5 6 7 8 9 10 11 12 13 14 15 16 17 18 19 20 21 22 23 24 D D D P P D D D D D D P P D D D Processor 3 Processor 4 1 2 3 4 5 6 7 8 9 10 11 12 13 14 15 16 17 18 19 20 21 22 23 24 D D D P P D D D D D D P P D D D 2 DCPMMs 4 DRAM DIMMs per processor Table 205 App Direct mode with 2 DCPMMs and 4 DRAM DIMMs pe...

Page 209: ...206 Memory mode with 6 DCPMMs and 6 DRAM DIMMs per processor 6 processors In the table below P DCPMM D DRAM DIMM Processor 1 Processor 2 1 2 3 4 5 6 7 8 9 10 11 12 13 14 15 16 17 18 19 20 21 22 23 24 D P D P D P P D P D P D D P D P D P P D P D P D Processor 3 Processor 4 1 2 3 4 5 6 7 8 9 10 11 12 13 14 15 16 17 18 19 20 21 22 23 24 D P D P D P P D P D P D D P D P D P P D P D P D Processor 5 Proce...

Page 210: ...11 12 13 14 15 16 17 18 19 20 21 22 23 24 P D D D D D D D D P P D D D D D D D D P 2 DCPMMs 6 DRAM DIMMs per processor Table 209 Memory mode with 2 DCPMMs and 6 DRAM DIMMs per processor 6 processors In the table below P DCPMM D DRAM DIMM Note In this configuration only RDIMMs are recommended for the DRAM DIMMs Processor 1 Processor 2 1 2 3 4 5 6 7 8 9 10 11 12 13 14 15 16 17 18 19 20 21 22 23 24 D ...

Page 211: ...4 5 6 7 8 9 10 11 12 13 14 15 16 17 18 19 20 21 22 23 24 P D D D D P P D D D D P Processor 3 Processor 4 1 2 3 4 5 6 7 8 9 10 11 12 13 14 15 16 17 18 19 20 21 22 23 24 P D D D D P P D D D D P Processor 5 Processor 6 1 2 3 4 5 6 7 8 9 10 11 12 13 14 15 16 17 18 19 20 21 22 23 24 P D D D D P P D D D D P Chapter 3 Server hardware setup 207 ...

Page 212: ...r processor 6 DCPMMs 6 DRAM DIMMs per processor Table 211 Memory mode with 6 DCPMMs and 6 DRAM DIMMs per processor 8 processors In the table below P DCPMM D DRAM DIMM Processor 1 Processor 2 1 2 3 4 5 6 7 8 9 10 11 12 13 14 15 16 17 18 19 20 21 22 23 24 D P D P D P P D P D P D D P D P D P P D P D P D Processor 3 Processor 4 1 2 3 4 5 6 7 8 9 10 11 12 13 14 15 16 17 18 19 20 21 22 23 24 D P D P D P...

Page 213: ...5 6 7 8 9 10 11 12 13 14 15 16 17 18 19 20 21 22 23 24 P D D D D D D D D P P D D D D D D D D P Processor 3 Processor 4 1 2 3 4 5 6 7 8 9 10 11 12 13 14 15 16 17 18 19 20 21 22 23 24 P D D D D D D D D P P D D D D D D D D P Processor 5 Processor 6 1 2 3 4 5 6 7 8 9 10 11 12 13 14 15 16 17 18 19 20 21 22 23 24 P D D D D D D D D P P D D D D D D D D P Processor 7 Processor 8 1 2 3 4 5 6 7 8 9 10 11 12 ...

Page 214: ...1 12 13 14 15 16 17 18 19 20 21 22 23 24 P D D D D P P D D D D P Processor 5 Processor 6 1 2 3 4 5 6 7 8 9 10 11 12 13 14 15 16 17 18 19 20 21 22 23 24 P D D D D P P D D D D P Processor 7 Processor 8 1 2 3 4 5 6 7 8 9 10 11 12 13 14 15 16 17 18 19 20 21 22 23 24 P D D D D P P D D D D P Install server hardware options This section includes instructions for performing initial installation of optiona...

Page 215: ... cause system failure from damaged pins damaged connectors loose cabling or loose components Remove the front cover Remove the front cover by pressing the release buttons and pulling the cover from the front of the server Complete the following steps to remove the front cover Watch the procedure A video of the replacement process is available YouTube Youku Figure 27 Front cover removal Step 1 Pres...

Page 216: ...y module on page 216 Make sure that memory module fillers are installed in all vacant memory module connectors Make sure that all memory air baffles are installed See Memory air baffle replacement on page 350 Before you install the system board 1 If the front cover is installed remove it See Remove the front cover on page 322 2 Remove compute tray where the system board is being installed See Remo...

Page 217: ...s part of a processor heat sink module PHM assembly PHM installation requires a Torx T30 driver S002 CAUTION The power control button on the device and the power switch on the power supply do not turn off the electrical current supplied to the device The device also might have more than one power cord To remove all electrical current from the device ensure that all power cords are disconnected fro...

Page 218: ...proven index shtml for a list of processors supported for your server All processors on the system board must have the same speed number of cores and frequency Before you install a new PHM or replacement processor update your system firmware to the latest level See Update the firmware on page 256 Installing an additional PHM can change the memory requirements for your system See Install a memory m...

Page 219: ... Watch the procedure A video of the installation process is available YouTube Youku Step 1 Remove the processor socket cover if one is installed on the processor socket by placing your fingers in the half circles at each end of the cover and lifting it from the system board Step 2 Install the processor heat sink module on the system board Chapter 3 Server hardware setup 215 ...

Page 220: ...to fully tighten is 1 4 1 6 newton meters 12 14 inch pounds After installing the PHM option 1 If there are memory modules to install install them See Install a memory module on page 216 Also install memory module fillers that are provided with the PHM in any vacant memory module connectors 2 Install the upper system board or system board filler if it was removed See Install a system board on page ...

Page 221: ...ties that are supported for your server Notes Do not mix RDIMMs and LR DIMMs in the same server Install higher capacity ranked DIMMs first following the population sequence for the memory mode being used Installing or removing DIMMs changes the server configuration When you restart the server it displays a message that indicates that the memory configuration has changed There are multiple ways to ...

Page 222: ...board upper tray DIMM number System board 4 upper board upper tray DIMM number 1 1 25 49 73 2 2 26 50 74 3 3 27 51 75 4 4 28 52 76 5 5 29 53 77 6 6 30 54 78 7 7 31 55 79 8 8 32 56 80 9 9 33 57 81 10 10 34 58 82 11 11 35 59 83 12 12 36 60 84 13 13 37 61 85 14 14 38 62 86 15 15 39 63 87 16 16 40 64 88 17 17 41 65 89 18 18 42 66 90 19 19 43 67 91 20 20 44 68 92 21 21 45 69 93 22 22 46 70 94 218 Think...

Page 223: ...ensitive to static discharge and require special handling In addition to the standard guidelines for Handling static sensitive devices Always wear an electrostatic discharge strap when removing or installing memory modules Electrostatic discharge gloves can also be used Never hold two or more memory modules together so that they touch Do not stack memory modules directly on top of each other durin...

Page 224: ...stem board on page 310 2 Install the compute tray See Install a compute tray on page 307 3 If you have no additional options to install in the upper or lower compute tray install the front cover See Install the front cover on page 227 Install a hard disk drive backplane Hard disk drive backplanes are in the upper and lower compute trays that are accessed from the front of the server The installati...

Page 225: ...om the front of the server backplane for drives 20 23 first then 16 19 and 12 15 These population orders allow a mix of drive backplane types to be installed in the server 3 Apply new drive bay labels based on the backplane locations determined in the previous step Several drive bay labels come with each type of the supported drive backplane Install the labels that match the label types used for y...

Page 226: ... the backplane SAS backplanes have only one data cable NVMe backplanes have two data cables See Cable routing for drives on page 40 Step 4 Repeat Step 1 on page 222 Step 2 on page 222 and Step 3 on page 222 for each hard disk drive backplane being installed in the upper tray Step 5 Turn the tray upside down Step 6 Route and connect the data cables See Cable routing for drives on page 40 Route each...

Page 227: ...ds are disconnected from their power sources before performing this procedure Note If you are installing a system board processor memory module as options in the lower compute tray perform these tasks first See Install the system board on page 211 Install a processor heat sink module on page 213 or Install a memory module on page 216 Before you install the hard disk drive backplane 1 If the front ...

Page 228: ...er SAS cable or the system board NVMe cable See Cable routing for drives on page 40 Complete the following steps to install a hard disk drive backplane in the lower compute tray Watch the procedure A video of the replacement process is available YouTube Youku Step 1 Connect the power and data cables to the hard disk drive backplane See Cable routing for drives on page 40 a Connect the power cable ...

Page 229: ...e tray Each drive should be installed in its original location See Install a hard disk drive on page 324 6 If you have no additional options to install in the upper or lower compute tray install the front cover See Install the front cover on page 227 Install a hard disk drive Insert the hard disk drive in its bay and close the latch handle to lock the drive in place Hard disk drives are hot swap d...

Page 230: ...he drive into the bay until the drive stops then rotate drive handle closed to fully seat the drive and lock it in place Step 3 Check the hard disk drive status LED to verify that the hard disk drive is operating correctly If the yellow hard disk drive status LED of a drive is lit continuously that drive is faulty and must be replaced If the green hard disk drive activity LED is lit the drive is p...

Page 231: ...o not mix standard 512 byte and advanced 4 KB format drives in the same RAID array because it may lead to potential performance issues Check the instructions that come with the drive to determine whether you have to set any switches or jumpers on the drive If you are installing a SAS or SATA hard disk drive be sure to set the SAS or SATA ID for that device Install the front cover Install the front...

Page 232: ...r 17 The installation of two of these adapters in contiguous sequential slots is not supported For example you cannot install two adapters in slots 6 and 7 When installing the Mellanox Innova 2 Flex Open Programmable SmartNIC in an 8 socket configuration A maximum of four of these adapters can be installed in the system The Mellanox Innova 2 Flex Open Programmable SmartNIC can be installed only in...

Page 233: ...with I O tray slot 9 and insert it then press the adapter into the I O tray until the connector is fully seated Step 3 Tighten the captive thumbscrew on the side of the LOM adapter that secures it to the bracket on the I O tray After installing an optional LOM adapter in slot 9 1 If you have no additional adapters to install in the I O tray or in the riser for slot 10 to 15 riser 2 install the ris...

Page 234: ...re disconnected from their power sources before performing this procedure Before you install an optional adapter in slot 5 to 8 1 If the I O tray is installed in the server remove it See Remove the I O tray on page 334 2 Remove the riser or riser filler for slot 1 to 4 left riser to access the adapter connectors in the I O tray See Remove the riser for slot 1 to 4 riser 1 on page 358 3 Make sure t...

Page 235: ...y 3 If you have no additional options to install in the I O tray install it See Install the I O tray on page 335 Install a PCIe adapter in slot 1 to 4 PCIe adapters in slot 1 to 4 are in an I O tray riser that is accessed from the rear of the server With the riser removed from the I O tray open the retention latch and insert the adapter in the riser then close the retention latch S002 CAUTION The ...

Page 236: ...ailable YouTube Youku Figure 40 Adapter installation slot 1 to 4 Step 1 Open the retention latch Step 2 Align the adapter with the riser slot and insert it then press the adapter into the riser until the connector is fully seated Step 3 Close and lock the retention latch If you have no additional adapters to install in the riser after installing an optional adapter in slot 1 to 4 1 If any of the a...

Page 237: ...apter with an RJ45 connector make sure that there is sufficient clearance to disconnect the Ethernet cable from the adapter after it is installed 2 Remove the riser for slot 10 to 15 riser 2 See Remove the riser for slot 10 to 15 riser 2 on page 359 3 Make sure that there is no filler installed in the slot where you are installing the adapter Note If you are installing an adapter in slot 14 or 15 ...

Page 238: ... than one power cord To remove all electrical current from the device ensure that all power cords are disconnected from the power source on page 56 on page 254 Attention The adapter installed in slot 16 must have a metal bezel with holes no larger than 3 0 mm in any dimension CAUTION Make sure that all server power cords are disconnected from their power sources before performing this procedure Be...

Page 239: ...alling the riser in the I O tray 2 Install the riser in the I O tray See Install the riser for slot 16 to 17 riser 3 on page 368 3 If you have no additional options to install in the I O tray install it See Install the I O tray on page 335 Install an M 2 drive Use this information to install an M 2 drive option S002 CAUTION The power control button on the device and the power switch on the power s...

Page 240: ...ch the procedure A video of the installation process is available YouTube Youku on page 57 Step 1 Locate the connector on each side of the M 2 backplane Step 2 Insert the M 2 drive Figure 43 Inserting the M 2 drives Insert the M 2 drive at an angle approximately 30 degrees into the connector and rotate it until the notch catches on the lip of the retainer Notes When installing two drives align and...

Page 241: ...e no additional options to install in the I O tray install it See Install the I O tray on page 335 Note You will need to configure the M 2 drive to complete the installation See the information that comes with the M 2 drive option for information Install a riser Risers are in the I O tray that is accessed from the rear of the server Install adapters before installing the risers Install the riser f...

Page 242: ... tray is installed in the server remove it See Remove the I O tray on page 334 2 Make sure that there is no screw item 2 in following figure securing the I O tray board to the I O tray in a location where a captive riser screw will be installed 3 Make sure that there are no I O tray fillers installed in riser slot 1 to 4 4 Install adapters in the riser See Install a PCIe adapter in slot 1 to 4 on ...

Page 243: ...ser for adapter slot 10 to 15 riser 2 is in the I O tray that is accessed from the rear of the server After installing adapters in the riser insert the riser in the I O tray and secure it with two captive screws S002 CAUTION The power control button on the device and the power switch on the power supply do not turn off the electrical current supplied to the device The device also might have more t...

Page 244: ...ng the I O tray board to the I O tray in a location where a captive riser screw will be installed 3 Make sure that there are no I O tray fillers installed in riser slot 10 to 15 4 If you are Installing the optional slot 14 to 15 bracket make sure that it is in place See Install a riser bracket for slot 14 to 15 on page 241 5 Install adapters in the riser See Install a PCIe adapter in slot 10 to 15...

Page 245: ...335 Install a riser bracket for slot 14 to 15 The riser bracket for slot 14 to 15 is attached to the slot 10 to 15 I O tray riser that is accessed from the rear of the server After removing the I O tray and the riser for slot 10 to 15 riser 2 slide the bracket onto the riser until the retaining clips engage S002 CAUTION The power control button on the device and the power switch on the power suppl...

Page 246: ... the slots on the riser bracket with the pins on the riser and slide it in place then press the bracket onto the riser until the retaining clips engage After installing the optional riser bracket for slot 14 to 15 1 Install adapters in the riser See Install a PCIe adapter in slot 10 to 15 on page 232 2 If any of the adapters in the riser have internal cables make sure that they are connected befor...

Page 247: ...ich configurations Before you install the optional riser for slot 16 to 17 1 If the I O tray is installed in the server remove it See Remove the I O tray on page 334 2 Make sure that there is no screw item 2 in following figure securing the I O tray board to the I O tray in a location where a captive riser screw will be installed 3 Make sure that there are no I O tray fillers installed in adapter ...

Page 248: ...7 install the I O tray in the chassis See Install the I O tray on page 335 Install the M 2 backplane The M 2 backplane is in the I O tray that is accessed from the rear of the server After installing M 2 drives in the backplane insert the backplane in the I O tray and press it in place S002 CAUTION The power control button on the device and the power switch on the power supply do not turn off the ...

Page 249: ...e installation process is available YouTube Youku Figure 50 M 2 backplane installation Step 1 Align the openings in the plastic supports at each end of the M 2 backplane with the guide pins on the system board then insert the backplane in the system board connector Step 2 Press down on the M 2 backplane to fully seat it After installing the M 2 backplane option 1 If you removed a riser and have no...

Page 250: ...er supply do not turn off the electrical current supplied to the device The device also might have more than one power cord To remove all electrical current from the device ensure that all power cords are disconnected from the power source S035 CAUTION Never remove the cover on a power supply or any part that has this label attached Hazardous voltage current and energy levels are present inside an...

Page 251: ...rce than the power supplies in bays 2 and 4 Use the Lenovo Capacity Planner to calculate the required power capacity for what is configured for your server More information about the Lenovo Capacity Planner is available at https datacentersupport lenovo com solutions lnvo lcp Before you install a power supply 1 If the power supply bay contains a filler pull the filler from the bay Complete the fol...

Page 252: ...kSystem SR950 server to support eight processors However extra processors do not come with the conversion kit you are responsible for purchasing the desired number and type of processors If you install the conversion kit all processors in the server must be 8100 Series processors S002 CAUTION The power control button on the device and the power switch on the power supply do not turn off the electr...

Page 253: ...ight processors The following illustration identifies the various midplanes that might be installed in your server Figure 52 Midplane identification Table 218 Midplanes Midplane used in four socket storage rich configurations Midplane used in four socket and eight socket configurations The 4S Performance to 8S Upgrade Kit comes with one of these midplanes Midplane used in four socket and eight soc...

Page 254: ...ion you might need to remove up to 6 midplanes You must remove midplanes A if installed B C and D However you do not need to remove the power midplane midplane E See Midplane identification in Maintenance Manual for the locations of all the midplanes Instructions for removing the midplanes are available here http thinksystem lenovofiles com help topic 7X12 remove_a_midplane html Note When you remo...

Page 255: ...ign the compute tray with the opening in the front of the chassis and insert it e Fully open the compute tray release levers and push the compute tray into the chassis until it stops f Rotate the compute tray release levers towards the center until they lock and are fully closed g Remove the fan fillers in fan bay 7 to 12 and install fans in those bays See http thinksystem lenovofiles com help top...

Page 256: ... to the lower system board See http thinksystem lenovofiles com help topic 7X12 cable_routing_common html and http thinksystem lenovofiles com help topic 7X12 cable_routing_for_drives html f Install the system board into the upper bay in the tray See http thinksystem lenovofiles com help topic 7X12 install_the_compute_system_board html g Connect cables to the upper system board See http thinksyste...

Page 257: ...r LED flashes once per second S002 CAUTION The power control button on the device and the power switch on the power supply do not turn off the electrical current supplied to the device The device also might have more than one power cord To remove all electrical current from the device ensure that all power cords are disconnected from the power source Turn on the server The server can be turned on ...

Page 258: ...re disconnected from the power source Place the server in standby To place the server in a standby state power LED flashes once per second Note The Lenovo XClarity Controller can place the server in a standby state as an automatic response to a critical system failure Start an orderly shutdown using the operating system if supported by your operating system Press the power button to start an order...

Page 259: ...oose a static IP connection make sure that you specify an IPv4 or IPv6 address that is available on the network If you choose a DHCP connection make sure that the MAC address for the server has been configured in the DHCP server 4 Click OK to apply the setting and wait for two to three minutes 5 Use an IPv4 or IPv6 address to connect Lenovo XClarity Controller Important The Lenovo XClarity Control...

Page 260: ...o update the most current firmware for your server and the devices that are installed in the server Best practices related to updating firmware is available at the following site http lenovopress com LP0656 The latest firmware can be found at the following site http datacentersupport lenovo com us en products servers thinksystem sr950 7X12 downloads You can subscribe to product notification to sta...

Page 261: ... use for installing and setting up the firmware Tool Update Methods Supported Core System Firmware Updates I O Devices Firmware Updates Graphical user interface Command line interface Supports UXSPs Lenovo XClarity Provisioning Manager LXPM In band2 On Target Lenovo XClarity Controller XCC Out of band Off Target Selected I O devices Lenovo XClarity Essentials OneCLI OneCLI In band Out of band On T...

Page 262: ...ee Firmware Update section in the LXPM documentation compatible with your server at https sysmgt lenovofiles com help topic lxpm_frontend lxpm_product_page html Lenovo XClarity Controller If you need to install a specific update you can use the Lenovo XClarity Controller interface for a specific server Notes To perform an in band update through Windows or Linux the operating system driver must be ...

Page 263: ...pdate firmware for all managed servers through that interface Firmware management is simplified by assigning firmware compliance policies to managed endpoints When you create and assign a compliance policy to managed endpoints Lenovo XClarity Administrator monitors changes to the inventory for those endpoints and flags any endpoints that are out of compliance Specific details about updating firmwa...

Page 264: ...tore other systems For information about configuring the server using Lenovo XClarity Essentials OneCLI see http sysmgt lenovofiles com help topic toolsctr_cli_lenovo onecli_c_settings_info_commands html Lenovo XClarity Administrator You can quickly provision and pre provision all of your servers using a consistent configuration Configuration settings such as local storage I O adapters boot settin...

Page 265: ...eld in reserve and not used as active memory until a failure is indicated with reserved capacity subtracted from the total available memory in the system After an error threshold is surpassed in a system protected by memory sparing the content of a failing rank of DIMMs is copied to the spare rank The failing rank is then taken offline and the spare rank placed online for use as active memory in p...

Page 266: ...tem Settings Intel Optane DCPMMs to configure and manage DCPMMs For more details see the UEFI Setup section in the Lenovo XClarity Provisioning Manager documentation version compatible with your server at https sysmgt lenovofiles com help topic lxpm_ frontend lxpm_product_page html Note If the text based interface of Setup Utility opens instead of Lenovo XClarity Provisioning Manager go to System ...

Page 267: ... mode to another 1 Back up all the data and delete all the created namespaces Go to Namespaces View Modify Delete Namespaces to delete the created namespaces 2 Perform secure erase on all the installed DCPMMs Go to Security Press to Secure Erase to perform secure erase Make sure the capacity of installed DCPMMs and DRAM DIMMs meets system requirements for the new mode see DCPMM installation order ...

Page 268: ...atically Select this option to view the App Direct regions Namespaces App Direct capacity of DCPMMs requires the following steps before it is truly available for applications 1 Namespaces must be created for region capacity allocation 2 Filesystem must be created and formatted for the namespaces in the operating system Each App Direct region can be allocated into one namespace Create namespaces in...

Page 269: ...sphrases In the case the passphrases are lost or forgotten the stored data cannot be backed up or restored but you can contact Lenovo service for administrative secure erase After three failed unlocking attempts the corresponding DCPMMs enter exceeded state with a system warning message and the DCPMM unit can only be unlocked after the system is rebooted To enable passphrase go to Security Press t...

Page 270: ...Using a Redundant Array of Independent Disks RAID to store data remains one of the most common and cost efficient methods to increase server s storage performance availability and capacity RAID increases performance by allowing multiple drives to process I O requests simultaneously RAID can also prevent data loss in case of a drive failure by reconstructing or rebuilding the missing data from the ...

Page 271: ...smgt lenovofiles com help topic com lenovo lxci_deploypack_sccm doc dpsccm_c_endtoend_ deploy_scenario html Manual deployment If you cannot access the above tools follow the instructions below download the corresponding OS Installation Guide and deploy the operating system manually by referring to the guide 1 Go to https datacentersupport lenovo com solutions server os 2 Select an operating system...

Page 272: ... page click Update VPD 4 Update the UUID From Lenovo XClarity Essentials OneCLI Lenovo XClarity Essentials OneCLI sets the UUID in the Lenovo XClarity Controller Select one of the following methods to access the Lenovo XClarity Controller and set the UUID Operate from the target system such as LAN or keyboard console style KCS access Remote access to the target system TCP IP based To update the UU...

Page 273: ... XCC external IP address There is no default value This parameter is required xcc_user_id The BMC IMM XCC account name 1 of 12 accounts The default value is USERID xcc_password The BMC IMM XCC account password 1 of 12 accounts Note BMC IMM or XCC external IP address account name and password are all valid for this command Example command is as follows onecli config set SYSTEM_PROD_DATA SysInfoUUID...

Page 274: ..._DATA SysEncloseAssetTag asset_tag access_method Where asset_tag The server asset tag number Type asset aaaaaaaaaaaaaaaaaaaaaaaaaaaaaaaaa where aaaaaaaaaaaaaaaaaaaaaaaaaaaaaaaaa is the asset tag number access_method The access method that you select to use from the following methods Online authenticated LAN access type the command bmc username xcc_user_id bmc password xcc_password Where xcc_user_i...

Page 275: ... address account name and password are all valid for this command Example command is as follows onecli config set SYSTEM_PROD_DATA SysEncloseAssetTag asset_tag bmc xcc_user_id xcc_password xcc_external_ip 4 Reset the Lenovo XClarity Controller to the factory defaults See Resetting the BMC to Factory Default section in the XCC documentation compatible with your server at https sysmgt lenovofiles co...

Page 276: ...272 ThinkSystem SR950 Setup Guide ...

Page 277: ...dications 4 Check the event log for any events related to the server not powering on 5 Check for any LEDs that are flashing amber 6 Disconnect and reconnect the input power cords 7 Make sure that the power cords are connected to a working electrical outlet that is providing the necessary levels of input power see the power supply labels for input power requirements 8 Reseat the power supplies 9 Re...

Page 278: ...mbedded hypervisor device is listed in the list of available boot options From the management controller user interface click Server Configuration Boot Options For information about accessing the management controller user interface see the XClarity Controller product documentation https sysmgt lenovofiles com help topic lxcc_frontend lxcc_overview html 5 Check http datacentersupport lenovo com fo...

Page 279: ...he adapter fails the test disconnect the backplane signal cable from the adapter and run the tests again If the adapter fails the test replace the adapter Displayed system memory less than installed physical memory Complete the following steps until the problem is resolved 1 Make sure that No error LEDs are lit on the operator information panel No DIMM error LEDs are lit on the system board Memory...

Page 280: ... the suspect DIMMs in one channel to another channel of the same processor that is a supported configuration and then restart the server If the problem is related to a memory module replace the failing memory module Note When DCPMMs are installed only adopt this method in Memory mode 7 Replace the DIMM 8 Restart the server A Lenovo optional device that was just installed does not work 1 Make sure ...

Page 281: ...he items that you removed one at a time restarting the system each time until the error occurs Replace the item for which the error occurs If the system does not restart suspect the system board Chapter 5 Resolving installation issues 277 ...

Page 282: ...278 ThinkSystem SR950 Setup Guide ...

Page 283: ... try to solve the problem yourself Check all cables to make sure that they are connected Check the power switches to make sure that the system and any optional devices are turned on Check for updated software firmware and operating system device drivers for your Lenovo product The Lenovo Warranty terms and conditions state that you the owner of the Lenovo product are responsible for maintaining an...

Page 284: ... as event logs and hardware inventory Service data can be collected through the following tools Lenovo XClarity Provisioning Manager Use the Collect Service Data function of Lenovo XClarity Provisioning Manager to collect system service data You can collect existing system log data or run a new diagnostic to collect new data Lenovo XClarity Controller You can use the Lenovo XClarity Controller web...

Page 285: ...tion about running the g ge et tiin nf fo or r see http sysmgt lenovofiles com help topic toolsctr_cli_lenovo onecli_r_getinfor_command html Contacting Support You can contact Support to obtain help for your issue You can receive hardware service through a Lenovo Authorized Service Provider To locate a service provider authorized by Lenovo to provide warranty service go to https datacentersupport ...

Page 286: ...282 ThinkSystem SR950 Setup Guide ...

Page 287: ... see Front view on page 24 and Rear view on page 31 System board connectors The following illustration shows the internal connectors on the system board Figure 53 System board connectors Table 219 System board internal connectors Callout Callout 1 Front panel connector 6 Hard disk drive Power connector 2 Fan board power connector J56 7 Front panel USB connector 3 Fan board signal connector J40 8 P...

Page 288: ...owing steps 1 Check the Lenovo XClarity Controller event log and the system error log for information about the error 2 Save the log if necessary and clear the log afterward 3 Light path diagnostic switch Press the light path diagnostic switch to turn on the system board LEDs 4 Processor 1 error LED LED on An error has occurred with processor 1 See Processor problems in Maintenance Manual 5 Memory...

Page 289: ...tor 8 NVMe connector I O tray connectors The following illustration shows the internal connectors on the I O tray including connectors of PCIe slot 5 to 8 and the LOM connector of slot 9 For information about connectors on I O tray risers see I O tray riser connectors on page 287 For information about all external connectors on the rear of the server including those on the I O tray see Rear view o...

Page 290: ...e RAID card in the upper tray PCIe slot 20 is assigned to the M 2 backplane inside the I O tray I O tray switches Two switch blocks are located on the I O tray SW1 The switch block SW1 is located near the VGA connector on the I O tray All switches in this switch block are reserved SW2 The switch block SW2 is located near the M2 SATA PCIe backbplane connector Table 223 SW2 switch block definition o...

Page 291: ...ower off the server disconnect input power on page 254 I O tray riser connectors The following illustrations show the internal connectors on the I O tray risers Up to three risers can be installed in the I O tray The chassis supports the following riser configurations Riser 1 Slot 1 to 4 riser provides four PCIe3 x8 full height half length connectors Slot 1 to 4 riser provides four PCIe x16 full h...

Page 292: ...3 connectors There are two PCIe3 x16 full height half length connectors in the slot 3 to 4 and slot 12 to 13 riser Note Callouts for slots 3 to 4 apply when the riser is installed in the riser 1 position Callouts for slots 12 to 13 apply when the riser is installed in the riser 2 position Figure 58 Slot 3 to 4 and slot 12 to 13 riser connectors Table 225 Slot 14 to 15 riser connectors Callout Call...

Page 293: ...onnectors in the slot 16 to 17 riser Figure 60 Slot 16 to 17 riser connectors Table 227 Slot 16 to 17 riser connectors Callout Callout 16 PCIe3 x8 Slot 16 17 PCIe3 x8 Slot 17 Storage interposer connectors The following illustration shows the internal connectors on the interposer Note Some cable connectors have locks or latches that must be disengaged to disconnect the cable For information about i...

Page 294: ...card configurations Notes The RAID cards in the illustration might be different than the RAID card in your system Connector locations for all RAID cards are similar Some cable connectors have locks or latches that must be disengaged to disconnect the cable For information about RAID card cable routing see Cable routing for drives on page 40 Figure 62 RAID card connectors type 1 Table 229 RAID card...

Page 295: ...hat controls only SAS drives and one that controls both SAS and NVMe drives Cable routing for drive components is different for SAS and SAS NVMe drives SAS drive backplane connectors SAS NVMe drive backplane connectors For information about drive backplane cable routing see Cable routing for drives on page 40 SAS drive backplane connectors Figure 64 SAS drive backplane connectors Table 231 SAS dri...

Page 296: ...n the server The removal and installation procedures for each riser type are different and are described in the following topics PCIe adapters 1 to 4 see Remove a PCIe adapter from slot 1 to 4 on page 293 and Install a PCIe adapter in slot 1 to 4 on page 299 PCIe adapters 5 to 8 and the LOM adapter slot 9 For PCIe adapters 5 to 8 see Remove a PCIe adapter from slot 5 to 8 on page 294 and Install a...

Page 297: ...s in contiguous sequential slots is not supported For example you cannot install two adapters in slots 2 and 3 Remove a PCIe adapter from slot 1 to 4 PCIe adapters in slot 1 to 4 are in an I O tray riser that is accessed from the rear of the server After removing the I O tray and the riser for slot 1 to 4 riser 1 open the retention latch and remove the adapter from the riser S002 CAUTION The power...

Page 298: ... O tray S002 CAUTION The power control button on the device and the power switch on the power supply do not turn off the electrical current supplied to the device The device also might have more than one power cord To remove all electrical current from the device ensure that all power cords are disconnected from the power source on page 56 on page 254 CAUTION Make sure that all server power cords ...

Page 299: ...s for shipping that are supplied to you Remove a LOM adapter from slot 9 The LOM adapter in slot 9 is in the I O tray that is accessed from the rear of the server After removing the I O tray from the chassis and remove the adapter from the I O tray S002 CAUTION The power control button on the device and the power switch on the power supply do not turn off the electrical current supplied to the dev...

Page 300: ...vailable YouTube Youku Figure 68 LOM adapter removal slot 9 Step 1 Fully loosen the captive thumbscrew on the side of the LOM adapter that secures it to the bracket on the I O tray Step 2 Disengage the LOM adapter from its connector on the I O tray and lift the adapter from the I O tray After you remove a LOM adapter If you are instructed to return the adapter follow all packaging instructions and...

Page 301: ...riser 2 See Remove the riser for slot 10 to 15 riser 2 on page 359 Complete the following steps to remove an adapter from slot 10 to 15 Watch the procedure A video of the installation process is available YouTube http list youku com albumlist show id_50952215 Figure 69 Adapter removal slot 10 to 15 Step 1 Open the retention latch Step 2 Disengage the adapter from its connector on the riser and lif...

Page 302: ...254 Before you remove an adapter from slot 16 to 17 1 Disconnect and label all cables connected to adapters in the I O tray then remove the I O tray See Remove the I O tray on page 334 2 Remove the riser for slot 16 to 17 See Remove the riser for slot 16 to 17 riser 3 on page 362 Complete the following steps to remove an adapter from slot 16 to 17 Watch the procedure A video of the installation pr...

Page 303: ...e The device also might have more than one power cord To remove all electrical current from the device ensure that all power cords are disconnected from the power source on page 56 on page 254 CAUTION Make sure that all server power cords are disconnected from their power sources before performing this procedure Before you install an adapter in slot 1 to 4 make sure that there is no filler install...

Page 304: ...o 8 are in the I O tray that is accessed from the rear of the server With the I O tray removed from the chassis insert the adapter in the I O tray Note You should not install a RAID or Host Bus Adapter card in slot 7 S002 CAUTION The power control button on the device and the power switch on the power supply do not turn off the electrical current supplied to the device The device also might have m...

Page 305: ...ll the riser or riser filler for slot 1 to 4 left riser See Install the riser for slot 1 to 4 riser 1 on page 364 3 Install the I O tray in the chassis and connect all cables See Install the I O tray on page 335 Install a LOM adapter in slot 9 The LOM adapter in slot 9 is in the I O tray that is accessed from the rear of the server With the I O tray removed from the chassis insert the adapter in t...

Page 306: ...tive thumbscrew on the side of the LOM adapter that secures it to the bracket on the I O tray If you have no other operations to perform on the I O tray after installing a LOM adapter in slot 9 1 Install the riser for slot 10 to 15 riser 2 See Install the riser for slot 10 to 15 riser 2 on page 365 2 If any of the adapters in the I O tray have internal cables make sure that they are connected befo...

Page 307: ...a network adapter with an RJ45 connector make sure that there is sufficient clearance to disconnect the Ethernet cable from the adapter after it is installed Note If you are installing an adapter in slot 14 or 15 the slot 14 to 15 riser bracket or a riser bracket filler must be installed on the riser See Install the riser bracket for slot 14 to 15 riser 2 on page 367 Complete the following steps t...

Page 308: ...n on the device and the power switch on the power supply do not turn off the electrical current supplied to the device The device also might have more than one power cord To remove all electrical current from the device ensure that all power cords are disconnected from the power source on page 56 on page 254 CAUTION Make sure that all server power cords are disconnected from their power sources be...

Page 309: ...cted before installing the riser in the I O tray 2 Install the riser in the I O tray See Install the riser for slot 16 to 17 riser 3 on page 368 3 Install the I O tray in the chassis and connect all cables See Install the I O tray on page 335 Upper lower compute tray replacement Use the following procedures to remove and install the upper or lower compute tray Remove a compute tray The upper and l...

Page 310: ... remove the compute tray remove the front cover See Remove the front cover on page 322 Complete the following steps to remove the compute tray Watch the procedure A video of the replacement process is available YouTube Youku Figure 76 Compute tray removal to stop position Step 1 Press the button on each release lever then simultaneously rotate the release levers until they are perpendicular to the...

Page 311: ...ping that are supplied to you Install a compute tray Install a compute tray by inserting it in the front of the chassis pushing it in until it stops and closing the release levers S002 CAUTION The power control button on the device and the power switch on the power supply do not turn off the electrical current supplied to the device The device also might have more than one power cord To remove all...

Page 312: ...ortant Compute trays must be inserted in the chassis with the processors and memory visible from the top Step 1 Align the compute tray with its opening in the front of the chassis and insert Step 2 Fully open the compute tray release levers and push the compute tray into the chassis until it stops Step 3 Rotate the compute tray release levers until they lock fully closed If you are done performing...

Page 313: ...rent supplied to the device The device also might have more than one power cord To remove all electrical current from the device ensure that all power cords are disconnected from the power source on page 56 on page 254 CAUTION Make sure that all server power cords are disconnected from their power sources before performing this procedure Before you remove the system board 1 Remove the front cover ...

Page 314: ...s for shipping that are supplied to you Important Before you return the system board make sure that you install the CPU socket dust covers from the new system board To replace a CPU socket dust cover 1 Take a dust cover from the CPU socket assembly on the new compute system board and orient it correctly above the CPU socket assembly on the removed system board 2 Gently press down the dust cover le...

Page 315: ...or Remove a system board filler on page 312 Complete the following steps to install the compute system board Watch the procedure A video of the replacement process is available YouTube Youku Figure 80 System board installation Step 1 Align the system board with the rails in the compute tray then insert the system board making sure that the rails on the board fit into the slots in the compute tray ...

Page 316: ...se clips on the filler and sliding it out of the compute tray S002 CAUTION The power control button on the device and the power switch on the power supply do not turn off the electrical current supplied to the device The device also might have more than one power cord To remove all electrical current from the device ensure that all power cords are disconnected from the power source on page 56 on p...

Page 317: ...Install a system board filler by inserting it in the compute tray and pushing it in until it locks in place S002 CAUTION The power control button on the device and the power switch on the power supply do not turn off the electrical current supplied to the device The device also might have more than one power cord To remove all electrical current from the device ensure that all power cords are disc...

Page 318: ... accessed from the front of the server Procedures for removing and installing fan cages in the upper and lower trays are different Remove a fan cage upper tray The upper fan cage is in the upper compute tray or optional storage tray that is accessed from the front of the server After removing the upper tray turn it upside down press the fan cage releases and pull the fan cage toward the front of t...

Page 319: ...05 or Remove a storage tray on page 375 3 If you removed a compute tray and it has one or more compute system boards or a system board filler installed remove the system boards or system board filler See Remove a system board on page 309 or Remove a system board filler on page 312 4 Turn the tray upside down Complete the following steps to remove an upper fan cage Watch the procedure A video of th...

Page 320: ...at is accessed from the front of the server After removing the lower compute tray press the fan cage releases and pull the fan cage toward the front of the compute tray to remove it then disconnect the fan cage electrical connector S002 CAUTION The power control button on the device and the power switch on the power supply do not turn off the electrical current supplied to the device The device al...

Page 321: ...om the tray Step 4 Lift and remove the fan cage from the tray If you are instructed to return the fan cage follow all packaging instructions and use any packaging materials for shipping that are supplied to you Install a fan cage upper tray The upper fan cage is in the upper compute tray or optional storage tray that is accessed from the front of the server Fan cages are keyed and each can be used...

Page 322: ... all electrical current from the device ensure that all power cords are disconnected from the power source on page 56 CAUTION Make sure that all server power cords are disconnected from their power sources before performing this procedure Complete the following steps to install an upper fan cage Watch the procedure A video of the installation process is available YouTube Youku 318 ThinkSystem SR95...

Page 323: ...tor 1 in the underside of the fan cage Step 5 Insert the fan cage fully down into the tray making sure that you do not pinch any cables Important Make sure the that fan cage goes beneath all tabs on the tray when pushing it backward The fan cage must be pushed fully back until it is against the tray bulkhead along its entire length Step 6 Slide the fan cage back into the tray with the fan cage und...

Page 324: ...s are right side up when the compute tray is installed in the chassis Install the lower fan cage by connecting the fan cage electrical connector inserting the fan cage in the lower compute tray and pushing it backward until it locks in place S002 CAUTION The power control button on the device and the power switch on the power supply do not turn off the electrical current supplied to the device The...

Page 325: ...cage fully down into the tray making sure that you do not pinch any cables Important Make sure the that fan cage goes beneath all tabs on the tray when pushing it backward The fan cage must be pushed fully back until it is against the tray bulkhead along its entire length Step 6 Slide the fan cage back into the tray with the fan cage under the tabs on the tray 2 in above illustration Push the fan ...

Page 326: ...and remove it from the server After you remove the front cover If you are instructed to return the front cover follow all packaging instructions and use any packaging materials for shipping that are supplied to you If you are planning to recycle the front cover follow the instructions in Disassemble the front cover for recycle in Maintenance Manual for compliance with local regulations Install the...

Page 327: ...especially if it is part of a RAID array before you remove it from the server Before you make changes to disk drives disk drive controllers disk drive backplanes or disk drive cables back up all important data that is stored on hard disks Before you remove any component of a RAID array back up all RAID configuration information 2 If one or more NVMe solid state drives are to be removed make sure t...

Page 328: ...e bay 2 If you are instructed to return the drive assembly follow all packaging instructions and use any packaging materials for shipping that are supplied to you Install a hard disk drive Insert the hard disk drive in its bay and close the latch handle to lock the drive in place Hard disk drives are hot swap devices that can be installed while the server is powered on on page 56 on page 57 Before...

Page 329: ...stall the hard disk drive in the drive bay If the server is operating turned on the green activity LED on the hard disk drive should light solid indicating that the drive is receiving power Figure 90 Hard disk drive installation a Open the drive handle align the drive with the drive bay and insert the drive b Push the drive into the bay until the drive stops then rotate drive handle closed to full...

Page 330: ...ers Complete the following steps to remove a hard disk drive filler Watch the procedure A video of the installation process is available YouTube Youku Figure 91 Hard disk drive filler removal Step 1 Press the release tab and pull the filler from the bay Install fillers in all empty hard disk drive bays If you remove a four bay filler the vacant drive bays must be filled with a four bay filler hard...

Page 331: ...er tray Hard disk drive backplanes in the upper compute tray or optional storage tray are accessed from the front of the server There are several types of hard disk drive backplane Steps that are backplane specific are noted in each procedure S002 CAUTION The power control button on the device and the power switch on the power supply do not turn off the electrical current supplied to the device Th...

Page 332: ...s on the hard disk drive backplane that go to the storage interposer or to connectors on the system board or optional storage tray You might find it easier to disconnect cables from the backplane if you disconnect them from the storage interposer first reconnecting them to the storage interposer after removing the backplane or installing a new one Other cables might also need to be removed from th...

Page 333: ...nnected from their power sources before performing this procedure Before you remove the hard disk drive backplane 1 Remove the front cover See Remove the front cover on page 322 2 After noting their locations remove any hard disk drives that are installed in the lower compute tray See Remove a hard disk drive on page 323 3 Remove the lower compute tray See Remove a compute tray on page 305 4 Remov...

Page 334: ...nterposer lower tray on page 373 Make sure that all cables are routed and connected Install the fan cage See Install a fan cage lower tray on page 320 Install the lower compute tray See Install a compute tray on page 307 Install the front cover See Install the front cover on page 322 If you are instructed to return the backplane follow all packaging instructions and use any packaging materials tha...

Page 335: ...l storage tray Watch the procedure A video of the replacement process is available YouTube Youku Step 1 Connect the power cable to the backplane If this cable is connected to the storage interposer you might find it easier to disconnect it from the storage interposer and then reconnect it to the storage interposer after the backplane is installed See Cable routing for drives on page 40 Step 2 Inst...

Page 336: ... page 307 or Install the storage tray fully removed on page 377 4 Install any hard disk drives that you removed from the upper tray Each drive should be installed in its original location See Install a hard disk drive on page 324 5 Install the front cover See Install the front cover on page 322 Install a hard disk drive backplane lower tray Hard disk drive backplanes in the lower compute tray are ...

Page 337: ...s location in the server then insert the backplane and push it down until it is fully seated Step 3 Repeat Step 1 on page 333 and Step 2 on page 333 for each hard disk drive backplane being installed in the lower compute tray Step 4 Route and connect the data cables See Cable routing for drives on page 40 Route each SAS data cable to its connector on the RAID adapter then connect the SAS cable Rou...

Page 338: ...power supply do not turn off the electrical current supplied to the device The device also might have more than one power cord To remove all electrical current from the device ensure that all power cords are disconnected from the power source on page 56 on page 254 CAUTION Make sure that all server power cords are disconnected from their power sources before performing this procedure Before you re...

Page 339: ...ay by inserting it in the rear of the chassis pushing it in until it stops and closing the release levers If you are installing a new I O tray as a maintenance replacement you must transfer system identification information as part of the new I O tray installation S002 CAUTION The power control button on the device and the power switch on the power supply do not turn off the electrical current sup...

Page 340: ... its opening in the rear of the chassis and insert Position the tray toward the right side of the opening during insertion Step 2 Fully open the I O tray release levers and push the tray into the chassis until it stops Step 3 Rotate the I O tray release levers until they lock fully closed After installing the I O tray If you are done performing installation or maintenance procedures at the rear of...

Page 341: ...type and serial number from Lenovo XClarity Essentials OneCLI 1 Download and install Lenovo XClarity Essentials OneCLI To download Lenovo XClarity Essentials OneCLI go to the following site https datacentersupport lenovo com solutions HT116433 2 Copy and unpack the OneCLI package which also includes other required files to the server Make sure that you unpack the OneCLI and the required files to t...

Page 342: ...unt name and password are all valid for this command Example commands are as follows onecli config set SYSTEM_PROD_DATA SysInfoProdName m t_model bmc xcc_user_id xcc_password xcc_external_ip onecli config set SYSTEM_PROD_DATA SysInfoSerialNum s n bmc xcc_user_id xcc_password xcc_external_ip 4 Reset the Lenovo XClarity Controller to the factory defaults See Resetting the BMC to Factory Default sect...

Page 343: ...yLock value must be Disabled which means TPM_TCM_POLICY is NOT locked and changes to the TPM_TCM_POLICY are permitted If the return code is Enabled then no changes to the policy are permitted The planar may still be used if the desired setting is correct for the system being replaced 2 Configure the TPM_TCM_POLICY into XCC For customers in Chinese Mainland with no TPM or customers that require to ...

Page 344: ...ethod to unlock a policy once it has been set other than replacing system board imm TpmTcmPolicyLock is defined as below Value 1 uses string Enabled which means lock the policy Other values are not accepted Assert Physical Presence Before you can assert Physical Presence the Physical Presence Policy must be enabled By default the Physical Presence Policy is enabled with a timeout of 30 minutes The...

Page 345: ...where userid password are the credentials used to access the BMC Lenovo XClarity Controller interface of your server The default user ID is USERID and the default password is PASSW0RD zero not an uppercase o ip_address is the IP address of the BMC For more information about the Lenovo XClarity Essentials OneCLI s se et t command see http sysmgt lenovofiles com help topic toolsctr_cli_lenovo onecli...

Page 346: ...o access the BMC Lenovo XClarity Controller interface of your server The default user ID is USERID and the default password is PASSW0RD zero not an uppercase o ip_address is the IP address of the BMC For more information about the Lenovo XClarity Essentials OneCLI s se et t command see http sysmgt lenovofiles com help topic toolsctr_cli_lenovo onecli_r_set_command html M 2 backplane replacement Th...

Page 347: ... riser for slot 16 to 17 riser 3 on page 362 Complete the following steps to remove the M 2 backplane Watch the procedure A video of the installation process is available YouTube Youku Figure 99 M 2 backplane removal Step 1 Remove the M 2 backplane from the system board by pulling up on both ends of the backplane at the same time Note Pull the M 2 backplane straight up when removing it from the sy...

Page 348: ... the risers to gain access to the M 2 backplane install the M 2 drives in the backplane then insert the backplane in the I O tray and press it in place S002 CAUTION The power control button on the device and the power switch on the power supply do not turn off the electrical current supplied to the device The device also might have more than one power cord To remove all electrical current from the...

Page 349: ... connect all cables See Install the I O tray on page 335 3 See the documentation that comes with the M 2 backplane for device driver and configuration information to complete the installation M 2 backplane retainer adjustment The M 2 backplane retainer can be adjusted to accommodate three physical M 2 drive sizes Complete the following steps to adjust the M 2 backplane retainer position Figure 101...

Page 350: ...e The device also might have more than one power cord To remove all electrical current from the device ensure that all power cords are disconnected from the power source on page 56 on page 57 Before you remove an M 2 drive 1 Disconnect and label all cables connected to adapters in the I O tray then remove the I O tray See Remove the I O tray on page 334 2 Remove the riser for slot 10 to 15 riser 2...

Page 351: ...f you are instructed to return an M 2 drive follow all packaging instructions and use any packaging materials for shipping that are supplied to you Install an M 2 drive The M 2 drives are in the I O tray that is accessed from the rear of the server After removing the I O tray and the M 2 backplane insert the M 2 drives in the backplane and lock them in place with the drive retainer S002 CAUTION Th...

Page 352: ...p 1 Locate the connector on each side of the M 2 backplane Step 2 Insert the M 2 drive Figure 103 Inserting the M 2 drives Insert the M 2 drive at an angle approximately 30 degrees into the connector and rotate it until the notch catches on the lip of the retainer Notes When installing two drives align and support both drives before sliding the retainer forward to secure the drives When only one d...

Page 353: ...ar a soft click sound After installing an M 2 drive 1 Install the M 2 backplane See Install the M 2 backplane on page 344 2 Install the riser that you removed to access the M 2 backplane See Install the riser for slot 10 to 15 riser 2 on page 365 or Install the riser for slot 16 to 17 riser 3 on page 368 3 Install the I O tray and connect all cables See Install the I O tray on page 335 Appendix B ...

Page 354: ...page 305 3 If you are removing a memory air baffle from the lower compute system board remove the upper system board or system board filler See Remove a system board on page 309 Complete the following steps to remove a memory air baffle Watch the procedure A video of the replacement process is available YouTube Youku Note Each memory air baffle spans six memory modules Step 1 Open the six pairs of...

Page 355: ...t turn off the electrical current supplied to the device The device also might have more than one power cord To remove all electrical current from the device ensure that all power cords are disconnected from the power source on page 56 on page 254 on page 57 CAUTION Make sure that all server power cords are disconnected from their power sources before performing this procedure Complete the followi...

Page 356: ...oard Step 4 Make sure that each memory module aligns with its connector then seat each memory module See Install a memory module on page 355 for more information Note Make sure that all memory module connector retaining clips spanning the memory air baffle are closed even if a memory module is not installed in the connector Step 5 After installing each memory baffle make sure that it is secure by ...

Page 357: ...r during storage Never touch the gold memory module connector contacts or allow these contacts to touch the outside of the memory module connector housing Handle memory modules with care never bend twist or drop a memory module Note The same procedure is used to remove memory modules and memory module fillers Before you remove a memory module 1 If you are removing a DCPMM in App Direct or Mixed me...

Page 358: ...ory module that you removed 1 See the ThinkSystem SR950 Memory Population Reference for the required installation order of the remaining memory modules 2 Install a memory module filler that was originally provided with the PHM option in any vacant memory module connectors 3 Install the upper system board or system board filler if it was removed See Install a system board on page 310 4 Install the ...

Page 359: ...ical current supplied to the device The device also might have more than one power cord To remove all electrical current from the device ensure that all power cords are disconnected from the power source See Memory module installation rules and order on page 58 for detailed information about memory configuration and setup on page 56 on page 254 on page 57 CAUTION Make sure that all server power co...

Page 360: ...8 62 86 15 15 39 63 87 16 16 40 64 88 17 17 41 65 89 18 18 42 66 90 19 19 43 67 91 20 20 44 68 92 21 21 45 69 93 22 22 46 70 94 23 23 47 71 95 24 24 48 72 96 Complete the following steps to install a memory module Watch the procedure A video of the installation process is available YouTube Youku on page 57 Attention Memory modules are sensitive to static discharge and require special handling In a...

Page 361: ...straight down into the connector until the retaining clips snap into the locked position Step 2 If you are installing additional memory modules do so now After you install a memory module 1 Install the upper system board or system board filler if it was removed See Install a system board on page 310 2 Install the compute tray where the system board is installed See Install a compute tray on page 3...

Page 362: ...Remove the riser for slot 16 to 17 riser 3 on page 362 and Install the riser for slot 16 to 17 riser 3 on page 368 Remove the riser for slot 1 to 4 riser 1 The riser for adapter slot 1 to 4 riser 1 is in the I O tray that is accessed from the rear of the server After removing the I O tray loosen the two captive screws that secure the riser to the I O tray then remove the riser from the I O tray S0...

Page 363: ...e riser below the midplane connectors Screw location is labelled Remove screw before installing riser on the I O board 2 Install the I O tray fillers in adapter slot 1 to 4 item 4 in the figure If you are instructed to return the riser follow all packaging instructions and use any packaging materials for shipping that are supplied to you Remove the riser for slot 10 to 15 riser 2 The riser for ada...

Page 364: ... device also might have more than one power cord To remove all electrical current from the device ensure that all power cords are disconnected from the power source on page 56 on page 254 CAUTION Make sure that all server power cords are disconnected from their power sources before performing this procedure Before you remove the riser for slot 10 to 15 disconnect and label all cables connected to ...

Page 365: ...e connectors Screw location is labelled Remove screw before installing riser on the I O board 2 Install the I O tray fillers in adapter slot 10 to 15 item 4 in the figure If you are instructed to return the riser follow all packaging instructions and use any packaging materials for shipping that are supplied to you Remove the riser bracket for slot 14 to 15 riser 2 The riser bracket for slot 14 to...

Page 366: ...ray See Remove the I O tray on page 334 2 Remove the riser for slot 10 to 15 riser 2 See Remove the riser for slot 10 to 15 riser 2 on page 359 3 Remove any adapters that are installed in slots 14 or 15 See Remove a PCIe adapter from slot 10 to 15 on page 296 Complete the following steps to remove the riser bracket Figure 112 Riser bracket removal slot 14 to 15 Step 1 Open the retaining clips Step...

Page 367: ...ds are disconnected from their power sources before performing this procedure Before you remove the riser for slot 16 to 17 disconnect and label all cables connected to adapters in the I O tray then remove the I O tray See Remove the I O tray on page 334 Complete the following steps to remove the riser for slot 16 to 17 Watch the procedure A video of the installation process is available YouTube Y...

Page 368: ...it with two captive screws S002 CAUTION The power control button on the device and the power switch on the power supply do not turn off the electrical current supplied to the device The device also might have more than one power cord To remove all electrical current from the device ensure that all power cords are disconnected from the power source on page 56 on page 254 Before you install the rise...

Page 369: ...See Install the I O tray on page 335 Install the riser for slot 10 to 15 riser 2 The riser for adapter slot 10 to 15 riser 2 is in the I O tray that is accessed from the rear of the server After installing adapters in the riser insert the riser in the I O tray and secure it with two captive screws S002 CAUTION The power control button on the device and the power switch on the power supply do not t...

Page 370: ...the riser See Install a PCIe adapter in slot 10 to 15 on page 302 5 If any of the adapters in the riser have internal cables make sure that they are connected before installing the riser in the I O tray Complete the following steps to install the riser for slot 10 to 15 Watch the procedure A video of the installation process is available YouTube Youku Figure 115 Riser for slot 10 to 15 riser 2 ins...

Page 371: ...nt from the device ensure that all power cords are disconnected from the power source on page 56 on page 254 Before you install the riser bracket make sure that there is no filler installed on the I O tray for slot 14 to 15 Complete the following steps to install the riser bracket Figure 116 Riser bracket installation slot 14 to 15 Step 1 Align the slots on the riser bracket with the pins on the r...

Page 372: ...cted from the power source on page 56 on page 254 Attention Do not use the riser for slot 16 to 17 with four socket storage rich configurations Before you install the riser for slot 16 to 17 1 Make sure that there is no screw item 2 in following figure securing the I O tray board to the I O tray in a location where a captive riser screw will be installed 2 Make sure that there are no I O tray fill...

Page 373: ...he front of the server Procedures for removing and installing storage interposers in the upper and lower trays are different Remove a storage interposer upper tray The upper storage interposer is in the upper compute tray or optional storage tray that is accessed from the front of the server After removing the upper tray and fan cage disconnect the RAID card from the storage interposer and lift it...

Page 374: ...ystem board on page 309 4 Turn the tray upside down and remove the upper fan cage See Remove a fan cage upper tray on page 314 Complete the following steps to remove an upper storage interposer Watch the procedure A video of the installation process is available YouTube Youku Figure 118 Upper storage interposer removal Step 1 Disconnect all power and data cables from the storage interposer Step 2 ...

Page 375: ...o not turn off the electrical current supplied to the device The device also might have more than one power cord To remove all electrical current from the device ensure that all power cords are disconnected from the power source on page 56 CAUTION Make sure that all server power cords are disconnected from their power sources before performing this procedure Before you remove an lower storage inte...

Page 376: ...ials for shipping that are supplied to you Install a storage interposer upper tray The upper storage interposer is in the upper compute tray or optional storage tray that is accessed from the front of the server Insert the storage interposer in the upper tray and secure it with the screw then connect the RAID card to the storage interposer and install the fan cage and upper tray S002 CAUTION The p...

Page 377: ...you have installed the upper storage interposer 1 Install the upper fan cage See Install a fan cage upper tray on page 317 2 Turn the tray right side up 3 If you removed one or more system boards or a compute system board filler from a compute tray install the system boards or system board filler See Install a system board on page 310 4 Install the upper compute tray or storage tray See Install a ...

Page 378: ...following steps to install a lower storage interposer Watch the procedure A video of the installation process is available YouTube Youku Figure 121 Lower storage interposer installation Step 1 Position the storage interposer over the pins on the compute tray then slide the storage interposer to the right Step 2 Secure the storage interposer with the screw Step 3 Rotate the RAID card down and align...

Page 379: ...g a storage tray and do not plan to replace it relocate or backup data that is on the hard disk drives in the storage tray before removing it S002 CAUTION The power control button on the device and the power switch on the power supply do not turn off the electrical current supplied to the device The device also might have more than one power cord To remove all electrical current from the device en...

Page 380: ...until it stops then close the release levers Step 3 Press the release tabs on either side of the tray then slide the tray fully forward evenly and remove it from the chassis Attention Be prepared to support the full weight of the storage tray when you remove it from the chassis Do not use the release levers as handles to support the storage tray Figure 123 Storage tray removal from chassis 376 Thi...

Page 381: ...ed to the device The device also might have more than one power cord To remove all electrical current from the device ensure that all power cords are disconnected from the power source on page 56 on page 254 Before you install an optional storage tray 1 Make sure that all cables adapters and other components are installed and seated correctly and that you have not left loose tools or parts inside ...

Page 382: ...2 Fully open the storage tray release levers and push the tray into the chassis until it stops Step 3 Rotate the storage tray release levers until they lock fully closed If you are done performing installation or maintenance procedures at the front of the chassis install the front cover See Install the front cover on page 322 378 ThinkSystem SR950 Setup Guide ...

Page 383: ...service data 280 common cable routing 37 Common installation issues 273 component access 283 292 components server 23 compute tray installing 307 removing 305 replacing 305 configuration 11 13 15 17 18 Configuration ThinkSystem SR950 255 configure the firmware 259 connector battery 285 drive backplane 291 internal 283 interposer 289 I O tray 285 I O tray riser 287 RAID card 290 riser 287 storage b...

Page 384: ...trols and LEDs 27 front panel USB port cable routing 37 front panel video port cable routing 37 front view 24 G gaseous contamination 9 Getting help 279 guidelines memory 58 memory module 58 options installation 56 system reliability 57 guides cable 35 H handling static sensitive devices 57 hard disk drive installing 324 installing options 225 replacing 323 hard disk drive activity LED 27 hard dis...

Page 385: ...sparing 139 installing 4S Performance to 8S Upgrade Kit 248 4S to 8S Upgrade Option 248 adapter 228 adapter slot 1 to 4 231 299 adapter slot 10 to 15 232 302 adapter slot 16 to 17 234 304 adapter slot 5 to 8 229 300 adapter riser 237 bracket riser slot 14 to 15 241 367 compute tray 307 DIMM 355 DIMM air baffle 351 DIMM filler 355 fan cage lower 320 fan cage upper 317 filler DIMM 355 filler memory ...

Page 386: ...ing options 216 replacing 353 memory module guidelines 58 memory module installation order independent memory mode 63 independent memory mode 2 CPUs 64 independent memory mode 3 CPUs 65 independent memory mode 4 CPUs 69 independent memory mode 6 CPUs 73 independent memory mode 8 CPUs 83 memory mirroring 100 memory mirroring 2 CPUs 101 memory mirroring 3 CPUs 102 memory mirroring 4 CPUs 106 memory ...

Page 387: ...M 2 drive 346 memory air baffle 350 memory module removing 353 memory module filler removing 353 PCIe adapter slot 1 to 4 293 PCIe adapter slot 10 to 15 296 PCIe adapter slot 5 to 8 294 removing filler memory module 353 memory module 353 memory module filler 353 right riser 359 riser bracket slot 14 to 15 361 riser for slot 1 to 4 358 riser for slot 10 to 15 359 riser for slot 16 to 17 362 storage...

Page 388: ...tor LED front 27 System information LED 27 system board installing 310 installing options 211 removing 309 replacing 308 system board filler installing 313 removing 312 replacing 312 System configuration ThinkSystem SR950 255 system reliability guidelines 57 system board connectors 283 system board LEDs 283 T tag network access 23 TCM 338 telephone numbers 281 TPM 338 TPM 1 2 341 TPM 2 0 341 TPM p...

Page 389: ......

Page 390: ......

Reviews: