• Four 3.5-inch drive backplate (connects to RAID adapter)
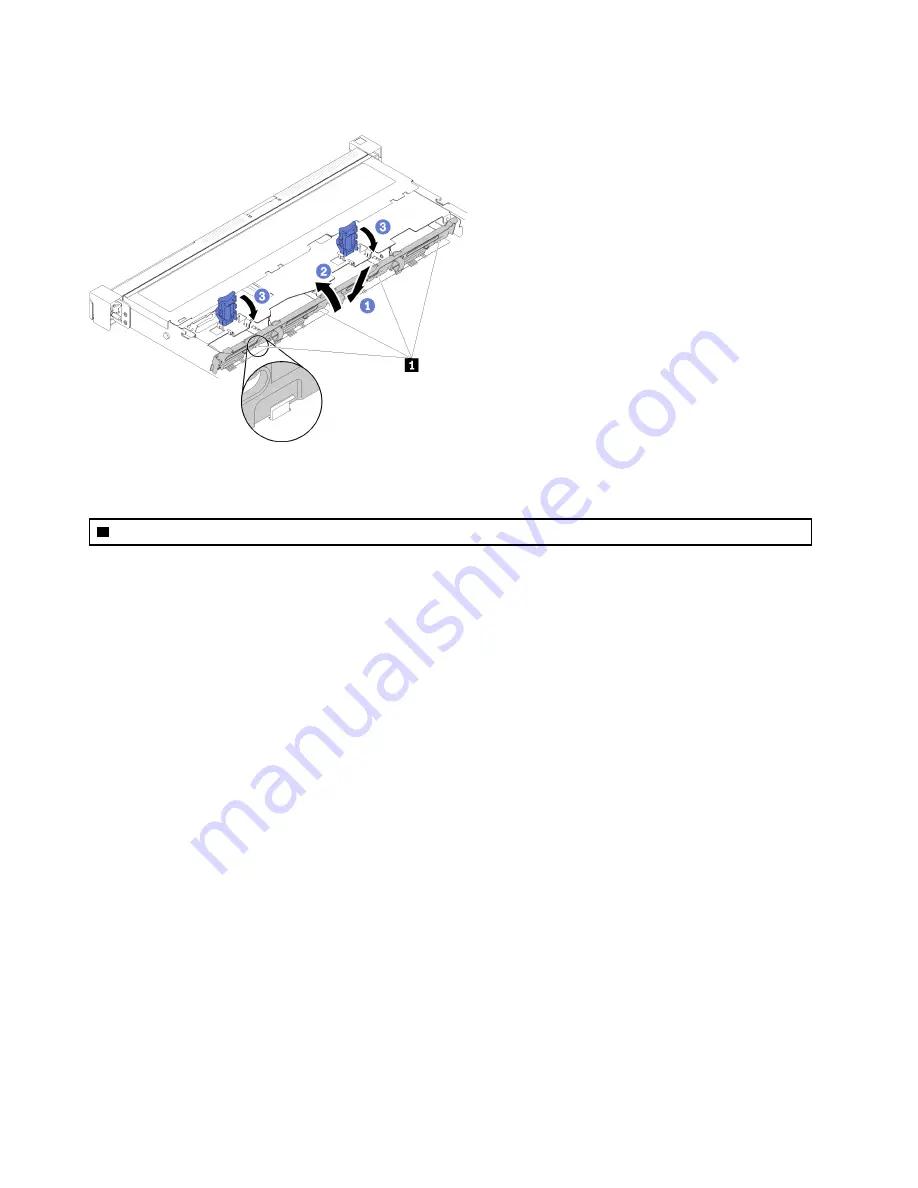
Figure 29. Simple-swap drive backplate installation
Table 18. Pin in the chassis
1
Pin
Step 1. Insert the backplate into the chassis with an angle as shown. Make sure the pins are against the
backplate on the backside.
Step 2. Rotate the backplate up toward the front of the server.
Step 3. Close the retaining clips to secure the backplate.
Step 4. Connect the backplate cables to the system board and the RAID adapter (if installed). See
.
After you install the simple-swap drive backplate, complete the following steps:
1. Install the top cover onto the server (see
“Install the top cover” on page 54
).
2. Install the server into the rack if necessary.
3. Reconnect power cords and all external cables.
Install an adapter
Use this information to install an adapter.
Before you install an adapter, complete the following steps:
1. Read
“Installation Guidelines” on page 32
to ensure that you work safely.
2. Touch the static-protective package that contains the component to any unpainted metal surface on the
server; then, remove it from the package and place it on a static-protective surface.
Notes:
• ThinkSystem SR150 does not support ARI/SR-IOV
• QLogic QL41262 PCIe 25Gb 2-Port SFP28 Ethernet Adapter does not support shared storage V3700v2
and V5030 configurations.
40
ThinkSystem SR150 Setup Guide
Summary of Contents for ThinkSystem SR150
Page 1: ...ThinkSystem SR150 Setup Guide Machine Type 7Y54 ...
Page 4: ...ii ThinkSystem SR150 Setup Guide ...
Page 8: ...vi ThinkSystem SR150 Setup Guide ...
Page 25: ...Chapter 2 Server components 17 ...
Page 38: ...30 ThinkSystem SR150 Setup Guide ...
Page 66: ...58 ThinkSystem SR150 Setup Guide ...
Page 86: ...78 ThinkSystem SR150 Setup Guide ...
Page 89: ......
Page 90: ...Part Number SP47A31795 Printed in Chinese Mainland 1P P N SP47A31795 1PSP47A31795 ...


