28
NE1032T Installation Guide
Rear Panel
The
rear
panel
is
composed
of
the
following
components.
Fans
For
cooling,
the
rear
panel
of
the
NE1032T
has
three
bays
for
hot
‐
swap
fan
modules.
Three
fan
modules
are
required
for
redundancy.
When
three
fan
modules
are
used,
if
there
is
a
failure
of
one
of
the
fans,
the
switch
reports
the
condition,
the
other
fans
continue
to
run,
and
the
switch
continues
to
operate
normally.
You
can
replace
one
failed
hot
‐
swap
fan
module
while
the
switch
is
operating.
If
a
second
fan
fails,
the
switch
reports
the
condition
and
shuts
down
to
prevent
overheating.
CAUTION:
Be
sure
to
finish
the
replacement
procedure
promptly.
The
switch
could
overheat
if
left
without
cooling
for
an
extended
period.
Compatible
fan
options
are
listed
in
the
Fan
operation
and
internal
temperatures
are
monitored.
If
the
air
temperature
exceeds
a
desired
threshold,
the
environmental
monitor
displays
warnings.
Note:
If
a
fan
fails,
the
maximum
operating
temperature
drops
from
+40°C
(104°F)
to
+35°C
(95°F).
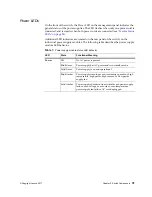
Fan LEDs
If
there
is
a
failure
of
one
or
more
fans,
the
front
panel
Fan
LED
flashes.
Additional
Fan
LED
indicators
are
located
on
the
rear
panel
of
the
switch,
on
the
individual
fan
modules.
The
following
table
describes
the
fan
module
LED
behavior.
Power Supply
The
rear
panel
of
the
NE1032T
has
two
bays
for
hot
‐
swap
power
supply
modules.
Each
power
supply
module
has
an
individual
IEC
320
C14
power
connector.
The
power
cord
attaches
to
a
universal
grounded
AC
power
source.
Compatible
power
options
are
listed
in
the
Table 6.
Fan module status LED behavior
LED State
Functional Meaning
On
Fan
is
operational
Off
Fan
module
has
no
power.
Flashing
Fan
speed
has
failed.
Replace
the
fan
module.
Summary of Contents for ThinkSystem NE1032T
Page 1: ...Lenovo ThinkSystem NE1032T RackSwitch Installation Guide For Lenovo Cloud Network OS ...
Page 6: ...6 Lenovo G8296 Installation Guide ...
Page 14: ...14 NE1032T Installation Guide ...
Page 18: ...18 NE1032T Installation Guide ...
Page 32: ...32 NE1032T Installation Guide ...
Page 78: ...78 NE1032T Installation Guide ...
Page 94: ...94 NE1032T Installation Guide ...
Page 100: ...100 NE1032T Installation Guide ...
Page 120: ...120 NE1032T Installation Guide ...


