


Chapter 5. Special keys
Your computer has several special keys to help you work more easily and effectively.
© Copyright Lenovo 2017
43
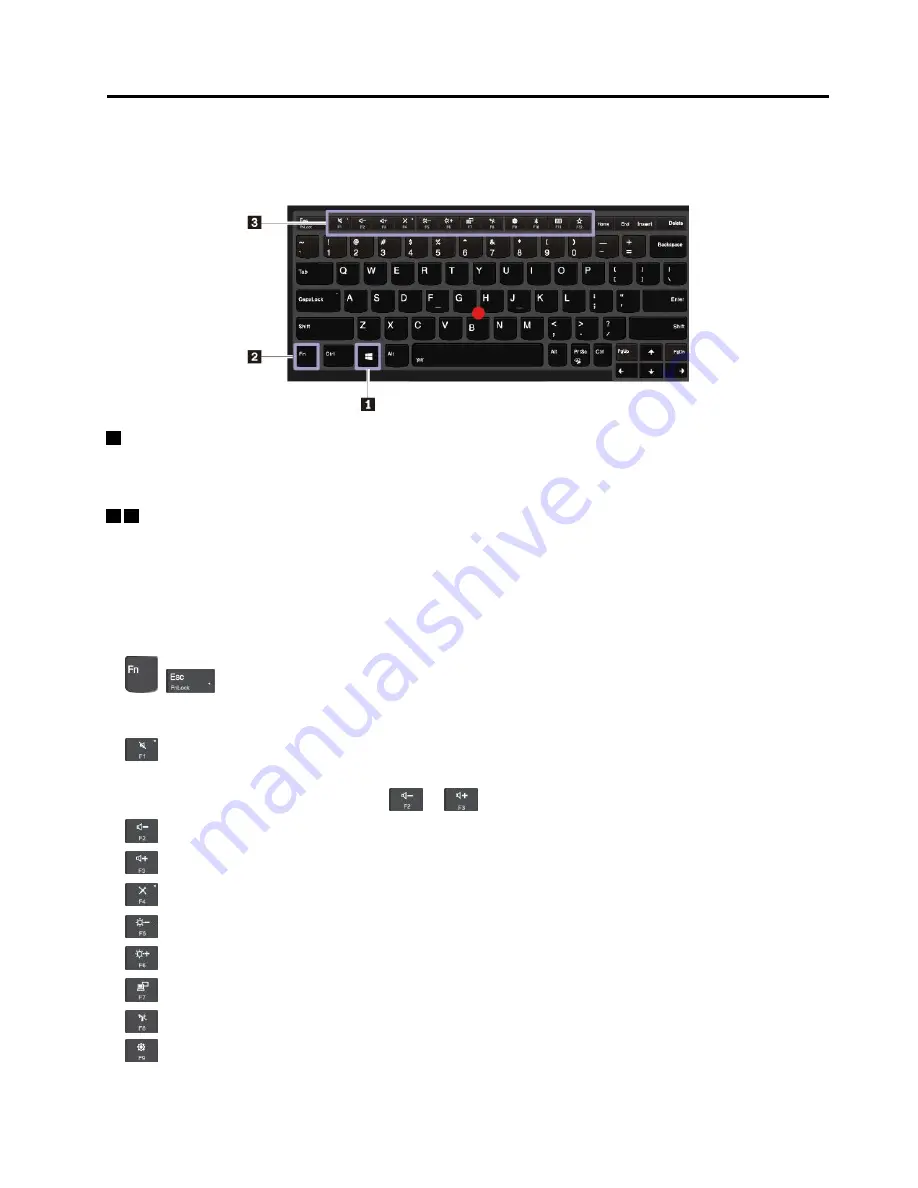
1
Windows logo key
Press the Windows logo key to open the Start menu. For information about using the Windows logo key with
other keys, see the help information system of the Windows operating system.
2 3
Fn key and function keys
You can configure the Fn key and function keys in the Keyboard Properties window by doing the following:
1. Go to Control Panel, and then change the view of Control Panel from Category to Large icons or Small
icons.
2. Click
Keyboard
. In the Keyboard Properties window, click the
Fn and function keys
tab.
3. Select the options of your preference.
•
+
Switch the key function between the standard F1–F12 function and the special function
printed as an icon on each key. When the Fn Lock indicator is off, you can use the default function. You
can change the default function in the Keyboard Properties window.
•
Mute or unmute the speakers. When the speakers are muted, the indicator on the key is on.
If you mute the sound and turn off your computer, the sound will remain muted when you turn on your
computer. To turn on the sound, press
or
.
•
Decrease the speaker volume.
•
Increase the speaker volume.
•
Mute or unmute the microphones. When the microphones are muted, the indicator on the key is on.
•
Darken the computer display.
•
Brighten the computer display.
•
Manage external displays.
•
Enable or disable the built-in wireless features.
•
–
For Windows 7:
Open Control Panel.
–
For Windows 10:
Open the Settings window.
Summary of Contents for ThinkPad X1 Carbon 20HQ
Page 1: ...Hardware Maintenance Manual Machine Types 20HQ 20HR 20K3 and 20K4 ...
Page 6: ...iv Hardware Maintenance Manual ...
Page 11: ...DANGER DANGER DANGER DANGER DANGER Chapter 1 Safety information 5 ...
Page 12: ...6 Hardware Maintenance Manual ...
Page 13: ...PERIGO PERIGO PERIGO PERIGO Chapter 1 Safety information 7 ...
Page 14: ...PERIGO PERIGO PERIGO PERIGO DANGER 8 Hardware Maintenance Manual ...
Page 15: ...DANGER DANGER DANGER DANGER DANGER DANGER Chapter 1 Safety information 9 ...
Page 16: ...DANGER VORSICHT VORSICHT VORSICHT VORSICHT 10 Hardware Maintenance Manual ...
Page 17: ...VORSICHT VORSICHT VORSICHT VORSICHT Chapter 1 Safety information 11 ...
Page 18: ...12 Hardware Maintenance Manual ...
Page 19: ...Chapter 1 Safety information 13 ...
Page 20: ...14 Hardware Maintenance Manual ...
Page 21: ...Chapter 1 Safety information 15 ...
Page 22: ...16 Hardware Maintenance Manual ...
Page 23: ...Chapter 1 Safety information 17 ...
Page 24: ...18 Hardware Maintenance Manual ...
Page 28: ...22 Hardware Maintenance Manual ...
Page 48: ...42 Hardware Maintenance Manual ...
Page 68: ...62 Hardware Maintenance Manual ...
Page 91: ...3 4 5 6 7 8 9 10 11 12 Chapter 8 Removing or replacing a FRU 85 ...
Page 106: ...4 Removal steps of the camera LED cable 3 100 Hardware Maintenance Manual ...
Page 109: ......
Page 110: ......


