background image

Chapter 6. Locations

Locating computer controls, connectors, and indicators

This topic introduces the locations of the computer controls, connectors, and indicators.

Note:

ThinkPad T14 Gen 2 and ThinkPad P14s Gen 2 might be shipped with different microprocessors, 

namely Intel

® 

and Advanced Micro Devices (AMD). Hereby Intel models and AMD models are used to 

distinguish computer models with different microprocessors.

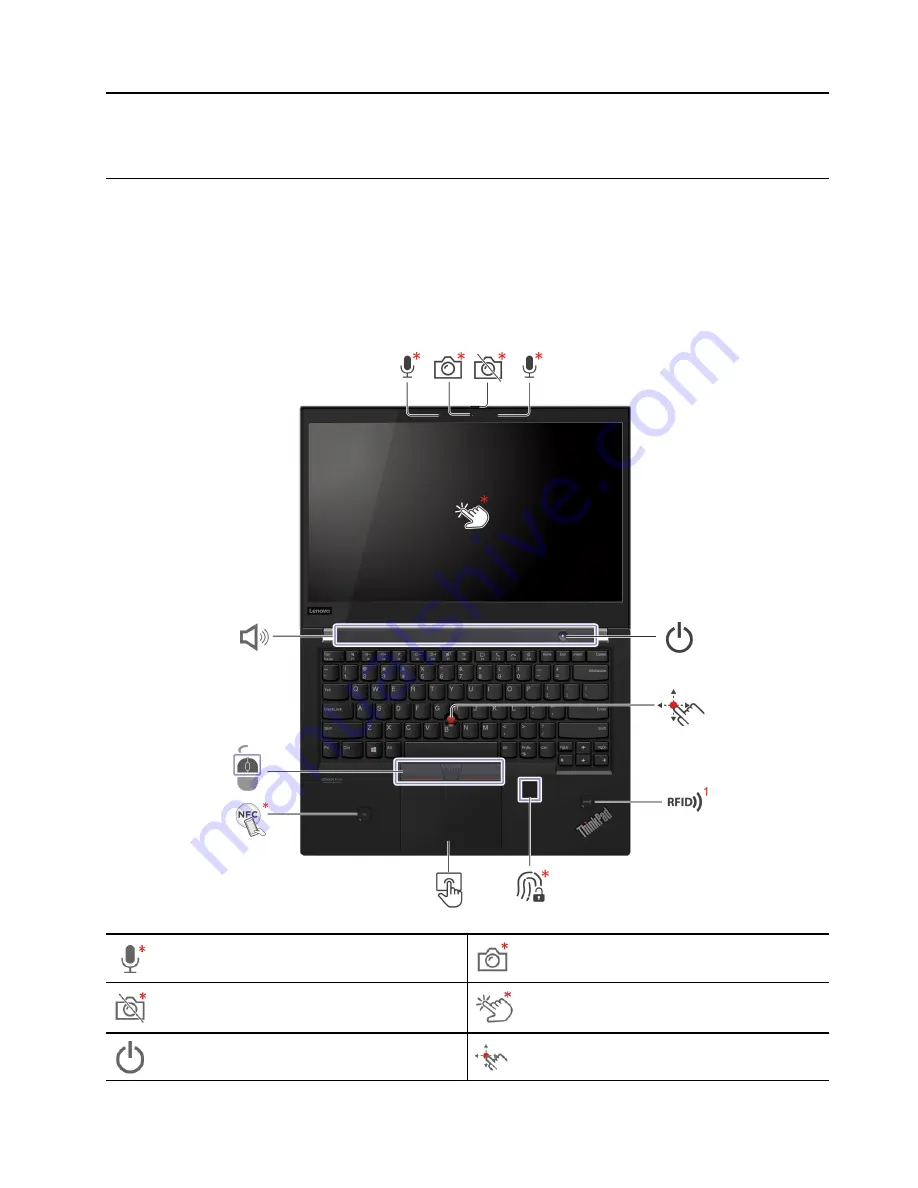
Front view

Microphone*

Infrared (IR) camera* / Camera*

Webcam privacy shutter*

Touch screen*

Power button

TrackPoint

® 

pointing stick

© Copyright Lenovo 2021

45

Summary of Contents for ThinkPad P14s Gen 1

Page 1: ...T14 Gen 2 and P14s Gen 2 Hardware Maintenance Manual ...

Page 2: ...der Appendix A Notices on page 123 Third Edition December 2021 Copyright Lenovo 2021 LIMITED AND RESTRICTED RIGHTS NOTICE If data or software is delivered pursuant a General Services Administration GSA contract use reproduction or disclosure is subject to restrictions set forth in Contract No GS 35F 05925 ...

Page 3: ...VMe password 31 Supervisor password 32 System management password 32 How to remove the power on password 33 How to remove the NVMe password 33 How to remove the system management password 33 Power management 34 Sleep mode 34 Hibernation mode 35 Symptom to FRU index 35 Numeric error codes 36 Error messages 37 Beep errors 37 No beep symptoms 39 LCD related symptoms 39 Intermittent problems 40 Undete...

Page 4: ...cable and antenna for selected models 89 1170 RFID reader cable and reader for models with RFID 90 1180 Power button board and cable 90 1190 System board 92 1200 MIMO wireless WAN antenna assembly for selected Intel models 97 1210 LCD unit 98 1220 Keyboard bezel assembly 103 2010 LCD bezel sheet and LCD bezel 103 2020 LCD panel and LCD elastic adhesive tapes 104 2030 Camera microphone module 116 2...

Page 5: ...ly for trained service technicians who are familiar with ThinkPad products Use this manual along with the advanced diagnostic tests to troubleshoot problems effectively Depending on the model some hardware configuration and software programs might not be available on the computer Some statements in this manual might not be applicable to the computer Before servicing a ThinkPad product be sure to r...

Page 6: ...iv T14 Gen 2 and P14s Gen 2 Hardware Maintenance Manual ...

Page 7: ...technicians and the customer s personnel are not in a hazardous position Place removed covers and other parts in a safe place away from all personnel while you are servicing the machine Keep your toolcase away from walk areas so that other people will not trip over it Do not wear loose clothing that can be trapped in the moving parts of a machine Ensure that your sleeves are fastened or rolled up ...

Page 8: ...ical shock can occur only when there is a complete circuit By observing the above rule you may prevent a current from passing through your body When using testers set the controls correctly and use the approved probe leads and accessories for that tester Stand on suitable rubber mats obtained locally if necessary to insulate you from grounds such as metal floor strips and machine frames Observe th...

Page 9: ...puter Disconnect the power cord 3 Check the power cord for a A third wire ground connector in good condition Use a meter to measure third wire ground continuity for 0 1 ohm or less between the external ground pin and the frame ground b The power cord should be the authorized type specified for your computer Go to https support lenovo com partslookup c Insulation must not be frayed or worn 4 Check ...

Page 10: ...ment Note The use of a grounding system to guard against ESD damage is desirable but not necessary Attach the ESD ground clip to any frame ground ground braid or green wire ground When working on a double insulated or battery operated system use an ESD common ground or reference point You can use coax or connector outside shells on these systems Use the round ground prong of the ac plug on ac oper...

Page 11: ...DANGER DANGER DANGER DANGER DANGER DANGER Chapter 1 Safety information 5 ...

Page 12: ...DANGER 6 T14 Gen 2 and P14s Gen 2 Hardware Maintenance Manual ...

Page 13: ...PERIGO Chapter 1 Safety information 7 ...

Page 14: ...PERIGO PERIGO PERIGO PERIGO 8 T14 Gen 2 and P14s Gen 2 Hardware Maintenance Manual ...

Page 15: ...PERIGO PERIGO PERIGO DANGER DANGER Chapter 1 Safety information 9 ...

Page 16: ...DANGER DANGER DANGER DANGER DANGER 10 T14 Gen 2 and P14s Gen 2 Hardware Maintenance Manual ...

Page 17: ...DANGER VORSICHT VORSICHT VORSICHT VORSICHT Chapter 1 Safety information 11 ...

Page 18: ...VORSICHT VORSICHT VORSICHT VORSICHT 12 T14 Gen 2 and P14s Gen 2 Hardware Maintenance Manual ...

Page 19: ...Chapter 1 Safety information 13 ...

Page 20: ...14 T14 Gen 2 and P14s Gen 2 Hardware Maintenance Manual ...

Page 21: ...Chapter 1 Safety information 15 ...

Page 22: ...16 T14 Gen 2 and P14s Gen 2 Hardware Maintenance Manual ...

Page 23: ...Chapter 1 Safety information 17 ...

Page 24: ...18 T14 Gen 2 and P14s Gen 2 Hardware Maintenance Manual ...

Page 25: ...Chapter 1 Safety information 19 ...

Page 26: ...20 T14 Gen 2 and P14s Gen 2 Hardware Maintenance Manual ...

Page 27: ...d in this manual After a system board is replaced ensure that the latest UEFI BIOS is loaded to the system board before you complete the service action To download and install software fixes drivers and UEFI BIOS go to https support lenovo com and follow the instructions on the screen Use the following strategy to prevent unnecessary expense for replacing and servicing FRUs If you are instructed t...

Page 28: ... listed in the Symptom to FRU Index section Strategy for replacing FRUs for CTO special bid and standard models This topic provides information about the model types and FRU identification Product definition This topic introduces different model types and how to identify each type Dynamic Configure To Order CTO model This model provides the ability for a customer to configure a Lenovo solution fro...

Page 29: ...duct do the following 1 Go to https support lenovo com partslookup 2 Type the Machine Type in the corresponding field to get a general FRU list or type the Serial Number for more detailed FRU information Chapter 2 Important service information 23 ...

Page 30: ...24 T14 Gen 2 and P14s Gen 2 Hardware Maintenance Manual ...

Page 31: ...pect that a FRU is defective clear the error log and run the test again If the error does not recur do not replace the FRU Be careful not to replace a nondefective FRU What to do first When you return a FRU you must include the following information in the parts exchange form or parts return form that you attach to it 1 Name and phone number of service technician 2 Date of service 3 Date on which ...

Page 32: ...ify the failing symptoms in as much detail as possible 2 Verify the symptoms Try to re create the failure by running the diagnostic test or by repeating the operation Diagnosing problems Many computer problems can be solved without outside assistance If you experience a problem with your computer the first place to start is the troubleshooting information in your computer documentation If you susp...

Page 33: ... and troubleshooting hints 2 When the ThinkPad logo is displayed repeatedly press and release the F10 key The main screen of the UEFI diagnostic program is displayed 3 Follow the instructions on the screen to use the program The following table displays the main items of the UEFI diagnostic program Depending on the model the items might differ slightly Table 1 Items on the main screen of the UEFI ...

Page 34: ... disc into the optical drive 3 Restart the computer 4 When the ThinkPad logo is displayed repeatedly press and release the F12 key When the Boot Menu window opens release the F12 key 5 Use the arrow keys to select ATAPI CDx x 0 1 and then press Enter The diagnostic program launches 6 Follow the instructions on the screen to use the diagnostic program Power system checkout To verify if a battery or...

Page 35: ...systems is installed the system will not charge Attention Lenovo has no responsibility for the performance or safety of unauthorized batteries and provides no warranties for failures or damage arising out of their use Move your pointer to the battery status icon in the Windows notification area to check the battery status The battery status icon displays the percentage of battery power remaining a...

Page 36: ...the voltage is correct replace the system board If the voltage is not correct replace the coin cell battery If the coin cell battery discharges quickly after replacement replace the system board 30 T14 Gen 2 and P14s Gen 2 Hardware Maintenance Manual ...

Page 37: ...the power on password the NVMe password the supervisor password and the system management password If any of these passwords has been set a prompt for it will be displayed on the screen whenever the computer is turned on The computer does not start until the password is entered Note If only a supervisor password is set the password prompt will not be displayed when the operating system is started ...

Page 38: ...ram without the password The system administrator can use the supervisor password to access a computer even if the user of that computer has set a power on password The supervisor password overrides the power on password The system administrator can set the same supervisor password on many ThinkPad notebook computers to make administration easier Attention If the supervisor password has been forgo...

Page 39: ... Select Security 5 Select Password 6 Select Power On Password 7 Type the current supervisor password or the system management password in the Enter Current Password field Then leave the Enter New Password field blank and press Enter twice 8 In the Changes have been saved window press Enter 9 Press F10 to save changes and exit the ThinkPad Setup program How to remove the NVMe password If you forget...

Page 40: ... Enter 9 Press F10 to save changes and exit the ThinkPad Setup program The system management password has been removed Power management To reduce power consumption the computer has two power management modes sleep and hibernation Sleep mode When the computer enters sleep mode the following events occur The LCD is powered off The hard disk drive or solid state drive is powered off The microprocesso...

Page 41: ...ve is read and system status is restored from the hard disk drive or solid state drive Symptom to FRU index This section contains following information Numeric error codes on page 36 Error messages on page 37 Beep errors on page 37 No beep symptoms on page 39 LCD related symptoms on page 39 Intermittent problems on page 40 Undetermined problems on page 40 The symptom to FRU index in this section l...

Page 42: ...rity Security password retry count exceeded 1 Run the ThinkPad Setup program The retry count will be reset Then save the current settings by pressing F10 2 Replace the system board 0251 System CMOS checksum bad Default configuration used 1 Charge the coin cell battery for more than 8 hours by connecting the ac power adapter 2 Replace the coin cell battery and run the ThinkPad Setup program to rese...

Page 43: ... sequence Fan error two short beeps 1 Replace the fan 2 Apply thermal grease 3 Replace the system board Thermal sensing error Replace the system board The battery installed is not supported by this system and will not charge Please replace the battery with the correct Lenovo battery for this system Press the ESC key to continue Replace the battery This system does not support batteries that are no...

Page 44: ...rgency reset hole Wait for one minute Then reconnect all power resources and restart the computer For models without the emergency reset hole press and hold the power button for about seven seconds Then reconnect to all power resources and restart the computer 2 Replace the system board service provider only 0002 Internal bus error Replace the system board service provider only 0281 General embedd...

Page 45: ...word prompt appears An NVMe password is set Type the password and press Enter LCD related symptoms Important The TFT LCD for the notebook computer contains many thin film transistors TFTs The presence of a small number of dots that are missing discolored or always lighted is characteristic of TFT LCD technology but excessive pixel problems can cause viewing concerns If the LCD you are servicing ha...

Page 46: ...rmittent problems Intermittent system hang problems can be due to a variety of causes that have nothing to do with a hardware defect such as cosmic radiation ESD or software errors FRU replacement should be considered only when a problem recurs When analyzing an intermittent problem do the following 1 Run the diagnostic test for the system board in loop mode at least 10 times 2 If no error is dete...

Page 47: ... Determine whether the problem has been solved 6 If the problem does not recur reconnect the removed devices one at a time until you find the failing FRU 7 If the problem remains replace the following FRUs one at a time do not replace a nondefective FRU a System board b LCD assembly Chapter 4 Related service information 41 ...

Page 48: ...42 T14 Gen 2 and P14s Gen 2 Hardware Maintenance Manual ...

Page 49: ...on FnLock indicator off special function Enable disable speakers Decrease volume Increase volume Enable disable microphones Darken display Brighten display Manage external displays Enable disable wireless Open collapse notification center Answer incoming calls on Microsoft Teams Decline incoming calls on Microsoft Teams Open the Vantage app You can customize the function of this key on the Vantage...

Page 50: ...ed Special key Description Pause operation Scroll contents Send system request Enter sleep mode To wake up the computer press Fn or the power button Go to beginning Go to end 44 T14 Gen 2 and P14s Gen 2 Hardware Maintenance Manual ...

Page 51: ...4 Gen 2 and ThinkPad P14s Gen 2 might be shipped with different microprocessors namely Intel and Advanced Micro Devices AMD Hereby Intel models and AMD models are used to distinguish computer models with different microprocessors Front view Microphone Infrared IR camera Camera Webcam privacy shutter Touch screen Power button TrackPoint pointing stick Copyright Lenovo 2021 45 ...

Page 52: ... Side view Intel models USB C Thunderbolt 4 power connector USB C Thunderbolt 4 connector USB 3 2 connector Gen 1 HDMI connector Audio connector microSD card slot Smart card slot Always On USB 3 2 connector Gen 1 Ethernet connector Security lock slot for selected models 46 T14 Gen 2 and P14s Gen 2 Hardware Maintenance Manual ...

Page 53: ...nnector USB C 3 2 Gen 2 connector USB 3 2 connector Gen 1 HDMI connector Audio connector microSD card slot Smart card slot Always On USB 3 2 connector Gen 1 Ethernet connector Security lock slot for selected models Chapter 6 Locations 47 ...

Page 54: ...d tray for selected models Locating FRUs and CRUs This topic introduces the following service parts Major FRUs and CRUs on page 50 LCD FRUs on page 53 Miscellaneous parts on page 54 Connector and cable guide on page 55 48 T14 Gen 2 and P14s Gen 2 Hardware Maintenance Manual ...

Page 55: ...then follow the on screen instructions to find the manual for your product You might be required to return the defective CRU When return is required 1 return instructions a prepaid shipping label and a container will be included with the replacement CRU and 2 you might be charged for the replacement CRU if Lenovo does not receive the defective CRU within thirty 30 days of your receipt of the repla...

Page 56: ...uter might look different from the illustration above Table 7 Major FRUs and CRUs No FRU description Self service CRU Optional service CRU 1 LCD unit No No 2 Speaker assembly No Yes 3 Power button board with cable No No 50 T14 Gen 2 and P14s Gen 2 Hardware Maintenance Manual ...

Page 57: ... M 2 2280 solid state drive Yes No 18 M 2 2242 solid state drive Yes No 19 Wireless LAN card2 No No 20 Base cover assembly Yes No 21 Nano SIM card tray Yes No 22 Coin cell battery No Yes 23 Built in battery No No 24 System board No No 25 I O bracket No No 26 Memory module No Yes 27 Thermal fan assembly No No 28 NFC antenna No No 29 NFC module No No 30 NFC cable No No 31 Thermal pad for the wireles...

Page 58: ...4 No No c Power cord Yes No d ac power adapter Yes No for selected models 2 for AMD models only Note The Lenovo factory recovery USB key is used to restore the Microsoft Windows operating system It might not come with the computer and a user might order it from https pcsupport lenovo com lenovorecovery though additional shipping and handling fees might apply 52 T14 Gen 2 and P14s Gen 2 Hardware Ma...

Page 59: ...ption Self service CRU Optional service CRU 1 LCD bezel sheet and elastic adhesive tapes No No 2 LCD bezel No No 3 LCD panel No No 4 LCD hinges No No 5 Microphone board No No 6 Conventional camera mic combo board No No Chapter 6 Locations 53 ...

Page 60: ...RU descriptions Self service CRU Optional service CRU Screw kit Screw M2 x L2 black 4 Screw M2 2 x L2 2 2 3 black 2 Screw M2 x L2 5 black 7 Screw M2 x L3 silver 4 Screw M2 x L4 black 13 Screw M2 5 x L2 5 silver 4 Screw M2 5 x L4 black 4 Spec No No Mechanical miscellaneous kit Always On USB 3 2 connector Gen 1 board bracket Ethernet card bracket Fingerprint reader bracket M 2 2242 solid state drive...

Page 61: ...ID Table 10 System board connector and cable guide Item Connector location Internal cable required Cable connection 1 Camera Hall sensor LED connector internal Camera Hall sensor LED cable Connect one end of the cable to the camera mic combo board hall sensor and LED and the other end to this connector 2 Power button board connector internal Power button board cable The power button board comes wi...

Page 62: ...this slot 11 USB 3 2 connector Gen 1 external No Connect USB compatible devices to this connector 12 HDMI connector external No Connect a compatible digital audio device or video monitor to this connector 13 Audio connector external No Connect headphones or a headset with 3 5 mm 0 14 inch 4 pole plug to this connector 14 Coin cell battery connector internal Coin cell battery cable The coin cell ba...

Page 63: ...ble to the Always On USB 3 2 connector Gen 1 board and the other end to this connector 22 Thermal fan connector internal Thermal fan assembly cable The thermal fan assembly comes with a cable Connect the cable to this connector 23 24 Keyboard connectors internal Keyboard assembly cables The keyboard assembly comes with the cables Connect the cables to these connectors 25 Nano SIM card slot externa...

Page 64: ...nal No Insert the wireless WAN card into this slot 8 Thunderbolt 4 connector USB C external No Connect a USB C compatible device or a Thunderbolt 4 compatible device to this connector 9 Docking station connector external No Connect a supported docking station to your computer through this connector 10 M 2 solid state drive connector internal No Insert the M 2 solid state drive into this slot 11 US...

Page 65: ... the cable to the system board one end to connector 15 and the other end to this connector 21 Always On USB 3 2 connector Gen 1 board connector internal Always On USB 3 2 connector Gen 1 board cable Connect one end of the cable to the Always On USB 3 2 connector Gen 1 board and the other end to this connector 22 Thermal fan connector internal Thermal fan assembly cable The thermal fan assembly com...

Page 66: ...power button board comes with a cable Connect the cable to this connector 3 Ethernet card connector internal Ethernet card cable Connect one end of the Ethernet card cable to the Ethernet card and the other end to this connector 4 Speaker assembly connector internal Speaker assembly cable The speaker assembly comes with cable Connect the cable to this connector 5 Wireless LAN card slot internal No...

Page 67: ... connector 15 NFC connector internal NFC cable Connect one end of the cable to the NFC module and the other end to this connector 16 Built in battery connector internal Built in battery cable The built in battery comes with a cable Connect the cable to this connector 17 Trackpad connector internal Trackpad cable Connect one end of the cable to the trackpad and the other end to this connector 18 Fi...

Page 68: ...cables Connect the cables to these connectors 25 Nano SIM card slot external No Install a nano SIM card into the nano SIM card tray Then insert the tray with the card into this slot for selected models Looking up FRU information For detailed FRU information including part numbers descriptions and substitution part numbers go to https support lenovo com partslookup 62 T14 Gen 2 and P14s Gen 2 Hardw...

Page 69: ... required to return the defective CRU When return is required 1 return instructions a prepaid shipping label and a container will be included with the replacement CRU and 2 you might be charged for the replacement CRU if Lenovo does not receive the defective CRU within thirty 30 days of your receipt of the replacement CRU See your Lenovo Limited Warranty documentation for full details Service tool...

Page 70: ... recommended to use new screws for replacements If you have a torque screwdriver tighten all screws firmly to the torque specified in the screw information table for each step Ensure torque screwdrivers are calibrated correctly following country specifications Retaining serial numbers This topic provides instructions on the following Restoring the serial number of the system unit on page 64 Retain...

Page 71: ...ance key to the computer 2 When the logo is displayed press Esc The ThinkPad Config Information Update Utility interface is displayed 3 Type 1 under Enter the action desired then press Enter The ThinkPad Serial Number Update Utility for Asset ID screen is displayed 4 Type 1 under Enter the action desired then press Enter Then follow the instructions on the screen to restore the serial number of th...

Page 72: ...nter The Auto UUID generation utility interface is displayed 6 Type y under Change UUID OK Y N then press Enter A new UUID is created and written If a valid UUID already exists it is not overwritten 66 T14 Gen 2 and P14s Gen 2 Hardware Maintenance Manual ...

Page 73: ...ve the following general guidelines 1 Do not try to service any computer unless you have been trained and certified An untrained person runs the risk of damaging parts 2 Before replacing any FRU review Chapter 7 FRU replacement notices on page 63 3 Begin by removing any FRUs that have to be removed before replacing the failing FRU Any such FRUs are listed at the beginning of each FRU replacement p...

Page 74: ...layed immediately press F1 to enter ThinkPad Setup 2 Select Config Power The Power submenu is displayed 3 Select Disable built in battery and press Enter 4 Select Yes in the Setup Confirmation window The built in battery is disabled and the computer turns off automatically Wait three to five minutes to let the computer cool Removing the nano SIM card and the nano SIM card tray Some models you are ...

Page 75: ...a b c d Chapter 8 Removing or replacing a FRU 69 ...

Page 76: ... Configure the keyboard language in UEFI BIOS 1 Enter the UEFI BIOS menu 2 Click Config Keyboard Mouse Keyboard Layout and then select the keyboard language 1020 Base cover assembly For access remove this FRU 70 T14 Gen 2 and P14s Gen 2 Hardware Maintenance Manual ...

Page 77: ...ivery the labels might be slightly different from the ones in the following illustration The new base cover assembly FRU is shipped with a kit containing labels of several kinds Apply those labels when you replace the base cover assembly For the labels that are not shipped with the new base cover assembly peel them from the old base cover assembly and adhere them to the new one Chapter 8 Removing ...

Page 78: ...e drive observe the following guidelines Replace the M 2 solid state drive only for upgrade or repair The M 2 solid state drive is not designed for frequent changes or replacement Before replacing the M 2 solid state drive make a backup copy of all the data that you want to keep Do not apply pressure to the M 2 solid state drive Do not touch the contact edge or circuit board of the M 2 solid state...

Page 79: ... the M 2 2242 solid state drive and its bracket Step Screw quantity Color Torque 1 M2 2 5 mm big head nylon coated 1 Black 0 18 0 015 Nm 1 85 0 15 kgf cm 1040 Memory module for selected models For access remove these FRUs in order Removing the nano SIM card and the nano SIM card tray on page 68 1020 Base cover assembly on page 70 Chapter 8 Removing or replacing a FRU 73 ...

Page 80: ...ule firmly and pivot it downwards until it snaps into place Ensure that the memory module is firmly installed in the slot and does not move easily 1050 Speaker assembly For access remove these FRUs in order Removing the nano SIM card and the nano SIM card tray on page 68 1020 Base cover assembly on page 70 74 T14 Gen 2 and P14s Gen 2 Hardware Maintenance Manual ...

Page 81: ...k 0 18 0 015 Nm 1 85 0 15 kgf cm When installing Ensure that the connector is attached firmly 1060 Wireless WAN card for selected models For access remove these FRUs in order Removing the nano SIM card and the nano SIM card tray on page 68 1020 Base cover assembly on page 70 Chapter 8 Removing or replacing a FRU 75 ...

Page 82: ...nector labeled Blue For WWAN card with four antenna cables ensure that you connect the orange cable to the connector labeled Orange on the card the blue cable to the connector labeled Blue the white and grey cable to the M1 connector and the black and grey cable to the M2 connector 1070 Wireless LAN card for AMD models For access remove these FRUs in order Removing the nano SIM card and the nano S...

Page 83: ...tor and the black cable into the auxiliary connector 1080 Coin cell battery For access remove these FRUs in order Removing the nano SIM card and the nano SIM card tray on page 68 1020 Base cover assembly on page 70 Removal steps of the coin cell battery DANGER Use only the authorized battery specified for your computer Any other battery could ignite or explode Chapter 8 Removing or replacing a FRU...

Page 84: ...efective A built in battery FRU should not be replaced unless this diagnostic test shows that the battery is defective The only exception to this is if the built in battery is physically damaged or a customer is reporting a possible safety issue If the Vantage app is not installed on the computer the customer should download and install the program to diagnose the built in battery before getting a...

Page 85: ... firmly Ensure that the base cover assembly is attached firmly otherwise battery connection may fail 1100 Thermal fan assembly For access remove these FRUs in order Removing the nano SIM card and the nano SIM card tray on page 68 1020 Base cover assembly on page 70 Removal steps of the thermal fan assembly for Intel models 2e Chapter 8 Removing or replacing a FRU 79 ...

Page 86: ...l grease at an amount of 0 2 grams on the parts marked a and b as shown in the following illustrations Either too much or too less application of grease can cause a thermal problem due to imperfect contact with a component For models with discrete thermal pipes For models with an integrated thermal pipe for T14 Gen 2 only 80 T14 Gen 2 and P14s Gen 2 Hardware Maintenance Manual ...

Page 87: ...t of 0 2 grams on the parts marked a as shown in the following illustrations Either too much or too less application of grease can cause a thermal problem due to imperfect contact with a component 1110 Ethernet card cable bracket and board For access remove these FRUs in order Removing the nano SIM card and the nano SIM card tray on page 68 1020 Base cover assembly on page 70 1100 Thermal fan asse...

Page 88: ...teps of the Ethernet card cable bracket and board Step Screw quantity Color Torque 3 M2 4 mm flat head nylon coated 3 Black 0 18 0 015 Nm 1 85 0 15 kgf cm 82 T14 Gen 2 and P14s Gen 2 Hardware Maintenance Manual ...

Page 89: ...racket and board For access remove these FRUs in order Removing the nano SIM card and the nano SIM card tray on page 68 1020 Base cover assembly on page 70 1090 Built in battery on page 78 Removal steps of the Always On USB 3 2 connector Gen 1 cable bracket and board Chapter 8 Removing or replacing a FRU 83 ...

Page 90: ...y 1130 Fingerprint reader cable bracket and board For access remove these FRUs in order Removing the nano SIM card and the nano SIM card tray on page 68 1020 Base cover assembly on page 70 1090 Built in battery on page 78 Removal steps of the fingerprint reader cable bracket and board for models without RFID 84 T14 Gen 2 and P14s Gen 2 Hardware Maintenance Manual ...

Page 91: ...big head nylon coated 1 Black 0 18 0 015 Nm 1 85 0 15 kgf cm When installing Ensure that the connector is attached firmly Removal steps of the fingerprint reader cable bracket and board for models with RFID Chapter 8 Removing or replacing a FRU 85 ...

Page 92: ...re that the connector is attached firmly 1140 Smart card reader module and cable for selected models For access remove these FRUs in order Removing the nano SIM card and the nano SIM card tray on page 68 1020 Base cover assembly on page 70 1090 Built in battery on page 78 86 T14 Gen 2 and P14s Gen 2 Hardware Maintenance Manual ...

Page 93: ... reader module and cable Step Screw quantity Color Torque 7 M2 2 5 mm big head nylon coated 2 Black 0 18 0 015 Nm 1 85 0 15 kgf cm When installing Ensure that the connector is attached firmly Chapter 8 Removing or replacing a FRU 87 ...

Page 94: ...020 Base cover assembly on page 70 1090 Built in battery on page 78 Removal steps of the trackpad and cable Step Screw quantity Color Torque 4 M2 2 mm flat head nylon coated 4 Black 0 18 0 015 Nm 1 85 0 15 kgf cm When installing Ensure that the connector is attached firmly 88 T14 Gen 2 and P14s Gen 2 Hardware Maintenance Manual ...

Page 95: ...er Removing the nano SIM card and the nano SIM card tray on page 68 1020 Base cover assembly on page 70 1090 Built in battery on page 78 Removal steps of the NFC module cable and antenna When installing Ensure that the connectors are attached firmly Chapter 8 Removing or replacing a FRU 89 ...

Page 96: ...ery on page 78 1130 Fingerprint reader cable bracket and board on page 84 Removal steps of the RFID reader cable and reader When installing Ensure that the connector is attached firmly 1180 Power button board and cable For access remove these FRUs in order Removing the nano SIM card and the nano SIM card tray on page 68 1020 Base cover assembly on page 70 90 T14 Gen 2 and P14s Gen 2 Hardware Maint...

Page 97: ...Removal steps of the power button board and cable Step Screw quantity Color Torque 5 M2 3 mm flat head nylon coated 1 Silver 0 18 0 015 Nm 1 85 0 15 kgf cm Chapter 8 Removing or replacing a FRU 91 ...

Page 98: ...only on a padded surface such as an ESD mat or a corrugated conductive surface For access remove these FRUs in order Removing the nano SIM card and the nano SIM card tray on page 68 1010 Keyboard on page 68 1020 Base cover assembly on page 70 1030 M 2 solid state drive on page 72 1040 Memory module for selected models on page 73 1060 Wireless WAN card for selected models on page 75 1070 Wireless L...

Page 99: ...d with ThinkPad T14 Gen 2 for Intel models 20W0 and 20W1 ThinkPad T15 Gen 2 or ThinkPad P15s Gen 2 ThinkPad P14s Gen 2 for Intel models 20VX and 20VY ThinkPad T15 Gen 2 or ThinkPad P15s Gen 2 Chapter 8 Removing or replacing a FRU 93 ...

Page 100: ...8 0 015 Nm 1 85 0 15 kgf cm 9 M2 2 5 mm big head nylon coated 1 Black 0 18 0 015 Nm 1 85 0 15 kgf cm Step Screw quantity Color Torque 11 M2 3 mm flat head nylon coated 3 Silver 0 18 0 015 Nm 1 85 0 15 kgf cm When installing 94 T14 Gen 2 and P14s Gen 2 Hardware Maintenance Manual ...

Page 101: ...h handling For models with a discrete graphics card a Graphics Processing Unit GPU b Central Processing Unit CPU For models with an integrated graphics card a Central Processing Unit CPU Removal steps of the system board for AMD models Note If you want to install a system board with the Linux operating system you need to configure Sleep State in UEFI BIOS to ensure that the system works correctly ...

Page 102: ...96 T14 Gen 2 and P14s Gen 2 Hardware Maintenance Manual ...

Page 103: ...e attached firmly Configure the keyboard language in UEFI BIOS 1 Enter the UEFI BIOS menu 2 Click Config Keyboard Mouse Keyboard Layout and then select the keyboard language 1200 MIMO wireless WAN antenna assembly for selected Intel models For access remove these FRUs in order Removing the nano SIM card and the nano SIM card tray on page 68 1010 Keyboard on page 68 1020 Base cover assembly on page...

Page 104: ...oval steps of the MIMO wireless WAN antenna assembly Antenna locations a 4x4 MIMO Wireless WAN antenna auxiliary b 4x4 MIMO Wireless WAN antenna main 1210 LCD unit For access remove these FRUs in order Removing the nano SIM card and the nano SIM card tray on page 68 1020 Base cover assembly on page 70 98 T14 Gen 2 and P14s Gen 2 Hardware Maintenance Manual ...

Page 105: ...Removal steps of the LCD unit for Intel models Chapter 8 Removing or replacing a FRU 99 ...

Page 106: ...Step Screw quantity Color Torque 6 M2 5 4 mm flat head nylon coated 4 Black 0 29 0 03 Nm 3 0 0 3 kgf cm 100 T14 Gen 2 and P14s Gen 2 Hardware Maintenance Manual ...

Page 107: ... installing Ensure that all the connectors are attached firmly and all the cables are inserted back into place properly Removal steps of the LCD unit for AMD models Chapter 8 Removing or replacing a FRU 101 ...

Page 108: ...Step Screw quantity Color Torque 5 M2 5 4 mm flat head nylon coated 4 Black 0 29 0 03 Nm 3 0 0 3 kgf cm 102 T14 Gen 2 and P14s Gen 2 Hardware Maintenance Manual ...

Page 109: ...in battery on page 78 1100 Thermal fan assembly on page 79 1110 Ethernet card cable bracket and board on page 81 1120 Always On USB 3 2 connector Gen 1 cable bracket and board on page 83 1130 Fingerprint reader cable bracket and board on page 84 1140 Smart card reader module and cable for selected models on page 86 1150 Trackpad and cable on page 88 1160 NFC module cable and antenna for selected m...

Page 110: ...r replacement 2020 LCD panel and LCD elastic adhesive tapes For access remove these FRUs in order 1210 LCD unit on page 98 2010 LCD bezel sheet and LCD bezel on page 103 LCD elastic adhesive tapes location LCD cover assembly material Panel type LCD elastic adhesive tapes location Aluminum FHD panel Touch panel 104 T14 Gen 2 and P14s Gen 2 Hardware Maintenance Manual ...

Page 111: ...l UHD panel Removal and installation steps of the LCD panel and the LCD elastic adhesive tapes for computer models with the aluminum LCD cover assembly and FHD panel Touch panel Removal steps of the LCD panel and the LCD elastic adhesive tapes Chapter 8 Removing or replacing a FRU 105 ...

Page 112: ... shown until three elastic adhesive tapes are all released from LCD unit 1 Note Do not pull the tapes too fast otherwise the tapes might snap 1a 1b 2 Lift up the LCD panel 3 Turn over the LCD panel 3 and detach the LCD cable from the LCD panel as shown 106 T14 Gen 2 and P14s Gen 2 Hardware Maintenance Manual ...

Page 113: ...tic adhesive tapes 1 Peel off the release liners from one side of the new elastic adhesive tapes Apply the tapes to the correct locations Peel off the release liners from the other side of the tapes Ensure that the three tapes are applied correctly as shown 2 Attach the LCD cable to the LCD panel as shown Turn over the LCD panel to secure the LCD panel with tapes Chapter 8 Removing or replacing a ...

Page 114: ... on a sticker fixed to the front of the new LCD part When the new color profiles are installed successfully a prompted window will be displayed Removal and installation steps of the LCD panel and the LCD elastic adhesive tapes for computer models with the aluminum LCD cover assembly and E privacy touch panel Removal steps of the LCD panel and the LCD elastic adhesive tapes 1 Grasp the end of elast...

Page 115: ...1a 1b 2 Lift up the LCD panel 3 Turn over the LCD panel 3 and detach the LCD cable from the LCD panel as shown Chapter 8 Removing or replacing a FRU 109 ...

Page 116: ...he tapes to the correct locations Peel off the release liners from the other side of the tapes Ensure that the three tapes are applied correctly as shown 2 Attach the LCD cable to the LCD panel as shown Turn over the LCD panel to secure the LCD panel with tapes Note For LCD panel with the factory color calibration feature do the following to install new color profiles 1 Connect your computer to th...

Page 117: ...nd installation steps of the LCD panel and the LCD elastic adhesive tapes for computer models with the PPS LCD cover assembly and FHD panel Touch panel Low power panel Removal steps of the LCD panel and the LCD elastic adhesive tapes 1 Grasp the end of three elastic adhesive tapes with tweezers Pull out each tape slowly in the direction as shown until five elastic adhesive tapes are all released f...

Page 118: ...sive tapes 1 Peel off the release liners from one side of the new elastic adhesive tapes Apply the tapes to the correct locations Peel off the release liners from the other side of the tapes Ensure that the three tapes are applied correctly as shown 2 Attach the LCD cable to the LCD panel as shown Turn over the LCD panel to secure the LCD panel with tapes 112 T14 Gen 2 and P14s Gen 2 Hardware Main...

Page 119: ... on a sticker fixed to the front of the new LCD part When the new color profiles are installed successfully a prompted window will be displayed Removal and installation steps of the LCD panel and the LCD elastic adhesive tapes for computer models with the PPS LCD cover assembly and E privacy touch panel UHD panel Removal steps of the LCD panel and the LCD elastic adhesive tapes 1 Grasp the end of ...

Page 120: ...1a 1b 2 Lift up the LCD panel 3 Turn over the LCD panel 5 and detach the LCD cable from the LCD panel as shown 114 T14 Gen 2 and P14s Gen 2 Hardware Maintenance Manual ...

Page 121: ...tic adhesive tapes 1 Peel off the release liners from one side of the new elastic adhesive tapes Apply the tapes to the correct locations Peel off the release liners from the other side of the tapes Ensure that the five tapes are applied correctly as shown 2 Attach the LCD cable to the LCD panel as shown Turn over the LCD panel to secure the LCD panel with tapes Chapter 8 Removing or replacing a F...

Page 122: ...ons to input the display serial number and click Submit You can find the display serial number and instructions on a sticker fixed to the front of the new LCD part When the new color profiles are installed successfully a prompted window will be displayed 2030 Camera microphone module For access remove these FRUs in order 1210 LCD unit on page 98 2010 LCD bezel sheet and LCD bezel on page 103 2020 ...

Page 123: ...s of the conventional camera microphone module When installing Ensure that the connector is attached firmly 2040 LCD hinges For access remove these FRUs in order 1210 LCD unit on page 98 2010 LCD bezel sheet and LCD bezel on page 103 Chapter 8 Removing or replacing a FRU 117 ...

Page 124: ... 29 0 03 Nm 3 0 0 3 kgf cm 2050 Camera Hall sensor LED cable For access remove these FRUs in order 1210 LCD unit on page 98 2010 LCD bezel sheet and LCD bezel on page 103 2020 LCD panel and LCD elastic adhesive tapes on page 104 2040 LCD hinges on page 117 118 T14 Gen 2 and P14s Gen 2 Hardware Maintenance Manual ...

Page 125: ...nector is attached firmly Removal steps of the conventional camera Hall sensor LED cable When installing Ensure that the connector is attached firmly Removal steps of the Hall sensor LED cable When installing Ensure that the connector is attached firmly Chapter 8 Removing or replacing a FRU 119 ...

Page 126: ...ng Ensure that the connector is attached firmly 2070 Wireless antenna assembly For access remove these FRUs in order 1210 LCD unit on page 98 2010 LCD bezel sheet and LCD bezel on page 103 2020 LCD panel and LCD elastic adhesive tapes on page 104 2040 LCD hinges on page 117 Removal steps of the wireless LAN antenna assembly Release the antenna cables from the cable guides on the LCD cover assembly...

Page 127: ...e damaged by the cable guides or a wire to be broken Removal steps of the wireless LAN WAN antenna assembly Attention When you route the cables ensure that they are not subject to any tension Tension could cause the cables to be damaged by the cable guides or a wire to be broken Chapter 8 Removing or replacing a FRU 121 ...

Page 128: ...emove these FRUs in order 1210 LCD unit on page 98 2010 LCD bezel sheet and LCD bezel on page 103 2020 LCD panel and LCD elastic adhesive tapes on page 104 2030 Camera microphone module on page 116 2040 LCD hinges on page 117 2050 Camera Hall sensor LED cable on page 118 2060 LCD cable on page 120 2070 Wireless antenna assembly on page 120 122 T14 Gen 2 and P14s Gen 2 Hardware Maintenance Manual ...

Page 129: ...blication Lenovo may make improvements and or changes in the product s and or the program s described in this publication at any time without notice The products described in this document are not intended for use in implantation or other life support applications where malfunction may result in injury or death to persons The information contained in this document does not affect or change Lenovo ...

Page 130: ...orporation or its subsidiaries in the U S and or other countries The terms HDMI and HDMI High Definition Multimedia Interface are trademarks or registered trademarks of HDMI Licensing LLC in the United States and other countries USB C is a trademark of USB Implementers Forum All other trademarks are the property of their respective owners 2021 Lenovo 124 T14 Gen 2 and P14s Gen 2 Hardware Maintenan...

Page 131: ...Announcements EEPROM Electrically Erasable Programmable Read Only Memory EFI Extensible Firmware Interface EPO emergency power off ESD electrostatic discharge EU European Union FCC Federal Communications Commission FRU Field Replaceable Unit GAV General Announce Variant GPU graphics processing unit HDD hard disk drive HDMI high definition multimedia interface ICs integrated circuits ICCID integrat...

Page 132: ...istered jack SATA Serial Advanced Technology Attachment SIM subscriber identity module SVP supervisor password TFTs thin film transistors UEFI Unified Extensible Firmware Interface USB Universal Serial Bus UUID universally unique identifier VGA video graphics array VRAM video random access memory WAN wide area network 126 T14 Gen 2 and P14s Gen 2 Hardware Maintenance Manual ...

Page 133: ......

Page 134: ...Part Number SP40W87698_01 Printed in China 1P P N SP40W87698_01 ...

Page 135: ... 1PSP40W87698_01 ...

Reviews: