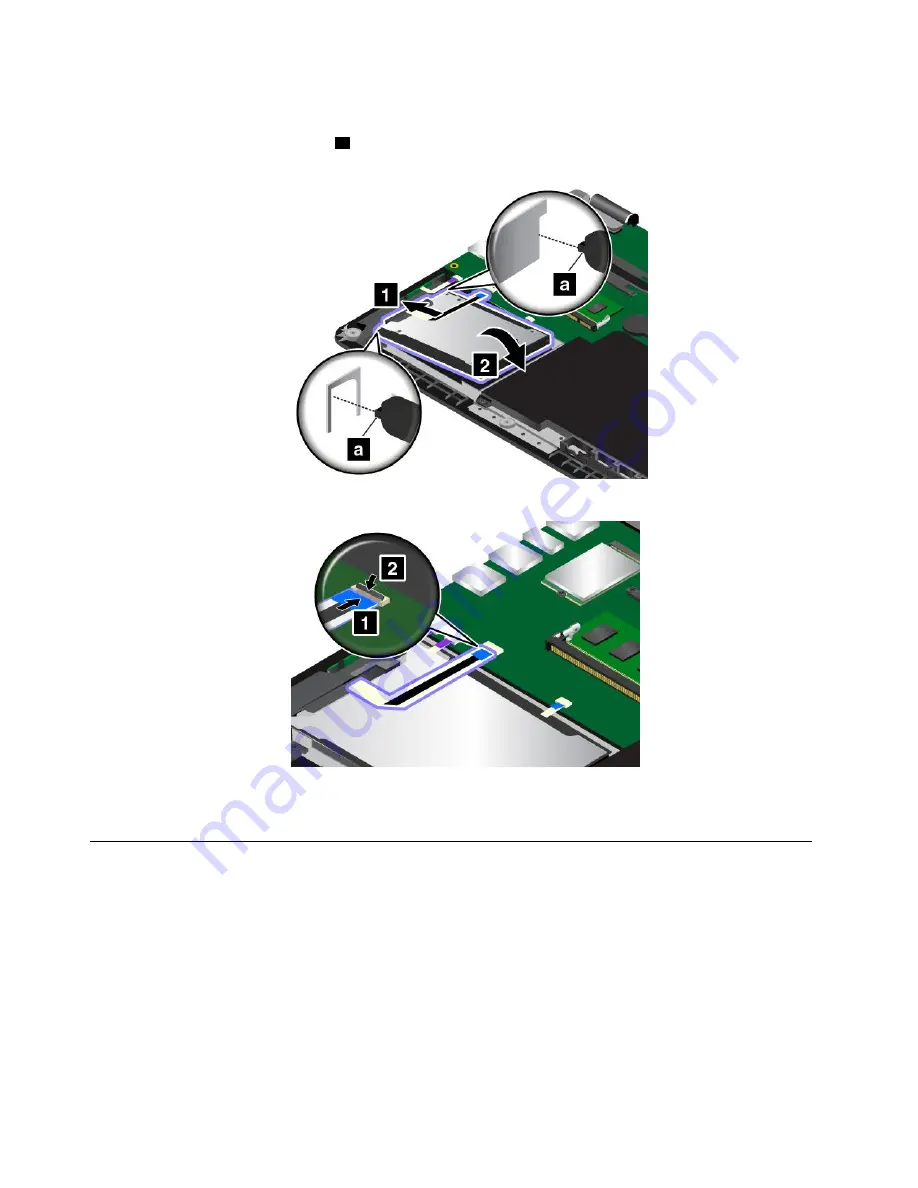
8. Place the new drive into the drive bay.
Note:
Ensure that the tiny tabs
a
on the storage drive bracket are correctly secured by the
corresponding hooks of the storage-drive retaining frame.
9. Attach the connector.
10. Reinstall the base cover assembly.
11. Turn the computer over again. Connect the ac power adapter and all cables to the computer.
Replacing the button I/O card
Before you start, print these instructions. Read the important safety information first. See “Important
safety information” on page vi.
To replace the button I/O card, do the following:
Attention:
Sensitive components are mounted on the button I/O card. Avoid any kind of rough handling
during the replacement.
1. Disable the built-in battery. See “Disabling the built-in battery” on page 107.
2. Close the computer display, and turn the computer over.
3. Remove the base cover assembly. See “Replacing the base cover assembly” on page 113.
120
ThinkPad S3, ThinkPad Yoga 14, and ThinkPad Yoga 460 User Guide
Summary of Contents for ThinkPad Hard Disk Drive
Page 1: ...ThinkPad S3 ThinkPad Yoga 14 and ThinkPad Yoga 460 User Guide ...
Page 6: ...iv ThinkPad S3 ThinkPad Yoga 14 and ThinkPad Yoga 460 User Guide ...
Page 16: ...xiv ThinkPad S3 ThinkPad Yoga 14 and ThinkPad Yoga 460 User Guide ...
Page 60: ...44 ThinkPad S3 ThinkPad Yoga 14 and ThinkPad Yoga 460 User Guide ...
Page 68: ...52 ThinkPad S3 ThinkPad Yoga 14 and ThinkPad Yoga 460 User Guide ...
Page 80: ...64 ThinkPad S3 ThinkPad Yoga 14 and ThinkPad Yoga 460 User Guide ...
Page 104: ...88 ThinkPad S3 ThinkPad Yoga 14 and ThinkPad Yoga 460 User Guide ...
Page 120: ...104 ThinkPad S3 ThinkPad Yoga 14 and ThinkPad Yoga 460 User Guide ...
Page 150: ...134 ThinkPad S3 ThinkPad Yoga 14 and ThinkPad Yoga 460 User Guide ...
Page 160: ...144 ThinkPad S3 ThinkPad Yoga 14 and ThinkPad Yoga 460 User Guide ...
Page 164: ...148 ThinkPad S3 ThinkPad Yoga 14 and ThinkPad Yoga 460 User Guide ...
Page 169: ......
Page 170: ......


