Lenovo ThinkPad A485 User Manual Download Page 60

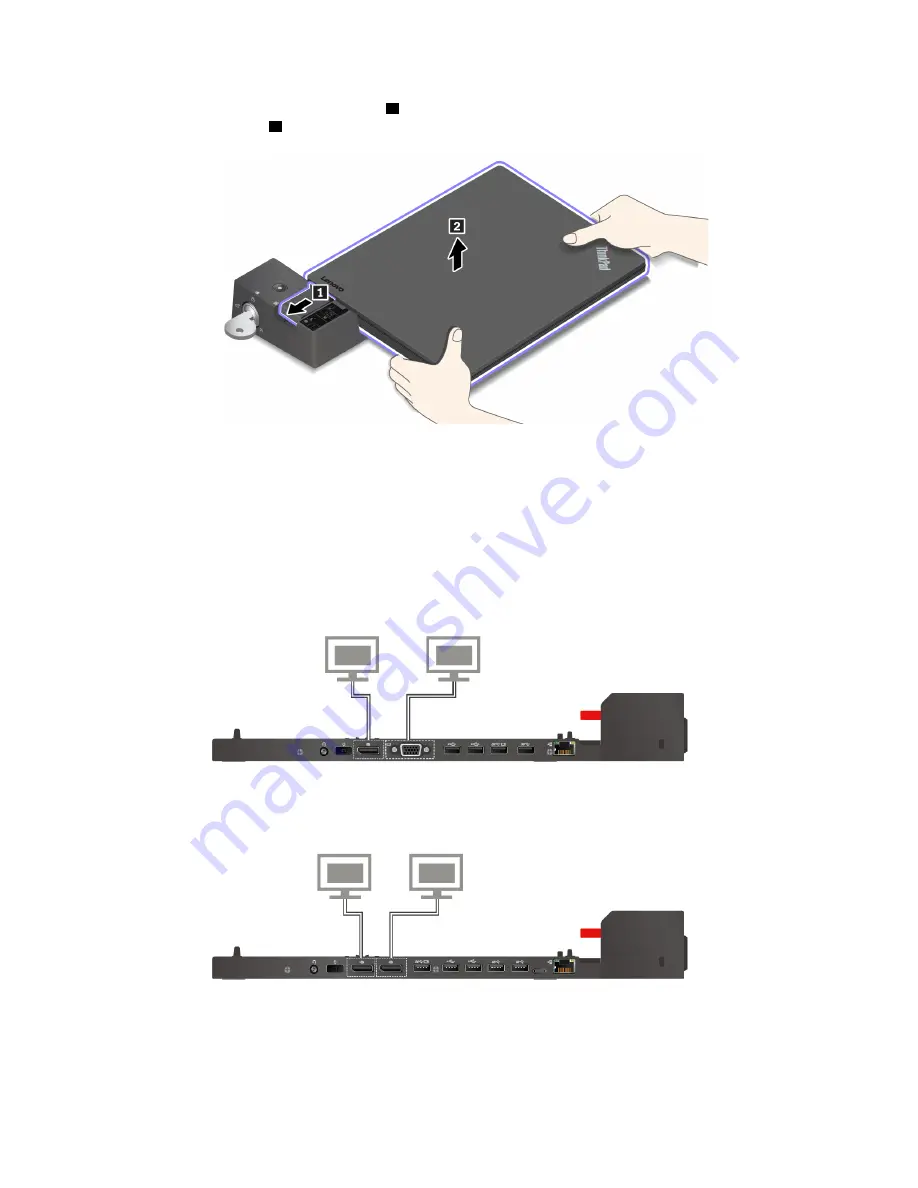
2.  Slide the latch in the direction as shown 

to release the computer, and then grasp both sides of the 

computer to remove it 

2

Guidelines on connecting multiple external displays

You can connect multiple external displays to a supported ThinkPad docking station. To ensure that the 
multiple displays work correctly, observe the following guidelines and connect the external displays to the 
appropriate connectors.

ThinkPad Basic Docking Station

Up to two external displays connected to the DisplayPort and the VGA connectors can work at the same 
time.  

ThinkPad Pro Docking Station

Up to two external displays connected to the two DisplayPort connectors can work at the same time.  

ThinkPad Ultra Docking Station

Up to three external displays connected to the docking station can work at the same time.

42

A485 User Guide

Summary of Contents for ThinkPad A485

Page 1: ...A485 User Guide ...

Page 2: ...t improvement on the documentation of your computer including this User Guide To get all the latest documents go to https support lenovo com Third Edition June 2018 Copyright Lenovo 2018 LIMITED AND RESTRICTED RIGHTS NOTICE If data or software is delivered pursuant to a General Services Administration GSA contract use reproduction or disclosure is subject to restrictions set forth in Contract No G...

Page 3: ... Using the multi touch screen 16 Using the special keys 18 Using the ThinkPad pointing device 20 ThinkPad pointing device overview 20 Using the TrackPoint pointing device 21 Using the trackpad 22 Using the trackpad touch gestures 23 Customizing the ThinkPad pointing device 23 Replacing the cap on the pointing stick 24 Power management 24 Using the ac power adapter 24 Using the battery 25 Managing ...

Page 4: ...ng your computer 91 Using advanced startup options 91 Recovering your operating system if Windows 10 fails to start 91 Creating and using a recovery USB drive 92 Chapter 9 Replacing devices 93 Customer Replaceable Units 93 Static electricity prevention 94 Disabling the built in battery 94 Replacing the removable battery 94 Replacing the nano SIM card 96 Replacing the base cover assembly 97 Replaci...

Page 5: ...es and regions 135 General recycling information 135 Important WEEE information 135 Japan recycling statements 136 Recycling information for Brazil 137 Battery recycling information for the European Union 137 Battery recycling information for Taiwan 138 Battery recycling information for the United States and Canada 138 Recycling information for China 138 Appendix D Restriction of Hazardous Substan...

Page 6: ...iv A485 User Guide ...

Page 7: ...his information includes references to power adapters and batteries In addition to notebook computers some products such as speakers and monitors ship with external power adapters If you have such a product this information applies to your product In addition computer products contain a coin sized internal battery that provides power to the system clock even when the computer is unplugged so the b...

Page 8: ...omputer Protect the cables from being damaged Applying strong force to cables may damage or break them Route communication lines or the cables of an ac power adapter a mouse a keyboard a printer or any other electronic device so that they cannot be walked on tripped over pinched by your computer or other objects or in any way subject to treatment that could interfere with the operation of your com...

Page 9: ...from your product Or you might hear sounds like popping cracking or hissing These conditions might merely mean that an internal electronic component has failed in a safe and controlled manner Or they might indicate a potential safety issue However do not take risks or attempt to diagnose the situation yourself Contact the Customer Support Center for further guidance For a list of Service and Suppo...

Page 10: ...ustomer Support Center or your documentation Only use a Service Provider who is approved to repair your particular product Note Some computer parts can be upgraded or replaced by the customer Upgrades typically are referred to as options Replacement parts approved for customer installation are referred to as Customer Replaceable Units or CRUs Lenovo provides documentation with instructions when it...

Page 11: ...tor terminals on a power adapter which can eventually result in overheating Ensure that all power cord connectors are securely and completely plugged into receptacles Do not use any power adapter that shows corrosion at the ac input pins or shows signs of overheating such as deformed plastic at the ac input pins or anywhere on the power adapter Do not use any power cords where the electrical conta...

Page 12: ...replace the outlet with one that enables this safety feature Never overload an electrical outlet The overall system load should not exceed 80 percent of the branch circuit rating Consult an electrician for more information if you have questions about power loads and branch circuit ratings Be sure that the power outlet you are using is properly wired easily accessible and located close to the equip...

Page 13: ...ttery Do not crush or puncture the battery Do not short circuit the battery or expose it to water or other liquids Keep the battery away from children Keep the battery away from fire Stop using the battery if it is damaged or if you notice any discharge or the buildup of foreign materials on the battery leads Store the rechargeable batteries or products containing the rechargeable batteries at roo...

Page 14: ...s according to local laws and regulations Notice for non rechargeable coin cell battery DANGER If the coin cell battery is incorrectly replaced there is danger of an explosion The battery contains a small amount of harmful substance Do not heat to more than 100 C 212 F The following statement applies to users in the state of California U S A California Perchlorate Information Products containing m...

Page 15: ...ate your computer or charge the battery near flammable materials or in explosive environments Ventilation slots fans and or heat sinks are provided with the product for safety comfort and reliable operation These features might inadvertently become blocked by placing the product on a bed sofa carpet or other flexible surface Never block cover or disable these features When the ac power adapter is ...

Page 16: ...r until all internal parts enclosures are fastened into place Never use the computer when internal parts and circuits are exposed DANGER Connect and disconnect cables as described in the following procedures when installing moving or opening covers on this product or attached devices To connect 1 Turn everything OFF 2 First attach all cables to devices 3 Attach signal cables to connectors 4 Attach...

Page 17: ...earphone connectors do not comply with specifications of EN 50332 2 The headphone output connector of your computer complies with EN 50332 2 Sub clause 7 This specification limits the computer s maximum wide band true RMS output voltage to 150 mV To help protect against hearing loss ensure that the headphones or earphones you use also comply with EN 50332 2 Clause 7 limits for a wide band characte...

Page 18: ...de of glass This glass could break if the product is dropped on a hard surface or receives a substantial impact If glass breaks do not touch or attempt to remove it Stop using your product until the glass is replaced by trained service personnel xvi A485 User Guide ...

Page 19: ...iew This chapter provides basic information to help you get familiar with your computer Computer controls connectors and indicators This section introduces hardware features of the computer Front view Copyright Lenovo 2018 1 ...

Page 20: ...he right or unveil slide to the left the camera lens For more information see Using the cameras on page 29 5 Power button Press the power button to turn on the computer or put the computer to sleep mode To turn off the computer open the Start menu and click Power and then click Shut down If your computer is unresponsive you can turn off the computer by pressing and holding the power button for fou...

Page 21: ...t the computer to ac power through either of the two USB C connectors Lenovo provides various USB C accessories to help you expand your computer functionality For more information go to https www lenovo com accessories Note When the battery power is below 10 the USB C accessories connected to the USB C connector might not work correctly 2 Docking station connector Connect your computer to a suppor...

Page 22: ...might get damaged 3 HDMI connector The High Definition Multimedia Interface HDMI connector is a digital audio and video interface It enables you to connect your computer to a compatible digital audio device or video monitor such as a high definition television HDTV Note The HDMI connector on your computer supports the HDMI 2 0 standard by default If you connect an external display to your computer...

Page 23: ...the one on the computer 6 Media card slot You can insert a flash media card into the media card slot for data access or storage For more information see Using a media card or a smart card on page 31 7 Mini security lock slot To protect your computer from theft lock your computer to a desk table or other fixtures through a security cable lock designed to fit the mini security lock slot on your comp...

Page 24: ...the keyboard the keyboard drainage holes can help drain out liquid from your computer 6 Speakers Your computer is equipped with a pair of stereo speakers 7 Emergency reset hole If the computer stops responding and you cannot turn it off by pressing the power button remove the ac power adapter Then insert a straightened paper clip into the emergency reset hole to reset the computer 8 Nano SIM card ...

Page 25: ...ndicator in the ThinkPad logo on the computer lid and the indicator in the power button show the system status of your computer Blinks for three times The computer is initially connected to power On The computer is on in normal mode Off The computer is off or in hibernation mode Chapter 1 Product overview 7 ...

Page 26: ...cator is on the speakers are muted 7 Microphone mute indicator When this indicator is on the microphones are muted 9 ac power status indicator This indicator shows the ac power and charging status of the computer White connected to ac power battery power 90 100 Amber connected to ac power battery power 0 90 Off not connected to ac power Important product information This section provides informati...

Page 27: ... FCC ID and IC certification number for the wireless module installed by Lenovo Note Do not remove or replace a factory preinstalled wireless module by yourself For replacement you must contact Lenovo service first Lenovo is not responsible for any damage caused by unauthorized replacement For a user installable wireless WAN module the actual FCC ID and IC certification number is affixed to the wi...

Page 28: ...omputer models preinstalled with any version of Windows 10 In other countries and regions the Genuine Microsoft label is required only on computer models licensed for Windows 10 Pro The absence of a Genuine Microsoft label does not indicate that the preinstalled Windows version is not genuine For details on how to tell whether your preinstalled Windows product is genuine refer to the information p...

Page 29: ...ching IPS or Twisted Nematic TN technology Display size 355 6 mm 14 inches Display resolution 1366 x 768 pixels or 1920 x 1080 pixels Multi touch technology Keyboard Six row keyboard backlight function available on some models Function keys ThinkPad pointing device including the TrackPoint pointing device and trackpad Connectors and slots Audio connector Always On USB 3 1 connector Gen 1 Docking s...

Page 30: ...ower adapter Sine wave input at 50 Hz to 60 Hz Input rating of the ac power adapter 100 V to 240 V ac 50 Hz to 60 Hz Operating environment Maximum altitude without pressurization 3048 m 10 000 ft Temperature At altitudes up to 2438 m 8000 ft Operating 5 C to 35 C 41 F to 95 F Storage 5 C to 43 C 41 F to 109 F At altitudes above 2438 m 8000 ft Maximum temperature when operating under the unpressuri...

Page 31: ... eat or smoke over your keyboard Particles that fall into your keyboard can cause damage Lenovo programs Your computer comes with Lenovo programs to help you work easily and securely Accessing Lenovo programs To access Lenovo programs on your computer do the following 1 Open the Start menu and locate a program by the program name 2 If you do not find the program in the program list search for the ...

Page 32: ...antage to do the following Manage updates get the latest drivers and keep the software on your computer up to date Protect yourself from malicious Wi Fi networks Optimize your computer performance monitor your computer health Access your user guide check warranty status and view accessories customized for your computer Read how to articles explore Lenovo forums and stay up to date on technology ne...

Page 33: ...ating system The Windows help information system provides you with detailed information about using the Windows operating system so that you can get the most of your computer To access the Windows help information system click the Start button to open the Start menu and then click Get Help Additionally you can use the Cortana personal assistant to search for help apps files settings and so on How ...

Page 34: ...ng slower What should I do Follow the General tips for preventing problems on page 73 Diagnose problems yourself by using the preinstalled diagnostic software See Diagnosing problems on page 73 Check for recovery solutions in Chapter 8 Recovery information on page 91 Print the following topics and keep them with your computer in case you are unable to access this electronic user guide when necessa...

Page 35: ...ts pages and photos Touch Drag an item to the location you want Mouse action Click hold and drag an item Function Move an object Touch Move two fingers closer together Mouse action Press the Ctrl key while scrolling the mouse wheel backward Function Zoom out Touch Move two fingers farther apart Mouse action Press the Ctrl key while scrolling the mouse wheel forward Function Zoom in Touch Swipe in ...

Page 36: ...s on using the multi touch screen The multi touch screen is a glass panel covered with a plastic film Do not apply pressure or place any metallic object on the screen which might damage the touch panel or cause it to malfunction Do not use fingernails gloved fingers or inanimate objects for input on the screen Regularly calibrate the accuracy of the finger input to avoid a discrepancy Tips on clea...

Page 37: ...s If you mute the sound and turn off your computer the sound will remain muted when you turn on your computer To turn on the sound press or Decrease the speaker volume Increase the speaker volume Mute or unmute the microphones Darken the computer display Brighten the computer display Manage external displays Enable or disable the built in wireless features Open the Settings window Enable or disabl...

Page 38: ...e between the high performance mode and the quiet mode of Lenovo smart cooling feature Fn Left arrow key This key combination has the same function as the Home key Fn Right arrow key This key combination has the same function as the End key Using the ThinkPad pointing device This section provides information about using the ThinkPad pointing device ThinkPad pointing device overview The ThinkPad po...

Page 39: ...index finger or middle finger to apply pressure to the pointing stick nonslip cap Use either thumb to press the left click button or right click button Point Use the pointing stick 1 to move the pointer on the screen To use the pointing stick apply pressure to the pointing stick nonslip cap in any direction parallel to the keyboard The pointer moves accordingly but the pointing stick itself does n...

Page 40: ...the left click action Right click Press the right click zone 2 to display a shortcut menu You also can tap anywhere on the surface of the trackpad with two fingers to perform the right click action Scroll Put two fingers on the trackpad and move them in the vertical or horizontal direction This action enables you to scroll through the document Web site or apps Ensure that you position your two fin...

Page 41: ... menu Two finger scroll Put two fingers on the trackpad and move them in the vertical or horizontal direction This action enables you to scroll through the document Web site or apps Two finger zoom out Put two fingers on the trackpad and move them closer together to zoom out Two finger zoom in Put two fingers on the trackpad and move them farther apart to zoom in Swipe three fingers up Put three f...

Page 42: ...use ac power the battery charges automatically Your computer comes with a USB C type ac power adapter and a power cord ac power adapter Converts ac power for notebook computer use Power cord Connects the ac outlet and the ac power adapter Connecting the ac power adapter To connect the computer to ac power ensure that you follow the steps in order Attention Using an improper power cord might severe...

Page 43: ... How often you access the storage drive How bright you make the computer display How often you use the wireless feature Charging the battery When you find that the remaining battery power is low charge your battery or replace the battery with a charged battery If an ac outlet is convenient connect the computer to ac power The battery is fully charged in about four to eight hours The actual chargin...

Page 44: ...open the Start menu click Power and then click Sleep Hibernation mode By using this mode you can turn off your computer completely without saving files or exiting any programs that are running When the computer enters hibernation mode all open programs folders and files are saved to the storage drive and then the computer turns off To put the computer to hibernation mode define what the power butt...

Page 45: ... to this type of network Your computer comes with a built in wireless network card to help you establish wireless connections and monitor the connection status To establish a wireless LAN connection do the following 1 Turn on the wireless feature See Using the special keys on page 18 2 Click the wireless network connection status icon in the Windows notification area A list of available wireless n...

Page 46: ...less WAN connection status through the wireless network connection status icon in the Windows notification area The more bars encompassed the better the signal is Using the Bluetooth connection Bluetooth can connect devices that are within a short distance from one another Bluetooth is commonly used in the following scenarios Connecting peripheral devices to a computer Transferring data between ha...

Page 47: ...ventional headphone Headphone function Note The conventional microphone is not supported Using the smart audio feature The smart audio feature is supported on some computer models To help protect against hearing loss the feature limits the computer s maximum wide band true RMS output voltage to 130 mV when a headset or headphone is connected To change the setting do the following 1 Go to Control P...

Page 48: ...ally the infrared light is invisible to the naked eyes 2 Infrared camera lens The infrared camera lens is used for creating the facial image of a user 4 Camera indicator When the camera indicator is on the infrared camera is in the recognition mode To set the infrared camera for face authentication do the following 1 Open the Start menu and click Settings Accounts Sign in options 2 Scroll down to ...

Page 49: ...Capacity SDHC card Supported smart card type You can use smart cards for authentication data storage and application processing Within large organizations you might also use smart cards for strong security authentication of single sign on SSO The smart card reader on your computer only supports the smart card of the following specifications Length 85 60 mm 3 37 inches Width 53 98 mm 2 13 inches Th...

Page 50: ... not remove a card when the computer is in sleep mode or hibernation mode Otherwise the system might not respond when you try to resume operation To remove a card do the following 1 Click the triangular icon in the Windows notification area to show hidden icons Then right click the Safely Remove Hardware and Eject Media icon 2 Select the corresponding item to eject the card from the Windows operat...

Page 51: ...re information see the Windows help information system Choosing a display mode You can display your desktop and apps on the computer display the external display or both To choose how to display the video output press the display mode switching key and then select a display mode you prefer There are four display modes PC screen only Displays the video output only on your computer screen Note Depen...

Page 52: ...o modes Note You will be prompted by the on screen display whenever the mode is changed Traveling with your computer This topic provides information to help you work with your computer when you are traveling Use the following travel tips to travel more confidently and efficiently with your computer When your computer goes through the x ray machines at airport security stations it is important to k...

Page 53: ...ide the Airplane mode control to turn it on Travel accessories If you are traveling to another country or region you might want to consider an appropriate ac power adapter for the country or region to which you are traveling To purchase travel accessories go to https www lenovo com accessories Chapter 2 Using your computer 35 ...

Page 54: ...36 A485 User Guide ...

Page 55: ...kPad Pro Docking Station and ThinkPad Ultra Docking Station This section introduces how to use the ThinkPad Basic Docking Station ThinkPad Pro Docking Station and ThinkPad Ultra Docking Station Locating controls connectors and indicators This section introduces the locations of controls connectors and indicators on the docking stations Note When your computer is attached to the docking station alw...

Page 56: ...ck indicator This indicator turns on when the system lock key is in the locked position 3 Docking status indicator This indicator turns on when your computer is successfully connected to the docking station 4 Power button Press the power button to turn on or turn off the computer attached to the docking station 5 Guide post Use the guide post to help you position your computer properly when you at...

Page 57: ...ng station from theft Use a security cable lock that fits this security lock slot 10 USB C connector Use this connector to transfer data or charge your external device 11 HDMI connector Connect a compatible digital audio device or video monitor such as an HDTV 13 USB 3 1 connector Gen 2 With greater data transfer rate the USB 3 1 connector Gen 2 is used to connect USB compatible devices such as a ...

Page 58: ...the docking station as shown 1 until you hear a click Slide the latch in the direction as shown 2 5 Check the docking status indicator The docking status indicator turns on when the computer is successfully docked Note If the indicator is off your computer is not attached to the docking station successfully To solve the problem detach and reattach the computer 40 A485 User Guide ...

Page 59: ...rop down Detaching your computer from a docking station To detach your computer from a docking station do the following Note The ThinkPad Basic Docking Station does not ship with a system lock installed If you do not purchase and install a system lock skip step 1 in the following instruction to detach your computer from the ThinkPad Basic Docking Station 1 Turn the system lock key to the unlocked ...

Page 60: ...rrectly observe the following guidelines and connect the external displays to the appropriate connectors ThinkPad Basic Docking Station Up to two external displays connected to the DisplayPort and the VGA connectors can work at the same time ThinkPad Pro Docking Station Up to two external displays connected to the two DisplayPort connectors can work at the same time ThinkPad Ultra Docking Station ...

Page 61: ...y Keys Num Lock for five seconds Turn on or turn off Toggle Keys Left Alt Left Shift Num Lock Turn on or turn off Mouse Keys Left Alt Left Shift PrtScn or PrtSc Turn on or turn off High Contrast For more information go to https windows microsoft com and then search using any of the following keywords keyboard shortcuts key combinations shortcut keys Ease of Access Center Ease of Access Center on t...

Page 62: ... you can start programs open menus click objects on the screen dictate text into documents and write and send e mails Everything you do with the keyboard and mouse can be done with only your voice To use Speech Recognition do the following 1 Go to Control Panel and ensure that you view Control Panel by Category 2 Click Ease of Access Speech Recognition 3 Follow the instructions on the screen Scree...

Page 63: ...ovo provides electronic documentation in accessible formats such as properly tagged PDF files or HyperText Markup Language HTML files Lenovo electronic documentation is developed to ensure that visually impaired users can read the documentation through a screen reader Each image in the documentation also includes adequate alternative text so that visually impaired users can understand the image wh...

Page 64: ...ormance If your work area is not in an office setting ensure to take special note of employing active sitting and taking work breaks Many ThinkPad product solutions are available to help you modify and expand your computer to best suit your needs You can find some of these options at https www lenovo com accessories Explore your options for docking solutions and external products that provide the ...

Page 65: ...ver Wipe it with a lint free cloth dampened in mild soap and water Avoid applying liquids directly to the cover Cleaning the keyboard Wipe the keys one by one with a lint free cloth dampened in mild soap and water If you wipe several keys at a time the cloth might hook onto an adjacent key and possibly damage it Avoid spraying cleaner directly onto the keyboard To remove any crumbs or dust from be...

Page 66: ...48 A485 User Guide ...

Page 67: ...rrect password to start using the computer When this icon is displayed type a power on password or a supervisor password Supervisor password The supervisor password protects the system information stored in the ThinkPad Setup program It provides the following security features If only a supervisor password is set a password prompt is displayed when you try to start the ThinkPad Setup program Unaut...

Page 68: ... your password and store it in a safe place If you forget the user hard disk password or both user and master hard disk passwords Lenovo cannot reset your passwords or recover data from the storage drive You must take your computer to a Lenovo reseller or a marketing representative to have the storage drive replaced Proof of purchase is required and a fee will be charged for parts and service Note...

Page 69: ... encrypt all user and system files including the swap and hibernation files BitLocker uses the TPM to provide enhanced protection for your data and to ensure early boot component integrity A compatible TPM is defined as a V2 0 TPM To check the BitLocker status go to Control Panel view Control Panel by Category and click System and Security BitLocker Drive Encryption For more information see the he...

Page 70: ...the fingerprint reader Depending on the model your computer might have a fingerprint reader Fingerprint authentication can replace your passwords such as the Windows password power on password and hard disk password In this way you can log in to your computer simply and securely Enrolling your fingerprints To enable fingerprint authentication enroll your fingerprints first During the enrollment th...

Page 71: ...ngerprint to log in to the computer you might forget your passwords Write down your passwords and keep them in a safe place If you forget your power on password you must take your computer to a Lenovo authorized servicer or a marketing representative to have the password canceled If you forget your hard disk password Lenovo cannot reset your password or recover data from the storage drive You must...

Page 72: ...se operations however only change the file location of the data they do not delete the data itself The data is still there even though it seems to be lost Thus it is sometimes possible to read the data by use of special software for data recovery There is a risk that people of bad faith might read and misuse the critical data on storage drives for unexpected purposes To prevent leakage of data it ...

Page 73: ...bout how to use the firewall program see the help system that comes with the program Protecting data against viruses Lenovo provides a full version of antivirus software on your computer with a free 30 day subscription After 30 days you must renew the license to continue receiving the antivirus software updates For more information about your antivirus software see the help system of your antiviru...

Page 74: ...56 A485 User Guide ...

Page 75: ... page 59 4 Select Startup Boot to display the Boot Priority Order submenu 5 Select the drive that contains the operating system installation program for example USB HDD Then press Esc 6 Select Restart and ensure that OS Optimized Defaults is enabled Then press F10 to save the settings and exit the ThinkPad Setup program 7 Follow the on screen instructions to install the device drivers and necessar...

Page 76: ... the latest drivers using Lenovo Vantage The system update function of Lenovo Vantage helps you keep the software on your computer up to date Update packages are stored on Lenovo servers and can be downloaded from the Lenovo Support Web site Update packages can contain applications device drivers UEFI BIOS flashes or software updates When Lenovo Vantage connects to the Lenovo Support Web site the ...

Page 77: ...t menu Then use the same method mentioned above to change other configurations 5 When you complete the configuration press F10 to save and exit You also can select the Restart tab in the ThinkPad Setup menu and restart your computer with one of the provided options You can press F9 to restore to the default settings Changing the startup sequence In some cases you might have to change the startup s...

Page 78: ...ts for flash update are as follows The computer must be started over LAN The computer must be engaged in the Preboot eXecution Environment PXE A network management program must be installed on the computer of the network administrator For instructions on how to update the UEFI BIOS go to https support lenovo com BIOS menu This topic introduces the following BIOS menus of your computer Main menu Co...

Page 79: ...on Enable or disable the Wake On LAN from Dock feature when the ThinkPad USB C Dock or ThinkPad Thunderbolt 3 Dock is attached Note The Wake on LAN from Dock feature does not work when the hard disk password is set UEFI IPv4 Network Stack Values Disabled Enabled Description Enable or disable Internet Protocol Version 4 IPv4 network stack for UEFI environment This menu is displayed only in UEFI Onl...

Page 80: ...s Disabled Enabled Description Enable or disable the built in trackpad Fn and Ctrl Key swap Values Disabled Enabled Description Exchange functions of the Fn key and the Ctrl key at the bottom left corner of the keyboard If you select Enabled the Fn key works as the Ctrl key and the Ctrl key works as the Fn key Note Only the physical Fn key can wake up the system from sleep mode Fn Sticky key Value...

Page 81: ...tery Values Maximum Performance Battery Optimized Description Battery Optimized Always the lowest speed Adaptive Thermal Management Description Select a thermal management scheme to use The scheme affects fan sound temperature and performance Scheme for AC Values Maximize Performance Balanced Description Maximize Performance Reduce CPU throttling Scheme for Battery Values Maximize Performance Bala...

Page 82: ...upervisor Password Values Disabled Enabled Descriptions Set a supervisor password to prevent unauthorized users from changing the startup sequence network related settings and system date and time For more information see Passwords introduction on page 49 Lock UEFI BIOS Settings Values Disabled Enabled Descriptions Enable this option to prevent unauthorized users from changing any settings in Thin...

Page 83: ...a on the internal storage drive For more information see Passwords introduction on page 49 Fingerprint Predesktop Authentication Values Disabled Enabled Descriptions Enable or disable fingerprint authentication before the operating system is loaded Reader Priority Values External Internal Internal Only Descriptions If your computer has an internal fingerprint reader and an attached external finger...

Page 84: ...k Prevention Values Disabled Enabled Descriptions When this option is disabled you can flash the UEFI BIOS to earlier version Note This item is set as Disabled by default when the OS Optimized Defaults on the Restart menu is set as Disabled This item is set as Enabled by default when the OS Optimized Defaults is set as Enabled Windows UEFI Firmware Update Values Enabled Disabled Descriptions Enabl...

Page 85: ... will shut down when you wake it up and any unsaved data will be lost Anti Theft Computrace Module Activation Values Disabled Enabled Permanently Disabled Descriptions Enable the UEFI BIOS interface to activate the computrace module Computrace is an optional monitoring service from Absolute Software If you select Permanently Disabled you cannot enable this setting again Secure Boot Secure Boot Val...

Page 86: ... not selectable To complete the configuration of Device Guard you have to set a supervisor password When this option is disabled the setup options are configurable and you can choose any boot options to start the computer DASH configuration Dash Support Values Enabled Disabled Description Enable or disable DASH Support Realtek LAN Controller Description Configure DASH Desktop and Mobile Architectu...

Page 87: ...er Lock Values Disabled Enabled Descriptions Enable this option to lock the boot device priority order Restart menu Note The BIOS menu items might change without notice Depending on the model the default value might vary Exit Saving Changes Descriptions Save the changes and restart the computer Exit Discarding Changes Descriptions Discard the changes and restart the computer The following changes ...

Page 88: ...rdware components of your computer It is the responsibility of the UEFI BIOS to provide information about itself and the devices on the system board This specification documents the standards for getting access to this BIOS information Preboot eXecution Environment The Preboot eXecution Environment PXE technology makes the computer more manageable by enabling the computer to start from a server Yo...

Page 89: ...using a remote network management program To enable or disable the Wake on LAN feature do the following 1 Restart the computer When the logo screen is displayed press F1 to start the ThinkPad Setup program 2 Select Config Network The Network submenu is displayed 3 Select a corresponding option for the Wake on LAN feature 4 Press F10 to save the settings and exit Defining a Network Boot sequence Wh...

Page 90: ...72 A485 User Guide ...

Page 91: ...e minor issues If you ever need to run a recovery on your computer to return the preinstalled contents onto the machine the following tips might help along the way 1 Remove all external devices such as the printer and keyboard 2 Ensure that your battery is charged and your computer has the ac power connected 3 Access ThinkPad Setup and load the default settings 4 Restart the computer and start the...

Page 92: ...es not turn back on continue with step 3 Note When the computer starts up and enters the Windows environment use the proper shutdown procedure to turn off the computer When the computer is off reattach the removable battery and restart the computer If the computer does not start with the removable battery reattached remove the removable battery and again start with step 2 If the computer starts wi...

Page 93: ...olution The EEPROM checksum is not correct block 0 and 1 The system board should be replaced and the box serial number must be reinstalled Have the computer serviced Message 0189 Invalid RFID configuration information area Solution The EEPROM checksum is not correct block 4 and 5 The system board should be replaced and the universally unique identifier UUID must be reinstalled Have the computer se...

Page 94: ...r The non volatile system UEFI variable storage is nearly full Note This error indicates that the operating system or programs cannot create modify or delete data in the non volatile system UEFI variable storage due to insufficient storage space after POST The non volatile system UEFI variable storage is used by the UEFI BIOS and by the operating system or programs This error occurs when the opera...

Page 95: ... by inserting a straightened paper clip into the emergency reset hole Wait for one minute Then reconnect all power resources 2 Replace the system board service provider only 0002 Internal bus error Replace the system board service provider only 0281 General embedded controller error Replace the system board service provider only 0282 Memory module error 1 Reinstall or replace the memory module 2 R...

Page 96: ...uding the maximum memory size and the memory speed 5 Run diagnostic programs See Diagnosing problems on page 73 Ethernet problems Problem My computer cannot connect to the network Solution Ensure that The cable is installed correctly The network cable must be securely connected both to the Ethernet connector of your computer and to the RJ45 connector of the hub The maximum allowable distance from ...

Page 97: ...t connects at 100 Mbps Solution Try another Ethernet cable Ensure that the link partner is set to auto negotiate Ensure that the switch is 802 3ab compliant gigabit over copper Wireless LAN problem Problem I cannot connect to the network using the built in wireless network card Solution Ensure that The Airplane mode is off Your wireless LAN driver is the latest version Your computer is within the ...

Page 98: ...roperties window For more information see Customizing the ThinkPad pointing device on page 23 Keyboard problems Problem All or some keys on the keyboard do not work Solution If an external numeric keypad is connected 1 Turn off the computer 2 Remove the external numeric keypad 3 Turn on the computer and try using the keyboard again If the keyboard problem is resolved carefully reconnect the extern...

Page 99: ... the power button again for confirmation The brightness level of the screen is appropriately set If a power on password is set press any key to display the prompt for the power on password and then type the correct password and press Enter If these items are correctly set and the screen remains blank have the computer serviced Problem When I turn on the computer only a white cursor is displayed on...

Page 100: ...c PnP Monitor or Generic Non PnP Monitor 6 Click Properties If you are prompted for an administrator password or confirmation type the password or provide confirmation 7 Click the Driver tab 8 Click Update Driver 9 Click Browse my computer for driver software and then click Let me pick from a list of available drivers on my computer 10 Clear the Show compatible hardware check box 11 Select the cor...

Page 101: ...y doing the following 1 Connect the external monitor to the monitor connector and then connect the monitor to an electrical outlet 2 Turn on the external monitor and the computer 3 Right click on the desktop and then click Display settings Display Note If your computer cannot detect the external monitor click Detect in the Display window 4 Click the icon for the appropriate monitor Monitor 2 icon ...

Page 102: ...ophone Boost function is turned on and set by doing the following 1 Go to Control Panel and ensure that you view Control Panel by Category 2 Click Hardware and Sound 3 Click Sound 4 Click the Recording tab in the Sound window 5 Select Microphone Array and click Properties 6 Click the Levels tab and adjust the Microphone Boost slider as you need 7 Click OK Note For more information about controllin...

Page 103: ...c program 7 Click the Playback tab Select Headset Earphone and then click Set Default The headset is set to the default device with a check mark displayed beside the headset icon 8 Play any sound through a music program Ensure that sound comes from the headset attached directly to the computer Fingerprint reader problems Problem The surface of the reader is dirty stained or wet Solution Gently cle...

Page 104: ...y 3 Reinstall the battery and reconnect the ac power adapter and then turn on the computer 4 If the power adapter icon still is not displayed in the Windows notification area have the ac power adapter and your computer serviced Power problems Print these instructions now and keep them with your computer for reference later Problem My computer is getting no power at all Solution Check the following...

Page 105: ... after the power on self test Solution Ensure that The battery is charged The operating temperature is within the acceptable range See Operating environment on page 12 If the problem persists have the computer serviced Problem A critical low battery error occurs and the computer immediately turns off Solution The battery power is getting low Plug the ac power adapter into an electrical outlet and ...

Page 106: ...oise intermittently Solution The rattling noise might be heard When the hard disk drive begins or finishes getting access to data When you carry the hard disk drive When you carry your computer This is a normal characteristic of a hard disk drive and is not a defect Problem The hard disk drive does not work Solution On the Startup menu of ThinkPad Setup ensure that the hard disk drive is on the Bo...

Page 107: ...ager window Ensure that the USB device setup is correct and that the assignment of computer resource and the installation of the device driver are correct To open the Device Manager window go to Control Panel and ensure that you view Control Panel by Category and click Hardware and Sound Device Manager If you are prompted for an administrator password or confirmation type the password or provide c...

Page 108: ...90 A485 User Guide ...

Page 109: ...ting system Start the computer from an external device Restore the Windows operating system from a system image To use advanced startup options do the following Note The items in the graphical user interface GUI might change without notice 1 Open the Start menu and then click Settings Update security Recovery 2 In the Advanced startup section click Restart now Troubleshoot Advanced options 3 Selec...

Page 110: ...uring the following process 1 Connect a proper USB drive at least 16 GB of storage to the computer 2 Type recovery in the search box on the taskbar Then click Create a recovery drive 3 Click Yes in the User Account Control window to allow the Recovery Media Creator program to start 4 In the Recovery Drive window follow the instructions on the screen to create a recovery USB drive Using the recover...

Page 111: ...roduct and are available from Lenovo at any time upon request You might be required to return the defective part that is replaced by the CRU When return is required 1 return instructions a prepaid shipping label and a container will be included with the replacement CRU and 2 you might be charged for the replacement CRU if Lenovo does not receive the defective CRU within thirty 30 days of your rece...

Page 112: ...static protective package and install the part without setting it down When this is not possible place the static protective package on a smooth level surface and place the part on the package Do not place the part on the computer cover or other metal surface Disabling the built in battery Before replacing any CRU ensure that you disable Fast Startup first and then disable the built in battery To ...

Page 113: ...echargeable battery is incorrectly replaced there is danger of an explosion The battery contains a small amount of harmful substances To avoid possible injury Replace only with a battery of the type recommended by Lenovo Keep the battery away from fire Do not expose it to excessive heat Do not expose it to water or rain Do not short circuit it Do not drop crush puncture or subject to strong forces...

Page 114: ...ss WAN connections Depending on the model you might need to purchase a nano SIM card or a nano SIM card might already be installed in your computer In some countries or regions a nano SIM card is part of the shipping contents that come with your computer Attention When installing or removing the nano SIM card do not touch the nano SIM card metal connectors To replace the nano SIM card do the follo...

Page 115: ...sition 7 Reinstall the removable battery 8 Turn the computer over Connect the ac power adapter and all cables to the computer Replacing the base cover assembly Before you start read Important safety information on page v and print the following instructions Notes Depending on the model your computer might look slightly different from the illustrations in this topic Chapter 9 Replacing devices 97 ...

Page 116: ...er disconnect the ac power adapter and then reconnect it to the computer To replace the base cover assembly do the following 1 Disable the built in battery See Disabling the built in battery on page 94 2 Ensure that the computer is turned off and disconnected from ac power and all cables 3 Close the computer display and turn the computer over 4 Remove the removable battery See Replacing the remova...

Page 117: ... the same time to disengage the hooks from the chassis 7 Press the location c with your thumb and insert your fingers into the holes d to pivot this area of the base cover assembly upward as shown This area of the base cover assembly will be disengaged from the chassis Chapter 9 Replacing devices 99 ...

Page 118: ...0 Reinstall the removable battery 11 Turn the computer over Connect the ac power adapter and all cables to the computer Replacing the wireless WAN card The following information is only for computer models with user installable modules Before you start read Important safety information on page v and print the following instructions Attention Do not touch the contact edge of the wireless WAN card O...

Page 119: ... connector with your fingers and gently disconnect each cable from the wireless WAN card 2 c Remove the screw that secures the wireless WAN card 3 The card is released from the secured position and pivots upward d Carefully remove the wireless WAN card out of the slot 4 7 To install a new wireless WAN card do the following a Align the notched edge of the new wireless WAN card with the slot key in ...

Page 120: ...grounded metal object This action reduces any static electricity from your body Static electricity might damage the memory module Do not touch the contact edge of the memory module Otherwise the memory module might get damaged To replace a memory module do the following 1 Disable the built in battery See Disabling the built in battery on page 94 2 Ensure that the computer is turned off and disconn...

Page 121: ...tched end of the new memory module toward the contact edge side of the memory slot Then insert the memory module into the slot at an angle of about 20 degrees 1 b Pivot the memory module downward until it snaps into place 2 Ensure that the memory module is firmly installed in the slot and cannot be moved easily c Close the film to protect the new memory module 3 8 Reinstall the base cover assembly...

Page 122: ...the internal storage drive might get damaged Do not apply pressure to the internal storage drive Do not make the internal storage drive subject to physical shocks or vibration Put the internal storage drive on a soft material such as cloth to absorb physical shocks Note Depending on your computer model a 2 5 inch hard disk drive a 2 5 inch solid state drive or an M 2 solid state drive might come w...

Page 123: ...t the cable from the 2 5 inch internal storage drive 9 Detach the bracket from the 2 5 inch internal storage drive To install the new 2 5 inch internal storage drive do the following 1 Attach the bracket to the new 2 5 inch internal storage drive Chapter 9 Replacing devices 105 ...

Page 124: ...and then pivot it downward 2 Ensure that the new internal storage drive is seated in place 4 Connect the cable to the system board 1 2 and insert the tape 3 5 Reinstall the base cover assembly and the removable battery 6 Turn the computer over Connect the ac power adapter and all cables 106 A485 User Guide ...

Page 125: ...turned off and disconnected from ac power and all cables 3 Close the computer display and turn the computer over 4 Remove the removable battery See Replacing the removable battery on page 94 5 Remove the base cover assembly See Replacing the base cover assembly on page 97 6 Disconnect the cable from the system board 1 2 and pull out the tape 3 7 Remove the M 2 solid state drive adapter by pulling ...

Page 126: ...rom the M 2 solid state drive adapter 9 Remove the two screws that secure the protective cover 1 and then remove the cover 2 10 Remove the screw that secures the M 2 solid state drive The M 2 solid state drive is released from the secured position and pivots upward 108 A485 User Guide ...

Page 127: ...ay do the following 1 Align the notch of the new M 2 solid state drive with the slot key in the M 2 slot Insert the solid state drive into the M 2 slot at an angle of about 20 degrees until it is secured tightly 1 and then pivot it downward 2 2 Install the screw to secure the M 2 solid state drive Chapter 9 Replacing devices 109 ...

Page 128: ... screws to secure the cover 4 If the M 2 solid state drive cable has been disconnected connect the cable to the M 2 solid state drive adapter 5 Insert the adapter 1 and then pivot it downward 2 Ensure that the adapter is seated in place 110 A485 User Guide ...

Page 129: ...2 solid state drive in the wireless WAN card slot do the following 1 Disable the built in battery See Disabling the built in battery 2 Ensure that the computer is turned off and disconnected from ac power and all cables 3 Close the computer display and turn the computer over 4 Remove the removable battery See Replacing the removable battery on page 94 5 Remove the base cover assembly See Replacing...

Page 130: ...e film to access the M 2 solid state drive 1 b Remove the screw that secures the M 2 solid state drive 2 The M 2 solid state drive is released from the secured position and pivots upward c Carefully remove the M 2 solid state drive out of the slot 3 112 A485 User Guide ...

Page 131: ... Before you start read Important safety information on page v and print the following instructions To replace the speaker assembly do the following 1 Disable the built in battery See Disabling the built in battery on page 94 2 Ensure that the computer is turned off and disconnected from ac power and all cables 3 Close the computer display and turn the computer over 4 Remove the removable battery S...

Page 132: ...6 Detach the connector of the speaker assembly 7 Remove the screws that secure the speaker assembly 1 and then remove the speaker assembly 2 114 A485 User Guide ...

Page 133: ...er Connect the ac power adapter and all cables to the computer Replacing the keyboard Before you start read Important safety information on page v and print the following instructions To remove the keyboard do the following 1 Disable the built in battery See Disabling the built in battery on page 94 2 Ensure that the computer is turned off and disconnected from ac power and all cables 3 Close the ...

Page 134: ...placing the removable battery on page 94 5 Loosen the two screws that secure the keyboard 6 Turn the computer over and open the display Push hard in the direction as shown to release the latches from the keyboard bezel 116 A485 User Guide ...

Page 135: ...ard as shown by arrow 1 Then turn over the keyboard as shown by arrow 2 8 Put the keyboard on the palm rest and detach the connectors Then remove the keyboard To install the new keyboard do the following Chapter 9 Replacing devices 117 ...

Page 136: ...hen turn over the keyboard 2 Insert the keyboard into the keyboard bezel as shown Ensure that the top edge of the keyboard the edge that is close to the computer display is under the frame of the keyboard bezel 118 A485 User Guide ...

Page 137: ...y and turn the computer over Tighten the screws to secure the keyboard 5 Reinstall the removable battery 6 Turn the computer over Connect the ac power adapter and all cables to the computer Replacing the coin cell battery Before you start read Important safety information on page v and print the following instructions Chapter 9 Replacing devices 119 ...

Page 138: ...y abuse or mishandling can cause the battery to overheat which can cause gasses or flame to vent from the battery or coin cell battery To replace the coin cell battery do the following 1 Disable the built in battery See Disabling the built in battery on page 94 2 Ensure that the computer is turned off and disconnected from ac power and all cables 3 Close the computer display and turn the computer ...

Page 139: ...er assembly and the removable battery 9 Turn the computer over Connect the ac power adapter and all cables to the computer Note After you replace the coin cell battery reset the system date and time in the ThinkPad Setup program See Date Time menu on page 64 Chapter 9 Replacing devices 121 ...

Page 140: ...122 A485 User Guide ...

Page 141: ...lowing questions before you call for help Then you are able to get help as quickly as possible What is the problem Is it continuous or intermittent Is there an error message What is the error code if any What operating system are you using Which version Which software applications were running at the time of the problem Can the problem be reproduced If so how Recording system information The seria...

Page 142: ...em is determined to be caused by Lenovo hardware under warranty trained service personnel are available to provide the applicable level of service Engineering change management Occasionally there might be changes that are required after a product has been sold Lenovo or your reseller if authorized by Lenovo will make selected Engineering Changes ECs that apply to your hardware available The follow...

Page 143: ...t phone numbers are available at https pcsupport lenovo com supportphonelist If the number for your country or region is not provided contact your Lenovo reseller or Lenovo marketing representative Purchasing additional services During and after the warranty period you can purchase additional services Service availability and service name might vary by country or region For more information about ...

Page 144: ...126 A485 User Guide ...

Page 145: ...rom the Web site or from your computer contact your local Lenovo office or reseller to obtain a printed version of the LLW Accessing the Ubuntu help system The Ubuntu help system provides information about how to use the Ubuntu operating system To access the help system from the Unity move your pointer to the Launch bar and then click the Help icon If you cannot find the Help icon from the Launch ...

Page 146: ...128 A485 User Guide ...

Page 147: ... Bluetooth Specification version 4 2 or 5 0 as defined by the Bluetooth Special Interest Group SIG However the Windows operating system might limit the support only on the Bluetooth Specification version 4 1 Usage environment and your health This computer contains integrated wireless cards that operate within the guidelines identified by radio frequency RF safety standards and recommendations ther...

Page 148: ...ireless communications comply with the radio frequency and safety standards of any country or region in which it has been approved for wireless use Brazil wireless radio compliance information Este equipamento não tem direito à proteção contra interferência prejudicial e não pode causar interferência em sistemas devidamente autorizados This equipment is not protected against harmful interference a...

Page 149: ...re is no guarantee that interference will not occur in a particular installation If this equipment does cause harmful interference to radio or television reception which can be determined by turning the equipment off and on the user is encouraged to try to correct the interference by one or more of the following measures Reorient or relocate the receiving antenna Increase the separation between th...

Page 150: ...cluding the installation of option cards from other manufacturers This product has been tested and found to comply with the limits for Class B equipment according to European Standards harmonized in the Directives in compliance The limits for Class B equipment were derived for typical residential environments to provide reasonable protection against interference with licensed communication devices...

Page 151: ... statement for products which connect to the power mains with rated current less than or equal to 20 A per phase Japan notice for ac power cord The ac power cord shipped with your product can be used only for this specific product Do not use the ac power cord for other devices Lenovo product service information for Taiwan Eurasian compliance mark Brazil audio notice Ouvir sons com mais de 85 decib...

Page 152: ...134 A485 User Guide ...

Page 153: ...tions determine the framework for the return and recycling of used appliances as applicable within each geography This label is applied to various products to indicate that the product is not to be thrown away but rather put in the established collection systems for reclaiming these end of life products Users of electrical and electronic equipment EEE with the WEEE marking must not dispose of end ...

Page 154: ...in Japan may have components that contain heavy metals or other environmental sensitive substances To properly dispose of disused components such as a printed circuit board or drive use the methods described above for collecting and recycling a disused computer or monitor Disposing of disused lithium batteries from Lenovo computers A button shaped lithium battery is installed inside your Lenovo co...

Page 155: ...s to indicate that the battery is not to be thrown away but rather reclaimed upon end of life per this Directive In accordance with the European Directive 2006 66 EC batteries and accumulators are labeled to indicate that they are to be collected separately and recycled at end of life The label on the battery may also include a chemical symbol for the metal concerned in the battery Pb for lead Hg ...

Page 156: ...ls on the battery pack in the product documentation If you need to dispose of a battery pack insulate it with vinyl tape contact Lenovo sales service or your place of purchase or a waste disposal operator and follow their instructions You also can refer to the instructions provided in the user guide for your product For proper collection and treatment go to https www lenovo com lenovo environment ...

Page 157: ...lectronic equipment RoHS recast or RoHS 2 For more information about Lenovo worldwide compliance on RoHS go to https www lenovo com rohs communication Turkish RoHS The Lenovo product meets the requirements of the Republic of Turkey Directive on the Restriction of the Use of Certain Hazardous Substances in Waste Electrical and Electronic Equipment WEEE Ukraine RoHS India RoHS RoHS compliant as per ...

Page 158: ...140 A485 User Guide ...

Page 159: ...Taiwan RoHS Appendix D Restriction of Hazardous Substances RoHS Directive of countries and regions 141 ...

Page 160: ...142 A485 User Guide ...

Page 161: ... use of energy an integral part of your day to day operations To help in this endeavor Lenovo has preset the following power management features to take effect when the computer has been inactive for a specified length of time Power plan Default when plugged into ac power Turn off the display After 10 minutes Put the computer to sleep After 30 minutes To awaken the computer from sleep mode press t...

Page 162: ...3 Right click your network adapter device and click Properties 4 Click the Power Management tab 5 Clear the Allow this device to wake the computer check box 6 Click OK 144 A485 User Guide ...

Page 163: ...blication Lenovo may make improvements and or changes in the product s and or the application s described in this publication at any time without notice The products described in this document are not intended for use in implantation or other life support applications where malfunction may result in injury or death to persons The information contained in this document does not affect or change Len...

Page 164: ...ource license including any Linux agreement s which may accompany software included with this product Lenovo may update this document at any time without notice To obtain the most up to date documentation for your computer go to https support lenovo com 146 A485 User Guide ...

Page 165: ...marks or registered trademarks of Advanced Micro Devices Inc DisplayPort is a trademark of the Video Electronics Standards Association The terms HDMI and HDMI High Definition Multimedia Interface are trademarks or registered trademarks of HDMI Licensing LLC in the United States and other countries Wi Fi Wi Fi Alliance and Miracast are registered trademarks of Wi Fi Alliance USB C is a trademark of...

Page 166: ...148 A485 User Guide ...

Page 167: ......

Page 168: ......

Reviews: