1. Do not use any tools or sharp objects to lift the locking lever on the microprocessor socket. Doing so
might result in permanent damage to the system board.
2. Do not touch the contacts in the microprocessor socket. Touching these contacts might result in
permanent damage to the system board.
Step 1.
If you are not installing a new microprocessor and a new heat sink, remove the thermal grease
from the heat sink and microprocessor; then, apply new thermal grease before installation (see
“Thermal grease” on page 36).
Step 2.
Install the microprocessor and heat sink.
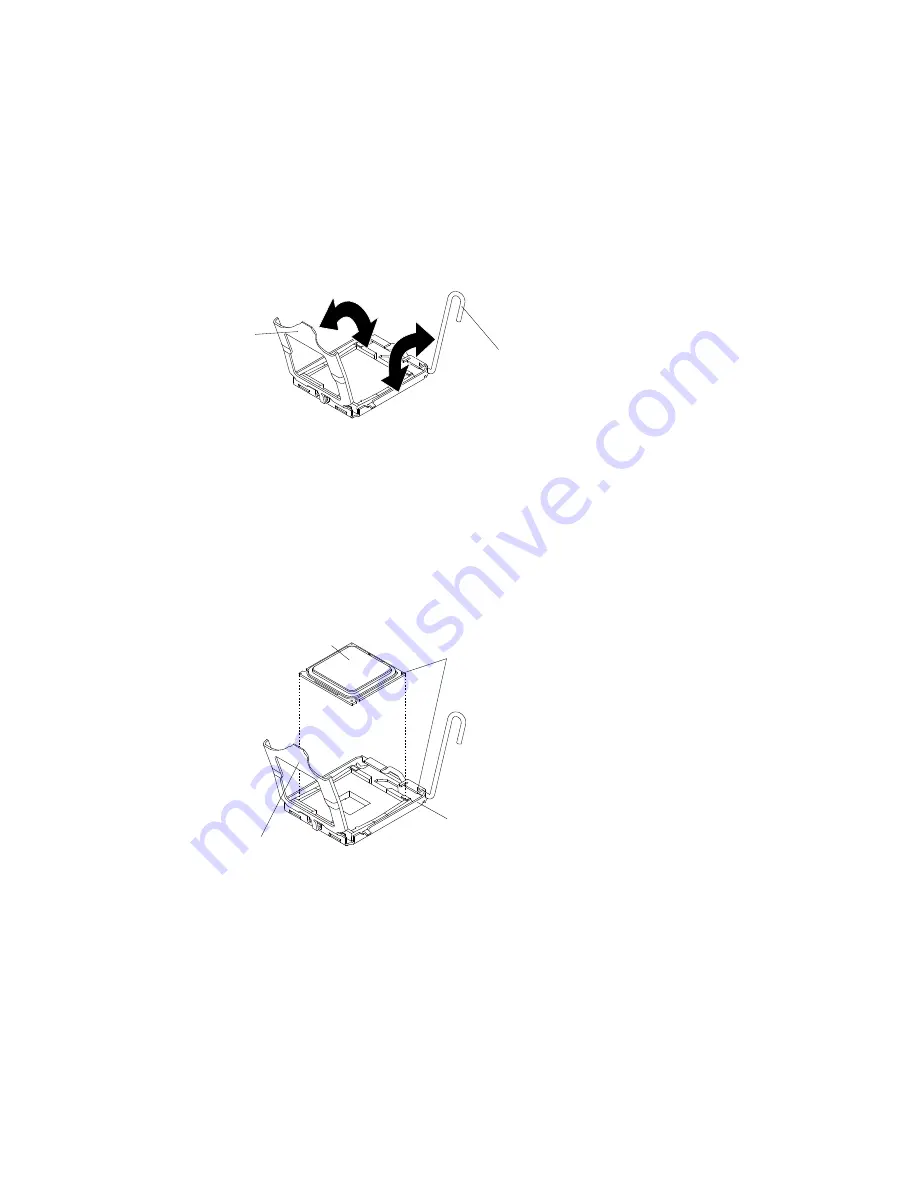
Microprocessor
release lever
Microprocessor
retainer
a.
Rotate the locking lever on the microprocessor socket from its closed and locked position until
it stops in the fully open position (approximately a 135° angle), as shown.
b.
Rotate the microprocessor retainer on the microprocessor socket from its closed position until
it stops in the fully open position (approximately a 135° angle), as shown.
c.
If a dust cover is installed over the microprocessor socket, lift the dust cover from the socket.
d.
Touch the static-protective package that contains the microprocessor to any
unpainted
metal
surface on the BladeCenter unit or any
unpainted
metal surface on any other grounded rack
component; then, remove the microprocessor from the package.
e.
Remove the dust cover from the bottom of the microprocessor.
Microprocessor
Microprocessor
socket
Alignment marks
Microprocessor retainer
f.
Orient the triangle painted on the corner of the microprocessor with the triangle on the
microprocessor socket.
g.
Carefully place the microprocessor into the microprocessor socket, using the alignment tabs
on the microprocessor with the alignment notches in the microprocessor socket as a guide.
Attention:
• Do not press the microprocessor into the socket.
• Make sure that the microprocessor is oriented and aligned correctly in the socket before
you try to close the microprocessor retainer.
h.
Carefully close the microprocessor retainer.
35
Summary of Contents for BladeCenter HS22
Page 1: ...BladeCenter HS22 Blade Server Installation and User s Guide Machine Types 7870 1936 1911 ...
Page 26: ...16 BladeCenter HS22 Blade ServerInstallation and User s Guide ...
Page 62: ...52 BladeCenter HS22 Blade ServerInstallation and User s Guide ...
Page 82: ...72 BladeCenter HS22 Blade ServerInstallation and User s Guide ...
Page 89: ...Taiwan Class A compliance statement Appendix B Notices 79 ...
Page 90: ...80 BladeCenter HS22 Blade ServerInstallation and User s Guide ...
Page 95: ......
Page 96: ...Part Number 00D9283 Printed in China 1P P N 00D9283 1P00D9283 ...


