


Chapter 7. FRU replacement notices
Read this chapter carefully before replacing any FRU.
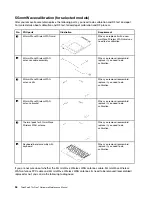
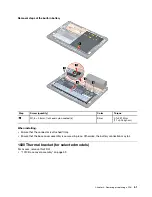
Service tool kit
Ensure that the following service tool kit is prepared before you service a notebook computer.
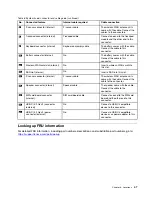
No.
Tool name
Tool type
1
Phillips-head screwdriver
Common tool
2
Conductive tweezers
Common tool
3
Silicone grease
Consumable tool
4
Polyamide tape
Consumable tool
5
Mylar tape
Consumable tool
6
Eraser
Consumable tool
7
Electrical tape
Consumable tool
8
Double-sided tape
Consumable tool
9
Conductive tape
Consumable tool
Note:
The silicone grease can be applied to the surfaces of the microprocessor and heatsink to eliminate air
gaps.
Screw notices
Loose screws can cause a reliability problem. In your computer, this problem is addressed with special
nylon-coated screws that have the following characteristics:
• They maintain tight connections.
• They do not easily come loose, even with shock or vibration.
• They are harder to tighten.
Do the following when you service the computer:
• Keep the screw kit in your tool bag. For the part number of the screw kit, go to:
https://support.lenovo.com/partslookup
Tighten screws as follows:
•
Plastic to plastic
Turn an additional angle of 90 degrees after the screw head touches the surface of the plastic part.
© Copyright Lenovo 2022
49
Summary of Contents for 21BX001LGE
Page 1: ...ThinkPad X13s Gen 1 Hardware Maintenance Manual ...
Page 6: ...iv ThinkPad X13s Gen 1 Hardware Maintenance Manual ...
Page 11: ...DANGER DANGER DANGER DANGER DANGER DANGER Chapter 1 Safety information 5 ...
Page 12: ...DANGER 6 ThinkPad X13s Gen 1 Hardware Maintenance Manual ...
Page 13: ...PERIGO Chapter 1 Safety information 7 ...
Page 14: ...PERIGO PERIGO PERIGO PERIGO 8 ThinkPad X13s Gen 1 Hardware Maintenance Manual ...
Page 15: ...PERIGO PERIGO PERIGO DANGER DANGER Chapter 1 Safety information 9 ...
Page 16: ...DANGER DANGER DANGER DANGER DANGER 10 ThinkPad X13s Gen 1 Hardware Maintenance Manual ...
Page 17: ...DANGER VORSICHT VORSICHT VORSICHT VORSICHT Chapter 1 Safety information 11 ...
Page 18: ...VORSICHT VORSICHT VORSICHT VORSICHT 12 ThinkPad X13s Gen 1 Hardware Maintenance Manual ...
Page 19: ...Chapter 1 Safety information 13 ...
Page 20: ...14 ThinkPad X13s Gen 1 Hardware Maintenance Manual ...
Page 21: ...Chapter 1 Safety information 15 ...
Page 22: ...16 ThinkPad X13s Gen 1 Hardware Maintenance Manual ...
Page 23: ...Chapter 1 Safety information 17 ...
Page 24: ...18 ThinkPad X13s Gen 1 Hardware Maintenance Manual ...
Page 25: ...Chapter 1 Safety information 19 ...
Page 26: ...20 ThinkPad X13s Gen 1 Hardware Maintenance Manual ...
Page 44: ...38 ThinkPad X13s Gen 1 Hardware Maintenance Manual ...
Page 46: ...Bottom view Emergency reset hole 40 ThinkPad X13s Gen 1 Hardware Maintenance Manual ...
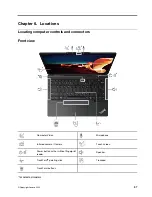
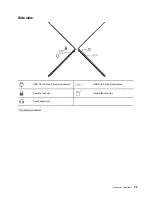
Page 47: ...Rear view Microphone Chapter 6 Locations 41 ...
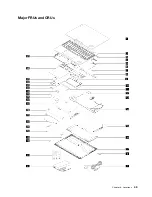
Page 49: ...Major FRUs and CRUs Chapter 6 Locations 43 ...
Page 54: ...48 ThinkPad X13s Gen 1 Hardware Maintenance Manual ...
Page 63: ...Chapter 8 Removing or replacing a FRU 57 ...
Page 81: ...Removal steps of the system board for WWAN models Chapter 8 Removing or replacing a FRU 75 ...
Page 94: ...88 ThinkPad X13s Gen 1 Hardware Maintenance Manual ...
Page 95: ......
Page 96: ...Part Number SP40T80538 Printed in China 1P P N SP40T80538 1PSP40T80538 ...