background image

Chapter 4. Secure your computer and information

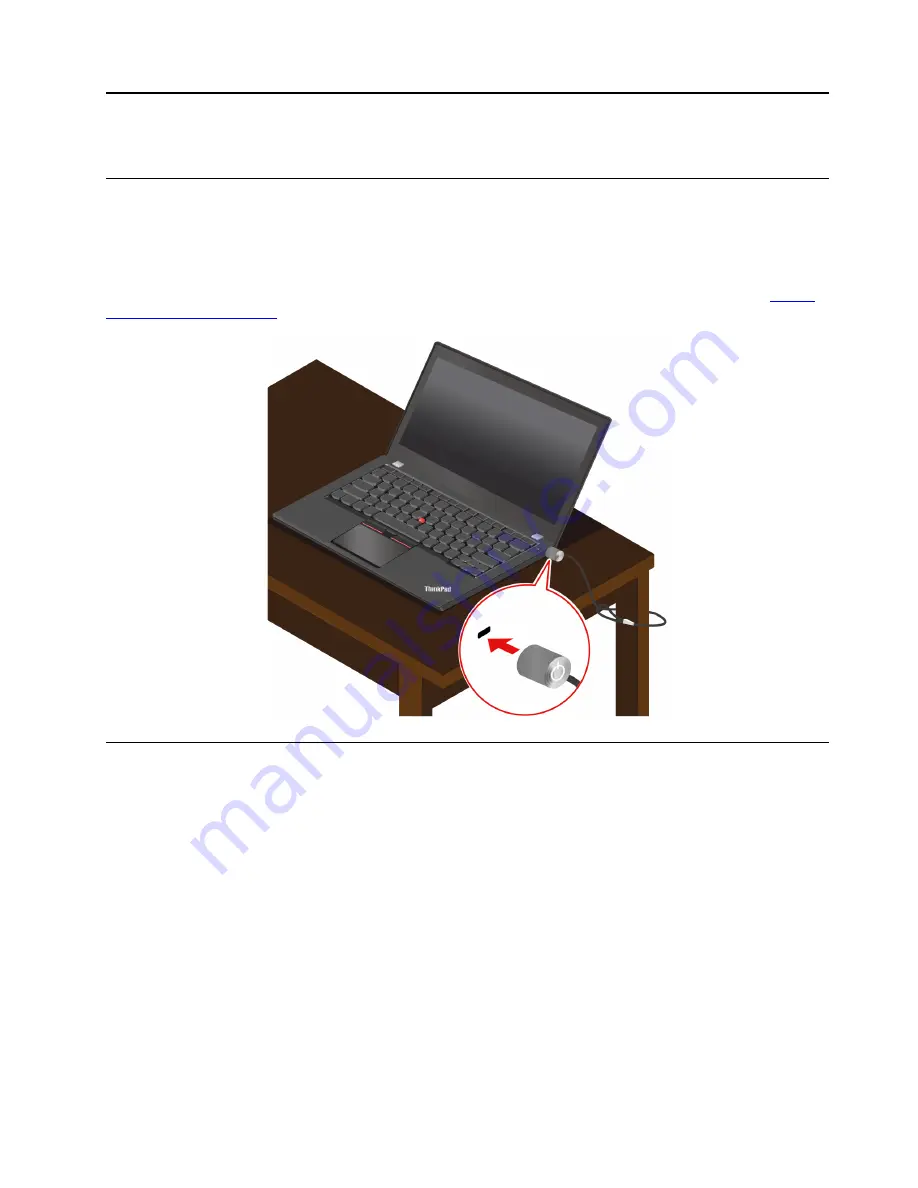
Lock the computer

Lock your computer to a desk, table, or other fixtures through a compatible security cable lock. 

Note:

You are responsible for evaluating, selecting, and implementing the locking device and security 

feature. Lenovo makes no comments, judgments, or warranties about the function, quality, or performance 
of the locking device and security feature. Cable locks for your product are available from Lenovo at 

https:// 

www.lenovoquickpick.com

.

Use passwords

This section introduces types of passwords in UEFI (Unified Extensible Firmware Interface) BIOS (Basic 
Input/Output System) and how to set, change, and remove a password.

Password types

You can set a power-on password, supervisor password, system management password, or hard disk 
password in UEFI BIOS to prevent unauthorized access to your computer. However, you are not prompted to 
enter any UEFI BIOS password when your computer resumes from sleep mode.

Power-on password

If you set a power-on password, a window is displayed on the screen when you turn on the computer. Enter 
the correct password to use the computer.

Supervisor password

The supervisor password protects the system information stored in UEFI BIOS. When entering the UEFI 
BIOS menu, enter the correct supervisor password in the window prompted. You also can press Enter to 

© Copyright Lenovo 2020, 2021

31

Summary of Contents for 21AD001KUS

Page 1: ...L13 Gen 2 L13 Yoga Gen 2 S2 Gen 6 and S2 Yoga Gen 6 User Guide ...

Page 2: ...t safety information on page 57 Safety and Warranty Guide Setup Guide Second Edition June 2021 Copyright Lenovo 2020 2021 LIMITED AND RESTRICTED RIGHTS NOTICE If data or software is delivered pursuant to a General Services Administration GSA contract use reproduction or disclosure is subject to restrictions set forth in Contract No GS 35F 05925 ...

Page 3: ...e computer 31 Use passwords 31 Password types 31 Set change and remove a password 33 Associate your fingerprints with passwords for selected models 34 Use Power Loss Protection function for selected models 34 Log in with your fingerprint for selected models 34 Log in with your face ID for selected models 35 Chapter 5 Configure advanced settings 37 UEFI BIOS 37 What is UEFI BIOS 37 Enter the UEFI B...

Page 4: ...Appendix E Notices and trademarks 91 ii L13 Gen 2 L13 Yoga Gen 2 S2 Gen 6 and S2 Yoga Gen 6 User Guide ...

Page 5: ...rmation Illustrations in this documentation might look different from your product Depending on the model some optional accessories features software programs and user interface instructions might not be applicable to your computer Documentation content is subject to change without notice To get the latest documentation go to https pcsupport lenovo com Copyright Lenovo 2020 2021 iii ...

Page 6: ...iv L13 Gen 2 L13 Yoga Gen 2 S2 Gen 6 and S2 Yoga Gen 6 User Guide ...

Page 7: ...with different microprocessors namely Intel and Advanced Micro Devices AMD Hereby Intel models and AMD models are used to distinguish computer models with different microprocessors Front view Infrared camera Camera Webcam privacy shutter Microphone TrackPoint pointing stick Touch screen Fingerprint reader Copyright Lenovo 2020 2021 1 ...

Page 8: ...t is designed to protect your privacy Related topics Log in with your face ID for selected models on page 35 Use the touch screen for selected models on page 13 Log in with your fingerprint for selected models on page 34 Use the TrackPoint pointing device on page 11 Use the trackpad on page 12 2 L13 Gen 2 L13 Yoga Gen 2 S2 Gen 6 and S2 Yoga Gen 6 User Guide ...

Page 9: ...lt 4 power connector USB C Thunderbolt 4 connector Ethernet connector Always On USB 3 2 connector Gen 1 Audio connector Security lock slot HDMI connector USB 3 2 connector Gen 1 microSD card slot Power button Chapter 1 Meet your computer 3 ...

Page 10: ...croSD card slot Power button Note The Ethernet extension connector Gen 2 and the adjoining USB C Thunderbolt 4 connector cannot be used simultaneously Related topics Charge the computer on page 23 USB specifications on page 6 Use a microSD card or smart card on page 25 Lock the computer on page 31 4 L13 Gen 2 L13 Yoga Gen 2 S2 Gen 6 and S2 Yoga Gen 6 User Guide ...

Page 11: ...ot in contact with user s bare skin Under normal operating conditions the temperature of the bottom surface will remain within an acceptable range as defined in IEC 62368 1 but such temperatures can still be high enough to cause discomfort or harm to the user if directly touched for over one minute at a time As such it is recommended that users avoid prolonged direct contact with the bottom of the...

Page 12: ... In Plane Switching IPS or Twisted Nematic TN technology Display ratio 16 9 Display resolution 1366 x 768 pixels or 1920 x 1080 pixels Multi touch technology Security features Face authentication Fingerprint reader Security lock slot Trusted Platform Module TPM Wireless features Bluetooth GPS on wireless WAN model Wireless LAN Wireless WAN Note The 4G cellular service is provided by authorized mob...

Page 13: ...0 pixels 60 Hz Connect to USB C accessories to help expand your computer functionality To purchase USB C accessories go to https www lenovo com accessories Statement on USB transfer rate Depending on many factors such as the processing capability of the host and peripheral devices file attributes and other factors related to system configuration and operating environments the actual transfer rate ...

Page 14: ...8 L13 Gen 2 L13 Yoga Gen 2 S2 Gen 6 and S2 Yoga Gen 6 User Guide ...

Page 15: ... Ethernet Extension Adapter Gen 2 You can also purchase a Lenovo USB C to Ethernet adapter or ThinkPad Ethernet Extension Adapter Gen 2 from Lenovo at https www lenovo com accessories Turn on the Airplane mode When the Airplane mode is enabled all wireless features are disabled 1 Click the action center icon in the Windows notification area 2 Click Airplane mode to turn on the Airplane mode Intera...

Page 16: ...display Brighten display Manage external displays Enable disable wireless Open collapse notification center Answer incoming calls on Microsoft Teams Decline incoming calls on Microsoft Teams Open the Vantage app You can customize the function of this key on the Vantage app Open Snipping Tool Toggle keyboard backlight for selected models Break operation Pause operation Scroll contents Send system r...

Page 17: ...rdingly The higher the pressure applied the faster the pointer moves TrackPoint buttons The left click button and right click button correspond to the left and right buttons on a traditional mouse Press and hold the dotted middle button while using your finger to applying pressure to the pointing stick in the vertical or horizontal direction Then you can scroll through the document Web site or app...

Page 18: ...ew cap has grooves a Use the trackpad You can use the trackpad to perform all the pointing clicking and scrolling functions of a traditional mouse Use the trackpad Left click zone Right click zone 12 L13 Gen 2 L13 Yoga Gen 2 S2 Gen 6 and S2 Yoga Gen 6 User Guide ...

Page 19: ...ained with oil turn off the computer first Then gently wipe the trackpad surface with a soft and lint free cloth moistened with lukewarm water or computer cleaner For more gestures see the help information of the pointing device Disable the trackpad The trackpad is active by default To disable the device 1 Open the Start menu and then click Settings Devices Touchpad 2 In the Touchpad section turn ...

Page 20: ...click Slide to scroll through items Zoom out Zoom in Swipe from the left view all open windows Swipe from the right open action center Swipe downwards shortly show title bar Swipe downwards close the current app Drag 14 L13 Gen 2 L13 Yoga Gen 2 S2 Gen 6 and S2 Yoga Gen 6 User Guide ...

Page 21: ...to an electrical outlet 3 Turn on the external display If your computer cannot detect the external display right click a blank area on the desktop and select display settings Then follow the on screen instructions to detect the external display Supported resolution The following table lists the supported maximum resolution of the external display Connect the external display to Supported resolutio...

Page 22: ...Attention Do not rotate the computer display with too much force or apply too much force to the upper right or upper left corner of the computer display Otherwise the computer display or hinges might get damaged Your computer features the following four YOGA modes You can switch among different modes according to your preference Note The keyboard and the pointing devices are automatically disabled...

Page 23: ... ThinkPad Pen Pro is an electronic pen stored in the pen slot To use the pen slide it out of the slot Notes The ThinkPad Pen Pro is not waterproof Keep the pen away from water and excessive moisture To purchase the ThinkPad Pen Pro go to https www lenovo com accessories Chapter 2 Get started with your computer 17 ...

Page 24: ...tie the pen through the pen tether hole 4 Check the battery status of the ThinkPad Pen Pro 1 Tap the pen tip on the computer screen before checking battery status of the pen Otherwise the battery status as shown in Lenovo Pen Settings might not be accurate 2 Type Lenovo Pen Settings in the search box to open Lenovo Pen Settings A battery icon is displayed on the upper right corner 3 Move the mouse...

Page 25: ... articles Notes The available features vary depending on the computer model The Vantage app makes periodic updates of the features to keep improving your experience with your computer The description of features might be different from that on your actual user interface Lenovo Quick Clean Depending on the model your computer might support the Lenovo Quick Clean feature The preinstalled Lenovo Quic...

Page 26: ...omputer awake when in use and automatically lock the computer when your head moves out of the camera range Privacy Alert When a shoulder surfer is detected an alert icon appears on your computer screen Privacy Guard When a shoulder surfer is detected your screen is blurred Press Alt F2 to cancel the blur effect Smart Display Blur screens you are not looking at If you are not facing any screen all ...

Page 27: ...rt Pointer Relocate the pointer to the screen you are facing When the pointer moves from one screen to another it is temporarily drawn large Note Snap Window and Smart Pointer only work when your computer is connected to external displays Ensure that external displays are placed at the same height of your computer Promote digital wellness Posture check Remind you to adjust your posture once you hu...

Page 28: ...owing to select the preferred mode 1 Click the battery status icon in the Windows notification area 2 Move the slider to the left or right to select your preferred mode Auto mode Auto battery mode Switch between quiet mode and battery mode automatically based on the amount of system activity Auto performance mode Switch among quiet mode balanced mode and performance mode automatically based on the...

Page 29: ...e the physical environment and whether you are using the computer Notes To maximize the life of the battery Use the battery until the charge is depleted and recharge the battery completely before using it Once the battery is fully charged it must discharge to 94 or lower before it will be allowed to recharge again The battery may optimize its full charge capacity based on your usage After prolonge...

Page 30: ...ERGY STAR compliant computers the following power plan takes effect when your computer has been idle for a specified duration Turn off the display After 10 minutes Put the computer to sleep After 10 minutes To reset the power plan 1 Right click the battery status icon and select Power Options 2 Choose or customize a power plan of your preference To reset the power button function 1 Right click the...

Page 31: ...e following information Supported smart card Supported smart card specifications 85 60 mm 3 37 inches x 53 98 mm 2 13 inches Attention Smart cards with slits are not supported Do not insert such a smart card into the smart card reader of your computer Otherwise the reader might get damaged Install or remove a card Attention Before removing the card 1 Click the triangular icon in the Windows notifi...

Page 32: ...To shop at Lenovo go to https www lenovo com accessories Docking station You can use the following docking stations to extend the capacity of your computer ThinkPad Basic Docking Station ThinkPad Pro Docking Station ThinkPad Ultra Docking Station Side connectors of docking stations Figure 1 ThinkPad Basic Docking Station Figure 2 ThinkPad Pro Docking Station Figure 3 ThinkPad Ultra Docking Station...

Page 33: ...ation to ac power 2 Disconnect the cables and devices from the left side of the computer 3 Turn the system lock key to the unlocked position 4 Align the top left corner of the computer with the guide post of the docking station Attach your computer to the docking station as shown 1 until you hear a click Slide the latch in the direction as shown 2 5 Check the docking status indicator The docking s...

Page 34: ...step 1 in the following instruction 1 Turn the system lock key to the unlocked position 2 Slide the latch in the direction as shown 1 to release the computer and then grasp both sides of the computer to remove it 2 Connect multiple external displays You can connect multiple external displays to a supported docking station To ensure that the multiple displays work correctly refer to the following t...

Page 35: ...onnectors supporting external displays ThinkPad Basic Docking Station DisplayPort VGA ThinkPad Pro Docking Station DisplayPort x2 ThinkPad Ultra Docking Station DisplayPort x2 HDMI VGA Chapter 3 Explore your computer 29 ...

Page 36: ...30 L13 Gen 2 L13 Yoga Gen 2 S2 Gen 6 and S2 Yoga Gen 6 User Guide ...

Page 37: ...are Interface BIOS Basic Input Output System and how to set change and remove a password Password types You can set a power on password supervisor password system management password or hard disk password in UEFI BIOS to prevent unauthorized access to your computer However you are not prompted to enter any UEFI BIOS password when your computer resumes from sleep mode Power on password If you set a...

Page 38: ...ssword If you have set both the system management password and the power on password the system management password overrides the power on password Hard disk passwords The hard disk password prevents unauthorized access to the data on the storage drive When a hard disk password is set you are prompted to type a correct password each time you try to access the storage drive To set the hard disk pas...

Page 39: ... you forget your user hard disk password or both user and master hard disk passwords Lenovo cannot reset your passwords or recover data from the storage drive You can contact a Lenovo authorized service provider to have the storage drive replaced A fee will be charged for parts and service If the storage drive is a CRU Customer Replaceable Unit you can also contact Lenovo to purchase a new storage...

Page 40: ... PLP Power Loss Protection function to avoid data loss or damage On very rare occasions your computer is not responding and you might have to shut down your computer by pressing and holding the power button for about seven seconds In this case the PLP function enables key data of your computer to be saved timely However there is no guarantee that all data is saved in any situation To check the typ...

Page 41: ...der with a wet dirty wrinkled or injured finger Log in with your face ID for selected models If your computer comes with a Windows Hello compatible infrared camera you can unlock your computer by scanning your face instead of using a password Create your face ID and unlock your computer by scanning your face 1 Type Sign in options in the Windows search box and then press Enter 2 Select the face ID...

Page 42: ...36 L13 Gen 2 L13 Yoga Gen 2 S2 Gen 6 and S2 Yoga Gen 6 User Guide ...

Page 43: ... BIOS menu However you cannot change the system configurations that are protected by the supervisor password Navigate in the UEFI BIOS interface Attention The default configurations are already optimized for you in boldface Improper change of the configurations might cause unexpected results You can navigate in the UEFI BIOS interface by pressing the following keys F1 Display the General Help scre...

Page 44: ... operating system Microsoft constantly makes updates to the Windows operating system Before installing a particular Windows version check the compatibility list for the Windows version For details go to https support lenovo com us en solutions windows support Attention It is recommended that you update your operating system through official channels Any unofficial update might cause security risks...

Page 45: ...apply Windows Update to get the latest updates for example the security patches Install device drivers You should download the latest driver for a component when you notice poor performance from that component or when you added a component This action might eliminate the driver as the potential cause of a problem Download and install the latest driver by one of the following methods Open the Vanta...

Page 46: ...40 L13 Gen 2 L13 Yoga Gen 2 S2 Gen 6 and S2 Yoga Gen 6 User Guide ...

Page 47: ... be charged for the replacement CRU if Lenovo does not receive the defective CRU within thirty 30 days of your receipt of the replacement CRU For full details see the Lenovo Limited Warranty documentation at https www lenovo com warranty llw_02 Refer to the following CRU list for your computer Self service CRUs ac power adapter Power cord ThinkPad Pen Pro for L13 Yoga Gen 2 S2 Yoga Gen 6 only Opti...

Page 48: ...eplace a CRU Base cover assembly Prerequisite Before you start read Appendix A Important safety information on page 57 and print the following instructions Note When your computer is connected to ac power do not remove the base cover assembly Otherwise there might be a risk of short circuits Replacement procedure 1 Disable the built in battery See Disable Fast Startup and the built in battery on p...

Page 49: ...tem For details on how to install a new operating system see Install a Windows operating system and drivers on page 38 The M 2 solid state drive is sensitive Inappropriate handling might cause damage and permanent loss of data When handling the M 2 solid state drive observe the following guidelines Replace the M 2 solid state drive only for upgrade or repair The M 2 solid state drive is not design...

Page 50: ... turn over the computer 4 Remove the base cover assembly See Base cover assembly on page 42 5 Remove the M 2 solid state drive a Remove the screw that secures the M 2 solid state drive bracket 1 Then remove the M 2 solid state drive with the bracket out of the drive slot 2 b Turn over the M 2 solid state drive with the bracket and remove the screw 1 Then remove the M 2 solid state drive from the b...

Page 51: ...Connect the ac power adapter and all disconnected cables to the computer Replacement procedure for the long M 2 solid state drive 1 Disable the built in battery See Disable Fast Startup and the built in battery on page 41 2 Turn off the computer and disconnect the computer from ac power and all connected cables 3 Close the computer display and turn over the computer 4 Remove the base cover assembl...

Page 52: ...r Keyboard Prerequisite Before you start read Appendix A Important safety information on page 57 and print the following instructions Replacement procedure Note You might be instructed to slide the keyboard frame forward or backward in some of the following steps In this case ensure that you do not press or hold the keys while sliding the keyboard frame Otherwise the keyboard frame cannot be moved...

Page 53: ... the tabs a and b into the slot between the TrackPoint buttons and the trackpad 1 Slightly pivot the tool downward 2 to release the left and right TrackPoint buttons Then remove the two TrackPoint buttons 3 Note If your new keyboard is not shipped with the special tool shown in the following procedure you can use alternative tools to pry up the TrackPoint buttons 4 Loosen the screws that secure th...

Page 54: ...l in the direction as shown to release the keyboard 1 Push the keyboard in the direction as shown by arrows 2 to release the latches from the keyboard bezel 7 Pivot the keyboard slightly upward 1 and then turn over the keyboard 2 48 L13 Gen 2 L13 Yoga Gen 2 S2 Gen 6 and S2 Yoga Gen 6 User Guide ...

Page 55: ...Then remove the keyboard 9 Attach the connectors and then turn over the keyboard 10 Insert the keyboard into the keyboard bezel as shown Ensure that the top edge of the keyboard the edge that is close to the display is under the keyboard bezel Chapter 6 CRU replacement 49 ...

Page 56: ...rd frame 12 Tighten the screws to secure the keyboard 13 Take the new TrackPoint buttons out of the new keyboard package Install the TrackPoint buttons as shown 14 Connect the ac power adapter and all disconnected cables to the computer 50 L13 Gen 2 L13 Yoga Gen 2 S2 Gen 6 and S2 Yoga Gen 6 User Guide ...

Page 57: ...wer button for about seven seconds Then reconnect to ac power and restart the computer What do I do if I spill liquid on the computer 1 Carefully unplug the ac power adapter and turn off the computer immediately The more quickly you stop the current from passing through the computer the more likely you will reduce damage from short circuits Attention Although you might lose some data or work by tu...

Page 58: ...fficient storage space after POST The non volatile system UEFI variable storage is used by the UEFI BIOS and by the operating system or programs This error occurs when the operating system or programs store large amounts of data in the variable storage All data needed for POST such as UEFI BIOS setup settings chipset or platform configuration data are stored in a separate UEFI variable storage Pre...

Page 59: ...e proper diagnostic app and install it on your smartphone 3 Run the diagnostic app and place the smartphone near the computer 4 Press Fn on your computer to emit the beep again The diagnostic app decodes the beep error and shows possible solutions on the smartphone Note Do not attempt to service a product yourself unless instructed to do so by the Customer Support Center or product documentation O...

Page 60: ...ers and firmware updates Secure your computer from outside threats Diagnose hardware problems Check the computer warranty status Access User Guide and helpful articles Type Vantage in the Windows search box and then press Enter Product documentation Safety and Warranty Guide Setup Guide This User Guide Regulatory Notice Go to https pcsupport lenovo com Then follow the on screen instructions to fil...

Page 61: ...ftware applications were running at the time of the problem Can the problem be reproduced If so how 2 Record the system information Product name Machine type and serial number The following illustration shows where to find the machine type and serial number of your computer Lenovo Customer Support Center During the warranty period you can call Lenovo Customer Support Center for help Telephone numb...

Page 62: ...ovo will make selected Engineering Changes ECs that apply to your hardware available Services not covered Replacement or use of parts not manufactured for or by Lenovo or nonwarranted parts Identification of software problem sources Configuration of UEFI BIOS as part of an installation or upgrade Changes modifications or upgrades to device drivers Installation and maintenance of network operating ...

Page 63: ...ces to power adapters and batteries In addition some products such as speakers and monitors ship with external power adapters If you have such a product this information applies to your product In addition computer products contain a coin sized internal battery that provides power to the system clock even when the computer is unplugged so the battery safety information applies to all computer prod...

Page 64: ...om your computer Protect the cables from being damaged Applying strong force to cables may damage or break them Route communication lines or the cables of an ac power adapter a mouse a keyboard a printer or any other electronic device so that they cannot be walked on tripped over pinched by your computer or other objects or in any way subject to treatment that could interfere with the operation of...

Page 65: ...t from your product You might also hear sounds like popping cracking or hissing These might merely mean that an internal electronic component has failed in a safe and controlled manner Or they might indicate a potential safety issue Do not take risks or attempt to diagnose the situation yourself Contact the Customer Support Center for further guidance For a list of Service and Support phone number...

Page 66: ...installation are referred to as Customer Replaceable Units or CRUs Lenovo provides documentation with instructions when it is appropriate for customers to install options or replace CRUs You must closely follow all instructions when installing or replacing parts The Off state of a power indicator does not necessarily mean that voltage levels inside a product are zero Before you remove the covers f...

Page 67: ...gradual corrosion of power cord terminals and or the connector terminals on a power adapter which can eventually result in overheating Ensure that all power cord connectors are securely and completely plugged into receptacles Do not use any power adapter that shows corrosion at the ac input pins or shows signs of overheating such as deformed plastic at the ac input pins or anywhere on the power ad...

Page 68: ...lectrician for more information if you have questions about power loads and branch circuit ratings Be sure that the power outlet you are using is properly wired easily accessible and located close to the equipment Do not fully extend power cords in a way that will stress the cords Be sure that the power outlet provides the correct voltage and current for the product you are installing Carefully co...

Page 69: ... temperature charged to approximately 30 to 50 of capacity We recommend that the batteries be charged about once per year to prevent overdischarge Do not put the battery in trash that is disposed of in landfills When disposing of the battery comply with local ordinances or regulations Notice for built in rechargeable battery DANGER Do not attempt to remove or replace the built in rechargeable batt...

Page 70: ... is swallowed or placed inside any part of the body seek medical care immediately Do not Throw or immerse into water Heat to more than 100 C 212 F Repair or disassemble Leave in an extremely low air pressure environment Leave in an extremely high temperature environment Crush puncture cut or incinerate Dispose of the battery as required by local ordinances or regulations The following statement ap...

Page 71: ... computer or charge the battery near flammable materials or in explosive environments Ventilation slots fans and or heat sinks are provided with the product for safety comfort and reliable operation These features might inadvertently become blocked by placing the product on a bed sofa carpet or other flexible surface Never block cover or disable these features When the ac power adapter is connecte...

Page 72: ...rts enclosures are fastened into place Never use the computer when internal parts and circuits are exposed DANGER Connect and disconnect cables as described in the following procedures when installing moving or opening covers on this product or attached devices To connect 1 Turn everything OFF 2 First attach all cables to devices 3 Attach signal cables to connectors 4 Attach power cords to outlets...

Page 73: ...onnectors do not comply with specifications of EN 50332 2 The headphone output connector of your computer complies with EN 50332 2 Sub clause 7 This specification limits the computer s maximum wide band true RMS output voltage to 150 mV To help protect against hearing loss ensure that the headphones or earphones you use also comply with EN 50332 2 Clause 7 limits for a wide band characteristic vol...

Page 74: ...U touch the static protective packaging containing the part to a metal expansion slot cover or other unpainted metal surface on the computer for at least two seconds This reduces static electricity in the package and your body When possible remove the static sensitive part from the static protective packaging and install the part without setting it down When this is not possible place the static p...

Page 75: ...the latches to keep the display open or closed Avoid directly exposing your computer and peripherals to the air from an appliance that can produce negative ions Wherever possible ground your computer to facilitate safe electrostatic discharge Clean your computer It is a good practice to clean your computer periodically to protect the surfaces and ensure trouble free operation Clean the computer co...

Page 76: ...70 L13 Gen 2 L13 Yoga Gen 2 S2 Gen 6 and S2 Yoga Gen 6 User Guide ...

Page 77: ...unding light sources active seating and the placement of your computer hardware can help you improve your performance and achieve greater comfort This example shows someone in a conventional setting Even when not in such a setting you can follow many of these tips Develop good habits and they will serve you well General posture Make minor modifications in your working posture to deter the onset of...

Page 78: ...rformance If your work area is not in an office setting ensure to take special note of employing active sitting and taking work breaks Many product solutions are available to help you modify and expand your computer to best suit your needs You can find some of these options at https www lenovo com accessories Explore your options for docking solutions and external products that provide the adjusta...

Page 79: ...o doc for Fedora go to opt Lenovo If you cannot view the LLW either from the Web site or from your computer contact your local Lenovo office or reseller to obtain a printed version of the LLW Access Linux distributions Linux is an open source operating system and popular Linux distributions include Ubuntu and Fedora To learn more about the Ubuntu operating system go to https www ubuntu com To lear...

Page 80: ...74 L13 Gen 2 L13 Yoga Gen 2 S2 Gen 6 and S2 Yoga Gen 6 User Guide ...

Page 81: ...figurations For some countries or regions use of 802 11ax may be disabled according to your local regulations Usage environment and your health This computer contains integrated wireless cards that operate within the guidelines identified by radio frequency RF safety standards and recommendations therefore Lenovo believes that this product is safe for use by consumers These standards and recommend...

Page 82: ... that apply to EU Council Radio Equipment Directive 2014 53 EU on the approximation of the laws of the Member States as well as the UK Radio Equipment Regulations SI 2017 No 1206 relating to radio equipment The full text of the system EU declaration of conformity is available at https www lenovo com us en compliance eu doc The full text of the system UK declaration of conformity is available at ht...

Page 83: ...비 전파 혼신 사용주파수 2400 2483 5 5725 5825 무선제품해당 해당 무선설비가 전파혼신 가능성이 있으므로 인명안전과 관련된 서비스는 할 수 없음 SAR 정보 본 장치는 전파 노출에 대한 가이드라인을 충족합니다 본 장치는 무선 송수신기 입니다 본 장치는 국제 가이드라인으로 권장되는 전파 노출에 대한 제한을 초과하지 않도록 설계되었습니다 장치 액세서리 및 최신 부품을 사용할 경우 SAR 값이 달라질 수 있 습니다 SAR 값은 국가 보고 및 테스트 요구 사항과 네트워크 대역에 따라 다를 수 있습니다 본 장치 는 사람의 신체에서 20mm 이상의 거리에서 사용할 수 있습니다 Environmental information of countries and regions This section provides...

Page 84: ...e presence of hazardous substances Lenovo electrical and electronic equipment EEE may contain parts and components which at end of life might qualify as hazardous waste EEE and waste electrical and electronic equipment WEEE can be delivered free of charge to the place of sale or any distributor that sells electrical and electronic equipment of the same nature and function as the used EEE or WEEE B...

Page 85: ...ter October 1 2003 For details go to https www lenovo com recycling japan Dispose of Lenovo computer components Some Lenovo computer products sold in Japan may have components that contain heavy metals or other environmental sensitive substances To properly dispose of disused components such as a printed circuit board or drive use the methods described above for collecting and recycling a disused ...

Page 86: ... used batteries and accumulators as applicable throughout the European Union This label is applied to various batteries to indicate that the battery is not to be thrown away but rather reclaimed upon end of life per this Directive In accordance with the European Directive 2006 66 EC batteries and accumulators are labeled to indicate that they are to be collected separately and recycled at end of l...

Page 87: ...yl tape contact Lenovo sales service or your place of purchase or a waste disposal operator and follow their instructions You also can refer to the instructions provided in the user guide for your product For proper collection and treatment go to https www lenovo com environment Recycling information for mainland China Battery recycling information for Taiwan Battery recycling information for the ...

Page 88: ...rical and electronic equipment RoHS recast or RoHS 2 For more information about Lenovo worldwide compliance on RoHS go to https www lenovo com rohs communication Turkish WEEE RoHS Ukraine RoHS India RoHS RoHS compliant as per E Waste Management Rules Mainland China RoHS The information in the following table is applicable to products manufactured on or after January 1 2015 for sale in the People s...

Page 89: ...Appendix D Compliance and TCO Certified information 83 ...

Page 90: ...unications Commission FCC Supplier s Declaration of Conformity The following information refers to the following products Product name Machine type s ThinkPad L13 Gen 2 20VH 20VJ 21AB and 21AC 84 L13 Gen 2 L13 Yoga Gen 2 S2 Gen 6 and S2 Yoga Gen 6 User Guide ...

Page 91: ...e the separation between the equipment and receiver Connect the equipment into an outlet on a circuit different from that to which the receiver is connected Consult an authorized dealer or service representative for help Lenovo is not responsible for any radio or television interference caused by using other than recommended cables and connectors or by unauthorized changes or modifications to this...

Page 92: ...EU Richtlinie zur elektromagnetischen Verträglichkeit Angleichung der Rechtsvorschriften über die elektromagnetische Verträglichkeit in den EU Mitgliedsstaaten und hält die Grenzwerte der Klasse B der Norm gemäß Richtlinie Um dieses sicherzustellen sind die Geräte wie in den Handbüchern beschrieben zu installieren und zu betreiben Des Weiteren dürfen auch nur von der Lenovo empfohlene Kabel angesc...

Page 93: ...ps www lenovo com compliance Regulatory labels Depending on your country or region you can find the government required regulatory information through one of the following methods On a physical label attached to the outside of your computer shipping carton On a physical label attached to your computer Through an electronic label screen E label screen preinstalled on your computer To access the E l...

Page 94: ...Bay Hong Kong Страна производства Китай Наименование и местонахождение уполномоченного изготовителем лица ООО Леново Восточная Европа Азия 143401 Московская область г Красногорск бульвар Строителей дом 4 корпус 1 помещение VII тел 7 495 645 83 38 факс 7 495 645 78 77 Импортер Наименование адрес импортера и информация для связи с ним указаны на этикетке на упаковке продукции Согласно ГОСТ 2 601 201...

Page 95: ...ed to the product the product packaging or displayed electronically on the E label screen or the power settings interface By using ENERGY STAR compliant products and taking advantage of the power management features of your computer you reduce the consumption of electricity Reduced electrical consumption contributes to potential financial savings a cleaner environment and the reduction of greenhou...

Page 96: ...90 L13 Gen 2 L13 Yoga Gen 2 S2 Gen 6 and S2 Yoga Gen 6 User Guide ...

Page 97: ... to improve and or modify the products and software programs described in the manuals included with your computer and the content of the manual at any time without additional notice The software interface and function and hardware configuration described in the manuals included with your computer might not match exactly the actual configuration of the computer that you purchase For the configurati...

Page 98: ...KPOINT ULTRACONNECT and Yoga are trademarks of Lenovo Intel is a trademark of Intel Corporation or its subsidiaries in the U S and or other countries Microsoft Windows Direct3D BitLocker and Cortana are trademarks of the Microsoft group of companies DisplayPort is trademark of the Video Electronics Standards Association Linux is the registered trademark of Linus Torvalds in the U S and other count...

Page 99: ......

Page 100: ......

Reviews: