Lenovo 10YC Hardware Maintenance Manual Download Page 64

Figure 19. Installing the storage drive bracket

4.  Connect the storage drive cable to the system board.

5.  Complete the replacement. See “Completing the parts replacement” on page 53.

Replacing the internal speaker

Attention:

Do not open the computer or attempt any repair before reading and understanding “Read this 

first: Important safety information” on page v in this document.

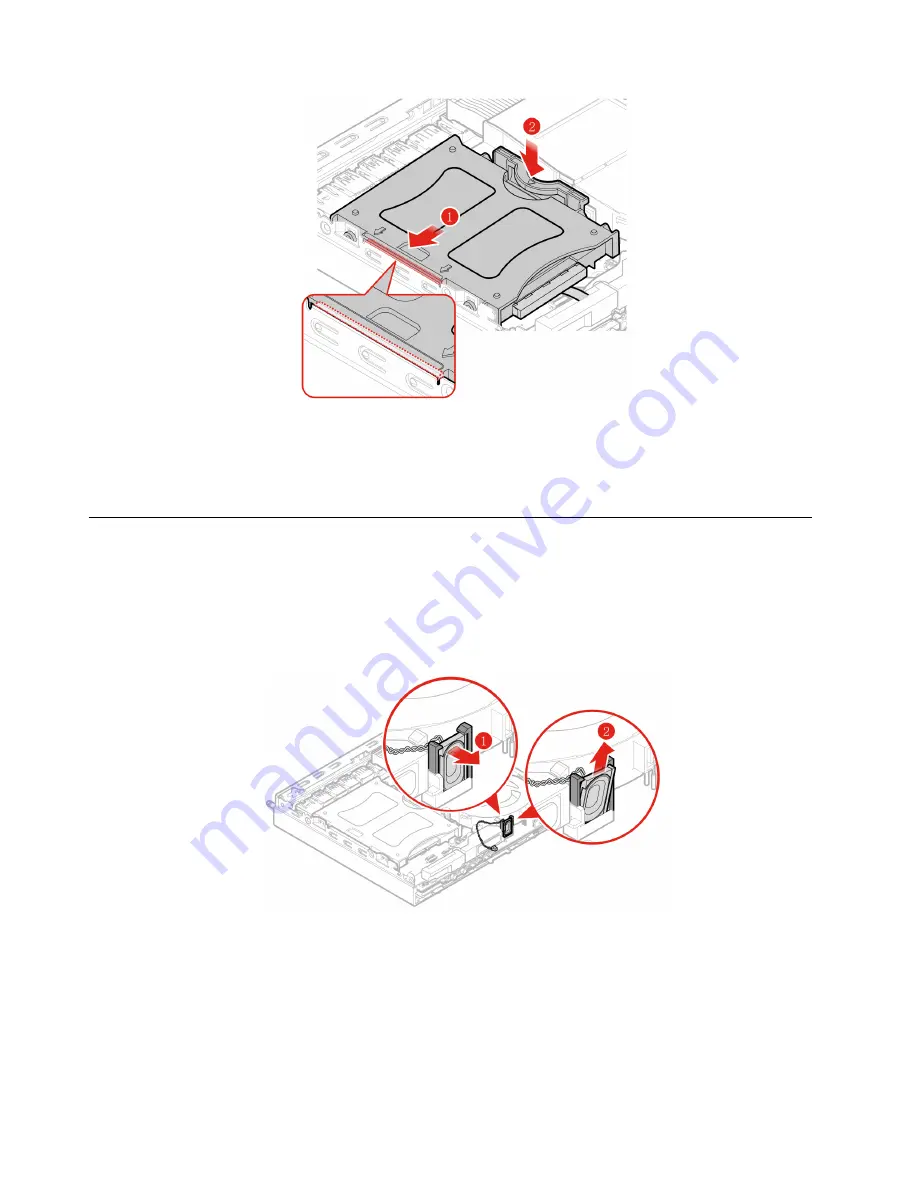
1.  Remove the computer cover. See “Removing the computer cover” on page 27.

2.  Disconnect the internal speaker cable from the internal speaker connector on the system board.

3.  Replace the internal speaker. 

Figure 20. Removing the internal speaker

30

M710q Hardware Maintenance Manual

Summary of Contents for 10YC

Page 1: ...M710q Hardware Maintenance Manual Machine Type 10YC ...

Page 2: ... information on page v and Appendix D Notices on page 69 First Edition September 2018 Copyright Lenovo 2018 LIMITED AND RESTRICTED RIGHTS NOTICE If data or software is delivered pursuant to a General Services Administration GSA contract use reproduction or disclosure is subject to restrictions set forth in Contract No GS 35F 05925 ...

Page 3: ...problems 18 Networking problems 18 Serial connector cannot be accessed 19 My USB device cannot be accessed 19 Software and driver problems 19 Chapter 6 Replacing hardware 21 Before replacing hardware 21 Guidelines for replacing non CRUs 21 Knowing FRUs including CRUs 22 Locating FRUs including CRUs 23 Replacing the keyboard or mouse 24 Replacing the power adapter 24 Replacing the VESA mount bracke...

Page 4: ...rmation 60 Appendix B WEEE and recycling information 61 Important WEEE information 61 Recycling information for Japan 61 Recycling information for Brazil 62 Battery recycling information for Taiwan 62 Battery recycling information for the European Union 63 Appendix C Restriction of Hazardous Substances RoHS Directive 65 European Union RoHS 65 Turkish RoHS 65 Ukraine RoHS 65 India RoHS 65 Chinese M...

Page 5: ...o troubleshoot problems Important This manual is intended only for trained service technicians who are familiar with ThinkCentre computers Use this manual along with the advanced diagnostic tests to troubleshoot problems effectively Before servicing a ThinkCentre computer be sure to read and understand Read this first Important safety information on page v Copyright Lenovo 2018 iii ...

Page 6: ...iv M710q Hardware Maintenance Manual ...

Page 7: ...o can stress the cord in ways that can cause the cord to fray crack or crimp This can present a safety hazard Always route power cords so that they will not be walked on tripped over or pinched by objects Protect power cord and power adapters from liquids For instance do not leave your power cord or power adapter near sinks tubs toilets or on floors that are cleaned with liquid cleansers Liquids c...

Page 8: ...our sleeves are fastened or rolled up above your elbows If your hair is long fasten it Insert the ends of your necktie or scarf inside clothing or fasten it with a nonconductive clip approximately 8 centimeters 3 inches from the end Do not wear jewelry chains metal frame eyeglasses or metal fasteners for your clothing Remember Metal objects are good electrical conductors Wear safety glasses when y...

Page 9: ...static discharges Do not use this type of mat to protect yourself from electrical shock Find the room emergency power off EPO switch disconnecting switch or electrical outlet If an electrical accident occurs you can then operate the switch or unplug the power cord quickly Do not work alone under hazardous conditions or near equipment that has hazardous voltages Disconnect all power before Performi...

Page 10: ...g of the units If an electrical accident occurs Use caution do not become a victim yourself Switch off power Send another person to get medical aid Safety inspection guide The intent of this inspection guide is to assist you in identifying potentially unsafe conditions on these products Each machine as it was designed and built had required safety items installed to protect users and service perso...

Page 11: ...requirements noted here 2 Make sure that the ESD protective devices you use have been certified ISO 9000 as fully effective When handling ESD sensitive parts Keep the parts in protective packages until they are inserted into the product Avoid contact with other people while handling the part Wear a grounded wrist strap against your skin to eliminate static on your body Prevent the part from touchi...

Page 12: ...to this product When possible use one hand only to connect or disconnect signal cables Never turn on any equipment when there is evidence of fire water or structural damage Disconnect the attached power cords telecommunications systems networks and modems before you open the device covers unless instructed otherwise in the installation and configuration procedures Connect and disconnect cables as ...

Page 13: ...D ROMs DVD ROM drives fiber optic devices or transmitters are installed note the following Do not remove the covers Removing the covers of the laser product could result in exposure to hazardous laser radiation There are no serviceable parts inside the device Use of controls or adjustments or performance of procedures other than those specified herein might result in hazardous radiation exposure D...

Page 14: ...pply do not turn off the electrical current supplied to the device The device also might have more than one power cord To remove all electrical current from the device ensure that all power cords are disconnected from the power source 1 2 xii M710q Hardware Maintenance Manual ...

Page 15: ... 18 kg 37 lb 32 kg 70 5 lb 55 kg 121 2 lb Copyright Lenovo 2018 xiii ...

Page 16: ...ia de fogo água ou danos estruturais Antes de abrir tampas de dispositivos desconecte cabos de alimentação sistemas de telecomunicação redes e modems conectados a menos que especificado de maneira diferente nos procedimentos de instalação e configuração Conecte e desconecte os cabos conforme descrito na tabela apresentada a seguir ao instalar mover ou abrir tampas deste produto ou de dispositivos ...

Page 17: ...spositivos de fibra ótica ou transmissores estiverem instalados observe o seguinte Não remova as tampas A remoção das tampas de um produto a laser pode resultar em exposição prejudicial à radiação de laser Não existem peças que podem ser consertadas no interior do dispositivo A utilização de controles ou ajustes ou a execução de procedimentos diferentes dos especificados aqui pode resultar em expo...

Page 18: ...tação não desligam a corrente elétrica fornecida ao dispositivo O dispositivo também pode ter mais de um cabo de alimentação Para remover toda a corrente elétrica do dispositivo assegure que todos os cabos de alimentação estejam desconectados da fonte de alimentação 1 2 xvi M710q Hardware Maintenance Manual ...

Page 19: ... Copyright Lenovo 2018 xvii ...

Page 20: ...1 2 xviii M710q Hardware Maintenance Manual ...

Page 21: ...oduit au cours d un orage Branchez tous les cordons d alimentation sur un socle de prise de courant correctement câblé et mis à la terre Branchez sur des socles de prise de courant correctement câblés tout équipement connecté à ce produit Lorsque cela est possible n utilisez qu une seule main pour connecter ou déconnecter les câbles d interface Ne mettez jamais un équipement sous tension en cas d ...

Page 22: ...par une pile de référence identique exclusivement référence 45C1566 ou suivre les instructions du fabricant qui en définit les équivalences Si votre système est doté d un module contenant une pile au lithium vous devez le remplacer uniquement par un module identique produit par le même fabricant La pile contient du lithium et peut exploser en cas de mauvaise utilisation de mauvaise manipulation ou...

Page 23: ...ATTENTION L interrupteur de contrôle d alimentation de l unité et l interrupteur dubloc d alimentation ne coupent pas le courant électrique alimentantl unité En outre le système peut être équipé de plusieurs cordonsd alimentation Pour mettre l unité hors tension vous devez déconnectertous les cordons de la source d alimentation 1 2 VORSICHT An Netz Telefon und Datenleitungen können gefährliche Spa...

Page 24: ...n die Einheiten an 3 Schließen Sie die Signalkabel an die Buchsen an 4 Schließen Sie die Netzkabel an die Steckdose an 5 Schalten Sie die Einheit EIN 1 Schalten Sie alle Einheiten AUS 2 Ziehen Sie zuerst alle Netzkabel aus den Netzsteckdosen 3 Ziehen Sie die Signalkabel aus den Buchsen 4 Ziehen Sie alle Kabel von den Einheiten ab CAUTION Eine verbrauchte Lithiumbatterie nur durch eine Batterie mit...

Page 25: ...rahl blicken Keine Lupen oder Spiegel verwenden Strahlungsbereich meiden 18 kg 32 kg 55 kg ACHTUNG Arbeitsschutzrichtlinien beim Anheben der Maschine beachten ACHTUNG Mit dem Netzschalter an der Einheit und am Netzteil wird die Stromversorgung für die Einheit nicht unterbrochen Die Einheit kann auch mit mehreren Netzkabeln ausgestattet sein Um die Stromversorgung für die Einheit vollständig zu unt...

Page 26: ...xxiv M710q Hardware Maintenance Manual ...

Page 27: ...1 2 PERICOLO La corrente elettrica proveniente dai cavi di alimentazione del telefono e di comunicazione può essere pericolosa Per evitare il rischio di scosse elettriche Copyright Lenovo 2018 xxv ...

Page 28: ...ecchiature 2 Innanzitutto collegare tutti i cavi alle unità 3 Collegare i cavi di segnale ai connettori 4 Collegare i cavi di alimentazione alla presa 5 Accendere l unità 1 SPEGNERE le apparecchiature 2 Innanzitutto rimuovere i cavi di alimentazione dalla presa 3 Rimuovere i cavi di segnale dai connettori 4 Rimuovere tutti i cavi dalle unità ATTENZIONE Quando si sostituisce la batteria al litio ut...

Page 29: ...te quanto segue Aprendo l unità vengono emesse radiazioni laser Non fissare il fascio non guardarlo direttamente con strumenti ottici ed evitare l esposizione al fascio 18 kg 32 kg 55 kg ATTENZIONE Prestare attenzione nel sollevare l apparecchiatura ATTENZIONE Il pulsante di controllo dell alimentazione presente sull unità e l interruttore dell alimentatore non disattivano l alimentazione corrente...

Page 30: ...xxviii M710q Hardware Maintenance Manual ...

Page 31: ...e instalación mantenimiento o reconfiguración de este producto durante una tormenta eléctrica Conecte todos los cables de alimentación a tomas de corriente debidamente cableadas y conectadas a tierra Cualquier equipo que se conecte a este producto también debe conectarse a tomas de corriente debidamente cableadas Siempre que sea posible utilice una sola mano para conectar o desconectar los cables ...

Page 32: ... dispositivos PRECAUCIÓN Cuando sustituya una batería de litio utilice solamente una batería número de pieza 45C1566 u otra de tipo equivalente recomendada por el fabricante Si su sistema dispone de un módulo que contiene una batería de litio reemplácelo sólo con el mismo tipo de módulo del mismo fabricante La batería contiene litio y puede explotar si no se utiliza manipula o desecha correctament...

Page 33: ...AUCIÓN Adopte procedimientos seguros al levantar el equipo PRECAUCIÓN El botón de control de alimentación del dispositivo y el interruptor de alimentación de la fuente de alimentación no desconectan la corriente eléctrica suministrada al dispositivo Además el dispositivo podría tener más de un cable de alimentación Para suprimir toda la corriente eléctrica del dispositivo asegúrese de que todos lo...

Page 34: ...xxxii M710q Hardware Maintenance Manual ...

Page 35: ... Note Your computer model might look slightly different from the illustration Figure 1 Front view 1 Power indicator 2 Power button 3 Storage drive status indicator 4 Microphone connector 5 Headset connector 6 USB 3 1 Gen 1 connector 7 Always On USB 3 1 Gen 1 connector 8 Illuminated red dot Copyright Lenovo 2018 1 ...

Page 36: ... recognition software 5 Headset connector Used to connect a headset or headphones to your computer 6 USB 3 1 Gen 1 connector Used to connect a USB compatible device For optimal data transfer connect a USB 3 1 Gen 1 device to a USB 3 1 Gen 2 or USB 3 1 Gen 1 connector instead of a USB 2 0 connector 7 Always On USB 3 1 Gen 1 connector Used to connect a USB compatible device For optimal data transfer...

Page 37: ...tors 2 15 USB 3 1 Gen 1 connector 16 DisplayPort 1 2 out connector 17 USB 3 1 Gen 1 connector 18 DisplayPort 1 2 out connector 19 Power adapter connector 9 Optional connector 2 Depending on the computer model the connector might vary 10 Optional connector 1 Depending on the computer model the connector might vary 11 Security lock slot Chapter 1 Overview 3 ...

Page 38: ...USB 3 1 Gen 1 device to a USB 3 1 Gen 2 or USB 3 1 Gen 1 connector instead of a USB 2 0 connector 16 HDMI 1 4 out connector Used to send video and audio signals from your computer to another audio or video device such as a high performance monitor 17 USB 3 1 Gen 1 connector Used to connect a USB compatible device For optimal data transfer connect a USB 3 1 Gen 1 device to a USB 3 1 Gen 2 or USB 3 ...

Page 39: ...onnector 1 2 Serial connector 2 3 USB 3 1 Gen 1 connector 4 Storage drive fan connector 5 Microprocessor socket 6 Coin cell battery 7 Illuminated red dot connector 8 Internal speaker or advanced speaker connector Chapter 1 Overview 5 ...

Page 40: ...The machine type and model label is attached on the computer as shown Figure 4 Machine type and model label Specifications Power supply 65 watt automatic voltage sensing power supply optional 90 watt automatic voltage sensing power supply optional Storage drives 2 5 inch storage drive optional M 2 solid state drive optional Video features The integrated graphics card supports the following Display...

Page 41: ...l connectors optional USB connectors Expansion Memory slots M 2 solid state drive slot Network features Ethernet LAN Wireless LAN optional Bluetooth optional Physical dimensions Width 35 mm 1 4 inches Height 183 mm 7 2 inches Depth 179 mm 7 1 inches Weight without the package Maximum configuration as shipped 1 3 kg 2 9 lb Chapter 1 Overview 7 ...

Page 42: ...8 M710q Hardware Maintenance Manual ...

Page 43: ...o register the computer with Lenovo ensure that the computer is connected to the Internet Then go to http www lenovo com register and follow the instructions on the screen Frequently asked questions The following are some of the frequently asked questions and their answers The answers can help you optimize the use of your computer For the answers to more frequently asked questions about using your...

Page 44: ...10 M710q Hardware Maintenance Manual ...

Page 45: ... needs and the kind of work you do This section provides information about the factors that affect the way you arrange your workspace Glare and lighting Position the monitor to minimize glare and reflections from overhead lights windows and other light sources Reflected light from shiny surfaces can cause annoying reflections on your screen When possible place the monitor at right angles to window...

Page 46: ...f the screen is at or slightly below eye level and you can view it without twisting your body Chair position Use a chair that gives you good back support and seat height adjustment Use chair adjustments to best suit your desired posture Head position Keep your head and neck in a comfortable and neutral vertical or upright position Arm and hand positions Keep your forearms wrists and hands in a rel...

Page 47: ...ve text so that visually impaired users can understand the image when they use a screen reader Cleaning the computer CAUTION Remove any media from the drives and turn off all connected devices and the computer Then disconnect all power cords from electrical outlets and disconnect all cables that are connected to the computer It is a good practice to clean the computer periodically to protect the s...

Page 48: ...orage drive regularly You can restore the storage drive from a backup Moving the computer Before moving the computer take the following precautions 1 Back up your data on the storage drive 2 Remove any media from the drives and turn off all connected devices and the computer Then disconnect all power cords from electrical outlets and disconnect all cables that are connected to the computer 3 If yo...

Page 49: ...ble lock connects to the security lock slot at the rear of your computer Depending on the type selected the cable lock can be operated with a key or combination The cable lock also locks the buttons used to open the computer cover This is the same type of lock used with many notebook computers You can order such a cable lock directly from Lenovo by searching for Kensington at http www lenovo com s...

Page 50: ...16 M710q Hardware Maintenance Manual ...

Page 51: ...enter For a list of Lenovo Support phone numbers go to http www lenovo com support phone For other problems contact Amazon Helpdesk For more information about help service and technical assistance see Chapter 7 Getting information help and service on page 55 Troubleshooting Attention Do not open the computer or attempt any repair before reading and understanding Read this first Important safety in...

Page 52: ... drivers for the application programs Refer to the documentation for the affected application program to check whether any device drivers are required The image is discolored Solution The screen might be affected by interference from nearby equipment Move fluorescent desk lighting or any equipment that produces magnetic fields further away from the screen If the problem persists do the following 1...

Page 53: ...power cord to a grounded electrical outlet Turn on the USB device and keep the device online Detach and reconnect the USB connector to reset the USB device Software and driver problems This section provides solutions to software and driver related problems For some programs dates cannot be sorted in correct order Solution Some programs developed before the year 2000 use only the last two digits of...

Page 54: ...20 M710q Hardware Maintenance Manual ...

Page 55: ...Handle PCI PCIe cards memory modules system boards and microprocessors by the edges Never touch any exposed circuitry Prevent others from touching the options and other computer components Touch the static protective package containing the part to a metal expansion slot cover or other unpainted metal surface on the computer for at least two seconds This reduces static electricity from the package ...

Page 56: ...ustomer Replaceable Units CRUs are computer parts that a user can upgrade or replace Self service CRUs You can install self service CRUs easily These CRUs might be stand alone latched or secured by up to two screws Examples of self service CRUs include the keyboard mouse any USB device You are responsible for replacing all self service CRUs Optional service CRUs Handling optional service CRUs requ...

Page 57: ...clear the error log and run the test again If the error does not recur do not replace the FRU Only replace a defective FRU Locating FRUs including CRUs Notes Some of the components are optional To replace 1 2 23 24 25 and 26 contact a Lenovo service technician For a list of Lenovo Support phone numbers go to http www lenovo com support phone To replace other parts contact Amazon Helpdesk Figure 6 ...

Page 58: ...r and disconnect all power cords from electrical outlets 2 Disconnect the old keyboard or mouse cable from the computer 3 Connect a new keyboard or mouse to the appropriate connector on the computer Figure 7 Replacing the keyboard or mouse Replacing the power adapter Attention Do not open the computer or attempt any repair before reading and understanding Read this first Important safety informati...

Page 59: ...Figure 8 Removing the power adapter Figure 9 Removing the power cord Chapter 6 Replacing hardware 25 ...

Page 60: ...re reading and understanding Read this first Important safety information on page v in this document 1 Remove any media from the drives and turn off all connected devices and the computer 2 Disconnect all power cords from electrical outlets and disconnect all cables that are connected to the computer 3 Replace the VESA mount bracket 26 M710q Hardware Maintenance Manual ...

Page 61: ...ormation on page v in this document CAUTION Before you open the computer cover turn off the computer and wait several minutes until the computer is cool 1 Remove any media from the drives and turn off all connected devices and the computer 2 Disconnect all power cords from electrical outlets and disconnect all cables that are connected to the computer 3 Remove computer cover Note The dust shield i...

Page 62: ... Do not open the computer or attempt any repair before reading and understanding Read this first Important safety information on page v in this document 1 Remove the computer cover See Removing the computer cover on page 27 2 Disconnect the storage drive cable from the system board 3 Replace the storage drive 28 M710q Hardware Maintenance Manual ...

Page 63: ...Figure 16 Removing the storage drive bracket Figure 17 Removing the storage drive Figure 18 Installing the storage drive Chapter 6 Replacing hardware 29 ...

Page 64: ...ot open the computer or attempt any repair before reading and understanding Read this first Important safety information on page v in this document 1 Remove the computer cover See Removing the computer cover on page 27 2 Disconnect the internal speaker cable from the internal speaker connector on the system board 3 Replace the internal speaker Figure 20 Removing the internal speaker 30 M710q Hardw...

Page 65: ... Read this first Important safety information on page v in this document 1 Remove the computer cover See Removing the computer cover on page 27 2 Remove the storage drive See Replacing the storage drive on page 28 3 Remove the internal speaker See Replacing the internal speaker on page 30 4 Release the illuminated red dot cable from the system fan 5 Disconnect the system fan cable from the system ...

Page 66: ...rd Attention Do not open the computer or attempt any repair before reading and understanding Read this first Important safety information on page v in this document 1 Remove the computer cover See Removing the computer cover on page 27 2 Remove the storage drive See Replacing the storage drive on page 28 3 Replace the Wi Fi card Note Your Wi Fi card might look different from the one illustrated Fi...

Page 67: ...Figure 25 Disconnecting the Wi Fi antennas Figure 26 Removing the Wi Fi card Figure 27 Installing the Wi Fi card Figure 28 Connecting the Wi Fi antennas Chapter 6 Replacing hardware 33 ...

Page 68: ... cover Attention Do not open the computer or attempt any repair before reading and understanding Read this first Important safety information on page v in this document 1 Remove the computer cover See Removing the computer cover on page 27 2 Replace the bottom cover Figure 30 Removing the bottom cover 34 M710q Hardware Maintenance Manual ...

Page 69: ...n this document If your computer supports one memory module install the module into the DIMM 1 slot If your computer supports two memory modules install one memory module into the DIMM 1 slot first and then install the other into the DIMM 2 slot 1 Remove the computer cover See Removing the computer cover on page 27 2 Remove the bottom cover See Replacing the bottom cover on page 34 3 Replace the m...

Page 70: ... on page 53 Replacing the M 2 solid state drive Attention Do not open the computer or attempt any repair before reading and understanding Read this first Important safety information on page v in this document 1 Remove the computer cover See Removing the computer cover on page 27 2 Remove the bottom cover See Replacing the bottom cover on page 34 36 M710q Hardware Maintenance Manual ...

Page 71: ...2 solid state drive clip 4 Complete the replacement See Completing the parts replacement on page 53 Replacing the illuminated red dot cable Attention Do not open the computer or attempt any repair before reading and understanding Read this first Important safety information on page v in this document 1 Remove the computer cover See Removing the computer cover on page 27 Chapter 6 Replacing hardwar...

Page 72: ...ge 53 Replacing the advanced speaker Note The advanced speaker is optional Attention Do not open the computer or attempt any repair before reading and understanding Read this first Important safety information on page v in this document 1 Remove the computer cover See Removing the computer cover on page 27 2 Remove the storage drive See Replacing the storage drive on page 28 3 Disconnect the advan...

Page 73: ...antenna cover before installing the computer into the TIO monitor model Tiny in One 23 Monitor MT 10DQ Attention Do not open the computer or attempt any repair before reading and understanding Read this first Important safety information on page v in this document Replacing the front Wi Fi antenna 1 Remove the computer cover See Removing the computer cover on page 27 2 Remove the storage drive See...

Page 74: ...Figure 44 Disconnecting the front Wi Fi antenna cable from the Wi Fi card Figure 45 Removing the front Wi Fi antenna Figure 46 Installing the front Wi Fi antenna 40 M710q Hardware Maintenance Manual ...

Page 75: ...emove the computer cover See Removing the computer cover on page 27 2 Remove the storage drive See Replacing the storage drive on page 28 3 Disconnect the rear Wi Fi antenna cable from the Wi Fi card 4 Replace the rear Wi Fi antenna Note Record the cable routing before removing the rear Wi Fi antenna cable Figure 48 Removing the rear Wi Fi antenna Chapter 6 Replacing hardware 41 ...

Page 76: ...ures the rear Wi Fi antenna cable Figure 50 Removing the rear Wi Fi antenna cable Figure 51 Installing the rear Wi Fi antenna cable Figure 52 Installing the antenna cover to secure the rear Wi Fi antenna cable 42 M710q Hardware Maintenance Manual ...

Page 77: ...ore reading and understanding Read this first Important safety information on page v in this document 1 Remove the computer cover See Removing the computer cover on page 27 2 Remove the storage drive See Replacing the storage drive on page 28 3 Replace the storage drive cable Figure 54 Removing the storage drive cable Figure 55 Installing the storage drive cable 4 Complete the replacement See Comp...

Page 78: ...t the computer cool before removing the computer cover 1 Remove the computer cover See Removing the computer cover on page 27 2 Remove the storage drive See Replacing the storage drive on page 28 3 Remove the internal speaker See Replacing the internal speaker on page 30 4 Remove the system fan See Replacing the system fan on page 31 5 Replace the heat sink Figure 56 Loosening the screws that secu...

Page 79: ...r turn off the computer and wait several minutes until the computer is cool 1 Remove the computer cover See Removing the computer cover on page 27 2 Remove the storage drive See Replacing the storage drive on page 28 3 Remove the internal speaker See Replacing the internal speaker on page 30 4 Remove the system fan See Replacing the system fan on page 31 5 Remove the heat sink See Replacing the he...

Page 80: ...t while it is exposed The socket pins must be kept as clean as possible Figure 60 Unlocking the microprocessor socket retainer Figure 61 Pivoting the microprocessor socket upward Figure 62 Removing the microprocessor 46 M710q Hardware Maintenance Manual ...

Page 81: ...Figure 63 Installing the microprocessor Chapter 6 Replacing hardware 47 ...

Page 82: ...r 7 Complete the replacement See Completing the parts replacement on page 53 Replacing the coin cell battery Attention Do not open the computer or attempt any repair before reading and understanding Read this first Important safety information on page v in this document 48 M710q Hardware Maintenance Manual ...

Page 83: ... coin cell battery fails the date time and configuration information including passwords are lost An error message is displayed when you turn on the computer 1 Remove the computer cover See Removing the computer cover on page 27 2 Remove the storage drive See Replacing the storage drive on page 28 3 Remove the internal speaker See Replacing the internal speaker on page 30 4 Remove the system fan S...

Page 84: ...ttention Do not open the computer or attempt any repair before reading and understanding Read this first Important safety information on page v in this document 1 Remove the computer cover See Removing the computer cover on page 27 2 Remove the storage drive See Replacing the storage drive on page 28 3 Remove the advanced speaker See Replacing the advanced speaker on page 38 4 Remove the front Wi ...

Page 85: ...ove the heat sink See Replacing the heat sink on page 44 6 Remove the microprocessor See Replacing the microprocessor on page 45 7 Remove the advanced speaker See Replacing the advanced speaker on page 38 8 Remove the Wi Fi antennas See Replacing the Wi Fi antennas on page 39 9 Remove the antenna bracket See Replacing the antenna bracket on page 50 10 Remove the Wi Fi card See Replacing the Wi Fi ...

Page 86: ...ully handle the system board by its edges Figure 72 Removing the screws that secure the system board Figure 73 Removing the system board Figure 74 Installing the system board 52 M710q Hardware Maintenance Manual ...

Page 87: ...on or replacement for all parts Complete the replacement To Complete the replacement to your computer do the following 1 Ensure that all components have been reassembled correctly and that no tools or loose screws are left inside your computer 2 Ensure that the cables are routed correctly before reinstalling the computer cover Keep cables clear of the hinges and sides of the computer chassis to av...

Page 88: ...ecure the computer cover 5 Place the computer in an upright position 6 If a locking device is available use it to lock the computer 7 Reconnect the external cables and power cords to the corresponding connectors on the computer 54 M710q Hardware Maintenance Manual ...

Page 89: ...t and service warranty Lenovo Web site The Lenovo Web site http www lenovo com provides up to date information and services to help you buy upgrade and maintain the computer You also can do the following Shop for desktop and notebook computers monitors projectors upgrades and accessories for the computer and special offers Purchase additional services such as support for hardware operating systems...

Page 90: ...ocedures vary by country and some services might not be available in all countries International Warranty Service is delivered through the method of service such as depot carry in or on site service that is provided in the servicing country Service centers in certain countries might not be able to service all models of a particular machine type In some countries fees and restrictions might apply a...

Page 91: ...l not occur in a particular installation If this equipment does cause harmful interference to radio or television reception which can be determined by turning the equipment off and on the user is encouraged to try to correct the interference by one or more of the following measures Reorient or relocate the receiving antenna Increase the separation between the equipment and receiver Connect the equ...

Page 92: ...ova 21 851 01 Bratislava Slovakia This product is in conformity with the protection requirements of EU Council EMC Directive 2014 30 EU on the approximation of the laws of the Member States relating to electromagnetic compatibility This product has been tested and found to comply with the limits for Class B equipment according to European Standards harmonized in the Directives in compliance The Cl...

Page 93: ...tschen EMVG das EG Konformitätszeichen CE zu führen Verantwortlich für die Konformitätserklärung nach Paragraf 5 des EMVG ist die Lenovo Deutschland GmbH Meitnerstr 9 D 70563 Stuttgart Korea compliance statement Japan VCCI Class B compliance statement Japan compliance statement for products which connect to the power mains with rated current less than or equal to 20 A per phase Japan notice for ac...

Page 94: ...a incluyendo la que pueda causar su operación no deseada Taiwan vision precaution notice Additional regulatory information For additional regulatory information refer to the Regulatory Notice shipped with the computer Depending on the configuration of the computer and the country or region where the computer was purchased you might have received additional printed regulatory notices All regulatory...

Page 95: ... WEEE marking must not dispose of end of life EEE as unsorted municipal waste but use the collection framework available to them for the return recycle and recovery of WEEE and to minimize any potential effects of EEE on the environment and human health due to the presence of hazardous substances Lenovo electrical and electronic equipment EEE may contain parts and components which at end of life m...

Page 96: ...shaped lithium battery is installed inside your Lenovo computer to provide power to the computer clock while the computer is off or disconnected from the main power source If you need to replace it with a new one contact your place of purchase or contact Lenovo for service If you need to dispose of a disused lithium battery insulate it with vinyl tape contact your place of purchase or an industria...

Page 97: ...and accumulators on the environment and human health due to the potential presence of hazardous substances Before placing electrical and electronic equipment EEE in the waste collection stream or in waste collection facilities the end user of equipment containing batteries and or accumulators must remove those batteries and accumulators for separate collection Disposing of lithium batteries and ba...

Page 98: ...64 M710q Hardware Maintenance Manual ...

Page 99: ...e use of certain hazardous substances in electrical and electronic equipment RoHS recast or RoHS 2 For more information about Lenovo worldwide compliance on RoHS go to http www lenovo com rohs communication Turkish RoHS The Lenovo product meets the requirements of the Republic of Turkey Directive on the Restriction of the Use of Certain Hazardous Substances in Waste Electrical and Electronic Equip...

Page 100: ...Chinese Mainland RoHS 66 M710q Hardware Maintenance Manual ...

Page 101: ...Taiwan RoHS Appendix C Restriction of Hazardous Substances RoHS Directive 67 ...

Page 102: ...68 M710q Hardware Maintenance Manual ...

Page 103: ...he publication Lenovo may make improvements and or changes in the products and or the programs described in this publication at any time without notice The products described in this document are not intended for use in implantation or other life support applications where malfunction may result in injury or death to persons The information contained in this document does not affect or change Leno...

Page 104: ... of the Video Electronics Standards Association The terms HDMI and HDMI High Definition Multimedia Interface are trademarks or registered trademarks of HDMI Licensing LLC in the United States and other countries All other trademarks are the property of their respective owners 2018 Lenovo 70 M710q Hardware Maintenance Manual ...

Page 105: ......

Page 106: ......

Reviews: