12
Making home-made chips
Use waxy potatoes when making home-made
chips, so that they do not fall apart during
cooking.
It is best to use approx. 500 g of potatoes.
1. Peel the potatoes and chop them into thin
sticks, no thicker than 1 cm: the thinner the
sticks, the crispier the chips.
2. Soak the potato sticks in bowl of cold water
for at least 30 minutes to remove as much
starch from them as possible. Starch
prevents the chips from browning evenly.
Then dry them thoroughly with clean kitchen
paper. The sticks should be as dry as possi-
ble before being put into the appliance.
3. In a bowl, carefully mix the sticks with 1/2 to
1 tsp vegetable oil, e.g. sunflower oil, until all
of them are lightly coated with oil. This will
make the chips lovely and crispy. Do not
use butter or margarine. These fats are
not suitable for deep-frying.
4. Take the potato sticks out the bowl carefully,
letting any excess oil drip off.
If necessary, use a piece of kitchen paper
to dab off any excess oil. Place the potato
sticks into the cooking basket.
Please note:
Do not pour the sticks directly
out of the bowl into the cooking basket,
in order to prevent any excess oil from
ending up in the cooking basket!
5. Cook the chips according to the
instructions in the table.
Use
WARNING
– risk of fire
• Do not place the appliance under wall cup-
boards, near flammable objects or directly
against a wall or in a corner. Make sure that
the mains cord does not hang down from
the work surface.
• Keep the ventilation openings free.
Do not place anything onto the appliance.
• Never use the appliance without the cooking
basket or the sieve insert.
• Do not put any oil or fat into the cooking
basket.
M
Set the appliance on a heat-resistant,
non-slip, level and stable work surface.
M
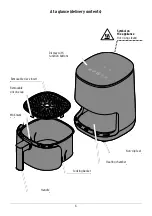
Place the sieve insert into the cooking bas-
ket. The small silicone caps on the base of
the sieve insert must be correctly attached.
Preheating
The values in the cooking table apply to a
pre-heated appliance. To time the cooking
process perfectly, we recommend preheating
the appliance. Switch the appliance on without
any food in it at first, but with the cooking basket
and sieve insert, as described in the section
“Prior to first use (without food)”.
Only fill the appliance with food once the
“Heating up” icon
has gone out (after
max. 3 minutes, depending on the temperature).
Start the cooking process
1. Fill the cooking basket with the food of your
choice. Do not fill the cooking basket above
the MAX-mark and refer to the quantities
recommended in the cooking table.
2. Place the cooking basket into the appliance all
the way. You should hear and feel the cooking
basket lock into place so that the contact
switch in the housing is activated. Otherwise,
the appliance cannot be switched on.


