


2018-08-07
Page 17
LABvault-HD
Administrative Web Interface
RECORDING
Set up your LABvault-HD system for recording with the administrative interface’s record quality and automation settings
and then learn how to use the interface to activate the LABvault-HD’s record features through the following subsections:
Record Settings
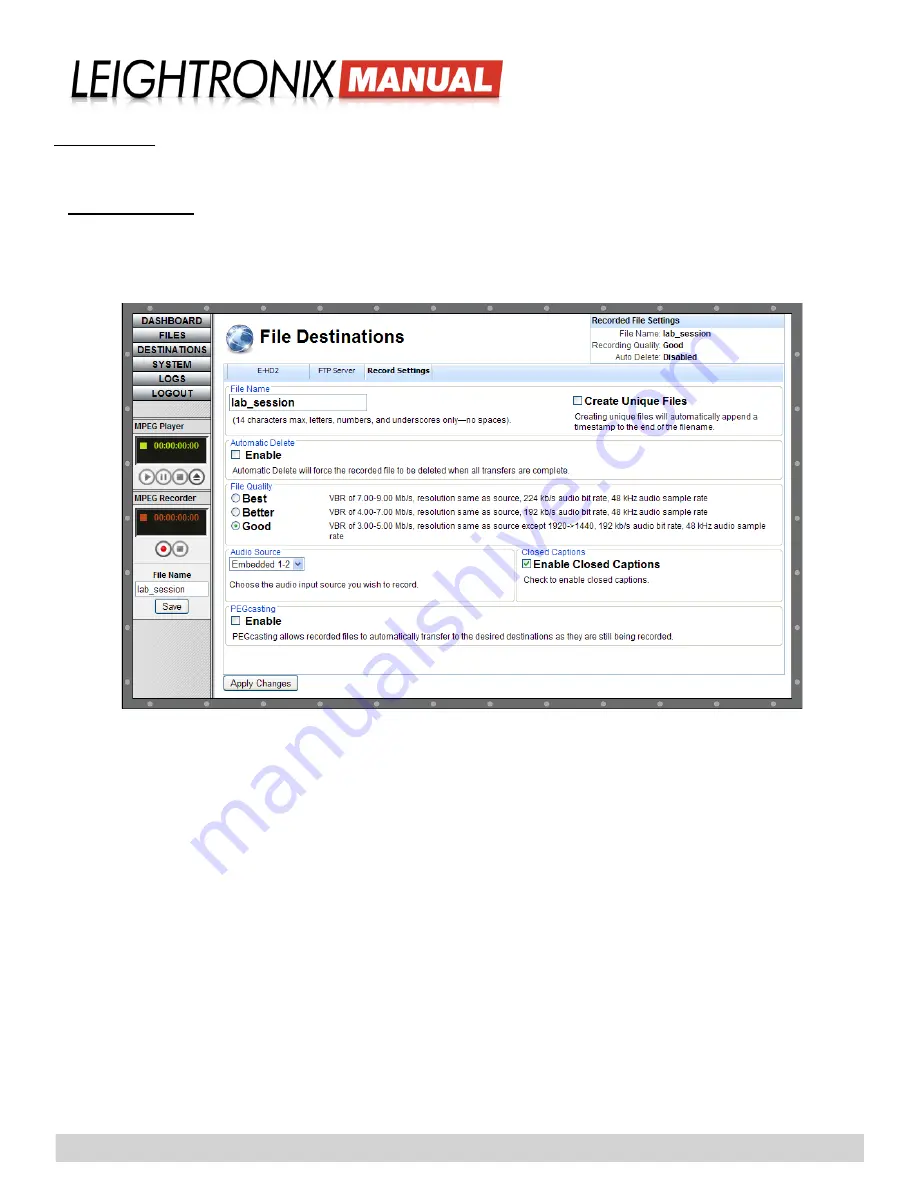
Click the “DESTINATIONS” button and then select the “Record Settings” tab. Enter the following record settings and
then click the “Apply Changes” button to send the changes to your LABvault-HD or “Cancel” to abort. The settings will
be applied to every recording session until they are changed.
“Record Settings” on “File Destinations” Screen
• “
File Name
”: in the “File Name” field, enter up to 14 characters (letters, numbers, and underscores only—no
spaces). If you use the same filename for more than one recording session, the record date and start time will be
appended to the name of each additional recorded file as “yy/mm/dd-hh/mm/ss” (year/month/day-hours/minutes/
seconds).
NOTE:
Alternatively, you may enter the new filename into the “File Name” box in the lefthand column of the
LABvault-HD Web interface. Click the “Save” button to make the change. The new name will appear in
the “File Name” field on the “File Settings” tab.
• “
Create Unique Files
”: when this option is selected, the record date and start time will be appended to the filename
of each recorded file as “yy/mm/dd-hh/mm/ss” (year/month/day-hours/minutes/seconds).
• “
Automatic Delete
”: if you want your recorded files deleted from the LABvault’s internal hard drive after each
transfer, select the “Enable” “Automatic Delete” option. The “Disable” option will cause your recorded files to stay
on the hard drive until you manually delete them from the “File Management” screen (click the “Files” button).
NOTE:
If no destinations are enabled, the LABvault-HD will record and store your files on its internal 250 GB hard
drive. Refer to “Managing Files” on page 21
for instructions on transferring and deleting files off the
internal hard drive.
• “
File Quality
”: select a “File Quality” recording preset for your files. Each recording quality preset represents the
range of bit rates within which the file will be recorded.
• “
Audio Source
”: select the type of embedded or non-embedded (“Analog” or “AES”) audio signal your system is set
up to record from the options below.
¾
“Analog”: corresponds to the analog terminals on the LABvault-HD’s audio input terminal block


