background image

Rugby 260SG / 270SG / 280DG, Accessories

35

7

Accessories

7.1

Batteries

Description

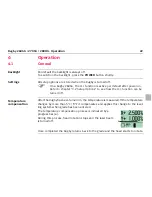
The battery solution

 in the Rugby will accept a NiMH pack (b) or an alkaline battery 

pack (d).

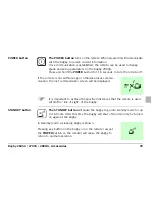
The battery packs will fit into the bottom of the Rugby.
Lock the battery pack in place using the large plastic nut.

Individual D-cell batteries must be inserted into the alkaline battery pack. The 
silver tabs on the battery pack must be aligned with the tabs inside the base of 
the Rugby.

a) Charger input
b) NiMH battery pack
c)

Battery compartment 
locking nut

d) Alkaline battery pack

a

b

c

d

Summary of Contents for Rugby 260SG

Page 1: ...Leica Rugby 260SG 270SG 280DG User Manual Version 1 0 English...

Page 2: ...informa tion Read carefully through the User Manual before you switch on the product Product identification The model and the serial number of your product are indicated on the type plate Enter the m...

Page 3: ...a potentially hazardous situation or an unintended use which if not avoided could result in death or serious injury Caution Indicates a potentially hazardous situation or an unintended use which if no...

Page 4: ...Features and Functions 10 3 Setup 13 3 1 General Setup 13 3 2 Setup Options 14 3 3 Additional Setup Options 20 4 Operation 22 4 1 General 22 4 2 Entering Grade 23 4 3 Rugby 260SG Used at Grade 25 4 4...

Page 5: ...justing Level Accuracy 31 6 Checking Lay Down Accuracy 33 6 1 Procedure 33 7 Accessories 35 7 1 Batteries 35 7 2 Remote Control 38 8 Troubleshooting 42 8 1 Screen Explanations 42 8 2 Troubleshooting S...

Page 6: ...Use 50 10 3 Limits of Use 52 10 4 International Limited Warranty 52 10 5 Responsibilities 53 10 6 Hazards of Use 54 10 7 Laser Classification 61 10 7 1 Rugby 260SG 270SG 62 10 7 2 Rugby 280DG 65 10 8...

Page 7: ...specific applications Contact your local dealer or Leica Geosystems for information specific to your jobsite requirements The Rugby grade laser is designed to serve your needs in a wide variety of app...

Page 8: ...Rugby 270SG Rugby 280DG 90 Plumb beam Vertical operation RF remote control Dual grade to 15 Single grade to 15 Fully automated grade control Single grade to 10 semi automatic Beam masking Bright visib...

Page 9: ...60SG and 270SG are single grade lasers and are capable of producing an accurate plane of laser light for applications which require level 1 or single slope 2 Dual grade The Rugby 280DG is a dual grade...

Page 10: ...nd Functions 2 Features and Functions Overview a POWER button b X Y button c UP button d X button Rugby 260SG and 270SG only e Easy grip handle f LCD display g STAR button h DOWN button i Charger inpu...

Page 11: ...set grade in the X axis Rugby 260SG and 270SG only Throughout this manual the X Y button will be used when referring to either the X or X Y button X Y button Press to set grade in the X and Y axis Rug...

Page 12: ...lso beam masking battery status H I and head speed Charger input For charging the batteries Easy grip handle For carrying and setup Tripod mount For attachment to a tripod with 5 8 11 mounting thread...

Page 13: ...The dirt will then be blown away from the Rugby and reduce interference Recommended head speeds The typical head speed for general construction applications is 10 rps 600 rpm When working at extended...

Page 14: ...ind and will provide better stability To make use of the extended grade capability make sure the Rugby is mounted on the tripod with the display directly over one leg 3 2 Setup Options Description The...

Page 15: ...e selected parameter Press the STAR button to accept the change Select EXIT and press the STAR button to return to the main screen Head speed and scan mode H I function Turns the H I function on and o...

Page 16: ...ance for your application The selected head speed is shown in the status line Scan and 0 rps Scan can be selected in the same screen as head speeds Use the UP or DOWN buttons to select scan 10 45 or 9...

Page 17: ...veled the head starts rotating and the self leveling accuracy remains the same The Rugby will trigger an H I alert if it has to re level beyond the limit The Rugby will stop rotating and the following...

Page 18: ...rade accuracy To indicate automatic mode the display shows The X axis slope can be changed by pressing the X Y button first and then the STAR button to enter the grade entry by digit screen Refer also...

Page 19: ...ith other operations on the job Using the setup menu the beam can be turned off in two or three selected sectors The beam masked sectors will appear dark The lock function is used to prevent the Rugby...

Page 20: ...if the Rugby is locked the backlight can be switched on by pressing the POWER button shortly Press and hold the POWER button to switch the Rugby OFF From the main screen press and hold the UP button t...

Page 21: ...l ensuring maximum accuracy The sensitivity can be set to Sensitivity Level SL1 or Sensitivity Level SL2 Select SL1 for normal conditions Select SL2 for very adverse conditions The remote function is...

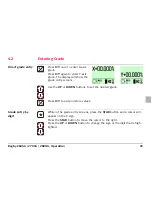
Page 22: ...ead starts to rotate On a Rugby 260SG the H I function is active per default after power on Refer to chapter 3 2 Setup Options to see how the H I function can be turned off After the Rugby has been tu...

Page 23: ...grade The display will show the grade entry screens Use the UP or DOWN buttons to set the desired grade Press X Y to exit and store values While in the grade entry screens press the STAR button and a...

Page 24: ...Grade capability Rugby 260SG 10 in one axis Rugby 270SG 15 in one axis Rugby 280DG 15 in both axes simultaneously Grade swap The grade values of an axis can easily be swapped from positive to negativ...

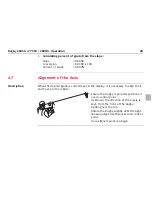
Page 25: ...down mode is only available on the Rugby 280DG Typical applications Lay down of 90 angles plumb tilt up walls and transferring points from the floor to the ceiling Description In lay down mode the bea...

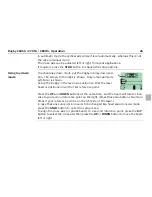
Page 26: ...se two buttons two more times if your reference point is on the left side of the laser In case that any setup option needs to be changed like head speed or scan mode press the STAR button to enter the...

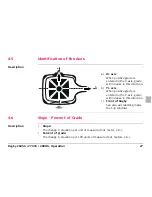
Page 27: ...measure foot meter etc Percent of grade The change in elevation per 100 units of measure feet meters etc a X axis When positive grade is entered in the X axis grade will increase in this direction b...

Page 28: ...essary to align the X and Y axes to the jobsite Slope 0 0059 Conversion 0 0059 x 100 Percent of Grade 0 590 Ensure the Rugby is properly positioned over a control point As shown the direction of the X...

Page 29: ...uracy upon receipt and periodically thereafter to ensure accuracy is maintained If your Rugby requires adjustment contact your nearest authorized service center or adjust the Rugby using the following...

Page 30: ...ed for checking the X axis 1 Align the X axis so that it is perpendicular to the wall Allow the Rugby to self level completely and then using your Rod Eye receiver mark the position of the beam Positi...

Page 31: ...acy adjustment Wait until the hour glass disappears before checking and changing the adjustment numbers Use the UP and DOWN buttons to change the number and move the beam to the half way point between...

Page 32: ...dure will cancel the adjustment and revert the accuracy to previously saved information Wait until the hour glass disappears before checking and changing the adjustment numbers Use the UP and DOWN but...

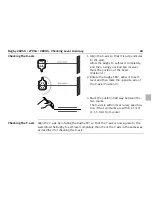
Page 33: ...on a Rugby 280DG 6 1 Procedure Checking lay down accuracy 1 To check lay down accuracy place the Rugby 280DG on its side on a flat level surface 30 m 100 ft from a wall so that the rotating beam proj...

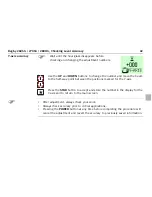
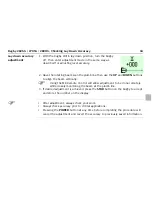
Page 34: ...saved information 1 With the Rugby still in lay down position turn the Rugby off then enter adjustment mode in the same way as described for adjusting level accuracy 2 Have the rotating beam scan the...

Page 35: ...ry packs will fit into the bottom of the Rugby Lock the battery pack in place using the large plastic nut Individual D cell batteries must be inserted into the alkaline battery pack The silver tabs on...

Page 36: ...main screen on page 12 Low battery If the battery pack runs low on power the low battery screen is shown The Rugby will continue to operate but the head speed will switch to 7 rps to activate the Rod...

Page 37: ...o 20 C 32 F to 68 F if possible It is normal for the battery to become warm during charging Using the chargers recommended by Leica Geosystems it is not possible to charge the battery if the temperatu...

Page 38: ...e of the main screen of the Rugby Only the Rugby 280DG supports use of the MR Remote Control All buttons on the remote except the SLEEP button have the same functionality as on the Rugby Before you ca...

Page 39: ...e remote is not within range or otherwise loses commu nication the lost communication screen will be displayed It is important to achieve the specified distances that the remote is used within the lin...

Page 40: ...n The remote will connect to the selected Rugby To exit this screen without changing settings highlight EXIT and press the X Y button The remote will display a low battery screen when the batteries ha...

Page 41: ...ith an internal antenna Always ensure that the remote is within the line of sight of the Rugby When the Rugby select screen is shown press and hold the STANDBY button for 1 5 seconds The shut off time...

Page 42: ...d please always provide the software version which is shown on the bottom line Customer name screen Can be programmed to display customer s name and address Contact your dealer for more details Standb...

Page 43: ...n Check Rugby s elevation and adjust if required Servo limit The Rugby cannot reach level or grade position Tilt it in direction as indicated by the arrows Tilt The Rugby is tilted at an angle of more...

Page 44: ...ne of sight of the Rugby Low battery Shown if Rugby battery runs low on power The head speed goes down to 7 rps to indicate low battery on the Rod Eye Pro receiver Rechargeable batteries must be recha...

Page 45: ...Possible causes and solutions No beam Check with a receiver to verify No self leveling Manual mode set to automatic mode Cannot change grade Check the other axis Check operation in manual mode Check...

Page 46: ...ter mine if they have moved Remote will not turn on Check and replace the batteries Remote will not communicatewith the Rugby Check that remote capability is enabled on the Rugby See small icon on the...

Page 47: ...y the product in its transport container and secure it Shipping When transporting the product by rail air or sea always use the complete original Leica Geosystems packaging transport container and car...

Page 48: ...pect the level accuracy given in this user manual before using the product Nickel Metal Hydride and D Cell batteries Refer to 11 Technical Data for information about storage temperature range Fully ch...

Page 49: ...ter or pure alcohol Do not use other liquids these may attack the polymer components Damp Products Dry the product the transport container the foam inserts and the accessories at a temperature not gre...

Page 50: ...must ensure that all users understand these directions and adhere to them 10 2 Intended Use Permitted use The product casts a horizontal laser plane or a laser beam for the purposes of alignment The...

Page 51: ...the prior explicit approval of Leica Geosystems Inadequate safeguards at the construction site for example when using on or near roads Deliberate dazzling of third parties Controlling of machines mov...

Page 52: ...nal Limited Warranty Description This product is subject to the terms and conditions set out in the International Limited Warranty which you can download from the Leica Geosystems home page at http ww...

Page 53: ...ety concepts in combination with the Leica Geosystems product Person in charge of the product The person in charge of the instrument has the following duties To understand the safety instructions on t...

Page 54: ...users must follow the safety directions given by the manufacturer and the direc tions of the person responsible for the product Caution Watch out for erroneous measurements if the product has been dro...

Page 55: ...authorities responsible for the electrical instal lations and follow their instructions Warning If the product is used with accessories for example masts staffs poles you may increase the risk of bein...

Page 56: ...nd locked in posi tion Avoid subjecting the equipment to mechanical stress Caution During the transport shipping or disposal of batteries it is possible for inappropriate mechanical influences to cons...

Page 57: ...ecautions The person responsible for the product must make all users fully aware of the existing dangers Operation of Charger Danger The charger is not designed for use under wet and severe conditions...

Page 58: ...Using the product after incorrect attempts were made to carry out repairs Precautions Do not open the product Only Leica Geosystems authorized service workshops are entitled to repair these products W...

Page 59: ...exposing themselves and third parties to the risk of severe injury and rendering the environment liable to contamination Precautions Product specific treatment and waste management information can be...

Page 60: ...ersion into fluids can cause leakage fire or explosions of the batteries Precautions Protect the batteries from mechanical influences and high ambient temperatures Do not drop or immerse batteries int...

Page 61: ...anticipate and avoid operational hazards The person responsible for the product must ensure that all users understand these directions and adhere to them Product classified as laser class 1 class 2 an...

Page 62: ...sified as laser class 2 in accordance with IEC 60825 1 2007 03 Safety of laser products EN 60825 1 2007 10 Safety of laser products Class 2 laser products are safe for momentary exposures but can be h...

Page 63: ...rspective class 2 laser products are not inherently safe for the eyes Precautions Avoid staring into the beam Description Value Maximum peak radiant power 2 7 mW 5 Pulse duration effective 2 2 1 1 ms...

Page 64: ...ules Operation is subject to the following two conditions 1 This device may not cause harmful interference and 2 this device must accept any interference received including interference that may cause...

Page 65: ...laser beam may be hazardous Low level eye hazard In particular for ocular exposure The risk of injury for laser class 3R products is limited because of Unintentional exposure would rarely reflect wor...

Page 66: ...ms windows mirrors metallic surfaces etc Precautions Do not aim at areas that are essentially reflective such as a mirror or which could emit unwanted reflections Do not look through or beside the opt...

Page 67: ...This device complies with part 15 of the FCC Rules Operation is subject to the following two conditions 1 This device may not cause harmful interference and 2 this device must accept any interference...

Page 68: ...in force in this respect Leica Geosystems cannot completely exclude the possibility that other equipment may be disturbed Caution There is a risk that disturbances may be caused in other equipment if...

Page 69: ...for example near radio transmitters two way radios or diesel generators Precautions Check the plausibility of results obtained under these conditions Warning If the product is operated with connecting...

Page 70: ...ich are in force in this respect Leica Geosystems cannot completely exclude the possibility that other equipment may be disturbed or that humans or animals may be affected Do not operate the product w...

Page 71: ...no guarantee that interference will not occur in a particular instal lation If this equipment does cause harmful interference to radio or television reception which can be determined by turning the eq...

Page 72: ...erence received including interference that may cause undesired operation This device contains a transmitter FCC ID RFD RFLRRC IC ID 3177A RFRC Complies with FDA performance standards for laser produc...

Page 73: ...ote Control Antenna Class 2 equipment according European Directive 1999 5 EC R TTE for which following EEA Member States apply restrictions on the placing on the market or on the putting into service...

Page 74: ...or the maximum permissible exposure of the guidelines and standards which are force in this respect The product must be used with the recommended antenna A separation distance of at least 20 cm should...

Page 75: ...0 ft Grade accuracy 3 0 mm at 30 m 1 8 inch at 100 ft Self leveling range 5 Laser diode type 635 nm visible red laser Operating temperature 20 to 50 C 4 to 122 F Storage temperature without batteries...

Page 76: ...receivers Description Value Grade capability X axis 10 to 10 Operating range 300 m 985 ft radius Head speed 10 rps 600 rpm Laser classification Class 2 IEC60825 1 Description Value Grade capability X...

Page 77: ...ither axis simultane ously Operating range rotating beam plumb beam visible 350 m 1150 ft radius up to 60 m 200 ft Scan mode 10 45 and 90 Scan feature Scan 90 Head speed 0 2 5 or 10 rps 0 120 300 600...

Page 78: ...te control distance may be decreased by LAN WIFI networks used nearby Description Value Distance 100 m 330 ft typical radius Battery type 4 AAA alkaline batteries Dimensions HWD 155 x 70 x 45 mm 6 1 x...

Page 79: ...Rugby 260SG 270SG 280DG Technical Data 79...

Page 80: ...Quality Management and Quality Systems ISO standard 9001 and Environmental Management Systems ISO standard 14001 Ask your local Leica Geosystems dealer for more information about our TQM program 7688...

Page 81: ...of Quality Management and Quality Systems ISO standard 9001 and Environmental Management Systems ISO standard 14001 Ask your local Leica Geosystems dealer for more information about our TQM program 7...

Reviews: