background image

16149_002

5

4

3

2

1

1 s


1.

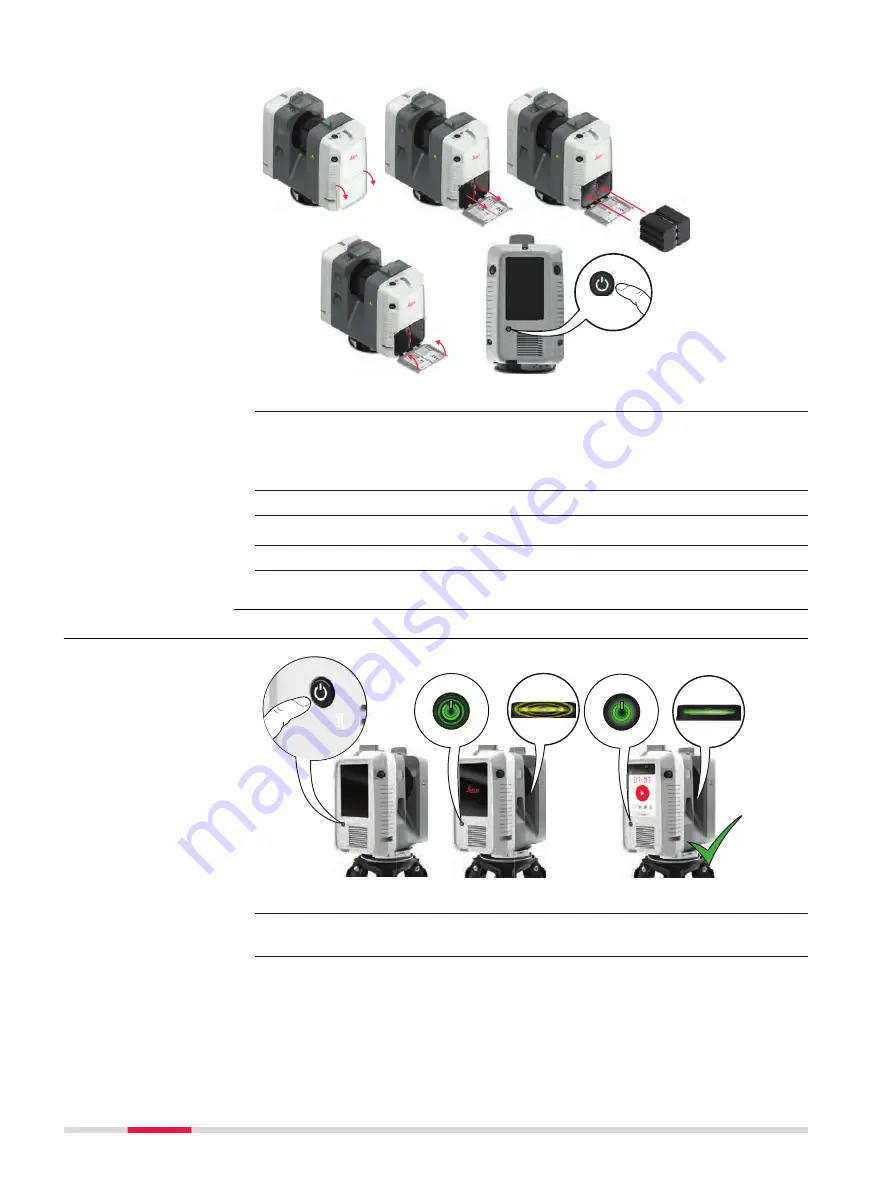
Open the battery compartment.

2.

Remove the left battery from the battery compartment by pushing

the upper red button to the right.

Remove the right battery from the battery compartment by pushing

the lower red button to the left.

3.

Insert the new batteries into the battery compartment.

Ensure that the battery contacts are facing inwards.

4.

Close the battery compartment.

5.

Turn on the instrument to start the boot process.

4.3

Operation - Getting Started

1

2

16235_003

3


1.

Press the power button to turn on the instrument.

2.

The instrument is starting. The power button is blinking green and

the LED indicator is blinking yellow.

3.

When the user interface is visible, the instrument is ready for opera-

tion.

The power button and the LED indicator are now continuously

green.

Insert and remove the

exchangeable batter-

ies

Stand-alone opera-

tion 

step-by-step

28

Operation

Summary of Contents for RTC360

Page 1: ...Leica RTC360 RTC360 LT User Manual Version 3 1 English...

Page 2: ...ontact your agency or Leica Geosystems authorised service centre Windows is a registered trademark of Microsoft Corporation in the United States and other countries All other trademarks are the proper...

Page 3: ...s the benefits of using it how it works and how to use it https learning leica geosystems com course view php id 142 Refer to the following resources for all RTC360 RTC360 LT documenta tion software T...

Page 4: ...6 2 Data Storage Concept 20 3 User Interface 22 3 1 Power Button 22 3 2 Instrument Status 22 3 3 Screen 24 4 Operation 25 4 1 Instrument Setup 25 4 1 1 General Information 25 4 1 2 Lightweight Tripod...

Page 5: ...signment of Lemo Ports 47 6 5 Environmental Specifications 48 6 5 1 RTC360 RTC360 LT 48 6 5 2 GEB361 Battery and GEV282 AC DC Power Supply 49 6 6 Dimensions 49 6 7 Weight 51 6 8 Accessories 51 6 9 Con...

Page 6: ...your safety it is important to read and fully understand the fol lowing table with the different signal words and their definitions Supplement ary safety information symbols may be placed within a war...

Page 7: ...r use in an atmosphere appropriate for permanent human habita tion not suitable for use in aggressive or explosive environments WARNING Working in hazardous areas or close to electrical installations...

Page 8: ...cautions The person responsible for the product must make all users fully aware of the existing dangers WARNING Inadequate securing of the working site This can lead to dangerous situations for exampl...

Page 9: ...lever which may result in serious injury Precautions Only use the GAD121 adapter plate for tilted or upside down mounting Make sure that the locking lever is secured by the locking screw from unintend...

Page 10: ...urnt poisonous gases are produced which may impair health If batteries are damaged or are heated strongly they can explode and cause poisoning burning corrosion or environmental contamination By dispo...

Page 11: ...pening of the product Either of the following actions may cause you to receive an electric shock Touching live components Using the product after incorrect attempts were made to carry out repairs Prec...

Page 12: ...ser working area if used and operated as defined in this User Manual due to the low eye hazard level National laws and local regulations could impose more stringent instructions for the safe use of la...

Page 13: ..._003 Model RTC360 LT Equip No 1234567 Power 24V 75W max Leica Geosystems AG CH 9435 Heerbrugg Manufactured 08 2019 Made in Switzerland Art No 877118 S No 3005001 WLAN PW 12345678 Complies with 21 CFR...

Page 14: ...e guidelines and standards When using computers two way radios or other electronic equipment pay attention to the information about electromagnetic compatibility provided by the manufacturer CAUTION I...

Page 15: ...agraph below is only applicable for products without radio WARNING This equipment has been tested and found to comply with the limits for a Class B digital device pursuant to part 15 of the FCC rules...

Page 16: ...accept any interference received including interference that may cause undesired operation IP54 This device contains FCC ID N6C SXPCEAN2 IC 4608A SPCEAN2 IEC 60825 1 2014 19618_003 XXXXXXXX XXXXXX A...

Page 17: ...ay not cause interference 2 This device must accept any interference including interference that may cause undesired operation of the device Canada D claration de Conformit L metteur r cepteur exempt...

Page 18: ...de covers and lift Use caution due to the weight of the instrument 6 kg 2 2 Container Contents 16159_003 j i h g f e d c b a a RTC360 RTC360 LT laser scanner b GEB361 Lithium Ion batteries c GKL341 Mu...

Page 19: ...a Antennas b Rotating mirror laser aperture c HDR cameras d Cameras for visual inertial sys tem RTC360 only e Quick release f LED indicator g Battery compartment h Touch screen i On Off button j Vent...

Page 20: ...by GEV282 AC power supply for indoor use only 2 6 2 Data Storage Concept Data is stored on an exchangeable USB data storage device The instrument comes with two Leica MS256 USB sticks exFAT formatted...

Page 21: ...external computers All data recorded by the instrument and all meta data created by the field app on the remote tablet is stored on the USB stick Type Description Data Scans images orientation Meta d...

Page 22: ...1 sec on and ready The Power button starts blinking yellow and the instrument switches off Press and hold the button 10 sec on The instrument switches off immediately Hard shutdown 3 2 Instrument Sta...

Page 23: ...ower button LED indicator Instrument status The instrument is off The instrument is booting up The instrument is ready The instrument is recording The instrument is being moved and the visual inertial...

Page 24: ...ed Follow the instructions in the display If necessary shut down the instrument and reboot again If status does not change contact the instrument sup port 3 3 Screen 16602_001 f e d c b a a Status fie...

Page 25: ...d Setup 16152_002 6 5 4 3 2 1 3x 3x 3x 1 Unlock the locks at the top of the legs 2 Unfold the legs so that the locks lock in their maximum position 3 Move the legs back to a fixed position so that the...

Page 26: ...ace the tribrach adapter on the tribrach and secure it with the locking knob of the tribrach 4 Place the instrument on the quick release mount and secure it 4 1 4 Upside down Mounting 0018888_001 0018...

Page 27: ...range for charging is from 0 C to 40 C 32 F to 104 F For optimal charging we recommend charging the batteries at a low ambient temperature of 10 C to 20 C 50 F to 68 F if possible It is normal for th...

Page 28: ...are facing inwards 4 Close the battery compartment 5 Turn on the instrument to start the boot process 4 3 Operation Getting Started 1 2 16235_003 3 1 Press the power button to turn on the instrument...

Page 29: ...art the recording and simultaneous data transfer with the hand held device 6 Start the processing of data on the handheld device 1 Start the instrument and wait until the user interface is visible 2 O...

Page 30: ...calibrated cameras for HDR 360 spherical image acquisition Five calibrated cameras for the visual inertial system VIS RTC360 only 0016150_001 a 16151_002 16151 002 b a 3 cameras for HDR imaging b 5 c...

Page 31: ...the rotating mirror protection glass such as a layer of dust condensation or fingerprints may cause considerable measuring errors 4 5 2 Onboard Controls The Start screen is displayed after the system...

Page 32: ...used 25 75 of storage used More than 75 of storage used USB storage device not attached Do not remove the USB storage device Click the Settings icon to open the Settings screen Job field Click the Jo...

Page 33: ...image acquisition enabled HDR image acquisition disabled Double Scan enabled Double Scan disabled Visual inertial system VIS enabled RTC360 only Visual inertial system VIS disabled RTC360 only Setup f...

Page 34: ...p the arrow to select a scan resolution low medium or high from the drop down menu Tap the checkbox to enable HDR image acquisition Tap the checkbox to enable Double Scan Tap the checkbox to enable th...

Page 35: ...date the atmospheric pressure at your reference elevation Tap the checkbox to enable the LED indicator Tap the checkbox to enable monitoring of tilt change occurred during data acquisi tion To detect...

Page 36: ...N code must be entered each time the instrument is started up or when the timeout expires If an incorrect PIN code has consecutively been entered five times the instrument is locked An unlocking key m...

Page 37: ...upgrade process 1 Copy the firmware file fw to the root directory on the USB stick 2 Attach the USB stick to the instrument 3 Tap the double arrow and select the firmware file from the drop down list...

Page 38: ...Cause s Suggested Remedies Missing points in scan Dust debris or finger prints on the rotating mirror protection glass Use a glass cleaning tis sue to clean the specific areas Problem Possible Cause...

Page 39: ...Asia asia support hds leica geosystems com Log files can be transferred to the USB stick using the Transfer com mand in the Settings screen 4 5 5 Field of View FoV 60 60 0 0 360 360 90 a b 17033_003 a...

Page 40: ...lure to follow these instructions could result in data loss and or permanent damage to the USB stick 4 2 3 4 2 3 1 16468_002 1 Open the USB compartment at the bottom of the instrument 2 To insert the...

Page 41: ...hat are exposed to high mechanical forces for example through fre quent transport or rough handling perform the Check Adjust periodically Perform the Check Adjust also for units which were stored for...

Page 42: ...protection glass with your fingers Only use a clean soft lint free cloth for cleaning If necessary moisten the cloth with water or pure alcohol Do not use other liquids other liquids may attack the p...

Page 43: ...tem is recommended Clean the glass pane regularly with the recommended cleaning tissue Switch off instrument and remove the battery Washing hands is necessary in order to avoid grease on the cleaning...

Page 44: ...or system equipped with various integ rated sensors to allow for automated RTC360 only or semi automated online registration in the field Sensor Description Visual inertial sys tem VIS RTC360 only Vid...

Page 45: ...oints second Laser unit Scanning laser Value Classification Laser Class 1 in accordance with IEC 60825 1 2014 05 Wavelength 1550 nm invisible Range Scanning data Value Beam divergence 0 5 mrad 1 e2 fu...

Page 46: ...me Camera type Estimated image duration MM SS HDR 01 00 Estimated scan size for different settings Resolution mm 10m Approx scan size Points Hz V Scan without colour MB Double Scan without colour MB L...

Page 47: ...ng time Typical charging time with charger GKL341 is 4 8 hours at room temperature 1 2 batteries up to 4 h 3 4 batteries up to 8 h Mode Value Input 100 240 V AC 50 60 Hz 2 0 A Output 24 V DC 6 25 A 15...

Page 48: ...ection against water dust and sand Type Protection RTC360 RTC360 LT IP54 IEC 60529 upright 15 upside down 15 Dust protected Protection against splashing water from any dir ection IP51 IEC60529 in any...

Page 49: ...supply Only operate in dry environments for example in build ings and vehicles 6 6 Dimensions Part Dimensions mm D W H Dimensions D W H RTC360 RTC360 LT laser scanner 120 240 230 4 7 9 4 9 1 GEV282 A...

Page 50: ..._002 230 240 120 154 5 GAD120 tribrach adapter 16236_003 81 2 104 5 41 2 GAD121 adapter plate for flexible mounting 16237_002 35 104 5 12 GAD122 adapter to mount a RTC360 on top of a Leica tripod 1683...

Page 51: ...GEB361 RTC360 lightweight tripod GST80 RTC360 tribrach adapter GAD120 RTC360 adapter plate for flexible mounting GAD121 Adapter to mount a RTC360 on top of a Leica tripod GAD122 RTC360 backpack GVP73...

Page 52: ...a safety hazard In certain conditions Lithium batteries can overheat and ignite When carrying or shipping your Leica product with Lithium batteries onboard a commercial aircraft you must do so in acc...

Page 53: ...ments or collected from your Leica Geosystems distributor You must not install or use the software unless you have read and accepted the terms and conditions of the Leica Geosystems Software Licence A...

Page 54: ...systems AG Heinrich Wild Strasse CH 9435 Heerbrugg Switzerland Phone 41 71 727 31 31 www leica geosystems com 870891 3 1 0en Original text Printed in Switzerland 2020 Leica Geosystems AG Heerbrugg Swi...

Reviews: