


Chapter 4: Connecting External Equipment (Optional)
65
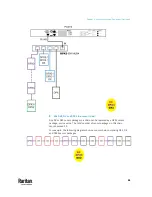
Introduction to Asset Tags
You need both asset strips and asset tags for tracking IT devices.
Asset tags provide an ID number for each IT device. The asset tags are adhered
to an IT device at one end and plugged in to an asset strip at the other.
The asset strip is connected to the PX3TS, and the asset tag transmits the ID
and positioning information to the asset strip.
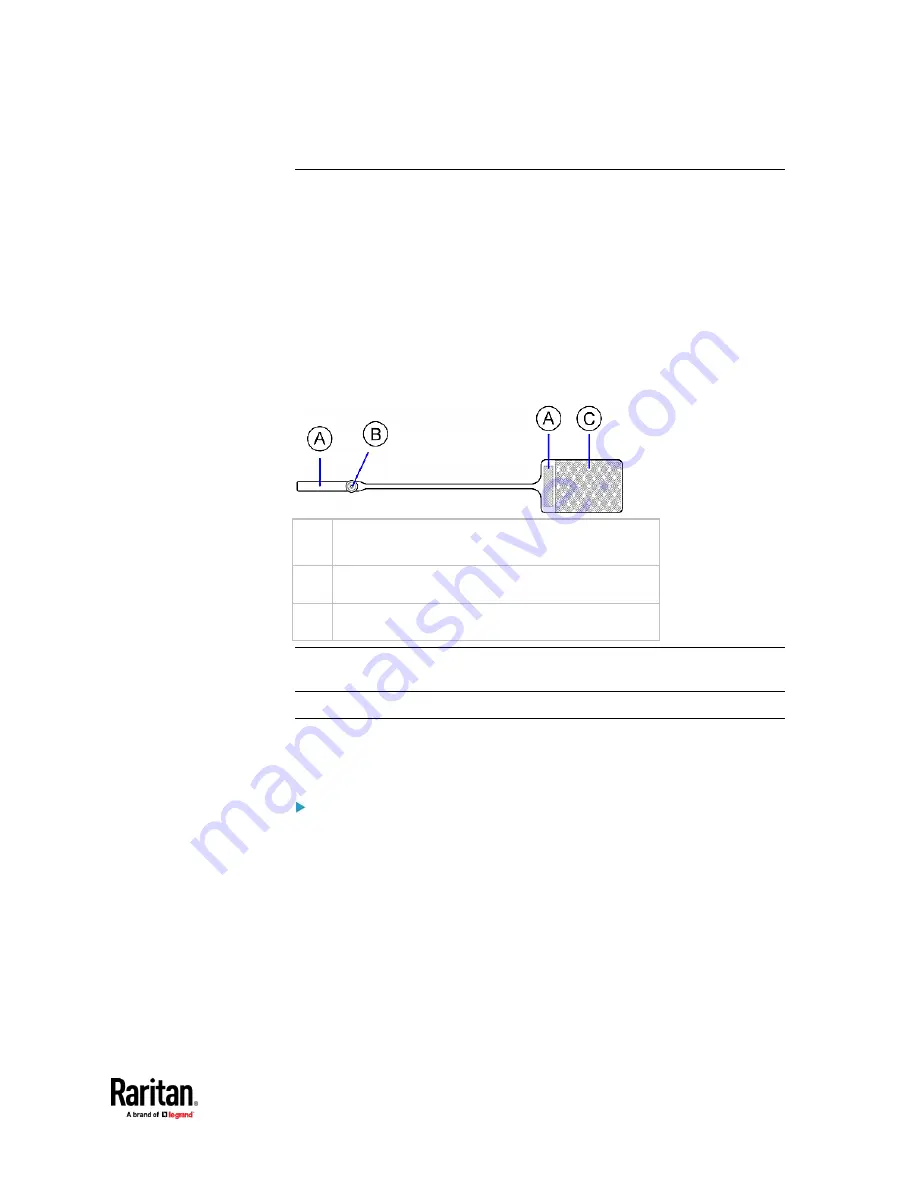
The following diagram illustrates an asset tag. Note that there are two types of
asset tags: non-programmable and programmable tags. The only difference is
that programmable asset tags allow you to customize each tag's ID or barcode
number while non-programmable ones have factory default ID or barcode
numbers, which you cannot change.
A
Barcode (ID number), which is available on either
end of the "non-programmable" asset tag
B
Tag connector
C
Adhesive area with the tape
Note: The barcode of each "non-programmable" asset tag is unique and is
displayed in the PX3TS device's web interface for identification.
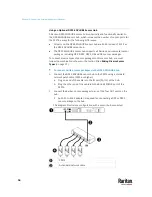
Connecting Regular Asset Strips to PX3TS
The cabling distance between an asset strip assembly and the PX3TS can be up
to 10 meters.
To connect regular asset strips to the PX3TS device:
1.
Affix the adhesive end of an asset tag to each IT device through the tag's
tape.
2.
Plug the connector of each asset tag into the corresponding tag port on the
asset strip.
3.
Connect the asset strip assembly to the PX3TS device, using a network
patch cable (CAT5e or higher).
▪
Connect one end of the cable to the RJ-45 connector on the MASTER
asset strip.
▪
Connect the other end of the cable to the FEATURE port on the PX3TS
device.
Summary of Contents for Raritan PX3TS
Page 4: ......
Page 6: ......
Page 20: ......
Page 80: ...Chapter 4 Connecting External Equipment Optional 60...
Page 109: ...Chapter 5 PDU Linking 89...
Page 117: ...Chapter 5 PDU Linking 97...
Page 441: ...Chapter 7 Using the Web Interface 421...
Page 464: ...Chapter 7 Using the Web Interface 444...
Page 465: ...Chapter 7 Using the Web Interface 445 Continued...
Page 746: ...Appendix A Specifications 726...
Page 823: ...Appendix I RADIUS Configuration Illustration 803 Note If your PX3TS uses PAP then select PAP...
Page 828: ...Appendix I RADIUS Configuration Illustration 808 14 The new attribute is added Click OK...
Page 829: ...Appendix I RADIUS Configuration Illustration 809 15 Click Next to continue...
Page 860: ...Appendix J Additional PX3TS Information 840...
Page 890: ...Appendix K Integration 870 3 Click OK...
Page 900: ......


