


Chapter 7: Using the Web Interface
414
3.
To specify the outlet group where this action will be applied, select it from
the 'Group to switch' list.
4.
In the Operation field, select an operation for the selected outlet group.
▪
Turn on all outlets in group: Turns on the selected outlet group.
▪
Turn off all outlets in group: Turns off the selected outlet group.
▪
Cycle all outlets in group: Cycles power to the selected outlet group.
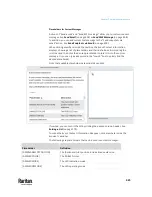
Switch Outlets
The "Switch outlets" action is available only when your PX3TS is
outlet-switching capable. This action turns on, off or power cycles a specific
outlet.
Operation:
1.
Choose Device Settings > Event Rules >
.
2.
Select 'Switch outlets' from the Action list.
3.
In the Operation field, select an operation for the selected outlet(s).
▪
Turn outlet on: Turns on the selected outlet(s).
▪
Turn outlet off: Turns off the selected outlet(s).
▪
Cycle outlet: Cycles power to the selected outlet(s).
4.
To specify the outlet(s) where this action will be applied, select them one
by one from the 'Available outlets' list.
▪
To add all outlets, click Select All.
5.
To remove any outlets from the 'Selected outlets' field, click that outlet's
.
▪
To remove all outlets, click Deselect All.
6.
If 'Turn outlet on' or 'Cycle outlet' is selected in step 3, you can choose to
select the 'Use sequence order and delays' checkbox so that all selected
outlets will follow the power-on sequence defined on the page of
Outlets
(on page 220).
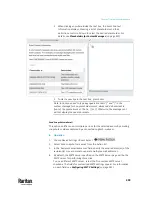
Switch Peripheral Actuator
If you have any actuator connected to the PX3TS, you can set up the PX3TS so it
automatically turns on or off the system controlled by the actuator when a
specific event occurs.
Note: For information on connecting actuators, see
DX2 Sensor Packages
(on
Operation:
1.
Choose Device Settings > Event Rules >
.
Summary of Contents for Raritan PX3TS
Page 4: ......
Page 6: ......
Page 20: ......
Page 80: ...Chapter 4 Connecting External Equipment Optional 60...
Page 109: ...Chapter 5 PDU Linking 89...
Page 117: ...Chapter 5 PDU Linking 97...
Page 441: ...Chapter 7 Using the Web Interface 421...
Page 464: ...Chapter 7 Using the Web Interface 444...
Page 465: ...Chapter 7 Using the Web Interface 445 Continued...
Page 746: ...Appendix A Specifications 726...
Page 823: ...Appendix I RADIUS Configuration Illustration 803 Note If your PX3TS uses PAP then select PAP...
Page 828: ...Appendix I RADIUS Configuration Illustration 808 14 The new attribute is added Click OK...
Page 829: ...Appendix I RADIUS Configuration Illustration 809 15 Click Next to continue...
Page 860: ...Appendix J Additional PX3TS Information 840...
Page 890: ...Appendix K Integration 870 3 Click OK...
Page 900: ......


