


Chapter 7: Using the Web Interface
381
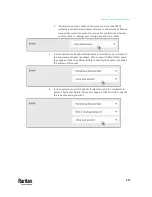
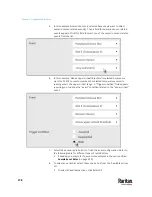
Event types
Radio buttons
Device connection or
disconnection, such as
a USB-cascaded slave
device
▪
Connected: PX3TS takes the action only when
the selected device is physically connected to it.
▪
Disconnected: PX3TS takes the action only when
the selected device is physically disconnected
from it.
▪
Both: PX3TS takes the action both when the
selected device is physically connected to it and
when it is disconnected.
+12V Supply1 (or 2)
Status
Available radio buttons include "Fault," "OK" and
"Both."
▪
Fault: PX3TS takes the action only when the
selected 12V power supply to the controller
enters the fault state.
▪
OK: PX3TS takes the action only when when the
selected 12V power supply to the controller
enters the OK state.
▪
Both: PX3TS takes the action whenever the
selected 12 power supply's status changes.
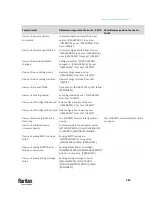
Default Log Messages
These default log messages are recorded internally and emailed to specified
recipients when PX3TS events occur (are TRUE) or, in some cases, stop or
become unavailable (are FALSE). See
Send Email
(on page 404) to configure
email messages.
Event/context
Default message when the event = TRUE Default message when the event =
FALSE
Asset Management > State
State of asset strip [AMSNUMBER]
('[AMSNAME]') changed to '[AMSSTATE]'.
Asset Management > Rack Unit >
* > Tag Connected
Asset tag with ID '[AMSTAGID]' connected
at rack unit [AMSRACKUNITPOSITION],
slot [AMSBLADESLOTPOSITION] of asset
strip [AMSNUMBER] ('[AMSNAME]').
Asset tag with ID '[AMSTAGID]'
disconnected at rack unit
[AMSRACKUNITPOSITION], slot
[AMSBLADESLOTPOSITION] of asset
strip [AMSNUMBER] ('[AMSNAME]').
Asset Management > Rack Unit >
* > Blade Extension Connected
Blade extension with ID '[AMSTAGID]'
connected at rack unit
[AMSRACKUNITPOSITION] of asset strip
[AMSNUMBER] ('[AMSNAME]').
Blade extension with ID '[AMSTAGID]'
disconnected at rack unit
[AMSRACKUNITPOSITION] of asset
strip [AMSNUMBER] ('[AMSNAME]').
Summary of Contents for Raritan PX3TS
Page 4: ......
Page 6: ......
Page 20: ......
Page 80: ...Chapter 4 Connecting External Equipment Optional 60...
Page 109: ...Chapter 5 PDU Linking 89...
Page 117: ...Chapter 5 PDU Linking 97...
Page 441: ...Chapter 7 Using the Web Interface 421...
Page 464: ...Chapter 7 Using the Web Interface 444...
Page 465: ...Chapter 7 Using the Web Interface 445 Continued...
Page 746: ...Appendix A Specifications 726...
Page 823: ...Appendix I RADIUS Configuration Illustration 803 Note If your PX3TS uses PAP then select PAP...
Page 828: ...Appendix I RADIUS Configuration Illustration 808 14 The new attribute is added Click OK...
Page 829: ...Appendix I RADIUS Configuration Illustration 809 15 Click Next to continue...
Page 860: ...Appendix J Additional PX3TS Information 840...
Page 890: ...Appendix K Integration 870 3 Click OK...
Page 900: ......


