


Chapter 6: Using the PX3TS
164
Fuses for the Inlet Transfer Switch
PX3TS models always contain two fuses for protecting the inlet transfer switch.
These fuses blow when the current flowing through them exceeds the fuse
rating.
If any fuse blows or malfunctions, the front panel indicates this situation by
turning on the 'Fuse' indicator lamp. See
Alarm Indicator Lamps
(on page 118).
At the same time, the internal beeper turns on. See
Beeper
(on page 168).
To determine which fuse is affected, check the front panel display of the
transfer switch.
Comparison: Fuses for the inlet transfer switch protect the inlet transfer switch
from overload. Overcurrent protectors for outlets, if available, protect
associated outlets from overload. The rating of a fuse for the inlet transfer
switch is higher than the rating of an overcurrent protector for outlets. See
Overcurrent Protectors for Outlets
(on page 167).
Replacing a Fuse on 1U Models
This section introduces how to replace a fuse on a 1U model.
To order replacement fuses from Raritan, see
Technical Specifications
(on page
721) for correct fuse types.
Replacing a "blown" fuse can be performed while both inlets remain connected
to power.
To replace a fuse:
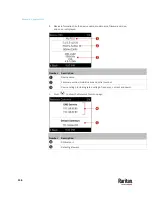
1.
Identify the bad fuse by checking the fuse status using the LCD display or
web interface.
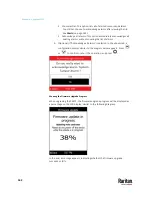
2.
Examine your PX3TS and the connected equipment to remove or resolve
the cause that results in the overload or short circuit.
This step is required,
or you cannot proceed with the next step.
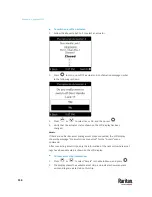
3.
When you are sure the overload does NOT exist, you can force transfer to
the inlet with the good fuse to restore the current output to outlets. See
Manual Transfer When an Alarm is Present
(on page 114).
▪
In case the good fuse blows after manual transfer, stop and repeat
Step 2.
4.
This step is recommended but not required -- disconnect the inlet with the
bad fuse from power.
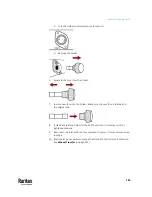
5.
Uninstall the bad fuse's holder from the PX3TS.
Summary of Contents for Raritan PX3TS
Page 4: ......
Page 6: ......
Page 20: ......
Page 80: ...Chapter 4 Connecting External Equipment Optional 60...
Page 109: ...Chapter 5 PDU Linking 89...
Page 117: ...Chapter 5 PDU Linking 97...
Page 441: ...Chapter 7 Using the Web Interface 421...
Page 464: ...Chapter 7 Using the Web Interface 444...
Page 465: ...Chapter 7 Using the Web Interface 445 Continued...
Page 746: ...Appendix A Specifications 726...
Page 823: ...Appendix I RADIUS Configuration Illustration 803 Note If your PX3TS uses PAP then select PAP...
Page 828: ...Appendix I RADIUS Configuration Illustration 808 14 The new attribute is added Click OK...
Page 829: ...Appendix I RADIUS Configuration Illustration 809 15 Click Next to continue...
Page 860: ...Appendix J Additional PX3TS Information 840...
Page 890: ...Appendix K Integration 870 3 Click OK...
Page 900: ......


