background image

65

CONSIGNES DE SÉCURITÉ

Ne pas déplacer l‘écran lorsqu‘il est raccordé au 
cordon d‘alimentation et aux câbles AV. 

•   Lors du déplacement de l‘écran, veiller à 

débrancher la fiche électrique et les câbles de la 
prise de courant ou de la source. 

•   Lors du déballage ou du transport de l‘écran, au 

moins 2 personnes sont nécessaires.  Veiller à 
transporter l‘écran en position droite. 

•   Transporter l‘écran en position droite. Éviter de 

placer l‘écran avec la face orientée vers le haut ou 
le bas.  

•   Manipuler doucement l‘écran. Ne pas le laisser 

tomber. 

XTX-5500 – MANUEL DE L‘UTILISATEUR – FRANÇAIS

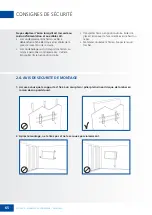
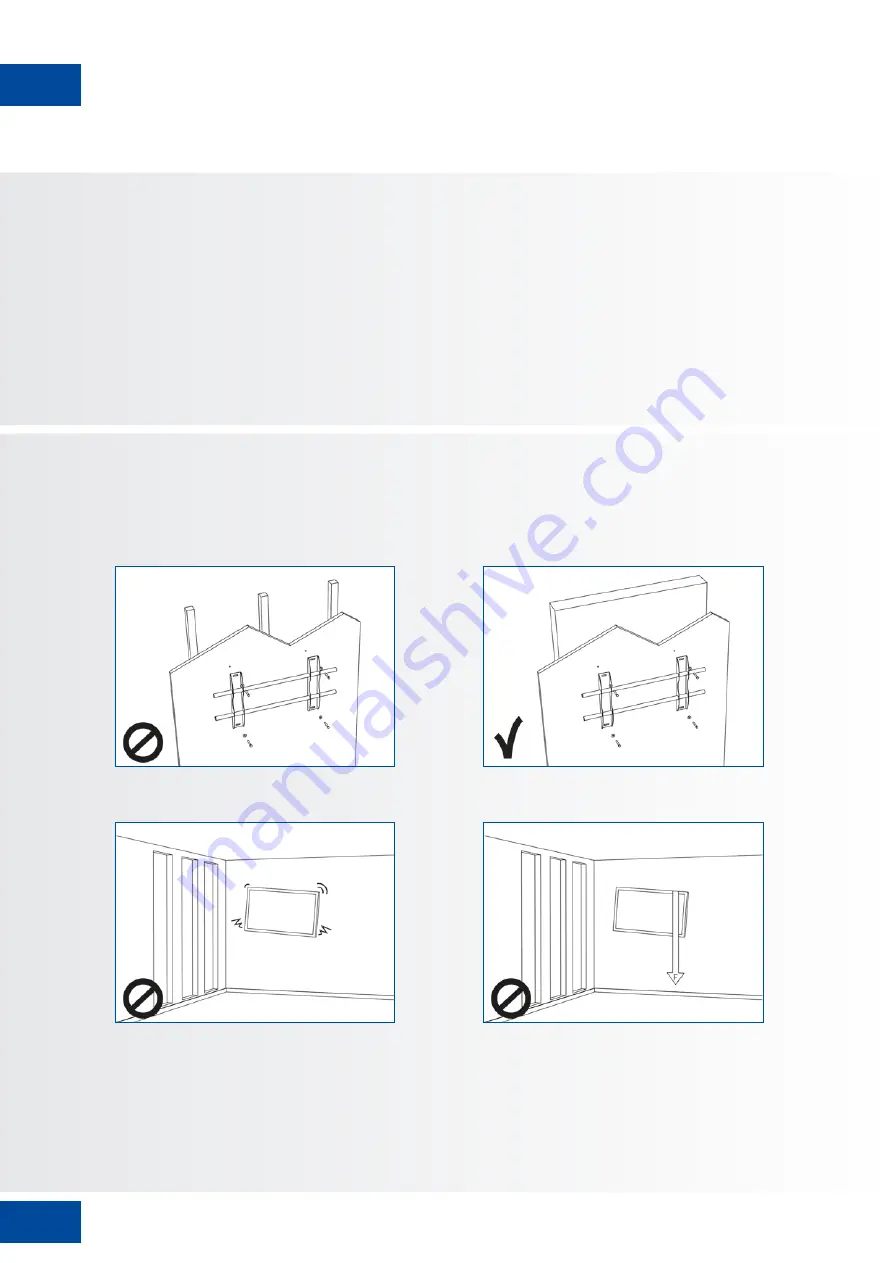
2.4.  AVIS DE SÉCURITÉ DE MONTAGE

1.   Assurez-vous que le support est fixé à un mur plein / pilier plein sinon il risque de tomber en 

raison de son poids lourd.

2.  Après le montage, ne le tirez pas et ne le secouez pas violemment.

Summary of Contents for XTX-5500UHD

Page 1: ...USER MANUAL XTX 5500UHD Version 1 0 ENGLISH DEUTSCH FRANÇAIS NEDERLANDS ESPAÑOL ...

Page 2: ...tions and Cable Management 10 4 4 Control Panel 11 4 5 Status LED 11 4 6 Input and Output Connector 11 4 7 Remote Control 12 5 Operations 13 5 1 Turning the Display On and Off 13 5 2 Adjusting the Volume and Input Source 13 5 3 Add a label to an input source 13 6 OSD On Screen Display Controls 13 6 1 OSD Menu Overview 14 6 2 Navigation through OSD Menu 15 7 Touch Operation 21 7 1 Touch USB Cable C...

Page 3: ... to 1 turn off the display for at least 6 hours after 16 hours of usage in a 24 hour period to help avoid image retention and 2 to turn the IRFM function to ON in the OSD menu under Advanced Settings This product isn t warranted for any damage caused by natural disaster such as earthquake thunder etc fire acts by third parties accidents owner s intentional misuse and fault or use in other improper...

Page 4: ...urned on but there isn t a picture remove the power plug from the outlet immediately Failure to do so may result in fire or electrical shock Contact your dealer for inspection If water is spilled or objects are dropped inside the display remove the power plug from the outlet immediately Failure to do so may result in fire or electrical shock Contact your dealer for inspection If the display is dro...

Page 5: ...such as radiators heat registers stoves or other apparatus that produce heat This may cause fire or electrical shock Don t overload outlets or cables beyond electrical capacity Don t use extension cords as it may cause fire or electrical shock Don t insert the power plug into an outlet other than 100 240V AC This may cause fire or electrical shock Don t use a damaged power plug or worn outlet Don ...

Page 6: ...g the display at least 2 people are needed Make sure the display is carried upright 2 4 WALL MOUNT SAFETY NOTICE 1 Please make sure if the bracket is fixed to the solid wall solid pillar for fear of falling due to heavy weight 2 After assembling please don t pull or shake violently Transport the display upright Avoid placing the display face up or down Handle the display gently Do not drop XTX 550...

Page 7: ...ug into the wall outlet connect the power cord to the display Don t operate the display with a damaged power cord or it may damage the display Using extension cords not recommended If an extension cord must be used ensure the voltage rating exceeds the max power consumption of the display If the voltage rating is less than the display it will cause the extension cord to overheat If there is thunde...

Page 8: ...he display Don t install or remove the power plug with wet hands This may cause an electrical shock If the display will not be used for a long period of time unplug the display This may cause premature wear of electrical components or fire Don t push or shake the display This may cause damage or injury If the glass of the display panel is broken liquid may escape Please don t touch the liquid If l...

Page 9: ...ht Sensor IR Receiver I is power on O is power off The power cord shipped separately is used to connect the display to an AC wall outlet Plug the power cord into the AC inlet on the side of the display Locate the Main Power switch directly above the AC inlet and press to turn power on and O to turn power off 4 2 POWER INPUT Item IR Remote Control Batteries Included IR Extender HDMI Cable USB Type ...

Page 10: ...NG SOLUTIONS AND CABLE MANAGEMENT Included accessory EasyFix Cable Clips Optional Control button FLEX height adjustable solutions Optional EasyFix camera bracket ships with Video Conferencing Upgrade Package XTX 5500 USER MANUAL ENGLISH ...

Page 11: ...omponents that have RGB or component output jacks such as a personal computer or external 9 PC Audio In Connects the audio output from a personal computer here 1 2 11 4 3 5 6 12 13 15 14 16 7 8 9 10 4 5 STATUS LED LED Illumination Condition Green Normal operation Blinking Orange No signal Orange Power Saving Off Power off AC off Note If the Status LED is set to Off in the OSD menu the Status LED w...

Page 12: ...djustment of VGA source 32 SOURCE Selects each source in sequence 33 VOLUME Decreases the sound volume 34 VOLUME Increases the sound volume 4 7 1 Changing the Remote Control Battery 1 Remove the battery cover Slide back and remove the battery cover in the direction of the arrow 2 Insert the batteries Align and insert two AAA batteries according to their plus and minus ports as indicated in the rem...

Page 13: ... two seconds VGA DisplayPort HDMI 1 HDMI 2 HDMI 3 OPS 2 Using the remote press the desired source button DISPLAYPORT HDMI1 HDMI2 HDMI3 HDMI4 VGA 3 If the display cannot find a source a No signal message will appear 5 1 TURNING THE DISPLAY ON AND OFF 5 2 ADJUSTING THE VOLUME AND INPUT SOURCE 5 3 ADD A LABEL TO AN INPUT SOURCE Note If there is no signal input for a period of time the display will au...

Page 14: ...f On Audio Source Default VGA Basic Settings Horizontal Pos 0 100 Vertical Pos 0 100 OSD Transparency 0 4 OSD Timeout 5 60 sec OSD Language English French German Nederland Power On Off Music Off On Power LED Off On RTC Schedule Current Time Setup Date Time Time Mode User Workday Everyday Mon Sun 00 00 23 59 00 00 23 59 Adv Settings Smart light control Off DCR Light Sensor IRFM Off On Noise Reducti...

Page 15: ...elect the desired level and then press ENTER Range 0 100 Default 50 Saturation Adjust the brilliance and brightness Press or select the desired level and then press ENTER Range 0 100 Default 50 Hue Increase or decrease the green hue Press or select the desired level and then press ENTER Range 0 100 Default 50 Backlight Increase or decrease the intensity of the LCD backlight Press or select the des...

Page 16: ...r to select the desired level and then press ENTER Range 0 100 Default 50 Input Source Select the main input source Options VGA DisplayPort HDMI1 HDMI2 HDMI3 OPS Default VGA Aspect Ratio Set the aspect ratio Options Auto Full Screen 16 9 Pillarbox 4 3 Auto Letterbox Point to Point Default Full Screen 16 9 Over Scan Adjust the image size Range 0 10 Default 0 Auto Scan Select whether the display wil...

Page 17: ...sh Power On Off Music Select whether to enable the power on off music when the monitor is powered up Options On Off Default On 6 2 4 Basic Settings This menu is used for basic settings Volume Adjust the sound Press or select the desired level and then press ENTER Range 0 100 Default 20 Bass Adjust the sound in low tones bass Press or select the desired level and then press ENTER Range 10 10 Defaul...

Page 18: ...duce random noise in the video content Options Off High Medium Low Default Off Wake Up From Sleep Change the behavior of Sleep Mode Options VGA Only Digital RS232 Ethernet Never Sleep Default VGA Only EDID Switch Select EDID Extended Display Identification Data of the HDMI and DisplayPort inputs Options 1080p 4K2K Note Use the 1080p for the broadest support of lower resolution sources Use 4K2K to ...

Page 19: ...for 5 minutes Normally the RS 232 DisplayPort and HDMI inputs are inactive in Sleep Mode to save power To change the behavior of Sleep Mode change the Wake up from Sleep setting in the Adv Setup menu I VGA Only default The RS 232 DisplayPort and HDMI inputs are inactive when the display is in sleep mode The display will wake up when it receives a signal at the VGA input II Digital RS232C Ethernet ...

Page 20: ...et gateway address 255 255 255 255 0 0 0 0 0 0 0 0 DNS Set DNS address 255 255 255 255 0 0 0 0 0 0 0 0 Save Settings Update the IP settings to net device No Yes Refresh Refresh dynamic IP info Power Status Alert Power change notification sent letters Off On Off Source Status Alert Source change notification sent letters Off On Off Lost Status Alert Signal lost change notification sent letters Off ...

Page 21: ...nnect one side of USB cable Type B USB connector on the display side 3 Connect the other side of USB cable Type A USB to the USB port on computer See picture below 4 Then turn on the computer 5 When USB cable connected then wait for 5 seconds and the touch function is ready to go It can be activated by pen finger or any other pointer Note Windows 10 is required for differentiation between pen touc...

Page 22: ...Y Video 3x HDMI 2 0 1 x DisplayPort 1 x VGA Audio Audio Out SPDIF Out PC Audio In Control IR Extender RS232 Ethernet Touch USB OPS slot Yes CONFERENCING Camera 2 Full HD wide angle cameras 1080p 30Hz linked to OPS Microphone High performance 4 channel array with Acoustical Echo Cancelling Automatic Gain Control and Noise Suppression linked to OPS PHYSICAL SPECIFICATIONS Dimensions mm 1437 W x 753 ...

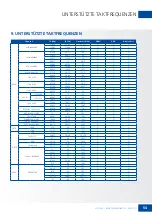
Page 23: ...67 5 75 108 O O O 1280x1024 63 981 60 02 108 O O O 79 976 75 025 135 O O O 1440 x 900 55 469 59 901 88 75 O 55 935 59 88 106 5 O O O WSXGA 1680 x1050 64 674 59 883 119 O O O 65 29 59 954 146 25 O O O UXGA 1600 x 1200 75 60 162 O O O 1920 x 1080 66 587 59 93 138 5 O O WUXA 1920 x 1200 74 038 59 95 154 O O QHD 2560x1440 88 787 59 951 241 5 O O QSXGA 2560x1600 98 713 59 972 268 5 O O EDTV 480p 31 5 6...

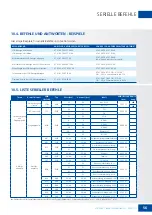
Page 24: ...the end of the command data always 08 CR is the ASCII carriage return key 0x0D 10 SERIAL COMMANDS 10 1 SERIAL COMMUNICATIONS 10 2 RS 232 CONNECTION AND PORT CONFIGURATION The display uses a simple text based control protocol to take requests from control devices and to provide responses to such devices This section describes how to send control messages over a serial link between the display and a...

Page 25: ... Gain mapping 0 100 55 53 42 UOR W R 00 64 00 64 Red Offset mapping 0 100 55 4F 52 UOG W R 00 64 00 64 Green Offset mapping 0 100 55 4F 47 UOB W R 00 64 00 64 Blue Offset mapping 0 100 55 4F 42 10 5 SERIAL COMMAND LIST 10 4 COMMAND AND RESPONSE EXAMPLES Here are some examples of serial commands and their responses Valid command on Power saving off mode The setting of Wake Up from Sleep must be VGA...

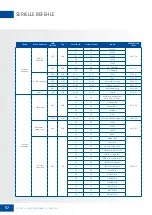
Page 26: ...n 56 45 52 ADJ W 00 00 Auto Adjust 41 44 4A Sharpness SHA W R 00 64 00 64 Sharpness 53 48 41 Other Control Scaling ASP W R 00 00 Main Window Aspect Ratio Native PointToPoint 41 53 50 01 01 Full Screen 16 9 02 02 Pillarbox 4 3 03 03 Letterbox 04 04 Auto ZOM W R 00 0A 00 0A Adjust overscan ratio 5A 4F 4D Baudrate Adjustment BRA W R 00 00 115200 42 52 41 01 01 38400 02 02 19200 03 03 9600 Other Contr...

Page 27: ...ying sub mcu version 02 00 5 byte Querying network module version Audio VOL W R 00 64 00 64 Volume 56 4F 4C BAS W R 00 14 00 14 Bass 10 10 42 41 53 TRE W R 00 14 00 14 Treble 10 10 54 52 45 BAL W R 00 14 00 14 Bass 10 10 42 41 4C INS W R 00 00 Internal Speaker Off 49 4E 53 W R 01 01 Internal Speaker On MUT W R 00 00 Mute Off 4D 55 54 W R 01 01 Mute On Scheme selection SCM W R 00 00 User 53 43 4D W...

Page 28: ...rm Disable Note14 W R 10 10 Thursday Alarm Disable Note14 W R 20 20 Friday Alarm Disable Note 14 W R 40 40 Saturday Alarm Disable Note14 NNH W R 00 17 00 17 Monday On Hour 4E 4E 48 NNM W R 00 3B 00 3B Monday On Minute 4E 4E 4D NFH W R 00 17 00 17 Monday Off Hour 4E 46 48 NFM W R 00 3B 00 3B Monday Off Minute 4E 46 4D ENH W R 00 17 00 17 Tuesday On Hour 45 4E 48 ENM W R 00 3B 00 3B Tuesday On Minut...

Page 29: ...F W R 01 01 On Smart Light Control SLC W R 00 00 Off 53 4C 43 SLC W R 01 01 DCR SLC W R 02 02 Light Sensor Power LED LED W R 00 00 Off 4C 45 44 LED W R 01 01 On HDMI EDID EDH W R 00 00 4Kx2K 45 44 48 EDH W R 01 01 1080P DisplayPort EDID EDP W R 00 00 4Kx2K 45 44 50 EDP W R 01 01 1080P HDMI RGB Color Range HCR W R 00 00 Auto Detect 48 43 52 HCR W R 01 01 Full Range HCR W R 02 02 Limited Range Touch...

Page 30: ...tatic IP Settings IP1 W R 00 FF 00 FF Static IP Address 1 49 50 31 IP2 W R 00 FF 00 FF Static IP Address 2 49 50 32 IP3 W R 00 FF 00 FF Static IP Address 3 49 50 33 IP4 W R 00 FF 00 FF Static IP Address 4 49 50 34 MK1 W R 00 FF 00 FF Subnet Mask 1 4D 4B 31 MK2 W R 00 FF 00 FF Subnet Mask 2 4D 4B 32 MK3 W R 00 FF 00 FF Subnet Mask 3 4D 4B 33 MK4 W R 00 FF 00 FF Subnet Mask 4 4D 4B 34 GW1 W R 00 FF ...

Page 31: ...THINGS No Display Ensure the power plug is installed correctly on both ends Check the main power switch is set to Check that source equipment is operating correctly Check the input signal is compatible with this display Check the LED light The image is not centered Check the input signal is compatible with this display The image is not locked correctly Check the input signal is compatible with thi...

Page 32: ...32 XTX 5500 USER MANUAL ENGLISH APPENDIX 13 APPENDIX 13 1 DIMENSIONS The following illustration shows the overall dimensions of the display ...

Page 33: ...2 4 5 Status LED 42 4 6 Eingangs und Ausgangsanschlüsse 42 4 7 Fernbedienung 43 5 Betrieb 44 5 1 Den Monitor ein und ausschalten 44 5 2 Lautstärke und Eingangsquelle anpassen 44 5 3 Bezeichnung der Eingangsquelle hinzufügen 44 6 Bedienelemente des OSD On Screen Display 44 6 1 OSD Menü Übersicht 45 6 2 Navigation durch das OSD Menü 46 7 Touch Bedienung 52 7 1 USB Kabelanschluss für die Touch Funkti...

Page 34: ...hlen 1 innerhalb eines Zeitraums von 24 Stunden den Monitor nach 16 Stunden Betrieb mindestens 6 Stunden lang ausgeschaltet zu lassen um Nachbildeffekte zu vermeiden und 2 im OSD Menü die IRFM Funktion auf EIN zu stellen unter Erweiterte Einstellungen Von der Produktgarantie ausgenommen sind Schäden die durch Naturkatastrophen Erdbeben Gewitter usw Feuer Handlungen von Dritten Unfälle vorsätzliche...

Page 35: ...eint ziehen Sie unverzüglich den Netzstecker aus der Steckdose Bei Nichtbeachtung besteht die Gefahr eines Brandes oder Stromschlags Wenden Sie sich zur Überprüfung des Gerätes an Ihren Händler Wenn Wasser oder Gegenstände in den Monitor gelangt sind ziehen Sie unverzüglich den Netzstecker aus der Steckdose Bei Nichtbeachtung besteht die Gefahr eines Brandes oder Stromschlags Wenden Sie sich zur Ü...

Page 36: ...rpern Warmluftauslässen Öfen oder anderen Wärme erzeugenden Geräten Es besteht die Gefahr eines Brandes oder Stromschlags Steckdosen oder Kabel nicht über die elektrische Leistungsgrenze hinaus belasten Benutzen Sie keine Verlängerungskabel da die Gefahr eines Brandes oder Stromschlags besteht Schließen Sie den Netzstecker nur an Steck dosen mit 100 240V Wechselspannung an Andernfalls besteht die ...

Page 37: ...nitor in aufrechter Position getragen wird Transportieren Sie den Monitor aufrecht Den Monitor nicht mit der Anzeigefläche nach oben oder unten abstellen Den Monitor vorsichtig behandeln Nicht fallen lassen XTX 5500 BENUTZERHANDBUCH DEUTSCH 2 4 SICHERHEITSHINWEISE FÜR DIE WANDMONTAGE 1 Vergewissern Sie sich dass die Klemme an einer festen Wand einem soliden Pfeiler angebracht ist Andernfalls könnt...

Page 38: ...erst das Netzkabel an den Monitor an Erst danach stecken Sie den Netzstecker in die Steckdose Den Monitor nicht mit einem beschädigten Netzkabel betreiben denn er könnte dadurch beschädigt werden Benutzung von Verlängerungskabeln nicht empfohlen Wenn ein Verlängerungskabel benutzt werden muss vergewissern Sie sich dass die Betriebsspannung größer als die maximale Leistungsaufnahme des Monitors ist...

Page 39: ...reten Diese Flüssigkeit bitte nicht berühren Wenn Flüssigkeit in Ihre Augen oder auf die Haut geraten ist waschen Sie diese mit klarem Wasser ab und suchen Sie unverzüglich einen Arzt auf 2 6 REINIGUNG Ziehen Sie vor dem Reinigen den Netzstecker ab Bei Nichtbeachtung besteht die Gefahr eines Stromschlags oder einer Beschädigung Reinigen der Bildschirmoberfläche Wenn die Bildschirmoberfläche des Mo...

Page 40: ...bel USB Kabel Typ B zu A Netzkabel USB Stick Benutzerhandbuch Beutel mit EasyFix Kabelschellen High precision stylus PACKUNGSINHALT INSTALLATION XTX 5500 BENUTZERHANDBUCH DEUTSCH 3 2 MITGELIEFERTES ZUBEHÖR 4 INSTALLATION 4 1 UMGEBUNGSBEDINGUNGEN Über das separat gelieferte Netzkabel wird der Monitor an die Wandsteckdose angeschlossen Das Netzkabel an den WS Eingang an der Seite des Monitors anschl...

Page 41: ...ELMANAGEMENT XTX 5500 BENUTZERHANDBUCH DEUTSCH Mitgeliefertes Zubehör EasyFix Kabelschellen Optional Regler für elektrisch höhenverstellbare FLEX Lösungen Optional EasyFix Montageklemme für Kameras im Lieferumfang des Upgrade Pakets für Videokonferenzen ...

Page 42: ...den Anschluss von SDTV EDTV oder HDTV Komponenten als Videoquelle 5 6 HDMI 1 2 HDCP konformer digitaler Videoeingang fur den Anschluss von HDMI Quellen 7 HDMI Aus HDCP konforme digitale Videoeingänge für den Anschluss von HDMI Quellen 8 VGA Ein 15 Pin D Sub Anschluss von Komponenten mit RGB oder Komponenten Ausgangsbuchsen wie Personal Computer oder externe Geräte 9 PC Audio Ein Zum Anschließen de...

Page 43: ...sem Untergrund ablegen Nicht auseinandernehmen Nicht in Räumen mit hoher Temperatur oder hoher Luftfeuchte ablegen Beschriftung Beschreibung 1 INFO Information über Quelle und Auflösung 2 Schaltet den Monitor ein und aus 3 VGA Auswahl der PC RGB Quelle 4 DISPLAYPORT Auswahl der DisplayPort Quelle 5 8 11 HDMI 1 2 3 Auswahl der HDMI Quelle 10 OPS Auswahl der OPS Computerquelle 19 MENU Öffnet das OSD...

Page 44: ...feld Eine Warnmeldung wird angezeigt Drücken Sie den Netzschalter erneut um das Herunterfahren zu bestätigen Alternativ können Sie auch die Einschalttaste auf der Fernbedienung benutzen Um das Gerät vollständig auszuschalten setzen Sie den Ein Aus Schalter auf O oder ziehen Sie das Netzkabel von der Wandsteckdose ab Hinweis Bei Inaktivität über einen längeren Zeitraum schaltet sich der Monitor aut...

Page 45: ... 10 Lautsprecher Aus An Audioquelle Voreinstellung VGA Grundeinstellungen Horizontale Pos 0 100 Vertikale Pos 0 100 OSD Transparenz 0 4 OSD Zeitlimit 5 60 Sekunden OSD Sprache Englisch Französisch Deutsch Niederländisch Musik ein aus Aus An Betriebs LED Aus An Echtzeituhr Schema Aktuelle Zeit Datum und Uhrzeit einstellen Timer Modus Benutzer Werktag Immer Mo So 00 00 23 59 00 00 23 59 Weitere Eins...

Page 46: ...e oder zur Auswahl der gewünschten Stufe Drücken Sie anschließend ENTER Bereich 0 100 Voreinstellung 50 Sättigung Anpassen von Brillanz und Helligkeit D Drücken Sie oder zur Auswahl der gewünschten Stufe Drücken Sie anschließend ENTER Bereich 0 100 Voreinstellung 50 Farbton Erhöht oder verringert den Grünton Drücken Sie oder zur Auswahl der gewünschten Stufe Drücken Sie anschließend ENTER Bereich ...

Page 47: ...l der gewünschten Stufe Drücken Sie anschließend ENTER Bereich 0 100 Voreinstellung 50 Eingangsquelle Auswahl der Primär Eingangsquelle Optionen VGA DisplayPort HDMI1 HDMI2 HDMI3 OPS Voreinstellung VGA Bildformat Auswahl des Bildformats Optionen Auto Vollbild 16 9 Pillarbox 4 3 Auto Letterbox Point to Point Voreinstellung Vollbild 16 9 Overscan Anpassen der Bildgröße Bereich 0 10 Voreinstellung 0 ...

Page 48: ...ptions Englisch Französisch Deutsch Niederländisch Voreinstellung Englisch 6 2 4 Grundeinstellungen Dieses Menü dient zur Auswahl der Grundeinstellungen Lautstärke Anpassen der Lautstärke Drücken Sie oder zur Auswahl der gewünschten Stufe Drücken Sie anschließend ENTER Bereich 0 100 Voreinstellung 20 Tiefen Anpassen der Tontiefen Drücken Sie oder zur Auswahl der gewünschten Stufe Drücken Sie ansch...

Page 49: ...kung Unterdrückt das Rauschen bei Videoinhalten Optionen Aus Hoch Mittel Niedrig Voreinstellung Aus Schlafmodus beenden Das Verhalten des Schlafmodus ändern Optionen Nur VGA Digital RS232C Ethernet Schlafmodus deaktivieren Voreinstellung Nur VGA EDID Schalter Auswahl der EDID Extended Display Identification Data Einstellungen für den HDMI und DisplayPort Eingang Optionen 1080p 4K2K 60 4K2K 30 Note...

Page 50: ...ormalerweise sind die RS 232 DisplayPort und HDMI Eingänge im Standby Modus inaktiv um Energie zu sparen Um das Verhalten des Standby Modus zu verändern müssen Sie in den Erweiterten Einstellungen die Option Schlafmodus beenden verändern I Nur VGA Voreinstellung Die RS 232 DisplayPort und HDMI Eingänge sind inaktiv wenn der Monitor im Standby Modus ist Der Monitor beendet den Standby Modus wenn er...

Page 51: ...Gateway Adresse einstellen 255 255 255 255 0 0 0 0 0 0 0 0 DNS DNS Adresse einstellen 255 255 255 255 0 0 0 0 0 0 0 0 Einstellungen speichern IP Einstellungen auf Netzgerät aktualisieren Nein Ja Aktualisieren Dynamische IP Angaben aktualisieren Energiezustandsmeldung Energiezustandshinweis anzeigen Aus Ein Aus Statusmeldung der Quelle Hinweis über Wechsel der Quelle anzeigen Aus Ein Aus Verlust St...

Page 52: ...ite des USB Kabels USB Anschlusstyp B an der Seite des Monitors an 3 Schließen Sie das andere Ende des USB Kabels USB Anschlusstyp A an den USB Port des Computers an Siehe Abbildung unten 4 Schalten Sie dann den Computer ein 5 Nach dem Anschließen des USB Kabels warten Sie 5 Sekunden bis die Touch Funktion einsatzbereit ist Sie kann mit Stift Finger oder einem anderen Zeigemedium aktiviert werden ...

Page 53: ...o 3x HDMI 2 0 1 x DisplayPort 1 x VGA Audio Audio Aus SPDIF Aus PC Audio Ein Steuerung IR Extender RS232 Ethernet Touch USB OPS Steckplatz Ja KONFERENZFUNKTION Kamera 2 Full HD Weitwinkelkameras 1080p 30Hz verknüpft mit OPS Mikrofon Hochleistungsfähiges 4 Kanal Array mit akustischer Echokompensation automatischer Verstärkungsregelung und Rauschunterdrückung verknüpft mit OPS PHYSICAL SPECIFICATION...

Page 54: ...SXGA 1152x864 67 5 75 108 O O O 1280x1024 63 981 60 02 108 O O O 79 976 75 025 135 O O O 1440 x 900 55 469 59 901 88 75 O 55 935 59 88 106 5 O O O WSXGA 1680 x1050 64 674 59 883 119 O O O 65 29 59 954 146 25 O O O UXGA 1600 x 1200 75 60 162 O O O 1920 x 1080 66 587 59 93 138 5 O O WUXA 1920 x 1200 74 038 59 95 154 O O QHD 2560x1440 88 787 59 951 241 5 O O QSXGA 2560x1600 98 713 59 972 268 5 O O ED...

Page 55: ...uf Taste Zeilenanfang 0x0D 10 SERIELLE BEFEHLE 10 1 SERIELLE KOMMUNIKATION 10 2 RS 232 ANSCHLUSS UND PORT KONFIGURATION Der Monitor verwendet ein einfaches textbasiertes Steuerprotokoll mit dessen Hilfe Anfragen von Steuerungsgeräten angenommen und Antworten an diese Geräte zurückgegeben werden In diesem Abschnitt wird beschrieben wie Steuermeldungen über eine serielle Verbindung zwischen dem Moni...

Page 56: ...ex Anmer kung Stromversorgung und Eingangsquelle Stromversorgung steuern POW W R 00 00 Aus Soft 50 4F 57 01 01 Ein Soft IPC Steuerung IPC W R 00 00 Off 49 50 43 01 01 On Eingangsquelle MIN W R 00 00 VGA 4D 49 4E 9 9 HDMI1 0A 0A HDMI2 0B 0B HDMI3 0D 0D Displayport 0E 0E IPC OPS Anzeige anpassen Anzeige anpassen BRI W R 00 64 00 64 Helligkeit Hintergrundbeleuchtung 42 52 49 BRL W R 00 64 00 64 Helli...

Page 57: ...4A Schärfe SHA W R 00 64 00 64 Schärfe 53 48 41 Sonstige Steuerung Skalierung ASP W R 00 00 Bildformat Hauptfenster Nativ Point To Point 41 53 50 01 01 Vollbild 16 9 02 02 Pillarbox 4 3 03 03 Letterbox 04 04 Auto ZOM W R 00 0A 00 0A Overscan Verhältnis anpassen 5A 4F 4D Baudraten anpassung BRA W R 00 00 115200 42 52 41 01 01 38400 02 02 19200 03 03 9600 Sonstige Steuerung RCU W 00 00 MENU Taste 52...

Page 58: ...b 02 00 5 byte Netzwerkmodul Version abfragen Audio VOL W R 00 64 00 64 Lautstärke 56 4F 4C BAS W R 00 14 00 14 Tiefen 10 10 42 41 53 TRE W R 00 14 00 14 Höhen 10 10 54 52 45 BAL W R 00 14 00 14 Tiefen 10 10 42 41 4C INS W R 00 00 Interner Lautsprecher aus 49 4E 53 W R 01 01 Interner Lautsprecher ein MUT W R 00 00 Stummschaltung aus 4D 55 54 W R 01 01 Stummschaltung ein Darstellung auswählen SCM W...

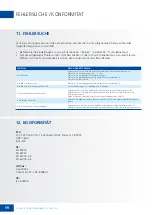
Page 59: ...d ist nicht zentriert Prüfen Sie ob das Eingangssignal mit diesem Monitor kompatibel ist Das Bild wird nicht richtig synchronisiert Check the input signal is compatible with this display Die Fernbedienung funktioniert nicht Vergewissern Sie sich dass die Batterien funktionstüchtig und richtig eingesetzt sind Vergewissern Sie sich dass die Fernbedienung auf den IR Sensor an der Vorderseite des Moni...

Page 60: ...60 XTX 5500 BENUTZERHANDBUCH DEUTSCH ANHANG 13 ANHANG 13 1 ABMESSUNGEN Die folgende Abbildung zeigt die Gesamtabmessungen des Monitors ...

Page 61: ...ED d état 70 4 6 Connecteurs d entrée et de sortie 70 4 7 Télécommande 71 5 Utilisations 72 5 1 Allumage ou extinction de l écran 72 5 2 Réglage du volume et de la source d entrée 72 5 3 Ajout d une étiquette à une source d entrée 72 6 Commandes OSD On Screen Display Affichage à l écran 72 6 1 Vue d ensemble du menu OSD 73 6 2 Navigation dans le menu OSD 74 7 Utilisation tactile 80 7 1 Connexion d...

Page 62: ... changer régulièrement l image à l écran Il est recommandé de 1 éteindre l écran durant au moins 6 heures après 16 heures d utilisation en 24 heures pour éviter la rémanence d image et 2 activer la fonction IRFM dans le menu OSD sous Paramètres avancés Ce produit n est pas garanti pour tout dommage causé par la catastrophe naturelle telle que les séismes les orages etc les incendies les actes comm...

Page 63: ...e n apparaît débranchez immédiatement sa fiche électrique de la prise de courant Le non respect de cette instruction risque de provoquer un incendie ou une électrocution Contactez votre revendeur pour faire inspecter l écran En cas de projections d eau ou de pénétration d objets à l intérieur de l écran débranchez immédiatement sa fiche électrique de la prise de courant Le non respect de cette ins...

Page 64: ...roduisent de la chaleur Cela risque de provoquer un incendie ou une électrocution Ne pas surcharger les prises de courant ou les câbles au delà de leur capacité électrique Ne pas utiliser des rallonges car cela risque de provoquer un incendie ou une électrocution Ne pas brancher la fiche électrique sur une prise de courant autre que 100 240 V AC Cela risque de provoquer un incendie ou une électroc...

Page 65: ...rsonnes sont nécessaires Veiller à transporter l écran en position droite Transporter l écran en position droite Éviter de placer l écran avec la face orientée vers le haut ou le bas Manipuler doucement l écran Ne pas le laisser tomber XTX 5500 MANUEL DE L UTILISATEUR FRANÇAIS 2 4 AVIS DE SÉCURITÉ DE MONTAGE 1 Assurez vous que le support est fixé à un mur plein pilier plein sinon il risque de tomb...

Page 66: ...rise de courant murale il faut raccorder le cordon d alimentation à l écran Ne pas utiliser l écran avec un cordon d alimentation endommagé car il risque d abîmer l écran Utilisation de rallonges pas recommandées Si une rallonge doit être utilisée il convient de vérifier si la tension nominale est supérieure à la consommation maximale de courant de l écran Une tension nominale inférieure à celle d...

Page 67: ... En cas de pénétration du liquide dans les yeux ou de contact avec la peau laver à l eau propre et consulter immédiatement un médecin CONSIGNES DE SÉCURITÉ CONTENU DU CARTON 2 6 NETTOYAGE Débrancher la fiche électrique avant le nettoyage Le non respect de cette instruction risque de provoquer une électrocution ou un dommage Nettoyage de la surface de l écran Lorsque la surface de l écran se salit ...

Page 68: ...ALLATION 4 INSTALLATION 4 1 CONDITIONS AMBIANTES Lors de l utilisation de l écran de la série XTX les conditions ambiantes de la pièce ne doivent pas être supérieures à celles indiquées ci après Température de fonctionnement De 5 C à 45 C de 41 F à 104 F Humidité inférieure à 90 HR max Le cordon d alimentation expédié séparément est utilisé pour raccorder l écran à une prise de courant murale du s...

Page 69: ... inclus Clips pour câble EasyFix Solutions réglables en hauteur FLEX avec bouton de commande en option 4 3 SOLUTIONS DE MONTAGE EASYFIX ET GESTION DES CÂBLES Patte de fixation de la caméra EasyFix livrée avec le progiciel de mise à niveau de la vidéoconférence en option ...

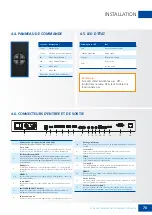
Page 70: ...ter les sources vidéo des composants SDTV EDTV ou HDTV 5 6 HDMI 1 2 Entrées vidéo numérique conformes à HDCP permettant de connecter les sources HDMI 7 Sortie HDMI Entrées numériques conformes HDCP pour la connexion aux sources HDMI 8 Entrée VGA D Sub 15 broches Permet de connecter des composants RVB ou des jacks de sortie d un composant tels qu un ordinateur personnel ou externe 9 Entrée audio du...

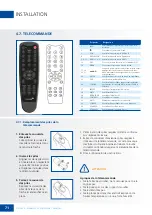
Page 71: ...lacez pas dans des endroits exposés à de hautes températures ou à une forte humidité Étiquette Désignation 1 INFO Pour obtenir des informations sur la source et la résolution 2 Pour allumer ou éteindre l écran 3 VGA Pour sélectionner la source RVB du PC 4 DISPLAYPORT Pour sélectionner la source DisplayPort 5 8 11 HDMI 1 2 3 Pour sélectionner la source HDMI 10 OPS Pour sélectionner la source de l o...

Page 72: ...ton Marche Arrêt de la télécommande Pour éteindre l écran Lorsque l appareil est sous tension appuyez sur le bouton d alimentation du boitier de commande Un message d avertissement apparaîtra Appuyez de nouveau sur le bouton d alimentation pour confirmer l arrêt Vous pouvez également utiliser le bouton d alimentation de la télécommande Pour couper complètement le courant mettez l interrupteur AC s...

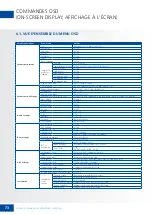
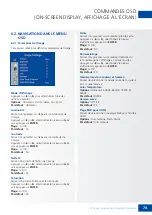
Page 73: ...e 10 10 Enceinte Désactivé Activé Source audio Défaut VGA Basic Settings Pos Horizontale 0 100 Pos verticale 0 100 Transparence OSD 0 4 Expiration OSD 5 60 Secondes Langue OSD Anglais Français Allemand Néerlandais Marche Arrêt Musique Désactivé Activé LED Alimentation Désactivé Activé RTC et Programme Heure actuelle Définir la date et l heure Mode minuterie Utilisateur Jour de travail Tous les jou...

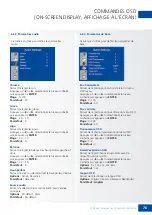
Page 74: ... puis appuyez sur ENTER Plage 0 100 Par défaut 50 Saturation Permet d ajuster la brillance et la luminosité Appuyez sur ou sélectionnez le niveau souhaité puis appuyez sur ENTER Plage 0 100 Par défaut 50 Teinte Permet d augmenter ou de réduire la teinte verte Appuyez sur ou sélectionnez le niveau souhaité puis appuyez sur ENTER Plage 0 100 Par défaut 50 Rétro éclairage Permet d augmenter ou de réd...

Page 75: ...souhaité puis appuyez sur ENTER Plage 0 100 Par défaut 50 Source d entrée Permet de sélectionner la source d entrée principale Options VGA DisplayPort HDMI1 HDMI2 HDMI3 OPS Par défaut VGA Rapport hauteur largeur Permet de définir le rapport hauteur largeur Options Auto Plein écran 16 9 Pillarbox 4 3 Automatique Letterbox PointToPoint Par défaut Plein écran 16 9 Taux de numérisation Permet d ajuste...

Page 76: ...onner la langue OSD Options Anglais Français Allemand Néerlandais Par défaut Anglais 6 2 4 Paramètres de base Ce menu est utilisé pour définir les paramètres de base Volume Permet de régler le son Appuyez sur ou sélectionnez le niveau souhaité puis appuyez sur ENTER Plage 0 100 Par défaut 20 Grave Permet de régler les graves Appuyez sur ou sélectionnez le niveau souhaité puis appuyez sur ENTER Pla...

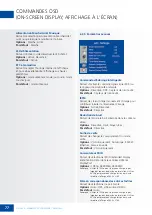
Page 77: ...ter la rémanence d image Options Activé Désactivé Par défaut Désactivé Réduction de bruit Permet de réduire le bruit aléatoire dans le contenu vidéo Options Désactivé Haut Moyen Bas Par défaut Désactivé Sortie de veille Permet de changer le comportement du mode veille Options VGA uniquement Numérique RS232C Ethernet Jamais en veille Par défaut VGA uniquement Commutateur EDID Permet de sélectionner...

Page 78: ...lle en l absence de réception d un signal pendant 5 minutes En principe les entrées RS 232 DisplayPort et HDMI sont inactives en Mode veille pour économiser de l énergie Pour changer le comportement du mode veille changez le paramètre Sortie de veille dans le menu Configuration avancée I VGA uniquement par défaut Les entrées RS 232 DisplayPort et HDMI sont inactives lorsque l affichage est en mode...

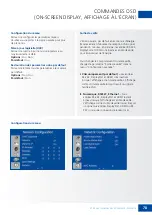
Page 79: ...nir une adresse DNS 255 255 255 255 0 0 0 0 0 0 0 0 Enregistrer les paramètres Mettre à jour les paramètres IP sur le dispositif NET Non Oui Actualiser Actualiser les informations d adresse IP dynamique Alerte d état d alimentation Envoi de lettres de notification de changement d alimentation Désactivé Activé Off Alerte d état de source Envoi de lettres de notification de changement de source Désa...

Page 80: ... l écran 3 Connectez l autre extrémité du câble USB USB de type A au port USB sur l ordinateur Voir l image ci dessous 4 Allumez ensuite l ordinateur 5 Lorsque le câble USB est connecté attendez 5 secondes et la fonction tactile est prête à être utilisée Elle peut être activée au moyen d un stylo du doigt ou de tout autre pointeur Remarque Windows 10 est nécessaire pour différencier les dispositif...

Page 81: ...I 2 0 1 x DisplayPort 1 x VGA Audio Sortie audio Sortie SPDIF Entrée audio du PC Commande Rallonge infrarouge RS232 Ethernet USB tactile Logement OPS Oui VIDÉOCONFÉRENCE Caméra 2 caméras grand angle Full HD 1080p 20Hz liaison à l OPS Microphone Matrice 4 canaux haute performance avec annulation d écho acoustique contrôle du gain automatique et suppression du bruit liaison à l OPS CARACTÉRISTIQUES ...

Page 82: ...1 83 O O O SXGA 1152x864 67 5 75 108 O O O 1280x1024 63 981 60 02 108 O O O 79 976 75 025 135 O O O 1440 x 900 55 469 59 901 88 75 O 55 935 59 88 106 5 O O O WSXGA 1680 x1050 64 674 59 883 119 O O O 65 29 59 954 146 25 O O O UXGA 1600 x 1200 75 60 162 O O O 1920 x 1080 66 587 59 93 138 5 O O WUXA 1920 x 1200 74 038 59 95 154 O O QHD 2560x1440 88 787 59 951 241 5 O O QSXGA 2560x1600 98 713 59 972 2...

Page 83: ... 5500 MANUEL DE L UTILISATEUR FRANÇAIS COMMANDES SÉRIE 10 COMMANDES SÉRIE 10 1 COMMUNICATIONS SÉRIE 10 2 CONNEXION RS 232 ET CONFIGURATION DU PORT L écran utilise un simple protocole de contrôle textuel pour recevoir les requêtes des dispositifs de contrôle et pour fournir des réponses à ces dispositifs Cette section décrit comment envoyer des messages de contrôle par une liaison série entre l écr...

Page 84: ... Contrôle de l alimentation et source d entrée Power Commande POW W R 00 00 Désactivé alimentation souple 50 4F 57 01 01 Activé alimentation souple Commande IPC IPC W R 00 00 Désactivé 49 50 43 01 01 Activé Source d entrée MIN W R 00 00 VGA 4D 49 4E 9 9 HDMI1 0A 0A HDMI2 0B 0B HDMI3 0D 0D Displayport 0E 0E IPC OPS Réglage de l écran Réglage de l écran BRI W R 00 64 00 64 Luminosité du rétro éclair...

Page 85: ...4A Netteté SHA W R 00 64 00 64 Netteté 53 48 41 Autre contrôle Mise à l échelle ASP W R 00 00 Rapport hauteur largeur principal Window natif PointToPoint 41 53 50 01 01 Plein écran 16 9 02 02 Pillarbox 4 3 03 03 Letterbox 04 04 Auto ZOM W R 00 0A 00 0A Réglage du taux de numérisation 5A 4F 4D Réglage du débit BRA W R 00 00 115200 42 52 41 01 01 38400 02 02 19200 03 03 9600 Autre contrôle RCU W 00 ...

Page 86: ...on de la version sub mcu 02 00 5 byte Interrogation de la version du module réseau Audio VOL W R 00 64 00 64 Volume 56 4F 4C BAS W R 00 14 00 14 Grave 10 10 42 41 53 TRE W R 00 14 00 14 Aigu 10 10 54 52 45 BAL W R 00 14 00 14 Grave 10 10 42 41 4C INS W R 00 00 Haut parleur interne Désactivé 49 4E 53 W R 01 01 Haut parleur interne Activé MUT W R 00 00 Silencieux Désactivé 4D 55 54 W R 01 01 Silenci...

Page 87: ...tible avec cet écran Contrôlez l état de l ampoule de la LED L image n est pas centrée Vérifiez si le signal d entrée est compatible avec cet écran L image n est pas verrouillée correctement Vérifiez si le signal d entrée est compatible avec cet écran La télécommande ne fonctionne pas Assurez vous que les piles sont neuves et installées correctement Assurez vous que la télécommande est dirigée ver...

Page 88: ...88 XTX 5500 MANUEL DE L UTILISATEUR FRANÇAIS ANNEXE 13 ANNEXE 13 1 DIMENSIONS L illustration suivante indique les dimensions globales de l écran ...

Page 89: ...ngs en uitgangsaansluitingen 98 4 7 Afstandsbediening 99 5 Bediening 100 5 1 Het scherm in en uitschakelen 100 5 2 Het volume en de ingangsbron aanpassen 100 5 3 Een label aan een ingangbron toevoegen 100 6 Bediening van het OSD On Screen Display 100 6 1 Overzicht van het OSD menu 101 6 2 Navigeren door het OSD menu 102 7 Touch bediening 108 7 1 Aansluiting van de USB kabel voor touch bediening 10...

Page 90: ... regelmatig Om beeldinbranding te voorkomen is het raadzaam om 1 het scherm na 16 uur gebruik binnen een periode van 24 uur minstens 6 uur uit te laten staan en 2 de functie IRFM in het OSD menu AAN te zetten onder Geavanceerd De garantie op dit product is niet van toepassing op schade veroorzaakt door natuurrampen zoals een aardbeving bliksem enz brand handelingen door derden ongelukken opzetteli...

Page 91: ... met uw dealer Als het scherm is ingeschakeld maar er geen beeld verschijnt haal dan onmiddellijk de stekker uit het stopcontact Doet u dat niet dan kan dit brand of een elektrische schok veroorzaken Neem voor een inspectie contact op met uw dealer Haal de stekker onmiddellijk uit het stopcontact als er water op het scherm is gemorst of als er iets in het scherm is gevallen Doet u dat niet dan kan...

Page 92: ...re apparaten die warmte produceren Dit kan brand of een elektrische schok veroorzaken Het elektrische vermogen van stopcontacten en kabels nooit overschrijden Geen verlengsnoer gebruiken dit kan brand of een elektrische schok veroorzaken De stekker nooit in een stopcontact met een spanning anders dan 100 240 VAC steken Dit kan brand of een elektrische schok veroorzaken Nooit beschadigde stekkers o...

Page 93: ... nodig om het scherm uit te pakken of te dragen Zorg ervoor dat het scherm altijd rechtop wordt gedragen Vervoer het scherm rechtop Leg het niet met het beeldscherm naar boven of beneden gericht neer Ga altijd voorzichtig om met het scherm Laat het niet vallen 2 4 VEILIGHEIDSMAATREGELEN VOOR WANDBEVESTIGING 1 Bevestig de beugel stevig aan een degelijke wand of pilaar Het scherm is zwaar en zou and...

Page 94: ...voedingskabel en of de stekker Sluit de voedingskabel eerst op het scherm aan en steek pas dan de stekker in het stopcontact Gebruik het scherm nooit met een beschadigde voedingskabel dit kan het scherm beschadigen Gebruik van verlengsnoeren niet aanbevolen Als er een verlengsnoer moet worden gebruikt controleer dan dat het spanningsbereik groter is dan het maximale stroomverbruik van het scherm A...

Page 95: ...ermpaneel is gebroken kan er vloeistof ontsnappen Raak deze vloeistof niet aan Als de vloeistof in de ogen komt of contact maakt met de huid deze met schoon water wassen en onmiddellijk medische hulp inschakelen 2 6 REINIGEN Haal de stekker van de voedingskabel uit het stopcontact alvorens deze te reinigen Doet u dat niet dan kan dit een elektrische schok of schade veroorzaken Het oppervlak van he...

Page 96: ...C Luchtvochtigheid minder dan 90 RV max De voedingskabel apart geleverd wordt gebruikt om het scherm op een wisselstroomstopcontact aan te sluiten Sluit de voedingskabel aan op de wisselstroomingang aan de zijkant van het scherm De aan uit schakelaar zit recht boven de wisselstroomingang Druk op om het scherm in te schakelen of op O om het uit te schakelen 4 2 ELEKTRISCHE VOEDING Artikel IR afstan...

Page 97: ...G NEDERLANDS 4 3 EASYFIX MONTAGEOPLOSSINGEN EN KABELBEHEER Meegeleverde accessoires EasyFix kabelklemmen Optionele Regelknop voor in hoogte verstelbare FLEX oplossingen Optionele EasyFix camerabeugel komt met upgradepakket voor videoconferencing ...

Page 98: ...1 SD HD ingang om SDTV EDTV of HDTV videobronnen aan te sluiten 5 6 HDMI 1 2 Voldoen aan HDCP Digitale video ingangen om HDMI bronnen aan te sluiten 7 HDMI Uit HDCP compliant digitale video ingangen voor aansluiting van HDMI bronnen 8 VGA In 15 pins D Sub Verbindt componenten die RGB of aansluitingen voor componentuitgangen hebben zoals een personal computer of extern apparaat 9 PC audio in Hier s...

Page 99: ... schudden en niet stoten Niet op nat materiaal neerleggen Niet uit elkaar halen Niet neerleggen op plaatsen waar hij kan worden blootgesteld aan hoge temperaturen of hoge vochtigheid Label Omschrijving 1 INFO Geeft informatie over de bron en resolutie 2 Om het scherm in en uit te schakelen 3 VGA Selecteer de PC RGB bron 4 DISPLAYPORT Selecteer de DisplayPort bron 5 8 11 HDMI 1 2 3 Selecteer de HDM...

Page 100: ...schuwingsmelding Druk nogmaals op de aan uit toets om het uitschakelen te bevestigen of gebruik de aan uit toets op de afstandsbediening Als u de voeding helemaal wilt uitschakelen zet u de voedingschakelaar in de stand O of haalt u de stekker uit het stopcontact 5 1 HET SCHERM IN EN UITSCHAKELEN 5 2 HET VOLUME EN DE INGANGS BRON AANPASSEN Opmerking Als er een tijd lang geen signaal wordt ontvange...

Page 101: ... 100 Lage tonen 10 10 Hoge tonen 10 10 Balans 10 10 Luidspreker Uit Aan Audiobron Standaard VGA Basisinstellingen Horizontale pos 0 100 Verticale pos 0 100 OSD transparantie 0 4 OSD time out 5 60 Seconden OSD taal Engels Frans Duits Nederland Muziek AAN UIT Uit Aan Voeding LED Uit Aan Realtimeklok en planning Huidige tijd Huidige tijd en datum instellen Timermodus Gebruiker Werkdag Elke dag Ma Zon...

Page 102: ...nste niveau te selecteren en druk vervolgens op ENTER Bereik 0 100 Standaard 50 Kleurverzadiging Stel de witheidsgraad en de helderheid af Druk op of om het gewenste niveau te selecteren en druk vervolgens op ENTER Bereik 0 100 Standaard 50 Schakering Verhoog of verlaag de groentint van het beeld Druk op of om het gewenste niveau te selecteren en druk vervolgens op ENTER Bereik 0 100 Standaard 50 ...

Page 103: ...GA bron Druk op of to om het gewenste niveau te selecteren en druk vervolgens op ENTER Bereik 0 100 Standaard 50 Ingangsbron Selecteer de primaire ingangsbron Opties VGA DisplayPort HDMI1 HDMI2 HDMI3 OPS Standaard VGA Beeldverhouding Stel de beeldverhouding in Opties Autom Volledig scherm 16 9 Zuil 4 3 Autom Brievenbus PointToPoint Standaard Volledig scherm 16 9 Overscan Pas de beeldgrootte aan Be...

Page 104: ...teer de taal van het OSD Opties Engels Frans Duits Nederlands Standaard Engels 6 2 4 Algemene instellingen Dit menu wordt gebruikt om de basisinstellingen aan te passen Volume Pas het geluid aan Druk op of om het gewenste niveau te selecteren en druk vervolgens op ENTER Bereik 0 100 Standaard 20 Lage tonen Pas de lage tonen aan bas Druk op of om het gewenste niveau te selecteren en druk vervolgens...

Page 105: ...ding te voorkomen Opties Aan Uit Standaard Uit Ruisonderdrukking Onderdruk ongewenste ruis in de videocontent Opties Uit Hoog Middelhoog Laag Standaard Uit Uit slaapstand Wijzig het gedrag van de slaapstand Opties Alleen VGA Digitaal RS232C Ethernet Nooit in slaapstand Standaard Alleen VGA EDID schakelaar Selecteer EDID Extended Display Identification Data van de HDMI en DisplayPort ingang Opties ...

Page 106: ...een signaal wordt ontvangen Normaal gesproken zijn zijn de ingangen RS 232 DisplayPort en HDMI om stroom te besparen inactief in de slaapstand U kunt het gedrag van de slaapstand wijzigen via de instelling Uit slaapstand in het menu Geavanceerd I Alleen VGA standaard De ingangen RS 232 DisplayPort en HDMI zijn inactief wanneer het scherm in de slaapstand staat Het scherm wordt geactiveerd wanneer ...

Page 107: ...255 255 255 255 0 0 0 0 0 0 0 0 DNS Stel het DNS adres in 255 255 255 255 0 0 0 0 0 0 0 0 Instellingen opslaan Update de IP instellingen van het netwerkapparaat Nee Ja Vernieuwen Vernieuw de dynamische IP gegevens Melding voedingsstatus Verstuur berichten over wijzigingen in de voedingsstatus Uit Aan Uit Melding bronstatus Verstuur berichten over wijzigingen in de bronstatus Uit Aan Uit Melding ge...

Page 108: ... kabel met de USB stekker type B moet aan op de schermzijde worden aangesloten 3 Sluit het andere einde van de USB kabel USB type A aan op de USB poort van de computer Zie de onderstaande afbeelding 4 Zet vervolgens de computer aan 5 Vijf seconden nadat de USB kabel is aangesloten is de touch functie klaar voor gebruik U kunt deze activeren met een pen een vinger of een andere aanwijzer NB Windows...

Page 109: ...CTIVITEIT Video 3x HDMI 2 0 1x DisplayPort 1x VGA Audio Audio uit SPDIF uit PC audio in Besturing IR extender RS232 Ethernet touch USB OPS sleuf Ja CONFERENCING Camera 2 Full HD breedhoek camera s 1080p 30Hz gekoppeld aan OPS Microfoon Hoogwaardige 4 kanaals opstelling met onderdrukking van akoestische echo automatische intensiveringsregeling en ruisonderdrukking gekoppeld aan OPS FYSIEKE SPECIFIC...

Page 110: ... 83 O O O SXGA 1152x864 67 5 75 108 O O O 1280x1024 63 981 60 02 108 O O O 79 976 75 025 135 O O O 1440 x 900 55 469 59 901 88 75 O 55 935 59 88 106 5 O O O WSXGA 1680 x1050 64 674 59 883 119 O O O 65 29 59 954 146 25 O O O UXGA 1600 x 1200 75 60 162 O O O 1920 x 1080 66 587 59 93 138 5 O O WUXA 1920 x 1200 74 038 59 95 154 O O QHD 2560x1440 88 787 59 951 241 5 O O QSXGA 2560x1600 98 713 59 972 26...

Page 111: ...de opdrachtgegevens aanduidt altijd 08 CR het ASCII Enter teken is 0x0D 10 SERIËLE OPDRACHTEN 10 1 SERIËLE COMMUNICATIE 10 2 AANSLUITING EN CONFIGURATIE VAN RS 232 POORT Het scherm gebruikt een eenvoudig op tekst gebaseerd besturingsprotocol om verzoeken van besturingsapparaten te ontvangen en op deze apparaten te reageren Dit hoofdstuk beschrijft hoe berichten worden verzonden via een seriële kop...

Page 112: ... DEC Inhoud CMD HEX Opmer king Voedings regeling en ingangsbron Aan uit Besturing POW W R 00 00 Uit zacht 50 4F 57 01 01 Aan zacht IPC Control IPC W R 00 00 Uit 49 50 43 01 01 Aan Ingangsbron MIN W R 00 00 VGA 4D 49 4E 9 9 HDMI1 0A 0A HDMI2 0B 0B HDMI3 0D 0D Displayport 0E 0E IPC OPS Scherm aanpassen Scherm aanpassen BRI W R 00 64 00 64 Helderheid van achtergrondverlichting 42 52 49 BRL W R 00 64 ...

Page 113: ...tische instelling 41 44 4A Scherpte SHA W R 00 64 00 64 Scherpte 53 48 41 Overige regeling Schaal ASP W R 00 00 Beeldverhouding hoofdscherm Native PointToPoint 41 53 50 01 01 Volledig scherm 16 9 02 02 Zuil 4 3 03 03 Brievenbus 04 04 Autom ZOM W R 00 0A 00 0A Beeldverhouding overscan aanpassen 5A 4F 4D Baudrate aanpassen BRA W R 00 00 115200 42 52 41 01 01 38400 02 02 19200 03 03 9600 Overige rege...

Page 114: ...sie opvragen 02 00 5 byte Netwerkmoduleversie opvragen Audio VOL W R 00 64 00 64 Volume 56 4F 4C BAS W R 00 14 00 14 Hoge tonen 10 10 42 41 53 TRE W R 00 14 00 14 Treble 10 10 54 52 45 BAL W R 00 14 00 14 Lage tonen 10 10 42 41 4C INS W R 00 00 Interne luidspreker Uit 49 4E 53 W R 01 01 Interne luidspreker Aan MUT W R 00 00 Dempen Uit 4D 55 54 W R 01 01 Dempen Aan Schema selecteren SCM W R 00 00 G...

Page 115: ... ingangssignaal geschikt is voor dit scherm Controleer de LED Het beeld is niet gecentreerd Controleer dat het ingangssignaal geschikt is voor dit scherm The image is not locked correctly Controleer dat het ingangssignaal geschikt is voor dit scherm De afstandsbediening werkt niet Controleer dat er nieuwe batterijen in zitten en dat deze goed zijn geplaatst Richt de afstandsbediening altijd op de ...

Page 116: ...116 XTX 5500 GEBRUIKERSHANDLEIDING NEDERLANDS BIJLAGE 13 BIJLAGE 13 1 AFMETINGEN De volgende illustratie toont de algemene afmetingen van het scherm ...

Page 117: ...e estado 126 4 6 Conector de entrada y de salida 126 4 7 Mando a distancia 127 5 Funcionamiento 128 5 1 Encendido y apagado de la pantalla 128 5 2 Ajuste del volumen y de la fuente de entrada 128 5 3 Adición de una etiqueta a la Feunte de entrada 128 6 Controles OSD visualización en pantalla 128 6 1 Descripción general del menú OSD 129 6 2 Navegación por el menú OSD 130 7 Función táctil 136 7 1 Co...

Page 118: ...n de la imagen Asegúrese de cambiar la imagen de la pantalla con frecuencia Se recomienda 1 apagar la pantalla durante 6 horas como mínimo después de 16 horas de uso en un periodo de 24 horas con el fin de evitar la retención de imágenes y 2 ajustar la función IRFM a Activado en el menú OSD en Configuración avanzada La garantía de este producto no cubre daños por desastres naturales terremotos tru...

Page 119: ...nguna imagen retire inmediatamente la clavija de la toma Si no lo hace podría producirse un incendio o una descarga eléctrica Póngase en contacto con su distribuidor para realizar una revisión En caso de derramar agua sobre la pantalla o si algún objeto cae en su interior retire inmediatamente la clavija de la toma Si no lo hace podría producirse un incendio o una descarga eléctrica Póngase en con...

Page 120: ... estufas u otros aparatos que despidan calor This may cause fire or electrical shock No sobrecargue las tomas ni los cables con más capacidad eléctrica de la permitida No utilice cables extensores podría producirse un incendio o una descarga eléctrica No introduzca la clavija en una toma que no sea de 100 240 V CA Podría producirse un incendio o una descarga eléctrica No utilice una clavija dañada...

Page 121: ...antalla Asegúrese de transportar la pantalla en posición vertical 2 4 AVISO DE SEGURIDAD DE MONTAJE EN PARED 1 Asegúrese de que el soporte esté bien fijado a una pared o pilar sólidos para evitar riesgo de caídas debidas al peso 2 Tras el montaje no tire de la pantalla ni la agite aplicando fuerza Transporte la pantalla en posición vertical Evite colocar la pantalla hacia arriba o hacia abajo Mane...

Page 122: ...e el cable de alimentación a la pantalla No ponga en marcha la pantalla con un cable de alimentación dañado puesto que podría dañar la pantalla Utilización de cables extensores no recomendado Si debe utilizarse un alargador asegúrese de que la tensión nominal supere el consumo máximo de potencia de la pantalla Si la tensión nominal es inferior a la de la pantalla hará que el alargador se sobrecali...

Page 123: ...oducirse una descarga eléctrica Si no va a utilizar la pantalla durante un periodo de tiempo prolongado desenchúfela Podría ocasionarse un desgaste prematuro de los componentes eléctricos o un incendio No empuje ni sacuda la pantalla Esto podría ocasionar daños y lesiones Si se rompe el cristal del panel de la pantalla podría salir líquido No toque el líquido Si el líquido entra en contacto con lo...

Page 124: ...agado El cable de alimentación enviado por separado se utiliza para conectar la pantalla a una toma de corriente de CA Conecte el cable de alimentación en la entrada de CA de la parte lateral de la pantalla Localice el interruptor principal justo encima de la entrada de CA y pulse para encender y O para apagar 4 2 ENTRADA DE ALIMENTACIÓN XTX 5500 MANUAL DE USUARIO ESPAÑOL Elemento Mando a distanci...

Page 125: ... CABLES Accesorio incluido Abrazaderas para cables EasyFix Opcional Soluciones FLEX de altura regulable del botón de control XTX 5500 MANUAL DE USUARIO ESPAÑOL Opcional Soporte para la cámara EasyFix se envía con el paquete de actualización para videoconferencias ...

Page 126: ...DCP 1 1 que sirve para conectar las fuentes de vídeo por componentes SDTV EDTV o HDTV 5 6 HDMI 1 2 Son entradas de vídeo digital que cumplen con HDCP para conectar fuentes HDMI 7 HDMI out Entradas de vídeo digital de conformidad con HDCP para conectar fuentes HDMI 8 VGA In 15 pines D Sub Conecta componentes que tienen RGB o conectores de salida por componentes como un PC o un dispositivo externo 9...

Page 127: ... desmonte No lo ponga en lugares expuestos a niveles altos de temperatura y humedad XTX 5500 MANUAL DE USUARIO ESPAÑOL Etiqueta Descripción 1 INFO Proporciona información sobre la fuente y la resolución 2 Enciende y apaga la pantalla 3 VGA Selecciona la fuente RGB del PC 4 DISPLAYPORT Selecciona la fuente DisplayPort 5 8 11 HDMI 1 2 3 Selecciona la fuente HDMI 10 OPS Selecciona la fuente del orden...

Page 128: ...3 HDMI4 VGA 3 Si la pantalla no encuentra una fuente aparecerá el mensaje No hay señal 5 1 ENCENDIDO Y APAGADO DE LA PANTALLA 5 2 AJUSTE DEL VOLUMEN Y DE LA FUENTE DE ENTRADA Nota Si no hay entrada de señal durante un tiempo la pantalla pasará automáticamente al modo de ahorro de energía en espera 6 CONTROLES OSD VISUALIZACIÓN EN PANTALLA Para visualizar los menús en pantalla pulse MENU en el mand...

Page 129: ...ss 10 10 Treble 10 10 Balance 10 10 Speaker Off On Audio Source Default VGA Basic Settings Horizontal Pos 0 100 Vertical Pos 0 100 OSD Transparency 0 4 OSD Timeout 5 60 sec OSD Language English French Deutsch Nederland Power On Off Music Off On Power LED Off On RTC Schedule Current Time Setup Date Time Time Mode User Workday Everyday Mon Sun 00 00 23 59 00 00 23 59 Adv Settings Smart light control...

Page 130: ...deseado y a continuación pulse ENTER Rango 0 100 Predeterminado 50 Saturación Ajuste la luminosidad y el brillo Pulse y seleccione el nivel deseado y a continuación pulse ENTER Rango 0 100 Predeterminado 50 Tono Aumente o disminuya el tono de verde Pulse y seleccione el nivel deseado y a continuación pulse ENTER Rango 0 100 Predeterminado 50 Retroiluminación Aumente o disminuya la intensidad de la...

Page 131: ...ulse ENTER Rango 0 100 Predeterminado 50 Fuente de entrada Seleccione la fuente de entrada principal Opciones VGA DisplayPort HDMI1 HDMI2 HDMI3 OPS Predeterminado VGA Relación de aspecto Ajuste la relación de aspecto Opciones Automático Pantalla completa 16 9 Pillarbox 4 3 Automático Letterbox Point to Point Predeterminado Pantalla completa 16 9 Redimensionamiento Ajuste el tamaño de la imagen Ran...

Page 132: ...n Neerlandés Predeterminado Inglés 6 2 4 Configuración básica Este menú se utiliza para la configuración básica Volumen Ajuste el sonido Pulse y seleccione el nivel deseado y a continuación pulse ENTER Rango 0 100 Predeterminado 20 Graves Ajuste el sonido en tonos bajos graves Pulse y seleccione el nivel deseado y a continuación pulse ENTER Rango 10 10 Predeterminado 0 Agudos Ajuste el sonido en t...

Page 133: ...R Sensor de luz Predeterminado Sensor de luz IRFM Permite crear un leve movimiento de los fotogramas para evitar la retención de imágenes Opciones Activado Desactivado Predeterminado Desactivado Reducción de ruido Permite reducir el ruido aleatorio de los contenidos de vídeo Opciones Desactivada Alta Media Baja Predeterminado Desactivada Salir del modo de espera Permite cambiar el comportamiento d...

Page 134: ...determinada Opciones No Sí Predeterminado No Por defecto la pantalla entrará en modo de ahorro de energía modo de espera si no se recibe ninguna señal durante 5 minutos Normalmente las entradas RS 232 DisplayPort y HDMI están inactivas en el modo de espera para ahorrar energía Para cambiar el comportamiento del modo de espera cambie la configuración Salir del modo de espera en el menú Configuració...

Page 135: ...55 255 255 0 0 0 0 0 0 0 0 DNS Establece una dirección DNS 255 255 255 255 0 0 0 0 0 0 0 0 Guardar configuración Actualiza la configuración de IP en el dispositivo de red No Sí Recargar Recarga la información de la IP dinámica Alerta de estado de alimentación Notificación de cambio en la alimentación Desactivada Activada Desactivada Alerta de estado de fuente Notificación de cambio en la fuente De...

Page 136: ... la pantalla 3 Conecte el otro extremo del cable USB conector USB tipo A al puerto USB del ordenador Consulte la imagen 4 A continuación encienda el ordenador 5 Una vez conectado el cable USB tendrá que esperar 5 segundos hasta que la función táctil esté lista Puede activarse con un marcador el dedo o cualquier otro tipo de puntero Tenga en cuenta lo siguiente Windows 10 es necesario para la difer...

Page 137: ...udio Salida SPDIF Entrada de audio de PC Control Salida de audio Salida SPDIF Entrada de audio de PC Ranura OPS Sí CONFERENCIAS Cámara 2 cámaras Full HD con gran angular 1080p 30Hz vinculadas a OPS Micrófono Sistema de 4 canales de alto rendimiento con cancelación de eco acústico control automático de ganancia y supresión de ruido vinculado a OPS ESPECIFICACIONES FÍSICAS Dimensiones mm 1437 ancho ...

Page 138: ... SXGA 1152x864 67 5 75 108 O O O 1280x1024 63 981 60 02 108 O O O 79 976 75 025 135 O O O 1440 x 900 55 469 59 901 88 75 O 55 935 59 88 106 5 O O O WSXGA 1680 x1050 64 674 59 883 119 O O O 65 29 59 954 146 25 O O O UXGA 1600 x 1200 75 60 162 O O O 1920 x 1080 66 587 59 93 138 5 O O WUXA 1920 x 1200 74 038 59 95 154 O O QHD 2560x1440 88 787 59 951 241 5 O O QSXGA 2560x1600 98 713 59 972 268 5 O O E...

Page 139: ...e carro ASCII 0x0D 10 COMANDOS DE SERIE 10 1 COMUNICACIONES DE SERIE 10 2 CONEXIÓN RS 232 Y CONFIGURACIÓN DE PUERTOS La pantalla utiliza un protocolo de control de texto sencillo para procesar solicitudes de dispositivos de control y proporcionar respuestas a dichos dispositivos En esta sección se describe cómo enviar mensajes mediante un enlace serie entre la pantalla y un sistema de control auto...

Page 140: ...rio Voedings regeling en ingangsbron Control de alimentación POW W R 00 00 Apagado alimentación del software 50 4F 57 01 01 Encendido alimentación del software Control IPC IPC W R 00 00 Desactivado 49 50 43 01 01 Activado Fuente de entrada MIN W R 00 00 VGA 4D 49 4E 9 9 HDMI1 0A 0A HDMI2 0B 0B HDMI3 0D 0D Displayport 0E 0E IPC OPS Ajuste de la pantalla Ajuste de la pantalla BRI W R 00 64 00 64 Bri...

Page 141: ...1 44 4A Nitidez SHA W R 00 64 00 64 Nitidez 53 48 41 Otros controles Escala ASP W R 00 00 Relación de aspecto de la ventana principal estándar PointToPoint 41 53 50 01 01 Pantalla completa 16 9 02 02 Formato pillarbox 4 3 03 03 Formato letterbox 04 04 Automático ZOM W R 00 0A 00 0A Ajuste de la relación de redimensionamiento 5A 4F 4D Ajuste de la tasa de baudios BRA W R 00 00 115200 42 52 41 01 01...

Page 142: ... la versión de MCU secundaria 02 00 5 byte Solicitud de la versión del módulo de red Audio VOL W R 00 64 00 64 Volumen 56 4F 4C BAS W R 00 14 00 14 Graves 10 10 42 41 53 TRE W R 00 14 00 14 Agudos 10 10 54 52 45 BAL W R 00 14 00 14 Graves 10 10 42 41 4C INS W R 00 00 Altavoz interno apagado 49 4E 53 W R 01 01 Altavoz interno encendido MUT W R 00 00 Silencio desactivado 4D 55 54 W R 01 01 Silencio ...

Page 143: ...ompatible con esta pantalla Compruebe la luz LED La imagen no está centrada Compruebe que la señal de entrada es compatible con esta pantalla La imagen no está bloqueada correctamente Compruebe que la señal de entrada es compatible con esta pantalla El mando a distancia no funciona Asegúrese de que las pilas son nuevas y se han instalado correctamente Asegúrese de dirigir el mando a distancia haci...

Page 144: ...144 APÉNDICE 13 APÉNDICE 13 1 DIMENSIONES La siguiente ilustración muestra las dimensiones generales de la pantalla XTX 5500 MANUAL DE USUARIO ESPAÑOL ...

Page 145: ...Legamaster brand of the edding group Legamaster International B V Postbus 111 NL 7240 AC Lochem T 31 0 573 71 30 00 F 31 0 573 71 30 01 info legamaster com www legamaster com ...

Reviews: