12
INSTALLATION
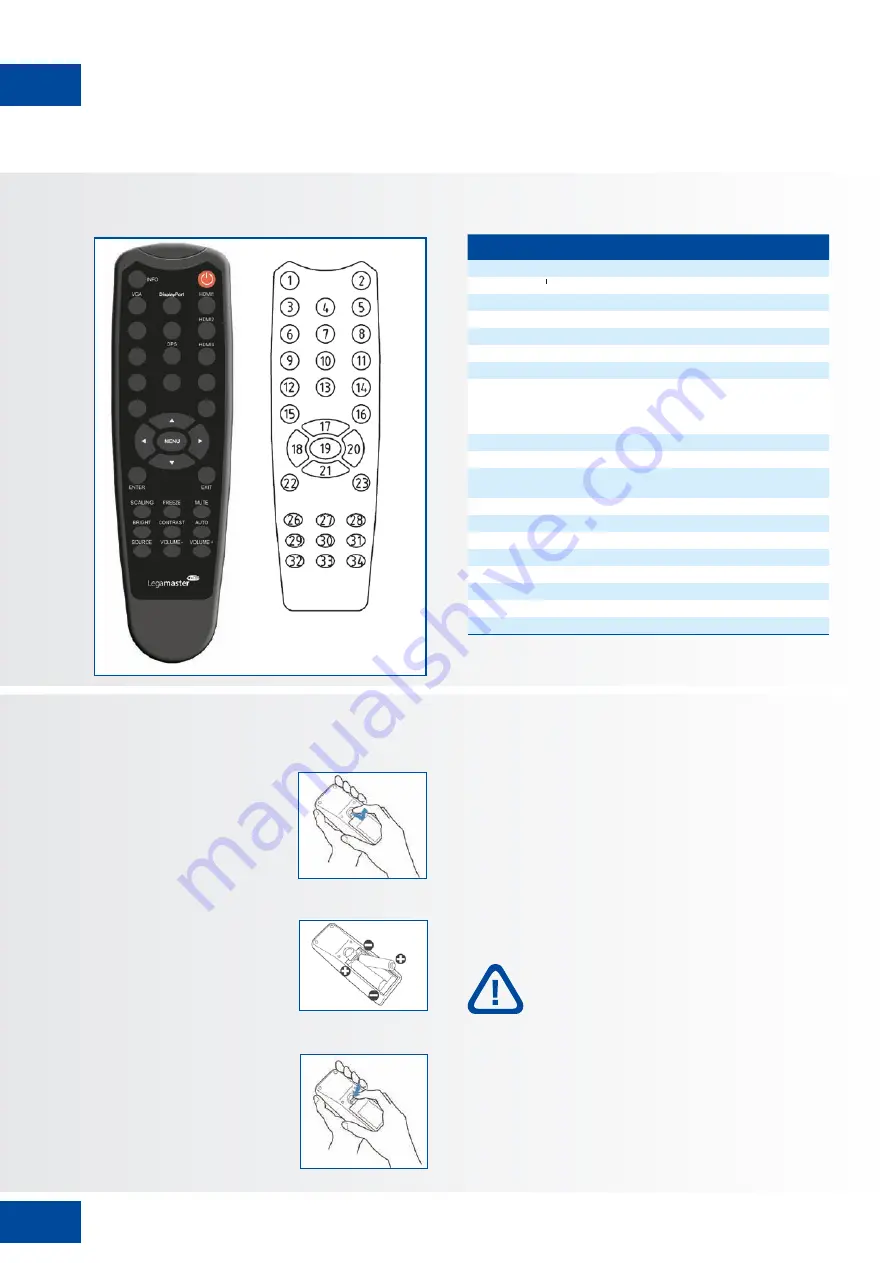
4.7. REMOTE CONTROL
Label
Description
1
INFO
Provides source and resolution information
2
Turns the display on and off
3
VGA
Selects the PC RGB source
4
DISPLAYPORT
Selects the DisplayPort source
5, 8, 11
HDMI 1, 2, 3
Selects the HDMI source
10
OPS
Selects the OPS computer source
19
MENU
Opens the display’s on-screen menu system.
17, 18,
20, 21
▲◄►▼
When the menu system is already open,
pressing this button will select the previous
submenu
Navigates through submenus and settings
22
ENTER
Selects highlighted menu choices
23
EXIT
Closes the menu system
26
SCALING
Selects each aspect ratio, in sequence: Full
Screen, Native, Letter Box and Pillar Box
27
FREEZE
Freezes the current picture on the screen
28
MUTE
Turns off the sound
29
BRIGHTNESS
Adjusts the brightness
30
CONTRAST
Adjusts the contrast
31
AUTO
Auto adjustment of VGA source
32
SOURCE
Selects each source, in sequence
33
VOLUME -
Decreases the sound volume
34
Increases the sound volume
4.7.1. Changing the Remote Control Battery
1. Remove the battery
cover
Slide back and remove
the battery cover in the
direction of the arrow.
2. Insert the batteries
Align and insert two AAA
batteries according to their
plus and minus ports (as
indicated in the remote
control).
3. Close the battery cover
Replace the battery cover in
the direction of the arrow
and snap it back into place.
I. Used batteries needed to follow the city rule to be
discarded.
II. Avoid keeping used, old batteries inside the remote
control, causing leakage of internal liquid resulting
metal rust or fatal damage to the remote control
hand unit.
III. Battery to be used according to the instruction
CAUTION
About the remote control
•
Don’t drop, shake or bump.
•
Don’t place on wet materials.
•
Don‘t dismantle.
•
Don’t place in locations with exposure to
high-temperature or high-humidity levels.
XTX-5500 – USER MANUAL – ENGLISH


