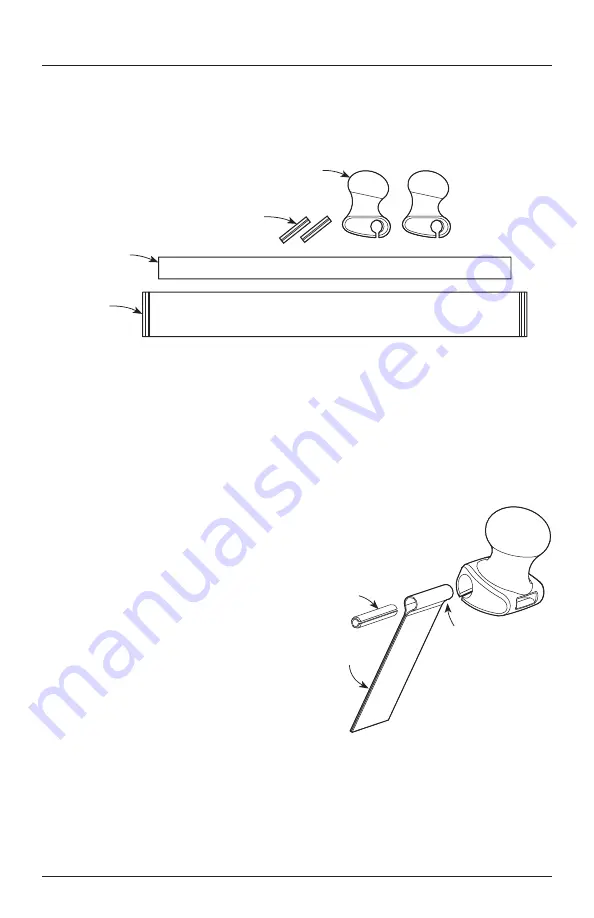
Figure 2: Inserting the pin.
Pin
Cut End In
Abrasive
Side Out
2
"
× 36
"
Sandpaper
Belt (120x).
Flexible
Beam
Pins
Handles
Figure 1: Bow sander components.
1
The fl exible fi berglass beam on this bow sander keeps a cloth-backed sandpaper
belt tensioned between two handles for sanding curved surfaces without risk of
creating a fl at spot. The 16
"
bow sander can be used with the included 2
"
× 36
"
sandpaper belt; for the 10
"
version, the belt will need to be cut in half.
If you are using the 16
"
bow sander with the 36
"
sandpaper belt provided,
fl atten the belt so that there are two folds set 18
"
apart. If you choose to use
sandpaper from a roll, cut a 24
"
length and make two folds, 18
"
apart and
approximately 2
"
to 3
"
from each cut end.
For the 10
"
bow sander, cut an 18
"
length of sandpaper and make two folds,
12
"
apart and approximately 2
"
to 3
"
from each cut end.
Insert a pin into one of the folded
ends of the sandpaper, then slide this
assembly into one handle, as shown
in
Figure 2
. Repeat this step for the
other handle. The sandpaper will lock
into the handle when the bow sander
is under tension.
Note:
When using a sandpaper strip,
the abrasive side should face out and
the cut ends should face in.
Bow Sander


