background image

Robotiq Hand-E Gripper Instruction Manual

Payload and force

Actuation force model used to calculate the recommended friction payload (W):

where:

l

is the force applied by the gripper to the load.

l

C

f

is the friction coefficient between fingertip and part load.

l

S

f

is a safety factor to be determined by the robot integrator.

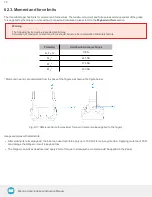
Fig. 6-9: Actuation force on the fingertip of the Hand-E Gripper

Info

l

The Actuation Force is the force that can be applied to an object by the motor of the gripper.

l

The gripper has a power off brake. This means that without power, gripper fingers are blocked.

Info

For example, if the silicone fingertips (HND-TIP-SLC-KIT) are used to lift a lubricated steel part (machine tending with cutting
oils), the friction coefficient would be 0.3 (tested static coefficient of friction).

Maximum weight with a safety factor of 2.4 and maximum force would be:

W = (2 x 130 N x 0.3) / 2.4 = 32.5 N

This calculation means that a 3.3 kg part will be held by the gripper when not moving (standing still). When accelerating, the
payload will decrease.

The biggest factor in such calculations will always be the friction coefficient, we recommend testing the coefficient.

Warning

You must consider the robot acceleration in your payload calculations.
Robot emergency stops will lead to major deceleration velocities.

71

Summary of Contents for ROBOTIQ HAND-E

Page 1: ...Robotiq Hand E for Hanwha Robots Instruction Manual robotiq com leanrobotics org Original Notice 2019 Robotiq Inc...

Page 2: ...ion 18 3 4 1 Installing the fingers fingertips holders on the Gripper 18 3 4 2 Installing the Gripper onto the robot 20 Single Gripper 20 3 5 ElectricalSetup 21 3 5 1 Pinout Interface 21 3 5 2 Couplin...

Page 3: ...ing the Plugin 58 4 8 1 Gripper Dashboard 58 5 User Interface 62 6 Specifications 63 6 1 Technicaldimensions 64 6 1 1 Couplings 65 6 1 2 Fingers and fingertips 67 Rack 67 Flat Rubber NBR Overmolded Fi...

Page 4: ...ionmechanism cleaning 82 8 Spare Parts Kitsand Accessories 83 9 Troubleshooting 85 10 Warrantyand Patent 86 11 Contact 87 12 Harmonized Standards Declarationsand Certificates 88 12 1 Translationof ori...

Page 5: ...necessary due to product improvements modifications or changes in specifications If such modification is made the manual will also be revised see revision information See the latest version of this m...

Page 6: ...er for sale or not without prior written consent from Robotiq Under copyright law copying includes translation into another language or format Information provided by Robotiq in this document is belie...

Page 7: ...uickly pick place and handle parts in a broad range of sizes and shapes Note This manual uses the metric system Unless otherwise specified all dimensionsare inmillimeters Note The following section pr...

Page 8: ...are actuated by a single motor Fig 1 1 Robotiq Hand E gripper Please refer to the Scope of Deliverysection and Spare Parts Kitsand Accessoriessection for details on standard and optional parts The Ha...

Page 9: ...te custom fingers and fingertips to Hand E Fig 1 2 Mounting a finger on a rack When ordered as a kit please refer to the Scope of Deliverysection a fingertip starting kit is included please refer to t...

Page 10: ...t also allows internal gripping The fingers can pick hollow parts from the inside by applying pressure with the outer surface of the fingers See the figure below for a representation and refer to the...

Page 11: ...rovide mechanical and electrical connectivity Please refer to the Mechanical Installationsection for installation of the coupling to the Technical dimensionssection for technical drawings and to the S...

Page 12: ...erved between those and the delivered product 2 1 Warning Info Any use of the Gripper in noncompliance of these warnings is inappropriate and may cause injury or damage Warning l The Gripper needs to...

Page 13: ...quire additional protection safety measures for example the work piece the Gripper is manipulating might be inherently dangerous to the operator 2 2 Intended Use The Gripper unit is designed for gripp...

Page 14: ...kage according to the scope of delivery and your order l Have the required parts equipment and tools listed in the requirements readily available Warning When installing l Meet the recommended environ...

Page 15: ...Kitsand Accessoriessection for a list of available couplings l Robotiq device cable CBL COM 1065 10 HF Caution The following is not included as part of a standard delivery l Options such as adapter p...

Page 16: ...with the gripper Required power supply must match the Robotiqdevice The following table shows the specifications with regards to the power supply required to operate the gripper and the optional Robo...

Page 17: ...ure 30 C 22 F Maximum storage transit temperature 70 C 158 F Minimum operating temperature 10 C 14 F Maximum operating temperature 50 C 122 F Humidity non condensing 20 80 RH Maximum vibration storage...

Page 18: ...cal Installation 3 4 1 Installing the fingers fingertips holderson the Gripper The figures below list the material and tools needed to mount fingers or fingertips holders onto the racks of the Hand E...

Page 19: ...Robotiq Hand E Gripper Instruction Manual Fig 3 2 Mounting fingertips on holders and then on the racks 19...

Page 20: ...ripper Here are the steps to follow to mount the Gripper to your robot see figure below Note that all screws must be locked in place using medium strengththreadlocker 1 Screw the coupling to the robot...

Page 21: ...s discretion 3 5 1 Pinout Interface The Gripper interfaces with its coupling via a 10 spring pin connector located on its outer surface Info The coupling used in the figure above is used for referenc...

Page 22: ...cabling to allow movement of the Gripper along all axes without pulling out the connectors Always protect the controller side robot side connector of the cable with a strain relief cable clamp The fig...

Page 23: ...nd E Gripper pigtail and device cable If additional cables are used suggested cable specifications are as follows Powersupply fusing l minimum 22 AWG TEW 300 V or 600 V RS485 signal l minimum 24 AWG T...

Page 24: ...RUI refer to the instruction manual of the RUI Use the provided RS 485 to USB converter ACC ADT USB RS485 refer to the figure below to plug into a PC with the Robotiq User Interface installed 2 Power...

Page 25: ...Robotiq Hand E Gripper Instruction Manual Fig 3 6 RS 485 to USB converter ACC ADT USB RS485 pinout 25...

Page 26: ...er Tip With the RUI controlling the Gripper you can go to the view menu to see input and output register values to further your understanding on how to command the Gripper You can also test gripping y...

Page 27: ...plugin at the root of the USB stick 3 Insert the USB stick in the teach pendant or controller 4 In the left pane select Management 5 Tap on PluginManagement tab 6 Tap the Add button to launch the fil...

Page 28: ...ctly installed it appears in the Management Menu Restart the system should you want newly installed plugins to be visible in the Management Menu 3 7 2 Uninstalling the plugin 1 In the PluginManagement...

Page 29: ...onized movement is initiated via a single Go to requested position command Parallel or encompassing grip is performed automatically A built in object detection feature is available the user can be not...

Page 30: ...Robotiq Hand E Gripper Instruction Manual Fig 4 1 Hand E control logic overview 30...

Page 31: ...e functionalities and status registers Register Robot Output Functionalities Robot Input Status Byte 0 ACTION REQUEST GRIPPERSTATUS Byte 1 RESERVED RESERVED Byte 2 RESERVED FAULT STATUS Byte 3 POSITIO...

Page 32: ...action moves the Gripper fingers to the requested position using the configuration defined by the other registers rGTO will engage motion while bytes 3 4 and 5 will determine aimed position force and...

Page 33: ...d Register POSITION REQUEST Address Byte 3 Bits 7 6 5 4 3 2 1 0 Symbol rPR This register is used to set the target position for the Gripper s fingers The positions 0x00 and 0xFFcorrespond respectively...

Page 34: ...speed l Register FORCE Address Byte 5 Bits 7 6 5 4 3 2 1 0 Symbol rFR The force setting defines the final gripping force for the Gripper The force will fix the maximum current sent to the motor If the...

Page 35: ...Object detection status is a built in feature that provides information on possible object pick up Ignore if gGTO 0 l 0x00 Fingers are in motion towards requested position No object detected l 0x01 Fi...

Page 36: ...No fault solid blue LED l Priority faults solid blue LED l 0x05 Action delayed the activation re activation must be completed prior to perform the action l 0x07 The activation bit must be set prior to...

Page 37: ...ddress Byte 4 Bits 7 6 5 4 3 2 1 0 Symbol gPO gPO Actual position of the Gripper obtained via the encoders value between 0x00 and 0xFF l 0x00 Fully opened l 0xFF Fully closed Register CURRENT Adress B...

Page 38: ...ibes key features in object picking applications l Force control l Re grasp l Object detection l Object contact loss 4 5 1 Force control The gripping force is controlled via the rFRbyte please refer t...

Page 39: ...attempt to close until it reaches the position request rPR l This feature is automatically set according to the force request rFR Info Feature is off at force request rFR 0 otherwise it is on l Re gr...

Page 40: ...en lost dropped Example of contact detected with an object 1 Set position speed and force at maximum full closing a rPR 0xFF rSP 0xFF rFR 0xFF 2 Set go to requested will initiate movement a rGTO 0x01...

Page 41: ...Robotiq Hand E Gripper Instruction Manual 4 6 Control Logic Example Fig 4 2 Example of Gripper control logic with corresponding registers 41...

Page 42: ...us org docs Modbus_over_serial_line_V1_02 pdf For debugging purposes the reader is also invited to download one of many free Modbus scanners such as the CASModbus Scanner from Chipkin Automation Syste...

Page 43: ...00 Termination Resistor2 120 ohms 1 Various converters are available in the Spare Parts Kitsand Accessoriessection 2 These parameters can be adjusted using the Robotiq User Interface Each register wor...

Page 44: ...us Object Detection Fault Status and Position Request Echo Request is 09 03 07 D0 00 02 C5 CE Bits Description 09 SlaveID 03 Function Code 03 Read Holding Registers 07D0 Address of the first requested...

Page 45: ...per Status Object Detection Fault Status and Position Request Echo Request is 09 04 07 D0 00 02 70 0E Bits Description 09 SlaveID 04 Function Code 04 Read Input Registers 07D0 Address of the first req...

Page 46: ...quest is 09 10 03 E9 00 02 04 60 E6 3C C8 EC 7C Bits Description 09 SlaveID 10 Function Code 16 Preset Multiple Registers 03E9 Address of the first register 0002 Number of registers written to 04 Numb...

Page 47: ...rce of the Gripper by writing to registers 0x03E9 1001 and 0x03EA 1002 Request is 09 17 07 D0 00 02 03 E9 00 02 04 00 E6 3C C8 2D 0C Bits Description 09 SlaveID 17 Function Code 23 read and write mult...

Page 48: ...register 07D1 F6C1 Cyclic Redundancy Check CRC Note that the content of the response might change depending on the Gripper s status Info The Gripper will execute the input command i e write execute on...

Page 49: ...00 00 00 00 00 00 73 30 Bits Description 09 SlaveID 10 Function Code 16 Preset Multiple Registers 03E8 Address of the first register 0003 Number of registers written to 06 Number of data bytes to fol...

Page 50: ...follow 3 registers x 2 bytes register 6 bytes 0100 Value to write to register 0x03E9 ACTION REQUEST 0x01 and GRIPPEROPTIONS 0x00 rACT 1 for Activate Gripper 0000 Value written to register 0x03EA 0000...

Page 51: ...ode 03 Read Holding Registers 02 Number of data bytes to follow 1 register x 2 bytes register 2 bytes 1100 Content of register 07D0 GRIPPERSTATUS 0x11 RESERVED 0x00 gACT 1 for Gripper Activation gSTA...

Page 52: ...0900 Value written to register 0x03E8 ACTION REQUEST 0x09 and GRIPPEROPTIONS 0x00 rACT 1 for Activate Gripper rGTO 1 for Go to Requested Position 00FF Value written to register 0x03E9 GRIPPEROPTIONS2...

Page 53: ...Code 03 Read Holding Registers 06 Number of data bytes to follow 3 registers x 2 bytes register 6 bytes 3900 Content of register 07D0 GRIPPERSTATUS 0x39 RESERVED 0x00 gACT 1 for Gripper Activation gGT...

Page 54: ...CT 1 for Gripper Activation gGTO 1 for Go to Position Request and gOBJ 2 for Fingershave stopped due to a contact while closing 00FF Content of register 07D1 FAULT STATUS 0x00 POSITION REQUEST ECHO 0x...

Page 55: ...ION REQUEST 0x09 and GRIPPEROPTIONS 0x00 rACT 1 for Activate Gripper rGTO 1 for Go to Requested Position 0000 Value written to register 0x03E9 GRIPPEROPTIONS2 0x00 and POSITION REQUEST 0x00 rPR 0 255...

Page 56: ...on Code 03 Read Holding Registers 06 Number of data bytes to follow 3 registers x 2 bytes register 6 bytes 3900 Content of register 07D0 GRIPPERSTATUS 0x39 RESERVED 0x00 gACT 1 for Gripper Activation...

Page 57: ...0x00 gACT 1 for Gripper Activation gGTO 1 for Go to Position Request and gOBJ 3 for Fingersare at requested position 0000 Content of register 07D1 FAULT STATUS 0x00 POSITION REQUEST ECHO 0x00 the pos...

Page 58: ...pper Dashboard To activate the gripper 1 Go to the RodiX menu on the left and select Gripper Fig 4 3 Menu to activate the gripper with the RodiX icon and Grippermenu highlighted 2 If no device is dete...

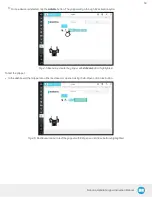
Page 59: ...go through its activation cycle Fig 4 5 Menu to activate the gripper with Activate button highlighted To test the gripper l In the dashboard the Gripper can either be closed or opened using the E Ope...

Page 60: ...he program a Tap the Commands tab to display the various nodes b Tap the Gripper icon to insert a gripper node c Tap the Gripper icon to insert a gripper node Fig 4 7 Menu to insert a gripper node in...

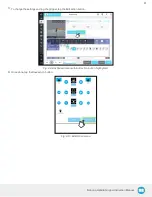
Page 61: ...er Instruction Manual 3 To change the settings and jog the gripper tap the Edit action button Fig 4 9 Dashboard menu with Edit action button highlighted 4 Once done tap the Save action button Fig 4 10...

Page 62: ...Interface Visit the product page of Hand E on support robotiq com to get the latest installer of the Robotiq User Interface along with appropriate documentation Please refer to the instruction manual...

Page 63: ...following sub sections provide data on the various specifications for Hand E l Section 6 1 technical dimensions of Hand E l Dimensions for custom fingertips l Dimensions of available fingertips l Sec...

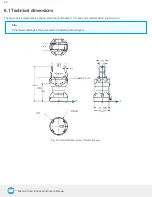
Page 64: ...echnical dimensions The figure below represents the gripper dimensions with axes X Y Z and origin referenced for finger motion Info All technical drawings in the current section depict aluminum finger...

Page 65: ...ankcoupling Below are the dimensions of the blank coupling AGC CPL BLANK 002 please refer to the Spare Parts Kitsand Accessoriessection available to create a custom bolt pattern The blue section can b...

Page 66: ...attern for coupling GRP CPL 062 please refer to the Spare Parts Kitsand Accessoriessection is compatible with l 50 mm pitch circle diameter l 4 M6 1 0 low head socket cap screw clearance l 1 M6 indexi...

Page 67: ...not exceed 100 N regardless of the direction Please refer to the Moment and force limitssection for more details Warning The following limits must be respected at all times Calculation of maximum mome...

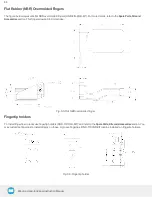
Page 68: ...nd Accessoriessection This finger allows a 0 50 mm stroke Fig 6 5 Flat NBRovermolded finger Fingertip holders To install fingertips on racks use fingertip holders HND TIP HLD KIT and refer to the Spar...

Page 69: ...mm stroke Fig 6 7 Flat aluminum finger Grooved fingertips The figure below the available grooved fingertip HND TIP VGR KIT please refer to the Spare Parts Kitsand Accessoriessection This fingertip has...

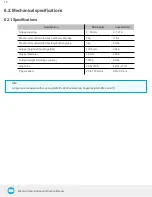
Page 70: ...d Form fit grasp 5 kg 11 lbs Maximum recommended payload Friction grasp 3 kg 6 6 lbs Gripper height without fingertips 100 5 mm 3 94 in Gripper diameter 75 mm 2 95 in Gripper weight including coupling...

Page 71: ...power gripper fingers are blocked Info For example if the silicone fingertips HND TIP SLC KIT are used to lift a lubricated steel part machine tending with cutting oils the friction coefficient would...

Page 72: ...strating Maximum Payload External Force vs Z Offset on Custom finger l The blue curve in the graph represents the maximum force payload F recommended at given Zoffset for a custom finger design mounte...

Page 73: ...nal force Warning l Fatigue stress has not been taken into consideration in the calculations l Robot acceleration and safety factor have not been taken into consideration in the calculations Caution I...

Page 74: ...otiq Hand E Gripper Instruction Manual 6 2 2 Center of massand tool center point Couplingsare included whenGrippersare not mounted onthe Camera Dual Gripperadapterplatesare included where appropriate...

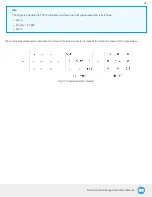
Page 75: ...ate the TCP for Grippers mounted on a dual gripper assembly is as follows l Rx 0 l Ry Ry 0 7854 l Rz 0 The coordinate system used to calculate the moment of inertia and center of mass of the Gripper i...

Page 76: ...t acceleration and safety factors Parameter Hand E withAluminum Fingers Fx Fy Fz 100 N Mx 2 65 Nm My 3 74 Nm Mz 2 00 Nm Moments in x and y are calculated from the base of the fingers as shown in the f...

Page 77: ...Robotiq Hand E Gripper Instruction Manual 6 3 Electrical specifications SPECIFICATION VALUE Operating supply voltage 24 V DC 10 Quiescent power minimum power consumption 1 W Peak current 1 1 A 77...

Page 78: ...grip force being applied picking an object while opening or closing or closing the fingers on themselves Maintenance Intervals Operation Daily Weekly 1 M cycles 2 M cycles Gripper Cleaning Dirty cond...

Page 79: ...Gripper electronics 1 Remove the Gripper from its coupling using the 4 mm hex key to unscrew the four 4 M5 0 8 x 35mm socket head cap screws Note that each screw uses a tooth lock washer do not lose t...

Page 80: ...nger by removing the M3 screws l Clean the rack and dry thoroughly l Insert the new finger on the rack l Fix the finger using the provided M3 screws apply low strength thread locker to the M3 screw th...

Page 81: ...in the Grippercleaning section 2 Inspect the Gripper l Finger movement must be symmetric and fluid test opening and closing of the Gripper l Finger or fingertip wear must not affect gripping if wear...

Page 82: ...freely from the rack housing Clean the rack housing the racks and the pinion using a degreaser Dry thoroughly Clean the fingers finger holders and fingertips if that is the case with a dry towel Remo...

Page 83: ...Optional controller for industrial communications See Robotiq Universal Controller Items UNI CTR XXXX Hand E Flat Rubber Overmolded Finger Kit Flat rubber overmolded finger kit includes l 2 x flat rub...

Page 84: ...Stick USB stick to install the URsoftware package ACC USB 16G End Effector Coupling Kit ISO 9409 1 50 4 M6 coupling for Adaptive Robot Grippers with screws and tools for Gripper fixation and 1 m pigta...

Page 85: ...9 Troubleshooting Section to be populated soon Robotiq Hand E Gripper Instruction Manual 85...

Page 86: ...n during the warranty period and found to meet all published specifications Robotiq will charge standard verification fees The unit is considered defective when at least one of the following condition...

Page 87: ...de USand Canada Fax 1 418 800 0046 Technical support Extension 3 Sales Extension 2 Head office Robotiq 966 chemin Olivier Suite 500 L vis Qu bec G7A 2N1 Canada Where automation Pros come to share thei...

Page 88: ...ent authorities the relevant technical documents specified by Annex VII part B within the required time Additionally the product declares in conformity with the following directives according to which...

Page 89: ...on Conformity of the product is only met if all instructions of this manual are followed Among others installation safety measures and normal usage must be met The following standards have been applie...

Page 90: ...Robotiq Hand E Gripper Instruction Manual 1 2 3 IngressProtection Certificate 90...

Reviews: