background image


  Chipper LS 160T 


48 

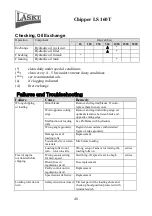
Checking, Oil Exchange  

Operation  
 

Component 

Interval (hrs) 


10 

100 

250 

500 

1000  2500  5000 

Exchange


Hydraulic oil in circuit


Hydraulic oil filter


Checking 


Hydraulic oil in tank 


Cleaning


Hydraulic oil tank


(*)   

clean daily under special conditions  

(**)  

clean every 4 – 5 hrs under extreme dusty conditions  

(***)   see recommended oils  
(o)  

if clogging indicated  

(

first exchange  


 Failures and Troubleshooting   

Failure


Cause


Remedy


Wrong chipping 
or loading  

Blunt blades  

Remove and regrind blades. If worn, 
replace them for new ones.  


Worn opposite cutting 
edge  

Remove and regrind cutting edge; set 
optimal clearance between blade and 
opposite cutting edge   


Malfunction of loading 
rolls  

See Problems with hydraulics 


Wrong angle geometry  

Regrind in accordance with detailed 
figure of edge geometry  


Damage/wear of 
loading rolls  

Replacement   


Too small, dry or rotten 
materials   

Mix before loading  


Loading rolls do not 
turn – rotor runs idle  

Wrong setup of sensor for turning the 
loading rolls on    

service 

Tractor engine 
overloaded while 
chipping  

Wrong sensor setting 
for min. speed     

Switching-off speed is set too high  

service 

Blown fuse in 
regulation circuit  

Fuse replacement  


Faulty control unit in 
regulation circuit 

Replacement  


Speed sensor defective  
 

Replacement 


Loading rolls do not 
turn 

Safety circuit not closed   Tilt rear part of the loading chute and 

check up hood position protected with 
terminal switch  


Summary of Contents for LS 160

Page 1: ...Orig version 11 2016 OPERATING INSTRUCTIONS CHIPPER LS 160 model LS 160T...

Page 2: ...structions for putting the machine into operation work safety and operating experiences You will learn how to carry out maintenance repairs and servicing and who is authorised for doing checks and oth...

Page 3: ...ORT OF PRODUCT HANDLING 20 PRECAUTIONS IN DESIGN 20 CONTROLS 23 USE 25 STORAGE 25 BEFORE PUTTING INTO OPERATION 25 COUPLING TO TRACTORS 26 CARDAN SHAFT ADJUSTMENT 28 PUTTING INTO OPERATION 29 CHIPPING...

Page 4: ...S 160T 4 NOSTRESS SYSTEM PROTECTION AGAINST OVERVOLTAGE 43 Maintenance Intervals 47 Checking Oil Exchange 48 FAILURES AND TROUBLESHOOTING 48 WASTE DISPOSAL 50 WARRANTY 51 SERVICE REPORT 52 HYDRAULIC S...

Page 5: ...Chipper LS 160T 5...

Page 6: ...Chipper LS 160T 6...

Page 7: ...required data in the following form concerning the given product and your dealer Type of product Serial number of product Dealer s address Address of authorised service Date of delivery Warranty expi...

Page 8: ...rns load materials to be chipped in a loading chute Not Allowed Use The chipper is not allowed to be used for disposal of aforesaid materials with foreign matters and objects such as metal steel bindi...

Page 9: ...ght of the controller frame By pushing the concerned controller in direction of material input the machine should stop material loading immediately Any repeated putting machine into operation is possi...

Page 10: ...le part can be set only in angles see following figure Never direct it toward the attendant s place While working the machine should fully rest on the ground with its frame bottom part Do not let the...

Page 11: ...PTO shaft on the tractor While chipping the operator is obliged to use only such a chipper which is in optimal operating condition not damaged through transport storage of from previous operation It...

Page 12: ...e work Both attendants must be properly trained in attendance and turning the chipper off in emergency cases Keep traffic lights and work safety symbols in proper order Check materials to be loaded an...

Page 13: ...parts of the machine run warm such as hydraulic elements belts and pulleys Do not touch them when the engine is still running or having been just stopped Do not let the engine running in high speed u...

Page 14: ...g motion with its safety pin inserted Before transport on public roads At public road transport this machine must be lifted up in its transport position see instructions in this manual First set also...

Page 15: ...upplied by the manufacturer 3 Under conditions of very low visibility any public road transport is not allowed 4 Any public road transport without this portable set of rear lamps and reflector glasses...

Page 16: ...pin socket 9 While working on public roads the amber light on the tractor cab must be turned on 10 The max permissible speed of the machine for transport on public roads is not explicitly specified a...

Page 17: ...against risks connected with the machine use Your respect to the symbol meanings is a precondition for your work safety 1 2 3 4 5 Read this operating manual before use Always follow the manual while...

Page 18: ...ing rolls Pull in hazard Warning Hazard of extremity injury by rotating part Warning Accident risk The user is obliged to keep all the work safety symbols legible clear and undamaged In case of any da...

Page 19: ...r components while the machine is still running they can be sources of electrical shocks ROTATING CHIPPING WHEEL When the drive is turned off the chipping wheel could continue to rotate for a short wh...

Page 20: ...light or with sufficient lighting in the workplace Transport of Product Handling This product is delivered completely mounted and attached to a wooden pallet or loaded in bulk without a pallet While h...

Page 21: ...d finally to release the key A yellow signal lamp lights up that means the machine safety circuit is activated After any interruption of the safety circuit or for repeated starting this circuit must b...

Page 22: ...ted with a hinged cover and by a terminal switch A safety pin of the chipping device rotor serves for rotor blocking at blades exchange and servicing The pin is hinged on the rotor box The chipping de...

Page 23: ...r function as that of the safety frame Controls Ignition box used for supply and control of the safety circuit CAUTION Despite the fact that this machine is not equipped with any driving engine its ig...

Page 24: ...ing rolls in motion for chipping or anytime after putting the machine out of operation or after emergency stop caused by pushing the safety frame By pressing the yellow button set the loading rolls in...

Page 25: ...agents on elastic hydraulic hoses Always put the machine aside on a flat and solid floor or on a wooden pallet for further handling Do not put any objects or tools on the machine Before Putting into...

Page 26: ...t the same time as a set Pay special attention to their fixing bolts Replace them if worn or damaged Hydraulic oil and oil filters should be changed regularly Do not use petrol or similar inflammable...

Page 27: ...y I or II For the category II attachment from the external side by means of the connecting pins 27 mm For the category I attachment into a fork by means of the connecting pin 22 mm According to an act...

Page 28: ...r type Check up the cardan shaft length as follows Couple the machine in the top and bottom draw rods of the tractor three point linkage Lift up the linkage for adjustment the machine must be lifted i...

Page 29: ...start check if the loading chute and the discharge duct are free of any materials Direct the discharge duct out of possible motion of other persons or prevent other persons to enter the working area A...

Page 30: ...TO shaft is ON then chips from previous operation may be ejected from the discharge duct Carry out functional checks of the safety frame for loading Push the frame in the in feed position and the load...

Page 31: ...ation of the chipper the attendant should always stand in the attendant s place see fig Having turned the chipping device on wait for speed stabilization With that you may soever increase or reduce th...

Page 32: ...special attention to thorny materials such as acacia and roses which may easily catch your sleeves Be careful while loading since materials may unexpectedly move in unwished directions In case of two...

Page 33: ...mpurities then a grinding interval for blades may last several months or several hundreds m3 of loaded materials Blunt blades are evident on chipped edges which are not clean but broken The chipper is...

Page 34: ...The cardan shaft is equipped with a freewheel clutch When turned off the rotor of the chipping device runs out approximately 120 sec Regardless of this running out turn the switch key in the STOP pos...

Page 35: ...ed clogging materials try to turn on the chipper again If it is not possible yet hinge away the upper hood part and try to remove all materials by hand the PTO shaft must be OFF Be aware the chipping...

Page 36: ...This wheel is put in ball bearings a drive pulley is fitted on its shaft The wheel is equipped with two blades for cutting of loaded materials Vanes welded on its rear side serve for ejecting chips in...

Page 37: ...Feeding speed m s 1 10 35 Drive hydrostatic Loading roll speed for turning off min 1 900 1100 Loading roll speed for turning on min 1 910 1110 Speed regulation NOSTRESS II Loading chute Feeding profi...

Page 38: ...be lowered on the ground Pay special attention to all safety elements Check up V belts for tightness and wear Keep regular intervals for lubrication of bearings Check up condition of blades and chippi...

Page 39: ...dge regrinding requires high demands for keeping cutting edge shape While grinding it is necessary to keep its optimal geometry see following figure Proper shapes prolong blade service life While regr...

Page 40: ...es proper setting of a clearance between the blade and the opposite cutting edge This distance should be set see following figure and checked after fitting ground blades then it grows with their wear...

Page 41: ...r speed values When the rotor stops the unit displays a total number of running hours TH or a daily number of running hours DH To reset the current daily number just press both arrow buttons together...

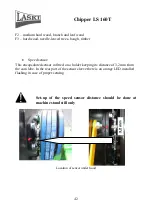
Page 42: ...nsor This encapsulated sensor in fitted on a holder keeping its distance of 3 2mm from the cam lobe In the rear part of the sensor sleeve there is an orange LED installed flashing in case of proper se...

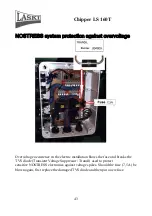
Page 43: ...urrence in the electric installation blows the fuse and breaks the TVS diode Transient Voltage Suppressor Transil used to protect sensitive NOSTRESS electronics against voltage spikes Should the fuse...

Page 44: ...ipping wheel and the hydraulic pump While tightening the belts proceed as follows Check up tension of new belts after first 5 service hours and afterwards always in intervals of 25 hours Excessive sli...

Page 45: ...ump 50 7 5 While tightening the belts proceed as follows Chipping wheel drive Loosen four nuts on the stretching bolts in the direction intended for pulley shifting For tightening loosen the nuts over...

Page 46: ...er change The oil filter is installed in the hydraulic circuit and accessible left under the loading chute We recommend changing the oil filter element always together with the hydraulic oil change Th...

Page 47: ...s must have clean and proper contact surfaces to avoid intermediate resistance at a wrong contact point Hydraulic Oil Change Do the first oil change after the first 500 running hours or after the firs...

Page 48: ...arance between blade and opposite cutting edge Malfunction of loading rolls See Problems with hydraulics Wrong angle geometry Regrind in accordance with detailed figure of edge geometry Damage wear of...

Page 49: ...speed Working speed of the chipping wheel must not exceed 1500 rpm Blades touch opposite edge Wrong setting of clearance Set distance to 0 5 1 mm Loosen blade bolts Tighten up fixing bolts Clearance...

Page 50: ...not exceed 1500 rpm Bearing loosened Tighten up bearing housing bolts with required torque Bearing worn Replacement Waste Disposal Any waste materials resulting from the machine operation should be d...

Page 51: ...epairs and actions on the machine Usage of unoriginal spare parts or parts intended for other models Disobedience to instructions for use Damage of the machine caused by faulty handling maintenance or...

Page 52: ...Chipper LS 160T 52 Service Report...

Page 53: ...Chipper LS 160T 53 Hydraulic scheme...

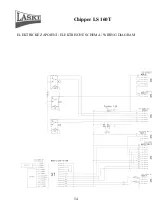
Page 54: ...Chipper LS 160T 54 ELEKTRICK ZAPOJEN ELEKTRISCHE SCHEMA WIRING DIAGRAM...

Page 55: ...Chipper LS 160T 55 ELEKTRICK ZAPOJEN ELEKTRISCHE SCHEMA WIRING DIAGRAM...

Reviews: