

Ver.0118-1
SPLED-CL1B-MOD1
Larson Electronics LLC
1
Thank you for purchasing the Larson Electronics
SPLED-CL1B-MOD1
solar
powered LED light beacon. Follow the steps below for installing and
maintaining your unit.
IMPORTANT
READ CAREFULLY BEFORE OPERATING THIS LIGHT. SAVE THESE INSTRUCTIONS
FOR FUTURE REFERENCE.
WARNING:
IF UNSURE ABOUT ANY SECTION OF THESE INSTRUCTIONS, CONSULT
A QUALIFIED PROFESSIONAL TO INSTALL THIS DEVICE.
WARNING:
DEVICE IS SUITABLE FOR INSTALLATION IN WET LOCATIONS.
WARNING:
ALTHOUGH BEACON IS WATERPROOF, IT IS NOT DESIGNED OR
INTENDED TO BE SUBMERGED.
WARNING:
DO NOT ALLOW DETACHABLE WIRES TO BECOME SUBMERGED!
•
IF DROPPED OR DAMAGED, THE UNIT MAY NO LONGER BE WATERPROOF
AND SHOULD BE REPLACED.
•
TO AVOID HAZARDS TO CHILDREN, ACCOUNT FOR ALL PARTS AND
DESTROY PACKING MATERIALS.
•
ON SOME UNITS, THE BASE CONTAINS A MAGNET. PEOPLE WITH
PACEMAKERS SHOULD CONSULT THEIR PHYSICIAN(S) BEFORE USE.
ELECTROMAGNETIC FIELDS IN CLOSE PROXIMITY TO HEART PACEMAKER
COULD CAUSE PACEMAKER INTERFERENCE OR PACEMAKER FAILURE.
HOW SOLAR LIGHT WORKS
Solar light must be placed outdoors. The solar panel collects and converts
sunlight into DC power while the pre-installed rechargeable batteries store
the energy to power the light at night.
Solar light illumination time
It depends on the seasonal sunlight availability in your geographical area
under certain weather conditions. Stronger or longer sunlight hours enable
batteries to store more energy which provides more lighting hours. On the
contrary, weaker or shorter sunlight hours reduce the lighting hours and its
brightness as well.
Solar panel mounting locations
Solar panel must be placed outdoor at a location with its solar panel
receiving direct sunlight at least five hours each day. Shadowed locations
will not allow batteries to be fully charged and will reduce both the
brightness of the light and the lighting hours. Precautions (prior to first time
use)
1.
To maximize battery capacity, the solar panel should be fully
charged by direct sunlight for five hours before initial use.
2.
Under extremely cold temperatures, the batteries may not charge
fully. In such cases, the Solar Lights may not stay illuminated as
long.
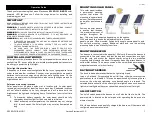
MOUNTING SOLAR PANEL
This solar panel includes
a permanent mounting
system that allows for
mounting to square/round
poles or flat surfaces such
as a wall or post shown in
figure 1.
Position the solar panel in
a location that receives
the maximum amount of
sunlight throughout the
day. This may need adjusted depending on the season.
With pole mounting, loosen the adjustment bolts to fit solar
panel onto pole. Once mounted, tighten bolts snug to secure panel to pole.
For surface mounting, remove additional plate and use the existing
mounting holes to mount directly to surface.
MOUNTING BEACON
The beacon is connected to the panel by 10ft of cord. Be sure the beacon is
connected to the solar panel and that the deutsch connections are tight.
Run the cord and mount the beacon nearby using the two predrilled
mounting holes toward the base. If magnetic mounting, attach beacon to
solid metal surface. The beacon comes with user selected permanent or
magnetic mount and color from factory.
DAY/NIGHT SENSOR
The dusk to dawn photocell activates the light at night and
turns it off at dawn. For operating the unit full time, slide the cover over the
photocell sensor to disable it. This can be repositioned by loosening the set
screw on the side and tightening once desired angle is achieved. The
selected location should not be near night time light sources such as porch
lights or street lights as they may cause the beacon to turn off at night.
ON/OFF SWITCH
The on/off switch powers the beacon on or off with the flip of a switch. The
power switch is located on the solar panel for operating the beacon at a
moment’s notice.
After the batteries have been fully charged, the beacon will illuminate with
configured panel operation listed.
Operation Guide
DEUTSCH
CONNECTOR


