background image

HVM200 Reference Manual

Connecting the HVM200 to a Mobile Device

2-5

TAKE NOTE 

Depending on your 

mobile device, you may need to per-
form this step each time you want to 
connect to the HVM200.

Step 2

Connect to the HVM200 WiFi network displaying the serial
number of your meter.

Step 3

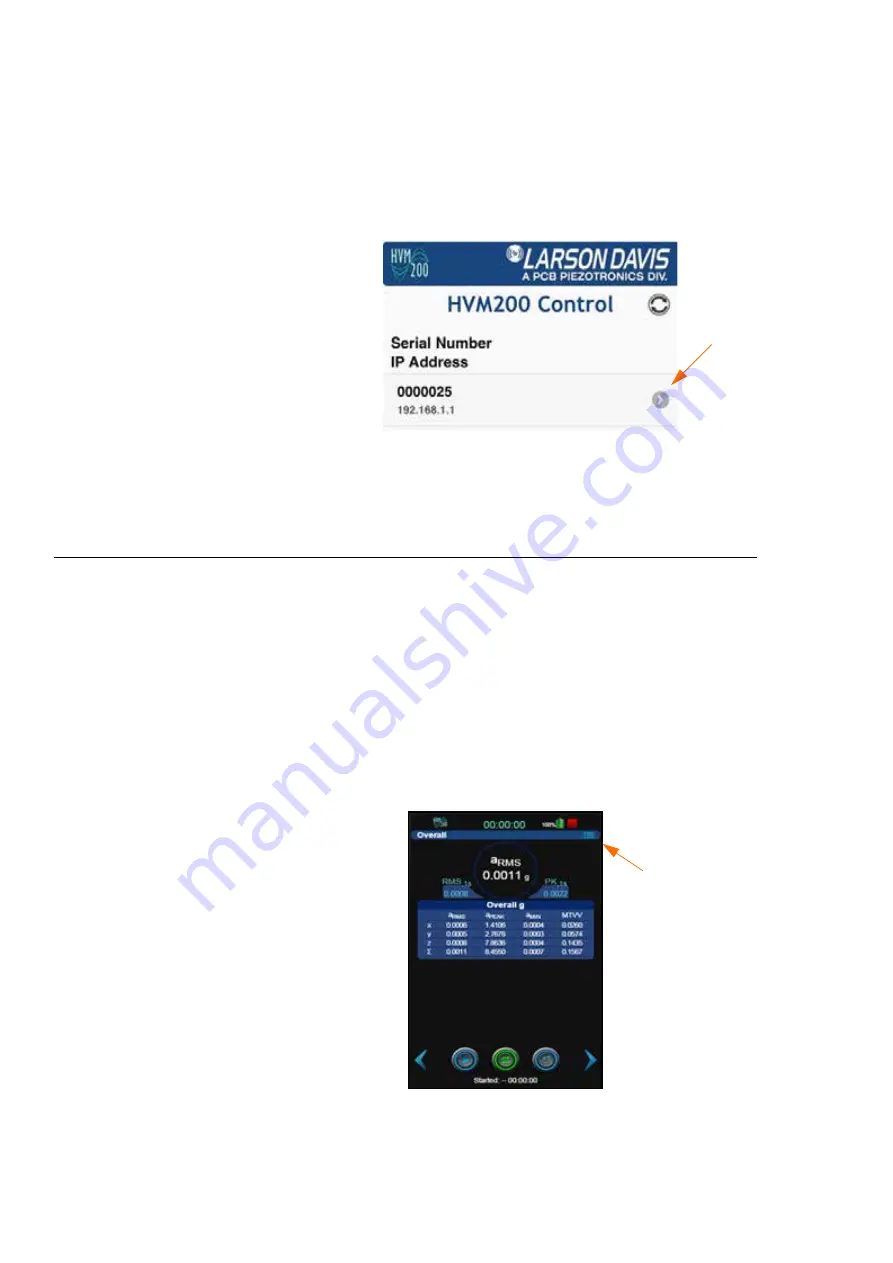
Launch the HVM200 Control app to begin controlling the
meter on your mobile device.

FIGURE 2-7  

HVM200 Access Point

Step 4

Connect the HVM200 by selecting the meter with the serial
number displayed for your meter.

2.5.3 Connecting HVM200 to WiFi Network

The HVM Control App will be able to connect to the HVM200 as long as
the mobile device is connected to the same wireless local network as the
HVM200.

To establish a WiFi connection over a network with the HVM200 meter,
follow these steps:

Step 1

Launch the HVM200 Control app or the G4 Live Stream
view. Select your meter. Click the menu icon.

TAKE NOTE 

It is best to make the 

initial connection to a WiFi network 
while also connected to a PC via 
USB, if possible.

FIGURE 2-8  

HVM200 App

Step 2

On the HVM200 Menu, select 

Setup WiFi

.

Tap here

Menu Icon

Summary of Contents for HVM200

Page 1: ...Model HVM200 HumanVibrationMeter Manual nbn Elektronik Handelsgesellschaft m b H Riesstra e 146 8010 Graz Tel 43 316 402805 Fax 43 316 402506 Vertrieb f r sterreich www nbn at...

Page 2: ...IHVM200 01 Rev C Larson Davis HVM200 Reference Manual...

Page 3: ...zotronics Inc This publication may contain inaccuracies or typographical errors PCB Piezotronics Inc will periodically update the material for inclusion in new editions Changes and improvements to the...

Page 4: ...4 Downloading Data 3 12 Module 4 Changing Features 4 1 4 1 Overview 4 1 4 2 Setting Syncing Meter Time and Date 4 1 4 3 Turning Off On WiFi Signal 4 3 4 4 Upgrade Firmware and Options 4 5 Appendix A...

Page 5: ...asy wear and convenient placement Mobile application for configuring measuring and viewing vibra tion data on multiple meters Connection and control of multiple meters through WiFi access Support for...

Page 6: ...L 41F Standard Contents with CCS047 Hard Shell Case CCS048 L Hand Arm Vibration Arm Band SEN041F accelerometer ADP081A Hand Adapter and SWW G4 HVM software license 1 3 2 Optional Accessories SWW G4 HV...

Page 7: ...r more informa tion on HVM200 accessories includ ing sensors see Adaptor Resonance Frequency Response on page B 1 ADP063 ADP080A ADP081A and ADP082A Adapters for accelerometer placement CBL217 05 CBL2...

Page 8: ...M200 to G4 LD Utility 2 7 2 6 1 G4 LD Utility Connection Options 2 7 2 6 2 Connecting the HVM200 meter to G4 LD Utility via USB 2 8 2 6 3 Connecting the HVM200 meter to G4 LD Utility via IP Address 2...

Page 9: ...s a yellow color while charging Step 4 Connect one end of the supplied USB cable to the HVM200 Micro B USB port and the other end to the PSA035 charger TAKE NOTE Avoid leaving the bat tery drained for...

Page 10: ...further help with the LED indicators refer to the label on the back of the meter or see LED Indications on page A 4 Stop Measurement Press power button once and the Status LED will show red to indica...

Page 11: ...on Use HVM200 Access Point to connect meter to one or more mobile devices Multiple HVM200 to multiple mobile devices FIGURE 2 6 Mobile Connections If a router is within range connect the HVM200 to the...

Page 12: ...e meter with the serial number displayed for your meter 2 5 3 Connecting HVM200 to WiFi Network The HVM Control App will be able to connect to the HVM200 as long as the mobile device is connected to t...

Page 13: ...e already entered a password and saved a net work the HVM200 automatically connects to the network with the greatest signal strength FIGURE 2 10 Network Settings TAKE NOTE The HVM200 supports WPA and...

Page 14: ...are both on the same local network you will see it in the list Select it to connect 2 6 Connecting HVM200 to G4 LD Utility TAKE NOTE G4 LD Utility for HVM software requires a license G4 LD Utility for...

Page 15: ...EARN MORE For more informa tion on working with G4 LD Utility refer to the G4 LD Utility Software Manual Step 1 Connect the HVM200 to a PC with the provided USB to micro B USB cable CBL218 Step 2 Laun...

Page 16: ...to your HVM200 meter follow these steps Step 1 Insert the accelerometer cable into the 4 pin connector on the HVM200 and then rotate the nut on the cable until the connection is tight Step 2 Insert th...

Page 17: ...ith an accelerometer FIGURE 2 17 Sensor List Identification and Sensitivity Step 7 In the Sensor List type the model serial number of your accelerometer and the sensitivity for the x y and z axes and...

Page 18: ...ity The following example demonstrates procedures for measuring vibration including Setting Up the Measurement Making the Measurement Downloading the Measurement Data 3 2 Setting Up the Measurement To...

Page 19: ...e documentation Step 6 Attach the transducer on your shaker so that the axis you wish to check is oriented properly Step 7 Start the shaker and note the arms values for each axis as follows TAKE NOTE...

Page 20: ...ne default setups in its Settings list These default setups correspond to settings typically used for different methods of measurement You can also create new setup files on the Settings list To creat...

Page 21: ...The interval time val ues represent the span that data is collected averaged and stored before starting a new sample Step 4 Use the bottom right arrow to move to the Setup tab specify any changes to...

Page 22: ...dule option on the Schedule tab Specify the Start Time Start Date End Date and Duration Specify a Delay Start if needed TAKE NOTE If a manual measure ment overlaps with the Start Time of a scheduled m...

Page 23: ...ration values into displacement values Step 9 On the Tools tab choose the Display Units and Integration method Specify the k Factor for each axis and type a Data File Name Click Save TAKE NOTE For who...

Page 24: ...ould be the farthest from the hand Step 2 Insert the HVM200 into the arm band so that the accelerom eter connector is nearest the hand Step 3 Connect the accelerometer to the HVM200 TAKE NOTE Refer to...

Page 25: ...button FIGURE 3 11 Meter is running measurement View Live Data While meter is stopped and not taking a measurement click the red Stop button A green Live button will appear To return to stop press Liv...

Page 26: ...vibration values represents the summation of vibration values taken from the X Y and Z axes The Summation display provides a real time graphical representation of the current summed values from all th...

Page 27: ...epresentations of current and overall values for each axis similar to Figure 3 14 FIGURE 3 15 X Y and Z Axes Data Displays Overload and Under range Indicators Overload LEARN MORE For information on ov...

Page 28: ...d accurately FIGURE 3 17 Under range Indicators Annotate the Measurement Click the Annotate button and type a note to include with the measure ment you do not need to stop the measurement to annotate...

Page 29: ...MORE For tips on working with raw data see see Working with RAW Data Files on page 3 12 Download raw data files You also need to specify storing data with this option on the Setup tab during measureme...

Page 30: ...hting filters for hand arm or whole body vibration purposes Example Matlab GNU Octave code for parsing HVM200 raw data format close all clear all clc Number of Samples to read Sample_Rate 7161 45833 H...

Page 31: ...z_axis_filt k hold off title HVM200 Data with Wk filter legend x y z save filteredsavename x_axis_filt y_axis_filt z_axis_filt Sample_ Rate Sample_Time Weighting Filters for Raw Data The isofilwk fun...

Page 32: ...f3 w4 2 pi f4 w5 2 pi f5 w6 2 pi f6 nyq fs 2 Nyquist frequency determine parameters for band limiting high pass and low pass b1 a1 butter 2 f1 nyq high High pass b2 a2 butter 2 f2 nyq Low pass determi...

Page 33: ...0 63 1 0 25 0 86 0 0625 0 80 0 10 0 80 1 Wh 108 10 1 1031 10 1 100 2 100 2 0 64 1 1 1 Wj 0 4 1 100 1 1 3 75 0 91 5 32 0 91 1 Wk 0 4 1 100 1 12 5 12 5 0 63 2 37 0 91 3 35 0 91 1 Wm 10 0 1 1 100 1 1 0 0...

Page 34: ...disabling features and upgrading the HVM200 4 2 Setting Syncing Meter Time and Date The HVM200 has a time feature that allows the meter s internal clock to be either manually set or synced with your P...

Page 35: ...ed on LEARN MORE For more informa tion on connecting the HVM200 to mobile app see Connecting the HVM200 to a Mobile Device on page 2 4 Step 2 Launch app and connect the HVM200 meter to your device usi...

Page 36: ...ime on your meter with the time on your mobile device 4 3 Turning Off On WiFi Signal 4 3 1 Turn Off WiFi Signal To disable WiFi signal completely from the HVM200 meter follow these steps CAUTION You w...

Page 37: ...the HVM200 meter follow these steps Step 1 Connect HVM200 via USB cable to PC launch G4 LD Util ity and connect meter see Connecting HVM200 to G4 LD Utility on page 2 8 Step 2 From the Setup WiFi scr...

Page 38: ...ke sure the meter is powered on Step 2 Launch G4 LD Utility and connect the HVM200 meter to your PC see Connecting HVM200 to G4 LD Utility on page 2 7 Step 3 If you meter is connected to G4 LD Utility...

Page 39: ...eference Manual Upgrade Firmware and Options 4 6 FIGURE 4 11 Upgrade Firmware Step 7 Open selected file Step 8 Press button for Upload Firmware or Upload Options A success message will appear close ou...

Page 40: ...onnections A 3 A 3 Operational Characteristics A 4 A 3 1 LED Indications A 4 A 4 Electrical Characteristics A 5 A 4 1 Power Consumption A 5 A 4 2 Power Supply A 5 A 4 3 Electrical Testing A 6 A 4 4 In...

Page 41: ...day 10 C to 50 C Effects of Temperature and Humidity Operating temperature 14 F to 122 F 10 C to 50 C The RMS level of the HVM200 varies up to 1 when exposed to temperatures of 10 C to 50 C and relati...

Page 42: ...le memory Swapping limitation Device must be off while replacing Micro SD card or battery A 1 8 Transducer Electronic Data Sheets TEDS Support Chips supported by HVM200 DS2430 and DS2431 Versions supp...

Page 43: ...charged the HVM200 will shut down when the remaining battery life approaches the threshold for safe shut down If the HVM200 shuts down mid measurement the file is trun cated and G4 LD Utility may not...

Page 44: ...Running The HVM200 is in the process of taking a measurement Blinking Measurement Run Pending The HVM200 is stabilizing for an impending measurement which may last up to 60 seconds or is awaiting a d...

Page 45: ...nto HVM200 ICP Inputs A 4 4 Input Input type ICP IEPE or CCP Excitation current 2 mA Input connector 1 4 28 4 pin male the input connection is also the transducer connection Measurement input voltage...

Page 46: ...Axis Operating Mode Frequency Weighting Reference Frequency Reference Amplitude Vibration Fa 0 4 Hz to 100 Hz Fb 0 4 Hz to 1250 Hz Fc 6 3 Hz to 1250 Hz 50 rad s 7 958 Hz 500 rad s 79 58 Hz 500 rad s...

Page 47: ...or typical mV Lower Limit Under range mV Lower Limit Lin earity Range typical mV Lower Limit Linearity Range maximum mV Upper Limit Overload V Fa 0 028 0 204 0 092 0 178 5 01 Fb 0 046 0 232 0 133 0 17...

Page 48: ...HVM200 Reference Manual Frequency Weighting Curves A 9...

Page 49: ...HVM200 Reference Manual Frequency Weighting Curves A 10...

Page 50: ...HVM200 Reference Manual Frequency Weighting Curves A 11...

Page 51: ...HVM200 Reference Manual Frequency Weighting Curves A 12...

Page 52: ...HVM200 Reference Manual Frequency Weighting Tables A 13 A 8 Frequency Weighting Tables The following tables show frequency weighting values for the HVM200...

Page 53: ...0 57 1 1 0 7943 0 27 0 17 1 1 1 000 0 11 0 06 1 1 1 259 0 04 0 00 1 1 1 585 0 02 0 02 1 1 1 995 0 01 0 03 1 1 2 512 0 00 0 03 1 1 3 162 0 00 0 03 1 1 3 981 0 00 0 02 1 1 5 012 0 00 0 03 1 1 6 310 0 00...

Page 54: ...HVM200 Reference Manual Frequency Weighting Tables A 15 251 2 16 11 16 20 2 316 2 20 04 20 16 2 398 1 24 02 24 22 2 Freq Hz Fa Ideal dB Fa Typical dB Tolerance dB...

Page 55: ...18 1 1 0 5012 1 48 1 49 1 1 0 6310 0 65 0 59 1 1 0 7943 0 27 0 21 1 1 1 000 0 11 0 08 1 1 1 259 0 04 0 05 1 1 1 585 0 02 0 04 1 1 1 995 0 01 0 04 1 1 2 512 0 00 0 04 1 1 3 162 0 00 0 07 1 1 3 981 0 0...

Page 56: ...05 1 1 251 2 0 01 0 06 1 1 316 2 0 02 0 05 1 1 398 1 0 04 0 10 1 1 501 2 0 11 0 15 1 1 631 0 0 27 0 31 1 1 794 3 0 64 0 63 1 1 1000 1 46 1 47 2 2 1259 3 01 3 35 2 2 1585 5 46 6 86 2 2 1995 8 64 12 55...

Page 57: ...6 310 6 310 3 02 2 77 2 83 2 2 0 04 0 02 1 1 7 943 7 943 1 52 1 18 1 25 2 2 0 06 0 12 1 1 10 00 10 00 0 67 0 43 0 46 1 1 1 41 1 39 1 1 12 59 12 59 0 31 0 38 0 39 1 1 4 22 4 21 1 1 15 85 15 85 0 12 0...

Page 58: ...34 60 37 41 2 2 1259 1 46 3 35 37 42 40 97 2 2 1585 3 01 6 86 40 97 46 21 2 2 1995 5 46 12 55 45 42 54 40 2 2 2512 8 64 21 30 50 60 67 23 2 3162 12 27 39 09 56 23 92 87 2 3981 16 11 86 14 62 07 101 37...

Page 59: ...29 1 59 0 08 0 06 0 10 0 12 1 1 1 259 8 27 0 85 0 00 0 01 0 06 0 06 1 1 1 585 8 07 0 61 0 06 0 02 0 26 0 28 1 1 1 995 7 60 0 64 0 10 0 05 1 00 1 06 1 1 2 512 6 13 0 86 0 15 0 09 2 23 2 30 1 1 3 162 3...

Page 60: ...45 30 62 41 50 2 2 158 5 28 56 37 60 34 57 34 63 33 43 46 68 2 2 199 5 34 03 43 28 40 20 40 32 36 99 52 36 2 251 2 39 69 49 17 46 04 46 21 41 43 58 25 2 316 2 45 65 55 16 51 98 52 19 46 62 64 23 2 39...

Page 61: ...08 6 30 6 26 6 33 6 30 1 1 1 259 2 29 2 29 6 28 6 28 6 29 6 28 1 1 1 585 3 91 3 92 6 32 6 33 6 13 6 16 1 1 1 995 5 80 5 82 6 34 6 37 5 50 5 54 1 1 2 512 7 81 7 85 6 22 6 26 3 97 4 01 1 1 3 162 9 85 9...

Page 62: ...2 64 58 37 8 64 12 34 30 69 36 42 2 251 2 58 27 64 21 12 26 16 22 36 32 42 32 2 316 2 64 11 70 24 16 11 20 18 42 16 48 30 2 398 1 70 04 76 29 20 04 24 25 48 10 54 40 2 Single Integration Double Integr...

Page 63: ...HVM200 Reference Manual Integration Weighting Limits A 24...

Page 64: ...HVM200 Reference Manual Integration Weighting Limits A 25...

Page 65: ...HVM200 Reference Manual Integration Weighting Limits A 26...

Page 66: ...HVM200 Reference Manual Integration Weighting Limits A 27...

Page 67: ...HVM200 Reference Manual Integration Weighting Limits A 28...

Page 68: ...e Manual 1 1 1 3 Octave Band Filters A 29 A 10 1 1 1 3 Octave Band Filters Octave Band Analysis OBA is an optional feature for the HVM200 A 10 1 OBA Compliance IEC 61260 1 2014 Class 1 ANSI S1 11 2014...

Page 69: ...ilter Responses A 10 3 1 1 OBA Filter Responses 1 1 Octave Measurement Range Frequency Hz Noise Floor mV Lower Limit Linearity mV Overload V 0 5 0 0076 0 079 5 01 1 0 0101 0 126 5 01 2 0 0088 0 089 5...

Page 70: ...HVM200 Reference Manual 1 1 1 3 Octave Band Filters A 31 1 1 Octave Filter Response Summary Graph 1 1 OBA 8 0 Hz Filter Response...

Page 71: ...HVM200 Reference Manual 1 1 1 3 Octave Band Filters A 32 1 1 OBA 8 0 Hz Filter Response Pass band 1 1 OBA 16 0 Hz Filter Response...

Page 72: ...063 5 01 0 63 0 0057 0 112 5 01 0 8 0 0053 0 089 5 01 1 0 0052 0 126 5 01 1 25 0 0054 0 178 5 01 1 6 0 0050 0 079 5 01 2 0 0055 0 158 5 01 2 5 0 0055 0 178 5 01 3 15 0 0053 0 282 5 01 4 0 0050 0 141 5...

Page 73: ...75 0 056 5 01 160 0 0074 0 063 5 01 200 0 0079 0 056 5 01 250 0 0084 0 056 5 01 315 0 0091 0 056 5 01 400 0 0098 0 079 5 01 500 0 0105 0 056 5 01 630 0 0115 0 079 5 01 800 0 0126 0 056 5 01 1000 0 013...

Page 74: ...HVM200 Reference Manual 1 1 1 3 Octave Band Filters A 35 1 3 OBA 0 4 Hz Filter Response 1 3 OBA 0 4 Hz Filter Response Pass band...

Page 75: ...HVM200 Reference Manual 1 1 1 3 Octave Band Filters A 36 1 3 OBA 8 0 Hz Filter Response 1 3 OBA 8 0 Hz Filter Response Pass band...

Page 76: ...HVM200 Reference Manual 1 1 1 3 Octave Band Filters A 37 1 3 OBA 16 0 Hz Center Band Filter Response 1 3 OBA 16 0 Hz Filter Response Pass band...

Page 77: ...Vibration Meter is a Type 1 instrument designed for use in assessing vibration as perceived by human beings The instrument meets the requirements of ISO 8041 2005 E Additionally because the HVM200 mee...

Page 78: ...xposure to whole body vibration Part 4 Guidelines for the evaluation of the effects of vibration and rotational motion on passenger and crew comfort in fixed guide way transport systems ISO 5349 1 200...

Page 79: ...ithin the Wh frequency range for the adaptors ADP080A ADP081A and ADP082A B 1 Mechanical B 1 1 ADP080A FIGURE B 1 Hand Adapter with SEN04XF Accelerometer Specification Unit ADP080 A ADP081 A ADP082 A...

Page 80: ...e measurements were performed by suspending the test object and exciting it with a modal hammer The responses were measured in x y and z directions using a triaxial accelerometer con nected to the tes...

Page 81: ...HVM200 Reference Manual Mechanical B 3 B 1 5 ADP080A SEN041 FIGURE B 4 ADP080A SEN041 Frequency Response Function X Y and Z...

Page 82: ...HVM200 Reference Manual Mechanical B 4 B 1 6 ADP081A SEN041 Frequency Response Function X Y and Z B 1 7 ADP082A SEN041 Frequency Response Function X Y and Z...

Page 83: ...ime in seconds aw t instantaneous acceleration t Time in seconds The Aeq integration time is from Run to Reset the display is updated once per second RMS Acceleration in Decibels ao reference accelera...

Page 84: ...ure points will be the maxi mum of the three axes exposure points Running RMS Acceleration LINEAR Integration time in seconds to Observation time The linear Arms integration time is controlled by the...

Page 85: ...eriod Minimum Transient Vibration Value Amin minimum reading of all Arms readings from Run to Reset The display is updated at the end of each Averaging time period Long Term Maximum Peak Amp peak leve...

Page 86: ...tantaneous accelera tion Kx Ky Kz X Y and Z axis Sum Factors The HVM200 uses the formula above to calculate the instanta neous summed acceleration aw t This value is then used to calculate a sum quant...

Page 87: ...ditions suivantes 1 l appareil ne doit pas produire de brouillage et 2 l utilisateur de l appareil doit accepter tout brouillage radio lectrique subi meme si le brouillage est susceptible d en comprom...

Page 88: ...is operated in a commercial environment This equipment generates uses and can radiate radio frequency energy and if not installed and used in accordance with the instruction man ual may cause harmful...

Reviews: