background image

Book Original Copying

Copying Methods

4 - 1

Book Original Copying

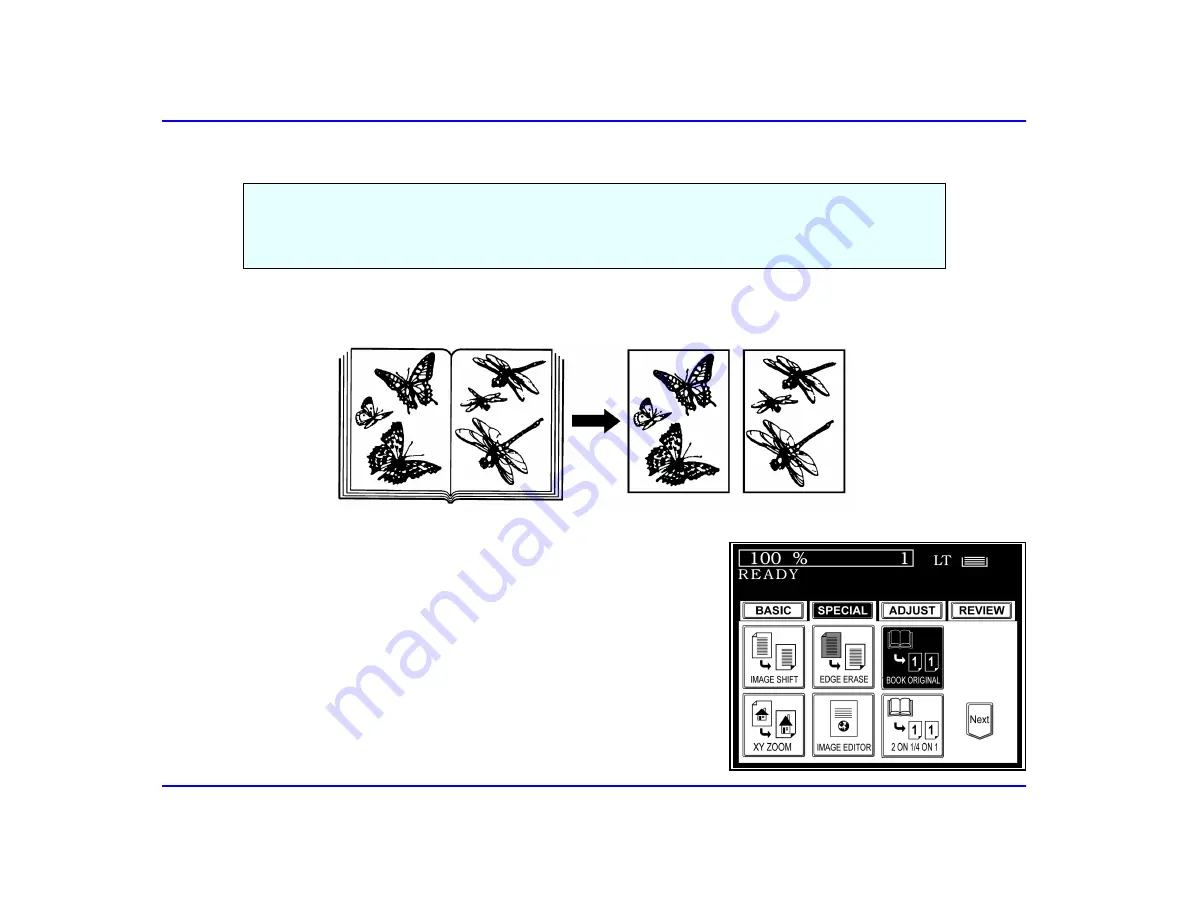
Example of Book Original Copying

1  

Touch the SPECIAL tab.

2  

Touch the BOOK ORIGINAL key to select the dual-page copy 
function.

Facing pages of a book or magazine are copied one at a time onto two separate sheets of paper at 
the same time. You need not to move the originals on the glass. Two letter size originals placed 
side by side on the Exposure Glass can be copied onto two separate sheets of paper. Reduction and 
enlargement copying functions are not available when using this feature.

Summary of Contents for 5580

Page 1: ...Operator Guide Digital Copier 5555 5565 5580 5555 5565 5580 5555 5565 5580 5555 5565 5580 your document management partner...

Page 2: ...December Printed in the U S A As an Energy Star Partner Lanier Worldwide Inc has determined that this product meets the Energy Star guidelines for energy efficiency Customer Vision Our commitment to...

Page 3: ...sure Settings 3 13 Selecting Enlargement and Reduction Ratio 3 15 Using AMS Automatic Magnification Selection 3 15 Using Original Size and Copy Size Selection 3 17 Zoom Keys 3 19 Using the Document Fe...

Page 4: ...Mode 6 2 Using Collate Mode 6 3 Using Stack Mode 6 5 Using Staple Mode 6 7 When Placing Originals on the Exposure Glass 6 8 Using the Hole Punch 6 9 Using Magazine Sort and Saddle Stitching 6 12 When...

Page 5: ...aning the Exposure Glass and RADF 7 65 Simple Troubleshooting 7 66 Copier Does Not Start 7 66 Copies are NOT Clear 7 66 When Copies have a Dirty Background 7 67 Specifications General Specifications 8...

Page 6: ...iv...

Page 7: ...Important Safeguards...

Page 8: ...ossible If you must use an extension cord use only a 3 conductor cord rated for at least 20 amperes Power cords rated for less can overheat and become a fire hazard 3 Do not operate your unit if any p...

Page 9: ...om the wall and allow 32 inches of clearance on the left and right sides of the copier If the optional finisher is used allow 32 inches on the left side of the copier Agency Certifications Your unit c...

Page 10: ...Important Safeguards 3 Important Safeguards...

Page 11: ...Chapter 1 Making Copies...

Page 12: ...s on your copier It includes Turning the Copier Power ON on page 1 1 Placing Your Original Document on page 1 1 Making Your Copy on page 1 2 For additional information on the more advanced features of...

Page 13: ...he message Enter job access code is displayed 2 Enter your four digit access code See Entering Access Codes on page 3 1 Placing Your Original Document 1 Place your original document Face down on the E...

Page 14: ...lighter or darker keys to lighten of darken your copy See Using Manual Exposure Settings on page 3 12 Photo Touch the EXPOSURE key then touch the lighter or darker keys to lighten of darken your copy...

Page 15: ...00 zoom keys to reduce your original to 25 or enlarge your original to 400 of its original size See Zoom Keys on page 3 19 Copying Methods Refer to the Table of Contents or Chapter 4 Copying Methods f...

Page 16: ...Making Your Copy 1 4 Making Copies...

Page 17: ...Chapter 2 Component Identification...

Page 18: ...ication Chapter Overview This chapter describes your copier s main components Included in this chapter are Control Panel on page 2 1 Touch Screen on page 2 2 Component Locations on page 2 3 Graphic Di...

Page 19: ...Touch Screen Provides messages regarding procedures and status of the unit 5 Function Clear Key Clears all selected modes 6 Stop Key Press to stop copy operations 7 Start Key Press to start copy oper...

Page 20: ...tes approximate number of sheets remaining in the selected source Refer to Paper Remaining chart above 7 Main Menu Keys 8 ZOOM Key Copy reduction and enlargement 9 DUPLEX Key For duplex copying 10 FIN...

Page 21: ...tional Key Counter Insert the optional Key Counter when used 3 Stack Feed Bypass Bypass copying allows copying on to transparencies letterhead or other non standard paper 4 Power Switch Press this swi...

Page 22: ...ce for the copier It holds up to 4 000 sheets of letter size paper 8 Paper Drawers Each paper drawer holds up to 500 sheets of paper 9 Control Panel All copy operations are controlled from the Control...

Page 23: ...eversing automatic document feeder 15 Document Feeder Tray Place your originals face up in the Document Feeder 16 Original Exit Tray Originals placed in the Document Feeder to be copied exit to this t...

Page 24: ...nisher 4 Clear Paper This symbol flashes when paper is misfed in the Fuser and Exit areas of the copier 5 Call For Service This symbol flashes when a maintenance by a service technician is required 6...

Page 25: ...r Paper This symbol flashes when paper fed from the LCC is misfed in the paper feed section 10 Replace Used Toner Container This symbol flashes when the Used Toner Container is full 11 Clear Paper Thi...

Page 26: ...Graphic Display 2 8 Component Identification...

Page 27: ...Chapter 3 Basic Copier Functions...

Page 28: ...ering Access Codes on page 3 1 Selecting Copy Quantities on page 3 3 Selecting Copy Paper Size on page 3 4 Selecting Copy Darkness Modes on page 3 11 Selecting Enlargement and Reduction Ratio on page...

Page 29: ...opier access to those persons who know an assigned Access Code The Access Code feature monitors copier usage by department project or persons and tracks the number of copies made with each Access Code...

Page 30: ...four dashes If you do not know which Access Code to use ask your Key Operator When your copying is complete clear your Access Code by pressing the FUNCTION CLEAR key This prevents unautho rized use o...

Page 31: ...original enter the number of copies you desire using the Keypad Press the CLEAR key to clear an entry if you entered an incorrect quantity Your copier automatically selects a copy quantity of one If...

Page 32: ...the size of the original and selects the same size copy paper APS mode is only for 100 copying AMS or Automatic Magnification Selection The copier senses the size of your original and automatically s...

Page 33: ...on the Exposure Glass When placing your originals on the Exposure Glass the message Change direction of original may appear on the Touch Screen Just raise the RADF and change the direction that your o...

Page 34: ...ic Magnification Selection 1 Check the Zoom key to see if the AMS feature is already selected If not touch the Zoom key 2 Select AMS Automatic Paper Selection 3 Select the desired output paper size 4...

Page 35: ...er or on the Exposure Glass When placing your originals on the Exposure Glass the message Change direction of original may appear on the Touch Screen Just raise the RADF and change the direction that...

Page 36: ...ginal paper size Use the AMS Automatic Magnification Selection mode when you wish to have different size originals copied on to the same size paper Copying mixed original sizes requires that At least...

Page 37: ...6 Select Automatic Paper Selection APS or Automatic Magnification Selection AMS 7 Touch the RETURN key 8 Place your originals and make any additional copy selections Note When copying mixed size orig...

Page 38: ...e a paper size other than those listed touch the OTHER key Place your special paper in the Paper Drawer If your copy paper does not fit in the Paper Drawers you can use the Bypass Tray See Selecting C...

Page 39: ...matically detects the density of the originals and makes copies at the optimum exposure You can set copy lightness or darkness using Automatic Exposure Setting Manual Exposure Setting Text Photo Expos...

Page 40: ...URE key 2 Touch the Lighter or Darker keys to select the lightness or darkness of the copy You can select from eleven settings The indicator shows the selected setting 3 Place your originals and press...

Page 41: ...elect Text Photo when your original contains photographs or pictures with letters Select Text when your original contains only text and no pictures Select Photo when copying photographs and colored or...

Page 42: ...oto Exposure Settings Basic Copier Functions 3 14 If MANUAL is displayed touch the EXPOSURE key and select AUTO 2 Touch either Photo Text or Text Photo 3 If necessary touch the lighter of darker keys...

Page 43: ...omatic Magnification Selection 1 Touch the ZOOM key There are three methods available to you for enlargement and reduction copying AMS Automatic Magnification Selection Original Size and Copy Size Sel...

Page 44: ...Selecting Enlargement and Reduction Ratio Basic Copier Functions 3 16 2 Touch the AMS key 3 Touch the desired Copy size key 4 Touch the RETURN key...

Page 45: ...the desired Copy size key If the selected paper size is not in any of the paper drawers the message Select correct drawer is displayed on the Touch Screen Install the correct size paper in the selecte...

Page 46: ...Using Original Size and Copy Size Selection Basic Copier Functions 3 18 4 Place the originals in the Document Feeder or on the Exposure Glass...

Page 47: ...increments Ratios from 25 to 400 can be set in one percent increments The selected ratio is displayed on the Touch Screen Touching the 400 or 25 keys causes 400 or 25 to be displayed immediately 3 To...

Page 48: ...ed a stack of different length originals through the Document Feeder 4 If the surface of any two originals are so rough that they cannot be moved when pinched between two fingertips the friction betwe...

Page 49: ...key will read AUTO START 3 If AUTO START is highlighted touch the AUTO START key 4 Touch the PRESS START key PRESS START allows you to stack feed up to 60 letter size originals into the Document Feed...

Page 50: ...AUTO START Feeding One Original at a Time 1 Touch the ADJUST tab 2 Touch the PRESS START key 3 Touch the AUTO START key AUTO START allows you to manually feed multiple single sheets into the Document...

Page 51: ...Chapter 4 Copying Methods...

Page 52: ...your unit Included in this chapter are Book Original Copying on page 4 1 Bypass Copying on page 4 3 Cover Sheet Copying on page 4 8 Duplex Copying on page 4 12 Interrupt Copying on page 4 19 Sheet In...

Page 53: ...copy function Facing pages of a book or magazine are copied one at a time onto two separate sheets of paper at the same time You need not to move the originals on the glass Two letter size originals p...

Page 54: ...or 2 SIDED two sided copying by touching the appropriate key 4 Place your book original on the Exposure Glass Align the center of your book original to the orange indicator with the bottom of the book...

Page 55: ...er you may feed this paper from the Stack Feed Bypass Tray Bypass copying bypasses the Paper Drawers and feeds copy paper from the Stack Feed Bypass Tray Use the Stack Feed Bypass to feed standard pap...

Page 56: ...n be placed in the Stack Feed Bypass Tray The Touch Screen turns to the Copy Size display and then shows Ready for bypass feeding Be sure to place your copy paper in the same direction as your origina...

Page 57: ...Bypass Copying Copying Methods 4 5 4 Press the START key to begin copying The sheet of paper in the Bypass Feed Tray feeds into the copier...

Page 58: ...ch Screen turns to the Copy Size display and then displays Ready for bypass feeding If necessary pull out the paper extension bar to support longer sheets of paper 3 Adjust the Side Guides of the Bypa...

Page 59: ...Selecting Copy Paper Size Copying Methods 4 7 4 Select the desired copy size by touching one of the six copy size keys 5 Make any other copy mode selections and then press the START key...

Page 60: ...de add sa front or back cover to each set of copies The available options are Adding a blank front cover Adding a copied front cover Adding a blank front cover and a blank back cover Adding a copied f...

Page 61: ...you are using special sheets of paper for the cover place them in the designated Cover Sheet Drawer To specify a Drawer for Cover Sheet use see Programming the New Paper Size on page 7 6 You can use a...

Page 62: ...Cover Sheet Copying Copying Methods 4 10 3 Touch the SPECIAL tab 4 Touch the Next key 5 Touch the COVER SHEET key...

Page 63: ...nk front and back cover FRONT COPIED BACK BLANK Adding copied front and blank back covers Note In the FRONT COPIED and FRONT COPIED BACK BLANK only the top side of the cover sheet will be copied even...

Page 64: ...ke duplex copies 1 Sided to 2 Sided Copying This mode makes two sided copies from one sided originals 2 Sided to 2 Sided Copying This mode makes two sided copies from two sided originals Book to 2 Sid...

Page 65: ...er automatically feed across the Exposure Glass and are scanned after you press the START key After scanning is complete the copies are made Using Exposure Glass When placing an original on the Exposu...

Page 66: ...1 Touch the BASIC tab 2 Touch the DUPLEX key 3 Touch the 2 2 key This selects copying from double sided originals to double sided copies 4 Make any additional copy settings 5 Place your originals in...

Page 67: ...ing 1 Touch the BASIC tab 2 Touch the DUPLEX key 3 Touch the 2 1 key This selects copying from a double sided original to single sided copies 4 Make any additional copy settings 5 Place your originals...

Page 68: ...Originals Copying Copying Methods 4 16 Duplexed Copies from Book Originals Copying 1 Touch the BASIC tab 2 Touch the DUPLEX key 3 Touch the Book 2 key This selects copying from a facing pages of a bo...

Page 69: ...ng starts from the left page of the book and ends on a right page 5 If you find it necessary to shift the image select SPECIAL IMAGE SHIFT and BOOK 6 Make any additional copy settings 7 Place the book...

Page 70: ...in the job touch the COPY FINAL PAGE key The last page is copies and the job is completed 13 If you realize that the last page you just copied is the last page to be copied touch the FINISHED key The...

Page 71: ...r Position the new original on the Exposure Glass 3 Enter the Access Code if prompted from the Touch Screen 4 Make any additional copy settings 5 Press the START key You can interrupt a copy job that...

Page 72: ...to cancel the Interrupt mode The message READY to resume job 1 is displayed The previous copy quantity copy ratio copy darkness and paper size are automatically reset 7 Put the remaining originals tha...

Page 73: ...same size and placed in the same direction Inserting a blank special sheet in front of the specified page Inserting a copied special sheet at the specified page You can insert two different kinds of s...

Page 74: ...e your original in the Document Feed Tray 2 If you are using special sheets of paper for the cover place them in the designated Sheet Insertion Drawer See Programming the New Paper Size on page 7 6 Yo...

Page 75: ...Sheet Insertion Copying Copying Methods 4 23 3 Touch the SPECIAL tab 4 Touch the Next key 5 Touch the INSERT key...

Page 76: ...front of the specified page INSERT COPIED Inserting a copied special sheet at the specified page 7 Using the keypad enter the desired page number where you want the special sheet to be inserted 8 Tou...

Page 77: ...g Copying Methods 4 25 11 Touch the BASIC tab 12 Select the Paper Drawer in the Touch Screen that matches the size and direction of the special cover sheet paper 13 Make any additional copy settings 1...

Page 78: ...Copying Example of 4 ON 1 Copying This feature allows you to reduce and copy two or more originals onto a single sheet 2 ON 1 Copying reduces two originals and copies them onto one sheet of paper 4 O...

Page 79: ...2 ON 1 and 4 ON 1 Copying Methods 4 27 When Using the Automatic Document Feeder 1 Place your originals in the Document Feeder 2 Touch the SPECIAL tab 3 Touch the 2ON1 4ON1 key...

Page 80: ...ng options by touching the appropriate key 2 ON 1 4 ON 1 2 ON 1 DUPLEX 4 ON 1 DUPLEX 5 Enter the type of original by touching the appropriate key 1 SIDE for one sided originals 2 SIDE for two sided or...

Page 81: ...ng Methods 4 29 When Placing Originals on the Exposure Glass 1 Touch the SPECIAL tab 2 Touch the 2ON1 4ON1 key 3 Select one of the following options by touching the appropriate key 2 ON 1 4 ON 1 2 ON...

Page 82: ...ginals 5 Make any additional copy settings 6 Place your originals on the Exposure Glass and press the START key 7 When the first original has finished being scanned touch the YES key and place the nex...

Page 83: ...d the edges of your copy Shift an image on a copy to allow for a better binding margin Reverse the light and dark areas of a copy using negative or positive images Reverse the direction of the copy us...

Page 84: ...opies Copying Methods 4 32 Annotation Adding Date and Time to Copies 1 Touch the SPECIAL tab 2 Touch the Next key 3 Touch the ANNOTATION key This function allows you to print the date and time at eith...

Page 85: ...Annotation Adding Date and Time to Copies Copying Methods 4 33 4 Touch the UPPER or LOWER key to place the time and date on the copies...

Page 86: ...ound the Copy 1 Touch the SPECIAL tab 2 Touch the EDGE ERASE key This feature is used to eliminate the shadows on the edge of the copy that result from torn or stained originals In the Edge Erase mode...

Page 87: ...ult value of 5 mm touch the SET key To change the Edge Erase margin touch either the 5mm or 20mm key to select the desired edge erase margin 4 Place your originals in the Document Feeder or on the Exp...

Page 88: ...can create margins on the copy and you can specify the position of these margins on either right or left side of the copy You can also create margins on copies of book originals with just the use of t...

Page 89: ...AGE SHIFT key to select the image shift function 3 You can select from left margin right margin or book margin To choose left margin touch the LEFT key To choose right margin touch the RIGHT key To ch...

Page 90: ...0mm or 30mm key to select the desired margin setting Then touch the SET key When combining Image Shift with duplex copying select LEFT SPACE for the front side and RIGHT SPACE for the back side of th...

Page 91: ...Reversing the image Copying Methods 4 39 Negative Positive Reversing the image 1 Touch the SPECIAL tab 2 Touch the IMAGE EDITOR key 3 Touch the NEG POS key This function allows you to reverse the blac...

Page 92: ...Image of Original Copying Methods 4 40 Mirror Image of Original 1 Touch the SPECIAL tab 2 Touch the IMAGE EDITOR key 3 Touch the MIRROR key This function allows you to make a mirror image of your ori...

Page 93: ...hods 4 41 Page Number Adding Page Numbers to Copies 1 Touch the SPECIAL tab 2 Touch the Next key This function allows you to print the page number at one of the following six locations Top left Top ce...

Page 94: ...age number position by touching the appropriate key TOP LEFT TOP CENTER TOP RIGHT BOTTOM LEFT BOTTOM CENTER BOTTOM RIGHT 5 Enter the starting page number using the keypad If you enter the wrong page n...

Page 95: ...sure the bottom edge is towards the front of the copier Place the original with the original scale on the left Trim allows you to copy only a portion of the original by trimming out what you do not wa...

Page 96: ...want to identify X2 is defined by the horizontal distance from 0 to the right edge of the area you want to identify Y1 defined by the vertical distance from 0 to the bottom edge of the area you want...

Page 97: ...This advances the cursor to the X2 value 5 If you make an error entering the value press the RESET key 6 Enter the X2 value using the keypad and then touch the SET key located at the right This advanc...

Page 98: ...ZOOM key 3 Enter the X reproduction ratio by touching the 25 100 or the 400 keys Touch the SET key to advance to the Y setting 4 Enter the Y reproduction ratio by touching the 25 100 or the 400 keys 5...

Page 99: ...Chapter 5 Special Copier Functions...

Page 100: ...page 5 1 Presetting Copy Modes on page 5 3 Energy Saving Modes on page 5 5 Key Copy Counter Optional on page 5 10 Weekly Timer on page 5 11 Setting Time and Date on page 5 15 Job Memory on page 5 20...

Page 101: ...posure Glass 3 Make your copy requirement selections When your copier is first turned ON it takes seven minutes for it to come to its READY condition During this time however you can set up your copy...

Page 102: ...ng Up Auto Start is displayed on the Touch Screen When your copier comes to its READY condition it automatically begins copying in the selected copy modes Note You can change the copying modes even af...

Page 103: ...des Special Copier Functions 5 3 Presetting Copy Modes 1 Touch the JOB PRESET key during the current copy run 2 Set the next copy job requirements You can preset your next copy job while the current c...

Page 104: ...ent copy job has scanned all of the originals place your originals for the next copy job in the Document Feeder 4 Press the START key When the current copy job is complete your next copy job begins au...

Page 105: ...s Your copier has three types of Energy Saving modes Automatic Energy Saver mode Manual Energy Saver mode Auto Power Shut Off mode If you have the Optional Printer Controller Board installed Auto Shut...

Page 106: ...tions 5 6 4 Select a time delay for your copier to go into the Energy Save mode by touching one of the preset time keys Preset times are from 3 to 60 minutes 5 To exit the Energy Save mode press eithe...

Page 107: ...tting the Energy Saver Mode 1 Press the ENERGY SAVER key to place your copier in the Energy Saver mode The ENERGY SAVER Indicator Light turns ON The message Saving energy press START is displayed 2 To...

Page 108: ...turns the power switch OFF After the last copier operation your copier automatically goes into Auto Power Shut Off mode after the pre selected time You can select the set time of the Auto Power Shut...

Page 109: ...5 9 3 Touch the AUTO SHUT OFF key 4 Select a time delay for your copier to go into the Auto Power Shut Off mode by touching one of the preset time keys Preset times are from 3 to 240 minutes 5 To exit...

Page 110: ...er into the right side of the copier Hold the counter with the counter toward you and the small arrow pointing up Insert it slowly until it comes to a stop 3 The READY message appears Make copies as y...

Page 111: ...hite background 2 If your timer settings are anything else 00 00 00 00 24 00 00 00 or 24 00 24 00 make sure the Weekly Timer key is not highlighted An incorrect setting can cause the machine to shut d...

Page 112: ...the ADJUST tab 2 Touch the WEEKLYTIMER key 3 Check the settings If they are correct touch the SET key To change settings touch the CHANGE key Note If the Access Code feature is being used you must en...

Page 113: ...s for which the copier should not be turned ON set the times as follows ON 0 00 OFF 0 00 Making Copies in Timer OFF Mode 1 If the Touch Screen is blank and the TIMER indicator light is ON press the ST...

Page 114: ...ation of the Weekly Timer 1 Touch the ADJUST tab The WEEKLY TIMER key is highlighted 2 Touch the WEEKLY TIMER key This turns the WEEKLY TIMER function OFF The Weekly Timer key is not highlighted If yo...

Page 115: ...5 Setting Time and Date 1 Touch the ADJUST tab 2 Touch the Next key 3 Touch the DATE TIME key Your copier uses time and dates for several operations You only need to enter time and date one time unles...

Page 116: ...ns 5 16 Entering Year Month and Date 1 Using the keypad enter the last two numbers of the year Example 1999 press 99 2001 press 01 2 Touch the right arrow key to advance to the DATE 3 Using the keypad...

Page 117: ...w key Using the keypad enter the date 1 31 the example shows 11 Entering Day of the Week 1 Touch the right arrow key to advance to the DAY 2 Using the keypad enter the number corresponding to the day...

Page 118: ...Entering Time of Day 1 Touch the right arrow key to advance to TIME 2 Using the keypad enter the hour 0 23 Time is displayed in 24 hour format Example 9 am enter 9 3 Touch the right arrow key Using th...

Page 119: ...l Copier Functions 5 19 4 Verify that all of your settings are correct If you should have a correction to make touch the left arrow key and make your corrections where necessary 5 When all settings ar...

Page 120: ...xposure and copy size 2 Touch the ADJUST tab 3 Touch the MODE MEMORY key You can store and recall a combination of frequently used copy modes at any time you like In addition to reproduction ratios yo...

Page 121: ...Copier Functions 5 21 4 Touch the MEMORY key to select the storage function 5 Touch a MEMORY key 1 4 The selected copy settings are stored under the memory selection The stored settings remain until n...

Page 122: ...Job Memory Special Copier Functions 5 22 Recalling a Copy Job Format 1 Touch the ADJUST tab 2 Touch the MODE MEMORY key 3 Touch the RECALL key...

Page 123: ...Job Memory Special Copier Functions 5 23 4 Touch the MEMORY key for the copy job you require 5 Press the START key...

Page 124: ...ws you to store the image of originals into the copiers memory You can then print it or overlay it on top of another copy Two modes are available 1 MEMORIZE mode Allows you to store the image in the c...

Page 125: ...rage Special Copier Functions 5 25 3 Touch the DOCUMENT STORAGE key 4 Touch the MEMORIZE key Note If the Access Code function is being used you must enter an Access Code before you can place an image...

Page 126: ...f images are already memo rized To confirm whether any images have been stored or not touch the key before memorizing the new image If an image is in the selected location the Touch Screen displays th...

Page 127: ...Document Storage Special Copier Functions 5 27 Print Mode 1 Touch the SPECIAL tab 2 Touch the Next key 3 Touch the DOCUMENT STORAGE key...

Page 128: ...s Code before you can print an image from memory 5 Touch the storage location number for printing Storage locations are from 1 to 24 6 Select the copy quantity You may want to touch the TEST PRINT key...

Page 129: ...nguage on the Touch Screen Special Copier Functions 5 29 Changing Language on the Touch Screen 1 Touch the ADJUST tab 2 Touch the Next key You can change the language of the Touch Screen English Frenc...

Page 130: ...hanging Language on the Touch Screen Special Copier Functions 5 30 3 Touch the CHANGE LANGUAGES key 4 Touch the desired language It may take a few seconds for the language to appear on the Touch Scree...

Page 131: ...Chapter 6 Using the Finisher...

Page 132: ...covers the use of the optional Finishers Using Non Sort Mode on page 6 2 Using Collate Mode on page 6 3 Using Stack Mode on page 6 5 Using Staple Mode on page 6 7 Using Magazine Sort and Saddle Stitch...

Page 133: ...copy sets easier Making Stacked Copy Sets The copies of each original are stacked together in a Finisher Tray The first page of each stack is off set for easier separation of the stacks Stapling your...

Page 134: ...ACK is displayed touch the key and select NON SORT NON STAPLE 2 Make any additional copy settings 3 Press the START key Your copies exit into Tray 1 of the Finisher Use Non Sort copying when you are m...

Page 135: ...Using Collate Mode 1 Touch the FINISHER key Collating saves you a lot of time by making complete sets of your originals Copies are assembled as sets in sequential order The last copy of the set is off...

Page 136: ...ls in the Document Feeder so the first page is on top When you are copying from the Exposure Glass in the Collate mode always copy the last page of a document first and work your way forward to the fi...

Page 137: ...r 6 5 Using Stack Mode 1 Touch the FINISHER key 2 Touch the STACK key 3 Make any additional copy settings Stacking keeps the copies of each original together The first page of each stack is off set fo...

Page 138: ...r originals in the Document Feeder so the first page is on top When you are copying from the Exposure Glass in the Stack mode always copy the last page of a document first and work your way forward to...

Page 139: ...ngs 4 Place originals face up in the Document Feeder or face down on the Exposure Glass Place your originals in the Document Feeder so the first page is on top When you are copying from the Exposure G...

Page 140: ...Placing Originals on the Exposure Glass 1 After the first original has finished being scanned touch the YES key 2 Set the next original and press the START key 3 Continue this sequence for the remaini...

Page 141: ...he FINISHER key With the optional hole punch unit attached to the optional finisher you can have the copies punched with holes for binding the document The hole punch punches holes in paper from 17 to...

Page 142: ...r the copy quantity 6 Select the desired copy settings 7 Press the START key Originals are scanned To add more originals press the CONTINUE key during scan ning 8 Copies exit to the Finisher When the...

Page 143: ...Using the Hole Punch Using the Finisher 6 11 To cancel copying press the STOP key to interrupt the copy run then touch the MEMORY CLEAR key...

Page 144: ...le Stitch Mode Copies 1 sided originals to 2 sided copies or 2 sided originals to 2 sided copies Automatically reducing the original to fit 2 pages on 1 sheet Then the copier folds and saddle stitches...

Page 145: ...cument Feed Tray 2 Touch the BASIC key 3 Touch the FINISHER key 4 By touching the appropriate key select MAGZINE SORT MAGAZINE SORT SADDLE STITCH SADDLE STITCH 5 Select the desired duplex method by to...

Page 146: ...key during the scanning process 9 Copies exit to the Finisher bins When the Finisher Bins reach their maximum capacity the following message appears Finisher full Remove paper Remove the copies from t...

Page 147: ...ginal on Exposure Glass 1 Place the originals face up in the Document Feed Tray 2 Touch the BASIC key 3 Touch the FINISHER key 4 By touching the appropriate key select MAGZINE SORT MAGAZINE SORT SADDL...

Page 148: ...direction When the first side original was placed horizontally the second side original should be placed horizontally but in the opposite direction 8 When the first original has finished being scanne...

Page 149: ...When Placing Original on Exposure Glass Using the Finisher 6 17 To cancel copying press the STOP key to interrupt the copy run then touch the MEMORY CLEAR key MEMORY CLEAR...

Page 150: ...When Placing Original on Exposure Glass 6 18 Using the Finisher...

Page 151: ...Chapter 7 Service and Supplies...

Page 152: ...damage to your copier Included in this chapter are Loading Paper on page 7 1 Changing Paper Size on page 7 5 Adding Toner on page 7 10 Replacing Used Toner Container on page 7 14 Removing Copy Paper...

Page 153: ...th the paper to be added and then reload the paper as a single stack If you change to a different size of copy paper the Paper Drawer must be adjusted The tray holds up to 500 sheets of 20 lb bond pap...

Page 154: ...e Be sure there is a gap of about 0 5 mm between the paper and each of the Side Paper Guides The total gap should not be more than 1 mm Misfeeds may occur if the gap is too tight or too loose 3 Push t...

Page 155: ...y Cassette Note If you want to add paper before the LCC runs out of paper press the TRAY DOWN key before opening the door The tray automatically moves down You can load up to 4 000 sheets of paper in...

Page 156: ...ace paper on the Tray You may place up 4 000 sheets of paper in the LCC Do not add paper above the limit line on the inner guide Do not use creased folded wrinkled or damp sheets of paper 3 Close the...

Page 157: ...e Guide and End Guide in place they must be installed by a service technician 3 Move the Guides to fit the new size paper 4 Secure the Guides with the thumb screws 5 Place the copy paper in the Paper...

Page 158: ...e New Paper Size Service and Supplies 7 6 Programming the New Paper Size 1 Touch the ADJUST tab 2 Touch the DRAWER SIZE key 3 Touch the Paper Drawer in the outline of the copier that you have changed...

Page 159: ...r Size Service and Supplies 7 7 4 From the paper size selections on the right side of the Touch Screen select the size that you changed the Paper Drawer to The copier now will recognized that size pap...

Page 160: ...awer in the outline of the copier from which you wish to feed either COVERS or INSERTS from The drawer you choose for COVER or INSERT must match the paper size and orientation of the rest of your job...

Page 161: ...ce and Supplies 7 9 5 Return to the BASIC screen and check to make sure that the COVER INSERT1 or INSERT2 is shown on the screen The screen on the right shows one drawer selected for the Cover Sheet a...

Page 162: ...oner Press HELP appears on the Touch Screen This machine has two levels of warnings The first is a low toner condition which occurs when there is enough toner for approximately 1000 copies remaining T...

Page 163: ...cement Toner Bottle in both hands Slowly turn the bottle upside down and back five times This loosens the toner in the bottle 3 Carefully place the edge of the Toner Bottle into the slot along the rea...

Page 164: ...handle on the Toner Hopper Cover toward the front of the copier until it stops 5 Pat the sides and bottom of the Toner Bottle to insure all toner empties into the Toner Hopper It takes approximately 2...

Page 165: ...6 Push the handle on the Toner Hopper Cover toward the rear of the copier until it stops 7 Carefully remove the Toner Bottle by tilting it slightly backwards then slide it out from the slot on the Ton...

Page 166: ...Toner Container 1 Remove the two thumb screws that hold the Used Toner Door closed 2 Open the Used Toner Door When the Used Toner Container is full the Used Toner Container symbol flashes and the mess...

Page 167: ...Adding Toner Service and Supplies 7 15 3 Pull out the Used Toner Container 4 Unscrew the cap from the top of the old Used Toner Container and screw it onto the container opening...

Page 168: ...nd Supplies 7 16 5 Install the new Used Toner Container by sliding it into the copier 6 Close the Used Toner Door and fasten with the two thumb screws 7 Dispose of the old Used Toner Container in acco...

Page 169: ...en indicates a paper misfeed and a misfeed symbol flashes the location of the paper misfeed The paper misfeed symbol flashes in different locations as shown in the diagram depending on where paper has...

Page 170: ...ever to release the optional finisher from the copier and move the Finisher away from the copier If the Finisher is not used remove the Exit Tray 2 Open the Exit Door 3 Remove the misfed paper 4 Close...

Page 171: ...Misfeeds in the Paper Feed Path Service and Supplies 7 19 Paper Path Misfeeds 1 Open the Front Doors of the copier 2 Push the LCC blue lock lever E to the right Move the LCC to the right until it sto...

Page 172: ...e and Supplies 7 20 3 Remove any misfed paper from the paper path Be sure to check the guide area on the left for the trailing edge of a misfed paper 4 Turn the blue lock lever C counterclockwise and...

Page 173: ...Paper Misfeeds in the Paper Feed Path Service and Supplies 7 21 5 Remove any misfed paper from the Transport Unit 6 Open the Fuser Cover using the blue lever D WARNING THE FUSER MAY BE VERY HOT D...

Page 174: ...7 22 7 If misfed paper is found in the Fuser rotate the blue knob B counterclockwise to feed it out of the Fuser 8 Lower the Fuser Cover and push the Transport Unit in until it stops 9 Rotate the blue...

Page 175: ...he left until it locks in place 11 Close the Front Doors of the copier Paper Misfeeds in the Duplexer 1 Push the Finisher Release Lever to release the optional finisher from the copier Move the Finish...

Page 176: ...pplies 7 24 2 Open the Exit Door 3 Remove the misfed paper 4 Close the Exit Door 5 If a Finisher is used push the Finisher back in place against the copier If the Finisher is not used set the Exit Tra...

Page 177: ...eed Path Service and Supplies 7 25 7 Push the blue lock lever E to the right Move the LCC to the right until it stops 8 Remove any misfed paper Be sure to check the guide area on the left for the trai...

Page 178: ...eeds in the Paper Feed Path Service and Supplies 7 26 9 Turn the blue knob F counterclockwise and remove any misfed paper 10 Lift up the blue lever G and pull out the Duplexer unit until it comes to a...

Page 179: ...the Paper Feed Path Service and Supplies 7 27 11 Pull up on the blue lever H and remove any misfed paper Remove all paper in the Duplexer 12 Press down on the blue lock lever I to open the Duplexer Tr...

Page 180: ...Service and Supplies 7 28 13 Remove any misfed paper 14 Close the Duplexer Transport Guide 15 Push the Duplexer unit in until it latches in place 16 Move the LCC to the left until it locks in place 17...

Page 181: ...ds in the Paper Drawers Service and Supplies 7 29 Paper Misfeeds in the Paper Drawers 1 Open the Front Doors of the copier 2 Push the LCC blue lock lever E to the right Move the LCC to the right until...

Page 182: ...rs Service and Supplies 7 30 3 Remove any misfed paper from the paper drawer feed paths 4 Open each Drawer and check for misfeeds 5 Move the LCC to the left until it locks in place 6 Close the left an...

Page 183: ...Paper Misfeeds in the Large Capacity Cassette LCC Service and Supplies 7 31 Paper Misfeeds in the Large Capacity Cassette LCC 1 Open the LCC Door 2 Remove any misfed paper 3 Close the LCC Door...

Page 184: ...Capacity Cassette LCC Service and Supplies 7 32 Paper Misfeeds in the Bypass Tray 1 Remove all sheets from the Bypass Tray 2 Realign the edges of the sheets adjust the Side Guides and place the sheet...

Page 185: ...per 2 Push the Finisher Release Lever to release the optional finisher from the copier and move the Finisher away from the copier When a misfeed occurs in the Finisher the FINISHER MISFEED symbol flas...

Page 186: ...Paper Misfeeds in the Optional Finisher Service and Supplies 7 34 3 Remove the misfed paper between the Finisher and the Copier 4 Open the Upper Access Door of the Finisher...

Page 187: ...Paper Misfeeds in the Optional Finisher Service and Supplies 7 35 5 Lift up on tab 1 or both tabs 1 and 2 and remove any misfed paper 6 Close all doors and push Finisher back against the copier 1 2...

Page 188: ...ice and Supplies 7 36 Paper Misfeed in the Finisher Hole Punching Unit 1 Raise the Paper Guide and remove the misfed paper 2 Lift the Release Lever and move the Finisher away from the copier 3 Remove...

Page 189: ...ng Unit Service and Supplies 7 37 4 Open the Cover of the Hole Punching Unit 5 Rotate the blue knob to locate the arrow within shaded area on the label Under this condition the punching pins are raise...

Page 190: ...Paper Misfeed in the Finisher Hole Punching Unit Service and Supplies 7 38 6 Open the Upper Cover of the Finisher 7 Lifting up the Lever 1 or Levers 2 and 3 remove the misfed paper...

Page 191: ...Paper Misfeed in the Finisher Hole Punching Unit Service and Supplies 7 39...

Page 192: ...Paper Misfeed in the Saddle Stitcher 1 Push the Finisher Release Lever to release the optional finisher from the copier and move the Finisher away from the copier 2 Open the Entrance Door of the Sadd...

Page 193: ...Paper Misfeed in the Saddle Stitcher Service and Supplies 7 41 3 Open the Lower Front Door of the Finisher 4 Turn the right hand knob counterclockwise...

Page 194: ...Paper Misfeed in the Saddle Stitcher Service and Supplies 7 42 5 Push in on the left hand knob turn it clockwise 6 Remove the misfed paper from the exit side of the Saddle Stitcher...

Page 195: ...aper Misfeed in the Saddle Stitcher Service and Supplies 7 43 7 Open the Exit Door of the Saddle Stitcher and remove any misfed paper 8 Close all the Doors and move the Finisher back against the copie...

Page 196: ...ving Original Misfeeds Original Misfeeds in the RADF 1 Open the Feed Side Cover of the Document Feeder 2 Remove the misfed original When a misfeed occurs in the RADF the CHECK ORIGINAL symbol flashes...

Page 197: ...e RADF and remove any misfed originals If an original is left on the Exposure Glass remove it 4 Lower the RADF 5 If the original is misfed in the exit section of the RADF open the Exit Side Cover and...

Page 198: ...Staple Cartridge for Finisher 1 Open the Upper Finisher Door When the Set Staple Cartridge message is displayed follow these instructions to refill the Staple Cartridge On the inside of the front cov...

Page 199: ...rtridges Service and Supplies 7 47 2 Turn the blue locking lever 90 degrees to the left and slide the Stapler Unit out until it stops 3 The Stapler Unit is hinged tilt the Stapler Unit outward to its...

Page 200: ...ple Cartridges Service and Supplies 7 48 4 Grasp the Staple Cartridge by the sides and pull the Staple Cartridge out from the Stapler Unit 5 Push down on the blue Upper Lever and remove the empty stap...

Page 201: ...Replacing Staple Cartridges Service and Supplies 7 49 6 Set a new staple cartridge refill in the Stapler Unit until you hear a click 7 Pull out the seal which is holding the staples...

Page 202: ...apler Unit until a catches 9 Tilt the Stapler Unit down and push it back into the Finisher 10 Turn the blue locking lever 90 degrees to the right to lock the Stapler Unit in place 11 Be sure the Finis...

Page 203: ...51 12 Close the Upper Finisher Door 13 Once the Finisher Door is closed the machine automatically feeds a sheet of paper and makes a series of staples in the sheet to test the Stapler Check to see the...

Page 204: ...Staple Cartridge for Saddle Stitcher Service and Supplies 7 52 Staple Cartridge for Saddle Stitcher 1 Open the Lower Door of the Finisher 2 Pull out the Saddle Stitch Unit until it stops...

Page 205: ...dle Stapler towards the front and rotate it 90 degrees clockwise 4 Remove the empty Staple Cartridge by pulling straight up on the Staple Cartridge 5 Remove the shipping cover from the feed end of the...

Page 206: ...d to the copier and Ledger or Letter R sized paper is selected 9 Close the Lower Door of the Finisher 10 Once the Finisher Door is closed the machine automatically feeds a sheet of paper and makes a s...

Page 207: ...Finisher Door and about ten seconds later open it again The stapler unit moves to the home position CAUTION Do not pull out the Stapler Unit without performing the above procedure or the Stapler Unit...

Page 208: ...ddle Stitcher Service and Supplies 7 56 3 Turn the blue locking lever 90 degrees to the left and slide the Stapler Unit out until it stops 4 The Stapler Unit is hinged Tilt the Stapler Unit outward to...

Page 209: ...Saddle Stitcher Service and Supplies 7 57 5 Grasp the Staple Cartridge by the sides and pull the Staple Cartridge out from the Stapler Unit 6 Pull out the Staple Guide with knob 2 while pushing in on...

Page 210: ...Staple Cartridge for Saddle Stitcher Service and Supplies 7 58 7 Remove the jammed staples with a pointed object 8 Push the Staple Guide back into its original position...

Page 211: ...rn the blue locking lever 90 degrees to the right to lock the Stapler Unit in place 11 Close the Upper Finisher Door 12 Once the Finisher Door is closed the machine automatically feeds a sheet of pape...

Page 212: ...Staple Cartridge for Saddle Stitcher Service and Supplies 7 60 Staple Cartridge for Saddle Stitcher 1 Open the Lower Door of the Finisher 2 Pull out the Saddle Stitch Unit until it stops...

Page 213: ...r Saddle Stitcher Service and Supplies 7 61 3 Pull out on the grip of the Saddle Stapler towards the front and rotate it 90 degrees clockwise 4 Remove the Staple Cartridge by pulling straight up on th...

Page 214: ...Staple Cartridge for Saddle Stitcher Service and Supplies 7 62 5 Push down on the blue lever 1 and pull up on lever 2 6 Remove the jammed staples 1 2...

Page 215: ...to both Staple Cartridges 8 Return the Saddle Stapler and Saddle Stitch Unit to their previous position 9 Once the Finisher Door is closed the machine automatically feeds a sheet of paper and makes a...

Page 216: ...Open the Hole Punch Cover 2 Slide out the container containing chad and empty the container 3 Return the container to its original position 4 Close the Hole Punch Cover When chad from the hole punch f...

Page 217: ...an dirty covers on the copier with a cloth moistened with a neutral detergent Then wipe off the detergent completely using a dry cloth Cleaning the Exposure Glass and RADF Clean the Exposure Glass and...

Page 218: ...Has the copier started N O Call for service Are the Front Doors firmly closed N O Close the Front Doors Has the copier started N O Call for service Is the Exit Door closed N O Close the Exit Door Has...

Page 219: ...Photo key or set the exposure properly in the manual exposure mode Are copied images clear N O Call for service QUESTION IF THEN NEXT IF THEN Is the exposure set properly N O Touch the AUTO Text Photo...

Page 220: ...Simple Troubleshooting 7 68 Service and Supplies...

Page 221: ...Chapter 8 Specifications...

Page 222: ...ation General Specifications on page 8 1 Finisher optional on page 8 4 Saddle Stitch Unit on page 8 8 Agency Certifications on page 8 10 Paper Sizes on page 8 12 Enlargement and Reduction Percentages...

Page 223: ...eat fusing and pressure roller Resolution 600 dpi x 600 dpi 2400 x 600 dpi with smoothing Exposure Glass Stationary original exposure type Warm up Time 7 minutes Originals Types Sheets books and three...

Page 224: ...5 x 8 5 Bypass non standard size Vertical 4 0 to 11 7 Horizontal 6 0 to 17 0 Duplex 11 0 x 17 0 to Statement R LCC 8 5 x 11 0 Copy Paper Weight Paper Trays 16 to 24 lb Bypass 16 to 34 lb Duplex 17 to...

Page 225: ...Zoom 25 to 400 in 1 steps Three preset keys 25 100 400 Exposure Control Automatic control and manually selectable in 11 steps Continuous Copy Counts 1 to 999 copies Total Copy Counter Mechanical tota...

Page 226: ...g Orientation Face up Stacking Size Ledger Legal Letter Letter R Statement R Paper Weight 17 to 24 lb 80 g m2 Paper Sizes Small Sizes Letter Statement R A4 B5 A5 R Large Sizes Letter R Legal Ledger Co...

Page 227: ...aple Sort max 30 sets regardless of sheet count Small Size Large Size Tray 1 2 750 sheets or stack height of 4 3 inches Tray 1 2 300 sheets or stack height of 2 9 inches Stacking Capacity Non Cascade...

Page 228: ...ets or stack height of 3 6 inches Tray 1 2 425 sheets or stack height of 2 5 inches Stacking Capacity Cascade Mixed Mode Mixed modes combination of Non Sort Staple and Non Staple jobs Tray 1 2 127 she...

Page 229: ...al letter letter R 1 point diagonal rear ledger letter 1 point rear letter R legal 2 point ledger letter Paper Detection Tray 1 2 by sensor Dimensions 23 6 W x 24 2 D x 39 9 H Weight 114 8 lbs Power S...

Page 230: ...ets Fold Only Single sheet 150 sheet max stack height Staple Type Multi position for 1st and 2nd tray 2 points staple at center position for saddle stitch Staple Direction Up to Down Staple Capacity 5...

Page 231: ...Hole Punch Unit Specifications 8 9 Hole Punch Unit Item Description Holes quantity Selectable 2 holes LG LT R COMP 3 holes LD LT Hole size 8 mm...

Page 232: ...use interference in which case the user will be required to take whatever measures may be required to correct the interference at their own expense Canada RFI This digital apparatus does not exceed th...

Page 233: ...nc has determined Lanier s 555 5565 5580 copier meets the Energy Star guidelines for energy efficiency Energy Star guidelines require that all Energy Star copiers have an OFF MODE feature that automat...

Page 234: ...216 x 356mm 257 x 356mm 279 x 432mm 216 x 330mm UK FOOLSCAP 8 x 13 inches 203 x 330mm EUROPE FOLIO 8 25 x 14 inches 210 x 356mm DIN A0 841 x 1189mm A1 594 x 841mm A2 420 x 594mm A3 297 x 420mm A4 210...

Page 235: ...Paper Sizes Specifications 8 13 B FORMAT ISO 216 JAPAN ISO 216 JAPAN ISO 216 JAPAN B4 353 x 250mm B4 364 x 257mm B5 250 x 176mm B5 257 x 182mm B6 176 x 125mm B6 182 x 129mm Type Paper Size Size...

Page 236: ...Percentages Specifications 8 14 Enlargement and Reduction Percentages Type Inch Version Metric Version Enlargement 400 400 200 200 155 141 129 122 121 115 Full Size 100 100 Reduction 93 93 85 87 78 8...

Page 237: ...Glossary...

Page 238: ...osure Glass The Book Original features can be used to make the book copying process more efficient Bypass Feed Tray A Tray used to feed single sheets of special or transparent stock into the copier to...

Page 239: ...ies requested Copy Paper See paper Copy Quantity This part of a Touch Screen shows the requested number of copies Copy Size Keys Keys used to input the desired size of the copy Darker Copies This term...

Page 240: ...art of an original during the Editing process Documents The set of pages either placed on the Exposure Glass or in the ADF to be copied Drum Assembly The unit located inside the copier that receives t...

Page 241: ...flects off the original travels through the optics and exposes the Drum Exposure Pad A Pad located on the bottom side of a Document Cover used to hold an original in place on the Exposure Glass during...

Page 242: ...e settings displayed by a copier when it comes to the READY condition These settings may be either the Factory Default settings or Factory Default settings that have been modified permanently by eithe...

Page 243: ...t can only accommodate one size at a time Paper Weight Throughout the Operator Guide there are references to 20 lb or 24 lb paper This refers to a standard measuring technique A certain number of shee...

Page 244: ...ay that opens from the side of the machine usually just above the LCC or Primary Paper Tray and is designed to feed a stack of paper This tray can be used to feed paper or transparency stock that woul...

Page 245: ...s it to the Document Exit Area of the Document Feeder To keep it operating correctly and to prevent the buildup of dirt which can cause dirty copies it must be cleaned periodically User Codes An optio...

Page 246: ...Copier Terms 9 Glossary...

Page 247: ...Index...

Page 248: ...reduction enlargement 1 3 Copy quantities 3 3 Copy size and original size selection 3 17 Copying making basic copy 1 2 Copying methods 2 ON 1 and 4 ON 1 4 26 book original 4 1 bypass copying 4 3 cove...

Page 249: ...5 3 K Key copy counter 5 10 L Language changing 5 29 in display 5 29 Lightness mode 3 11 M Magazine sort 6 12 Making copies 1 1 Masking identify area to edit 4 43 Mirror image 4 40 Misfeed bypass tray...

Page 250: ...ndard paper sizes 8 12 Sort magazine 6 12 Specifications finisher 8 4 general 8 1 Stack feed bypass 4 3 Stack mode 6 5 Staple cartridge saddle stitcher 7 52 7 60 Staple cartridges replacing 7 46 Stapl...

Page 251: ...URSE OF DEALING OF USAGE OF TRADE The Express Warranty will not apply to drums cleaning blades fuser cleaning felts toner developer or paper or to defects of damage incurred in transportation or due t...

Page 252: ...Customer Vision Our commitment to your complete satisfaction Lanier Worldwide Inc 2300 Parklake Drive N E Atlanta GA USA 30345 your document management partner www lanier com...

Reviews: