background image

24/25  


Service software UltraAssist 

© Gyr 


6. 

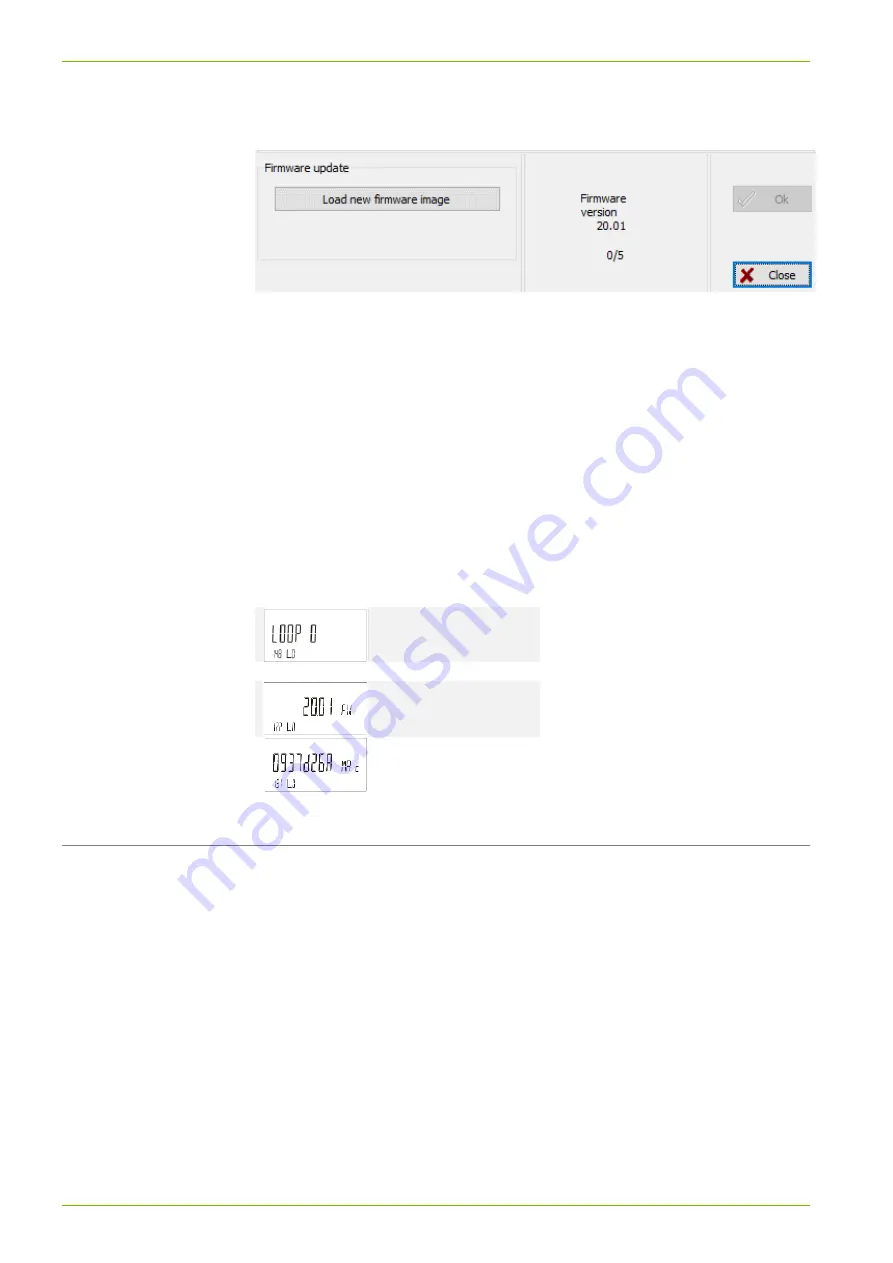
Open the following menu: PARAMETERIZATION 

→ LEGALLY 

RELEVANT PARAMETERS  

The following window appears: 


7. 

Click on "Load new firmware image". 

A dialog for selecting the firmware image file appears. 

8. 

Open the firmware image file. 

UltraAssist automatically checks the firmware image file and the 

“OK” 

button is selectable. 


9. 

To perform the firmware update, click the 

“OK” button. 

As a result, UltraAssist performs a firmware update (approximately 4 
minutes duration). 

After successfully updating the firmware, click "Close". 

10.3  Checking the actualized firmware version 

You can check the updated firmware version and the checksum in Loop 0. 


Head of the loop 


… 


Firmware version 


CRC / CMAC 


11  Service software UltraAssist 

The meter may also be parameterized in the parameterization mode using 
the optical interface via UltraAssist. 


Summary of Contents for T450

Page 1: ...Static Heat and Cooling Meter T450 Residential local and district heating ULTRAHEAT T450 ULTRACOLD T450 Service manual 32 21 101 004 a Date 22 04 2020 Landis Gyr GmbH ...

Page 2: ...on off 13 4 15 Switch unit of heat quantity 14 4 16 Change the installation location of the volume measuring part 14 4 17 Switch temperature sensor Pt100 to Pt500 15 4 18 Switch to normal operation 15 5 Torques 15 6 Power supply 15 6 1 Changing the battery 15 6 2 Dynamical calculation of battery life 16 7 Communication module 16 7 1 Connection terminals 17 7 2 Pulse output module 18 7 2 1 Installi...

Page 3: ...Contents 3 25 Landis Gyr 10 Firmware update 23 10 1 System requirements 23 10 2 Perform firmware update 23 10 3 Checking the actualized firmware version 24 11 Service software UltraAssist 24 ...

Page 4: ...of manual work relevant for the device like the adjustment maintenance or replacement of single components part of the meter Further technical support is provided by the manufacturer on request The meter s calibration relevant security symbols must not be damaged or removed Otherwise the warranty and calibration validity of the meter will be invalidated 1 1 Other available documentation Operating ...

Page 5: ... the leak tightness of the system Breaking the safety marks relevant for calibration voids the warranty and the validity of the calibration Avoid contact of the meter housing with silicone oils or substances containing silicone oil Only clean the meter from the outside with a soft slightly moistened cloth Do not use spirits or cleaning agents The meter must not be energized until it has been fully...

Page 6: ...her things govern the labelling and packaging of hazardous goods Do not open the batteries Do not bring batteries into contact with water or expose to temperatures exceeding 80 C The meter has no lightning protection Ensure lightning protection via the house installation ...

Page 7: ...cessible after removing the cover 3 Parameterization Note The parameterization of the meter may have an impact on the battery life Note Alternatively the meter can be parameterized in the parametrization mode via the optical interface using UltraAssist 3 1 Calling the parameterization function Proceed as follows to parameterize the meter Press the service button for 3 seconds until the LCD display...

Page 8: ...ter mid month set date DD Enter options day 01 31 Switch time of set date Options 24 end of day 00 start of day Enter date DD MM JJ Entry options day 01 31 month 01 12 year 00 99 Enter time hh mm ss Entry options Hour 00 23 Minute 00 59 Second 00 59 Enter property number Entry options per digit 0 9 Enter M Bus secondary address Entry options per digit 0 9 Enter M Bus primary address Entry options ...

Page 9: ...able parameters 9 25 Landis Gyr Switch temperature sensor Pt100 to Pt500 Only displayed when activated in the factory Switch to normal operation 4 1 Delete error F8 4 2 Delete maxima minima and average values ...

Page 10: ... note that no digit may flash any more 4 5 Enter monthly set date To enter the monthly set date proceed as follows 1 Press button 1 repeatedly until the LCD displays 2 Press button 2 repeatedly until the digit to be modified begins to flash 3 Press button 1 repeatedly until the required value is being displayed on the LCD Step 2 and 3 can be optionally repeated as often as needed until the require...

Page 11: ... the digit to be modified begins to flash 3 Press button 1 repeatedly until the required value is being displayed on the LCD Step 2 and 3 can be optionally repeated as often as needed until the required value is being indicated 4 Press button 1 to finally confirm the entered value Please note that no digit may flash any more 4 9 Enter time To enter the time proceed as follows 1 Press button 1 repe...

Page 12: ...ress proceed as follows 1 Press button 1 repeatedly until the LCD displays 2 Press button 2 repeatedly until the digit to be modified begins to flash 3 Press button 1 repeatedly until the required value is being displayed on the LCD You can repeat steps 2 and 3 as many times as you want until the required value appears 4 To confirm the entered value press the button 1 making sure that no more digi...

Page 13: ...Adjustable parameters 13 25 Landis Gyr 4 13 Test communication function 4 14 Switch radio module on off ...

Page 14: ...e parameters Landis Gyr 4 15 Switch unit of heat quantity 4 16 Change the installation location of the volume measuring part Note If necessary adjust the temperature sensors according to the installation requirements ...

Page 15: ...Power supply Caution Do not open the batteries Do not bring batteries into contact with water or expose to temperatures exceeding 80 C Dispose of used batteries at suitable collection points 6 1 Changing the battery Note When replacing the battery ensure that the battery service life is longer than the planned life cycle of the meter Note Only batteries approved by the manufacturer may be installe...

Page 16: ...ing to the polarity mark Observe the connection sequence Always start with the labelled battery position 1 Close the battery cover by tightening the screw If necessary attach a user lock to the battery cover Set the number of new batteries via UltraAssist 6 2 Dynamical calculation of battery life Note Note that after changing the batteries the number of batteries must be parameterized via UltraAss...

Page 17: ...onnection of the external cables to the modules Stripping length 6 mm Connection capacity rigid or flexible 0 14 1 5 mm flexible with wire and ferrule with plastic sleeve 0 25 1 5 mm flexible with wire end ferrule without plastic sleeve 0 25 1 0 mm conductor sizes 26 14 AWG Recommended screwdriver 0 6 3 5 mm Tightening torque 0 35 0 4 Nm ...

Page 18: ...can be output The pulse duration is identical on both channels Standard pulses are set to 100 ms pulse duration and 1 kWh 1 MJ or 10 l High definition pulses are set to 10 ms pulse duration and 0 1 kWh 0 1 MJ or 1 l 7 2 1 Installing the communication Proceed as follows to install a communication module If necessary open the housing cover by loosening the screw Run the cable from the outside throug...

Page 19: ...he testing of the module in chapter 4 13 Note Each further pressing of button 2 causes a pulse forces a pulse on both channels 7 3 M Bus module Note The telegram content of the readout can be parameterized via UltraAssist The M Bus module T45 MBUS enables the meter to communicate with a M Bus center in order to transmit measured values 7 3 1 Installing the communication Proceed as follows to insta...

Page 20: ... or modification is possible at any time Note Touch the module only on its plastic holder Note To connect an external cable open the cable sleeves so that they tightly enclose the cable Proceed as follows to install a communication module If necessary open the housing cover by loosening the screw First attach the contact surfaces of the module to the module slot Gently push the module in Close the...

Page 21: ... chapter Fehler Verweisquelle konnte nicht gefunden werden 7 4 5 Testing of the module The function in parameter setting mode of the meter forces a radio transmission Please find more detailed information on the testing of the transmission mode in chapter 4 13 Note Each further pressing of button 2 updates the send data of the data telegram by transmission from the meter and sends a radio telegram...

Page 22: ...r meters for activation Please note the following points for activation of pulse inputs The primary addresses and the secondary addresses or the device numbers must each be individual By assigning the addresses the pulse inputs can be queried individually with their own data frame The current volume meter reading of the pulse inputs is also contained in the standard data frame 9 Replacement of det...

Page 23: ...ter Torques and press the housing cover tightly into place If the LCD displays you can reset this error message via the parameterization menu See chapter 4 1 10 Firmware update 10 1 System requirements In order to perform the firmware update you need the following tools 1 UltraAssist software as of version 2 07 00 2 Optical head 3 Firmware image file 10 2 Perform firmware update 1 Open the housing...

Page 24: ...e and the OK button is selectable 9 To perform the firmware update click the OK button As a result UltraAssist performs a firmware update approximately 4 minutes duration After successfully updating the firmware click Close 10 3 Checking the actualized firmware version You can check the updated firmware version and the checksum in Loop 0 Head of the loop Firmware version CRC CMAC 11 Service softwa...

Page 25: ...Contact Landis Gyr GmbH Humboldtstraße 64 90459 Nürnberg Germany www landisgyr eu ...

Reviews: