background image


21 


6.2.2 

Cooling Circuit Connection and Filling 


Risk of damage by using improper cooling hoses! 

This may lead to damage to persons, damage to the unit or corrosion damage! 

  When choosing cooling hoses pay attention to sufficient burst strength and compatibility with coolant! 

  Only use cooling hoses without any signs of damage! 

  In case pure water is being used as coolant, ensure that non-transparent hoses are used to prevent the 

growth of algae in the water. Otherwise appropriate additives must be used. 

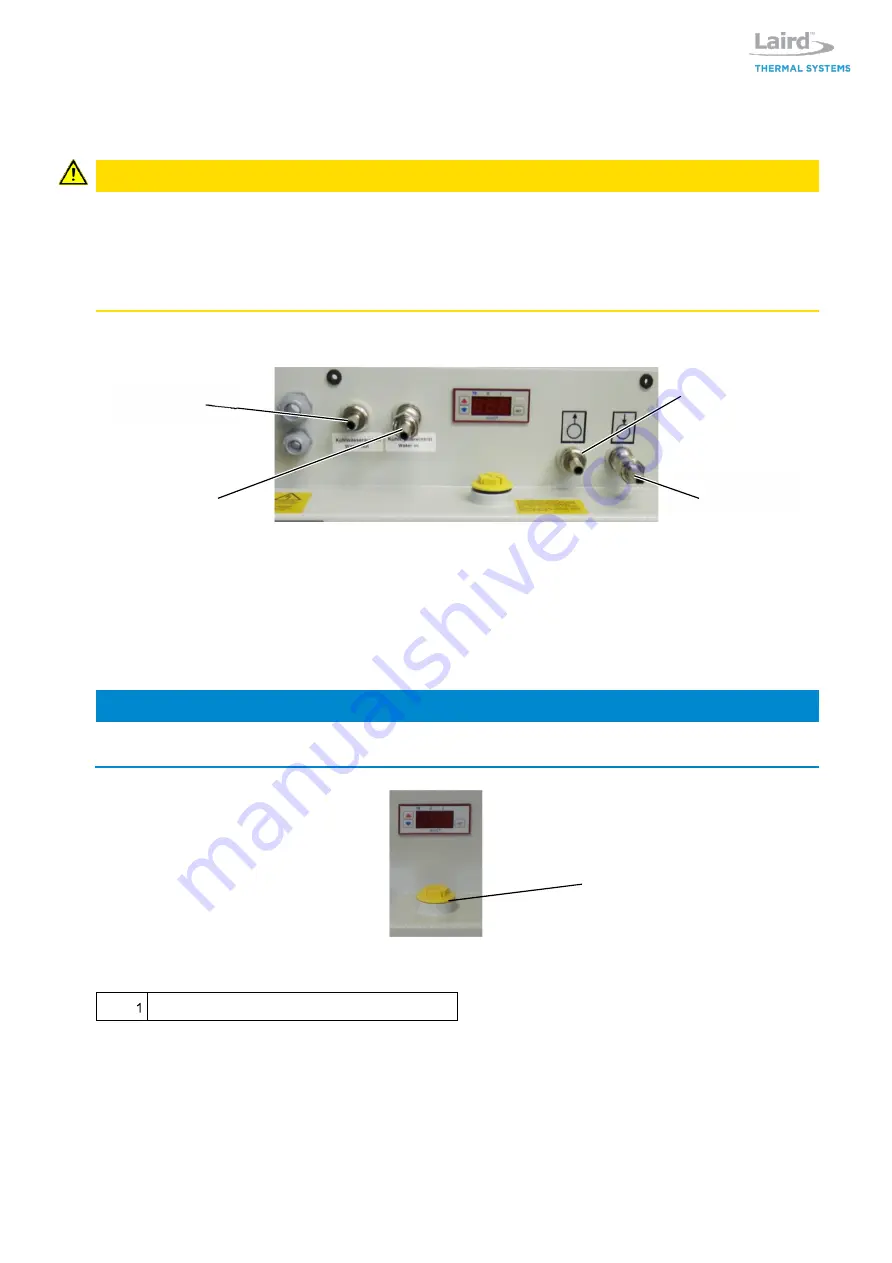
The cooling hoses with an internal diameter of 9 mm are connected to the unit by means of hose nipples. 

Water outlet and water inlet are indicated with respective symbols. 


Fig. 8: 

Labelling of water inlet and water outlet 

1) 

Connect a suitable hose to the hose nipples for cooling water inlet and cooling water outlet and secure it 

with a clamp, respectively. 

2) 

Connect a suitable hose to the hose nipples for coolant inlet and coolant outlet and secure it with a 

clamp, respectively. 

3) 

Connect the hoses to the corresponding nipples of the device to be cooled. 


When connecting the cooling hoses pay attention to flow direction. Follow the documentation released by 

the manufacturer of the device to be cooled. 


Fig. 9: 

Cap of coolant container 


CAUTION 

Water supply 

outlet 

Coolant outlet 

Water supply 

inlet 

Coolant inlet 

PLEASE NOTE


Cap (version for transport is shown) 


Summary of Contents for WW 3001

Page 1: ...1 Water Water Cooler WW 3001 Specification and User Manual Version 2 1 ...

Page 2: ...ge without notice Laird assumes no responsibility and disclaims all liability for losses or damages resulting from use of or reliance on this information All Laird products are sold subject to the Laird Terms and Conditions of sale including Laird s limited warranty in effect from time to time a copy of which will be furnished upon request Copyright 2019 2021 Laird Thermal Systems Inc All rights r...

Page 3: ...abels 13 3 5 In Case of Accidents 14 4 Product Description 15 4 1 Intended Use 15 4 2 Non Conformity with the Intended Use 15 4 3 Unit Components 16 4 3 1 Functional principle 16 4 4 Specifications 17 4 5 Setting up Requirements 18 4 5 1 Installation Location 18 4 5 2 Environmental Conditions 18 4 5 3 Infrastructure 18 5 Transport 19 5 1 Safety Indications for Transportation and Setting up 19 5 2 ...

Page 4: ...le Shooting 29 9 Maintenance and Cleaning 30 9 1 Maintenance Schedule 30 9 2 Refilling of Coolant 30 9 3 Cleaning of Strainer 31 9 4 Cleaning of Unit Body 32 10 Repair 33 10 1 Safety Instuctions on Repair 33 10 2 Repair Procedures 33 11 Dismounting Disposal Storage 34 11 1 Temporary Placing out of Operation 34 11 2 Re packaging of the unit 35 11 3 Storing the Unit 35 11 4 Disposal 35 11 5 Disposal...

Page 5: ...5 Revision History Date Index Reason for Change Name Page 24 Apr 2014 1 0 Edom Gimm 29 jun 2017 2 0 Update format H Sharef All 08 Oct 2021 2 1 Update format A Chomat All ...

Page 6: ... Inaccurate installation putting into service operation repair or maintenance of the product by people that are not fully authorized Use of the product despite of defect wrongly implemented or non functional safety devices or protective gear Unauthorized or forbidden modifications by the user concerning the electrical equipment of the unit Unauthorized or forbidden modifications by the user concer...

Page 7: ...se use the contact information given below Always communicate the following Your name and address Name of contact at your address Product data as on identification plate Type of unit serial number and year of manufacture Visit the website for contact details www lairdthermal com ...

Page 8: ...icle number 1104 00 Table 1 Unit specifications 2 2 Identification Plate The identification plate is attached to the front side of the unit see picture 1 Fig 1 Position of identification plate Fig 2 Unit specific identification plate 1 Unit type 2 Date of manufacture 3 Article number 4 Serial number 5 Electrical specification Identification plate ...

Page 9: ... lead to reversible injuries or to damage to property 3 2 Safety Symbols In this Operation Manual concrete safety instructions are given in order to point out unpreventable residual risks when operating the device These risks include danger for Human beings The device and other equipment The environment The safety symbols used in this manual are indicated below The main reason for their use is to ...

Page 10: ...s can be prevented by safety conscious and anticipatory behavior of staff Everybody working with the unit should keep the following in mind Make this Operation Manual available for everybody at the operational location of the unit in a complete and perfectly readable state Use the unit exclusively for what it was intended The unit must be operational and error free Check the condition of the unit ...

Page 11: ...ding the control elements of the unit can have an influence on the safe operation All intended changes must be authorized by the manufacturer After implementation of any change the operativeness of the safeguards must be verified No unauthorized changes on the unit are allowed All intended changes must be authorized by the manufacturer 3 3 3 Environmental Issues Environmentally conscious and antic...

Page 12: ...1 Safety and Signaling Equipment included in the Unit The unit is equipped with safety devices at critical spots see Fig 2 Water throughput is controlled by a flow switch that must be integrated in the potential free safety circuit of the device to be cooled The maximum temperature of the cooling circuit is controlled by a fixed thermostat with an opener contact that must be integrated into the sa...

Page 13: ...sible after removing the back cover For opening closing of the fasteners an AF8 wrench is required 2 Fig 4 Guards 1 Unit body 2 Access bushing for electric terminal block 3 Removable back cover 3 4 3 Caution Labels Danger spots on the unit are indicated in correspondence to German safety regulation BGV A8 Sicherheits und Gesundheitsschutzkennzeichnung am Arbeitsplatz Caution labels on the unit mus...

Page 14: ...of Accidents Should you or another person be injured when working with the unit Stay calm Render first aid Call the company first aider without exception Hint on electrical hazardous area at the back of the unit body ...

Page 15: ...ant with the intended use hazardous situations may occur Operation of the unit is not allowed under the following conditions The unit is used for a purpose other than the one it is intended for The unit or parts of it are damaged the electrical installation is not correct or the insulation is broken Protective or safety equipment is not functional or defect improperly installed or missing The unit...

Page 16: ...er glycol is driven by the pump to the device that is to be cooled and back via the return flow The heat is transferred to the cooling water through a plate heat exchanger following the principle of opposing flows The heat is then dumped from the unit by the cooling water The coolant temperature is controlled by an electric thermostat whereas coolant throughput is controlled by a flow control devi...

Page 17: ...Throughput 5 4 lpm 4 0 bars Mains voltage 230 VAC 50 60 Hz Current draw 1 8 A Operating noise 47 dB 50 Hz 1 m distance Table 5 Performance data Environmental conditions Operating temperature 0 C 40 C Storage temperature 20 C 70 C empty Relative humidity 10 90 Table 6 Environmental conditions Settings Maximum pressure 6 0 bar 0 2 bar Flow switch off 4 0 lpm Water supply temperature 25 C Maximum tem...

Page 18: ...due to unsuitable environmental conditions Damage to the unit and corrosion damage may result and are not covered by manufacturer s liability The unit is only authorized for use in indoor environments The unit must not be stored or operated in aggressive humid environments The unit must not be stored or operated outdoor Pay attention to the environmental conditions as given in the specifications o...

Page 19: ...t the unit or expose it to impacts 5 2 Transportation of the Unit The unit is delivered packaged and shrinked in foil on a transportable pallet Leave the unit on the pallet until bringing it into service Use a forklift or jack lift for transportation to the installation location 5 3 Unpacking and Disposal of Packaging Material Remove the foil before setting up the unit Inspect the unit with regard...

Page 20: ... 1 Placement Fig 7 Minimum clearance for air entrance and air exit 1 Move the unit to its installation location as mentioned in chapter 5 2 2 Place the unit in a way that air entrance and air exit are not obstructed Wall clearance on the left side when facing the unit must not be less than 0 5 m otherwise operating capacity may be restricted In case of storage of the unit at temperatures lower tha...

Page 21: ... by means of hose nipples Water outlet and water inlet are indicated with respective symbols Fig 8 Labelling of water inlet and water outlet 1 Connect a suitable hose to the hose nipples for cooling water inlet and cooling water outlet and secure it with a clamp respectively 2 Connect a suitable hose to the hose nipples for coolant inlet and coolant outlet and secure it with a clamp respectively 3...

Page 22: ...e unit into the safety circuit of the device to be cooled will lead to the inoperativeness of the safety equipment listed in chapter 3 4 1 on page 12 All connections required must be incorporated according to the wiring diagram shown in the addendum Ensure yourself that all connected safety equipment is properly functioning All works should be carried out by expert The unit is delivered without a ...

Page 23: ... 1 Remove the cap on the coolant container 2 Switch on the unit and let it run for about 10 minutes in order to fill and vent the cooling circuit Continuously check the filling level during this procedure Lack of coolant may destroy the pump When looking into the filling plug of the coolant container the filling level must always be at least at 2 3 of the tank height 3 If required refill coolant 4...

Page 24: ...tention to the hints given in the chapter Safety indications from page 9 on 7 2 Switching on the Unit The unit is ready for switching on 1 Switch on the unit about 1 minute prior to operation of the device to be cooled using the appropriate control of that device 2 Check the compliance with the operational data according to the specifications listed on page 17 The unit is running 7 3 Switching off...

Page 25: ...tting the switching point the switch head has to be adjusted For that purpose the screw retained by red locking varnish must be released and the switching head must be moved while the throughput change is monitored by means of the equipment implemented for that purpose After setting the switching point the head fixing screw must be firmly tightened again 7 4 2 By pass Valve The by pass valve is se...

Page 26: ...ting up the hysteresis of water supply nominal value P1 The hysteresis value of P1 is set as factory default to symmetrical 1 C The value itself is stored in the internal parameter P2 of the temperature controller 1 Press the SET key for approx 1 second The display shows P0 2 Press the keys or until P1 is displayed The display shows P1 3 Press the SET key to select P1 The current temperature setti...

Page 27: ...y nominal is set to 35 C Warning signal ON is triggered at 37 5 C Warning signal OFF is triggered at 32 5 C 1 Press the SET key for approx 1 second The display shows P0 2 Use the key or until P3 is displayed The display shows P3 3 Press the SET key to select P3 The display shows the current value for P3 factory default value 35 C Set up mode is activated 4 Use the keys and to set the desired value...

Page 28: ...ion The most common reason for disruption in operation of the unit is improper maintenance Maintenance should be carried out regularly according to the maintenance intervals defined in chapter 9 on page 29 In case of disruption start with checking the following Coolant polluted Low coolant contents because of leakage evaporation or an extended cooling circuit with long hoses More help can be found...

Page 29: ...ent Pay attention to smooth bends when hoses are connected Unit properly located Clearance to wall not less than 0 5 m Is there flow in cooling circuit Flow is signaled potential free by the safety equipment of the unit and can be visualized in the range of controls of the device to be cooled Coolant in coolant container is low Check coolant level refill coolant if necessary page 23 Fan turning Co...

Page 30: ... Coolant level min at 2 3 of container Visual inspection Operating personnel Strainer Clean replace if required Every 3 months more often when coolant polluted Strainer undamaged and clean Metric AF 24 wrench cloth or vessel Operating personnel Table 10 Maintenance schedule 9 2 Refilling of Coolant Since the cooling circuit is an open circuit evaporation of coolant may occur Thus the filling level...

Page 31: ...in a circle underneath the strainer cap location 3 Remove the strainer cover using a metric AF 24 wrench 4 Take off the strainer and clean it In case of damage the strainer must be replaced 5 Remount the strainer and screw on the cover 6 Should any coolant leak from the strainer the cap must be screwed on using a little more force 7 Remount the back panel 8 Start up the unit for venting the coolin...

Page 32: ...y occur as result of a damaged paint film For cleaning the unit body only use mild cleaning agents e g dish washing detergents Use clean and lintless cloth for cleaning Regularly remove dirt from the casing of the unit to prevent corrosion damage and clogging of the air grid Pay attention that all the plates at the unit are always clean and legible CAUTION ...

Page 33: ...he LAIRD service department for repair see page 7 When warranty has expired no restrictions from the side of LAIRD exist with respect to repair work carried out by the customer as long as guarantee and warranty conditions remain untouched In any case only expert staff is authorized for doing repair work When doing repair work on the unit always be aware of the safety regulations as defined in chap...

Page 34: ...e unit from mains 2 Remove all cabling from the unit 3 Remove all hoses to and from the unit In case the coolant contains glycol it must be collected and disposed according to current regulations Fig 13 Drain with operation cap 4 Two persons shall lift the unit up and turn it over 5 Let the coolant container run empty into an appropriate vessel 6 Clean the unit The unit is placed out of operation ...

Page 35: ... found in the specification paragraph on page 17 11 4 Disposal The unit was manufactured mainly from recyclable material Make sure the components of the unit end up at a qualified company for disposal and recycling Contact LAIRD for taking back end of life units see company contact on page 7 or ask a company specialized in disposal and recycling 11 5 Disposal of Operating Materials The operating m...

Page 36: ...re parts made by manufacturers other than LAIRD Identification data concerning the unit and spare parts The type of unit and the article number can be found on the identification plate of the unit The corresponding numbers in Fig 12 as well as the part descriptions are listed in the spare part list Please direct your inquiries and orders to LAIRD contact see page 7 with the following detailed info...

Page 37: ...own Not available 5 1 Magnet valve 2108 00 6 1 Motor 230VAC 50 60Hz 2001 00 7 1 Toothed ring for coupling of pump to motor not shown 2038 00 8 1 Red operation cap yellow transport cap shown 2109 00 9 1 Flow switch 2031 00 10 1 Strainer 2081 00 11 1 Level sensor RW16 2110 00 Table 11 Spare parts Not available parts can be replaced only at manufacturer site by service technician 2 8 5 3 9 11 1 6 10 ...

Page 38: ...38 Addendum Flow scheme ...

Page 39: ...39 Wiring diagram ...

Reviews: