16
Operating
Before using your Brush, review the previous pages in
this manual on initial set-up and adjustment. In this
section, you will learn how to operate the machine.
Note that connecting the machine to an adequate
dust collection system is necessary before operating
the unit.
The Brush offers considerable control and versatility
through variable brush speed and feed rate.
Experiment with both to find the proper sander
performance for a given application. Varying the
brush speed makes the brush more or less aggressive.
Too aggressive on the brush may tend to raise the
grain or excessively round edges. Sometimes it may
be better to make two or more passes with a less
aggressive brush or setting.
The brush is rotating against the direction of feed;
therefore, the leading edges of contours will receive
more sanding than trailing edges. Stock should be
reversed on subsequent passes to sand all surfaces.
Stock may also be fed at an angle to allow more brush
penetration on the sides.
Basic Operating Procedures
After you have connected the machine to a dust
collection system, you are ready to begin to use the
Brush. The basic operating procedure for the Brush
is as follows (Fig. 10):
1.
Set depth of cut/bristle contact (page 10).
2.
Set tension rollers to type of stock being
sanded (See Tension Roller Adjustment below
and Fig. 11).
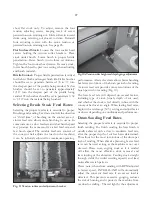
Fig. 10 Operating controls.
3.
Start sanding brush and select slow brush
speed (page 8).
4.
Start conveyor and select feed rate (page 10)
5.
Start dust collector system.
6.
Feed stock through unit.
7.
Gradually increase brush speed (RPM) until
the desired finish is achieved (Fig. 8).
To feed stock through the SuperBrush, rest and
hold the stock to be sanded on the conveyor table,
allowing the conveyor belt to carry the stock into the
brush. Once the stock is halfway through, reposition
yourself to the outfeed side of the machine to receive
and control the stock as it exits the unit.
Tension Roller Adjustment
Spring loaded infeed and outfeed Tension Rollers (Fig.
11 & page 26) are provided to maintain downward
pressure on stock being sanded and to prevent slippage
of the stock on the conveyor. When properly set, the
Tension Rollers should engage or raise up about
1/8”
to accommodate the stock being brushed.
The Tension Rollers can and must be adjusted to
accommodate flat surfaced stock vs highly contoured
surface stock. Tension Roller height is adjusted as
follows: Note: Make sure brush head is appropriate
for application and contact.
Tension Roller Pressure
The tension roller pressure is factory set for most
applications. However, the pressure of each roller can
be adjusted. Caution, too little pressure can result in
slippage of stock on conveyor belt or kick-back. Too
much tension can cause snipe when drum sanding
or not enough lift when sanding profiled material.
To increase tension, turn the tension adjusting
screw clockwise ¼ revolution at a time. To decrease
tension, turn the adjusting screw counterclockwise ¼
revolution at a time. See fig (11).
Tension Roller Pressure
The tension rollers are factory set for the most versatile
use and longest minimum length, approximately
4-
1/2” for most applications.
The rollers can be
adjusted closer to the sanding drum when sanding
Summary of Contents for SuperMax 19-38 Combo
Page 1: ...19 38 Combo Brush Drum Sander Owner s Manual Lagunatools com SKU 219383...
Page 31: ...31...
Page 34: ...34 34...
Page 36: ...36...
Page 39: ...39...


