


280
Hydraulic System
N
OTE
:
Check the tank breather cap every week to make sure that it is not clogged. If clogged, replace
it with a new one. Replacement of the breather cap should be done concomitantly with the
replacement of the hydraulic filter. However, the breather cap does not have to be changed
after the first 50 hours of truck service as it is the case for the hydraulic filter. Always open the
breather cap slowly.
Emptying Hydraulic Tank
To empty the hydraulic tank:
1.
Prepare the vehicle accordingly:
1 a.
Apply the parking brake.
1 b.
Start the engine.
1 c.
Engage the hydraulic pump.
1 d.
Retract all cylinders (packer, crusher panel, tailgate, etc.).
1 e.
Raise the body and install the safety prop.
1 f.
Disengage the hydraulic pump.
1 g.
Stop the engine.
2.
Lock out and tag out the vehicle (see
Locking Out and Tagging Out the Vehicle
3.
Clean around the filler/breather cap and remove it.
4.
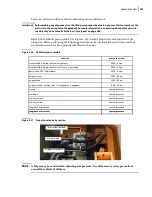
Place a clean container (minimum capacity: 60 gallons) under the drain plug.
5.
Remove the drain plug (see Figure 5
19) under the tank and let the tank drain completely.
6.
Once draining is complete, reinstall the drain plug.
Cleaning Strainer
To clean the strainer:
1.
Empty the hydraulic tank (see
2.
Remove both hose clamps from the suction hose (see Figure 5
23).
3.
Slide the hose over the pipe until it clears the shut-off valve (slide towards the front of the
vehicle).
4.
Disconnect the swivel bulkhead of the return hose (see Figure 5
25) to allow the shut-off valve
(ball valve) to turn freely when the strainer is loosened.
5.
Remove the 4 bolts that hold the flange in place (see Figure 5
24).
Caution!
Some hydraulic tanks are pressurized (3 to 5 PSI). Open the filler/breather cap slowly.
Summary of Contents for EXPERT
Page 1: ...EXPERT TM MAINTENANCE MANUAL...
Page 2: ......
Page 3: ...EXPERT MAINTENANCE MANUAL...
Page 10: ...viii Table of Contents...
Page 18: ...8 Introduction...
Page 244: ...234 General Maintenance...
Page 251: ...Lubrication 241 Figure 4 11 Glass compartment lubrication chart optional...
Page 252: ...242 Lubrication Figure 4 12 EXPERT lubrication chart...
Page 264: ...254 Lubrication...
Page 320: ...310 Hydraulic System...
Page 357: ...Troubleshooting 349...
Page 358: ...350 Troubleshooting...
Page 386: ...378 Multiplexing...