


Chapter 6: Maintaining the Nano Enclosure
Product Service 1-800-522-7658
31
Filter Leak Test
Purpose
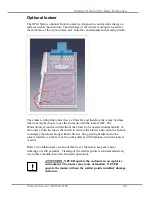
After installing the new ULPA filter, the filter should be leak checked. This test is
performed to determine the integrity of the ULPA filter, the filter housing, and the
filter mounting frames. Leak testing is to be done by a qualified technician with
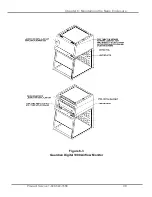
calibrated equipment. Remove the top perforated exhaust cover by using a Phillips
screwdriver to unfasten the (2) screws used to secure (2) clips. See Figure 6-1. The
filter passes the leak test at .01% or better. Reference Leak Testing and Photometer
scanning from the Institute of Environmental Services (IES-RP-CC001.3)
Apparatus
1.
An aerosol photometer ATI model 2D, 2E, 2G or equivalent
. Air
Techniques Hamilton Associates Inc., 11403 Cronridge Dr., Owings Mills,
MD 21117
2.
One aerosol generator of the Laskin nozzle(s) type
. An aerosol of mineral
oil or suitable liquid shall be created by flowing air through it. The compressed
air supplied to the generator should be adjusted to a pressure of 10± 1 psig
during operation. Air Techniques Inc. Model TDA-4A or equal. One nozzle at
10 psig is (67.5 cfm x 100ug/l)/(Vol. of air), For the 2' at 90 fpm or 130 cfm,
one nozzle @10 psig is 6,750/130 cfm = 52 ug/l. For the 3' at 90 fpm or 200
cfm, one nozzle @ 10 psig is 34 ug/l. For the 4' at 90 fpm or 265 cfm, one
nozzle at 10 psig is 26 ug/l. For the 5' at 90 fpm or 215 cfm, one nozzle at 10
psig is 31 ug/l. For the 6' at 90 fpm or 260 cfm, one nozzle at 10 psig is 26
ug/l. Note 5' and 6' use two filters.
3.
Mineral oil
(Catalog #1491400).
4.
Sampling Nozzle, Rectangular
1/2" x 3
-
1/4", Air Techniques, Inc.
Procedure
For the ATI 2G Photometer
1.
Turn on the photometer and allow it to operate for a minimum of 5 minutes.
Leave the valve in the “CLEAR” setting.
2.
Press the “ENTER” keypad. Press the “REF” keypad.
3.
The display will display “P1” for approximately 1 second, and then display a
numerical value.
4.
Using the “^” or “ν” keypads, respectively, increase or decrease the numerical
value until it equals 52 (2'), 34 (3'), 26 (4'), 31 (5'), 26 (6') for the enclosure at
90 fpm inflow velocity.
5.
Press the “ENTER” Keypad. The photometer will scan for 15 seconds, and
then the “0” keypad will flash. Press the “Enter” keypad. The unit will scan for
5 seconds, the display will read “0000,” and the unit will sound a confirming
tone.