58
Type A2 Exhaust HEPA Filter Leak Test
During this test the exhaust HEPA filter will be challenged and scanned to check for
leaks. This section describes how to access and test the exhaust HEPA filter on a Type
A2 biosafety cabinet. The aerosol generator and photometer should be prepared at this
point as described in the preparation steps listed in the previous section.
Before starting, examine the clearance between the top of the biosafety cabinet and the
ceiling or any overhead obstructions. If there is 18 inches (46 cm) or more of overhead
clearance, follow the procedure below to hinge the exhaust cover open. If there is not
enough clearance, remove the exhaust cover altogether.
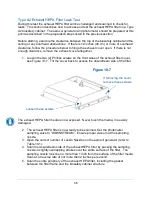
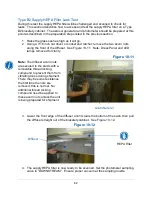
1. Loosen the two (2) Phillips screws on the front sides of the exhaust filter cover,
see Figure 10-7. Tilt the cover back to access the downstream side of the filter.
The exhaust HEPA filter media is now exposed. Never touch the media, it is easily
damaged.
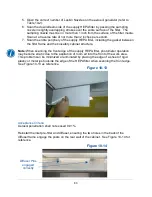
2. The exhaust HEPA filter is now ready to be scanned. Set the photometer
sampling valve to “DOWNSTREAM”. Ensure proper vacuum at the sampling
nozzle.
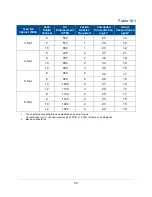
3. Open the correct number of Laskin Nozzles on the aerosol generator (refer to
Table 10-1).
4. Scan the downstream side of the exhaust HEPA filter by passing the sampling
nozzle in slightly overlapping strokes over the entire surface of the filter. The
sampling nozzle must be no more than 1 inch from the surface of the filter media.
Scan at a traverse rate of not more than 2 inches per second.
5. Scan the entire periphery of the exhaust HEPA filter, including the gasket
between the filter frame and the biosafety cabinet structure.
Figure 10-7
Loosen these screws
If removing the cover,
remove these screws
Summary of Contents for Logic+ A2
Page 149: ...149 208 240V...
Page 151: ...151 Blower only will not start...
Page 152: ...152 Lights only will not illuminate...
Page 153: ...153 UV Light will not illuminate...
Page 154: ...154 Airflow Alert activating...
Page 155: ...155 Filter Life Gauge not at 100 when new...
Page 156: ...156 Contamination in the work area...
Page 200: ...200 Figure 23 4 1 2 4 3 5 7 6 8 8...
Page 201: ...201 END OF 3849920 Figure 23 5 9 10 11 12 13...


