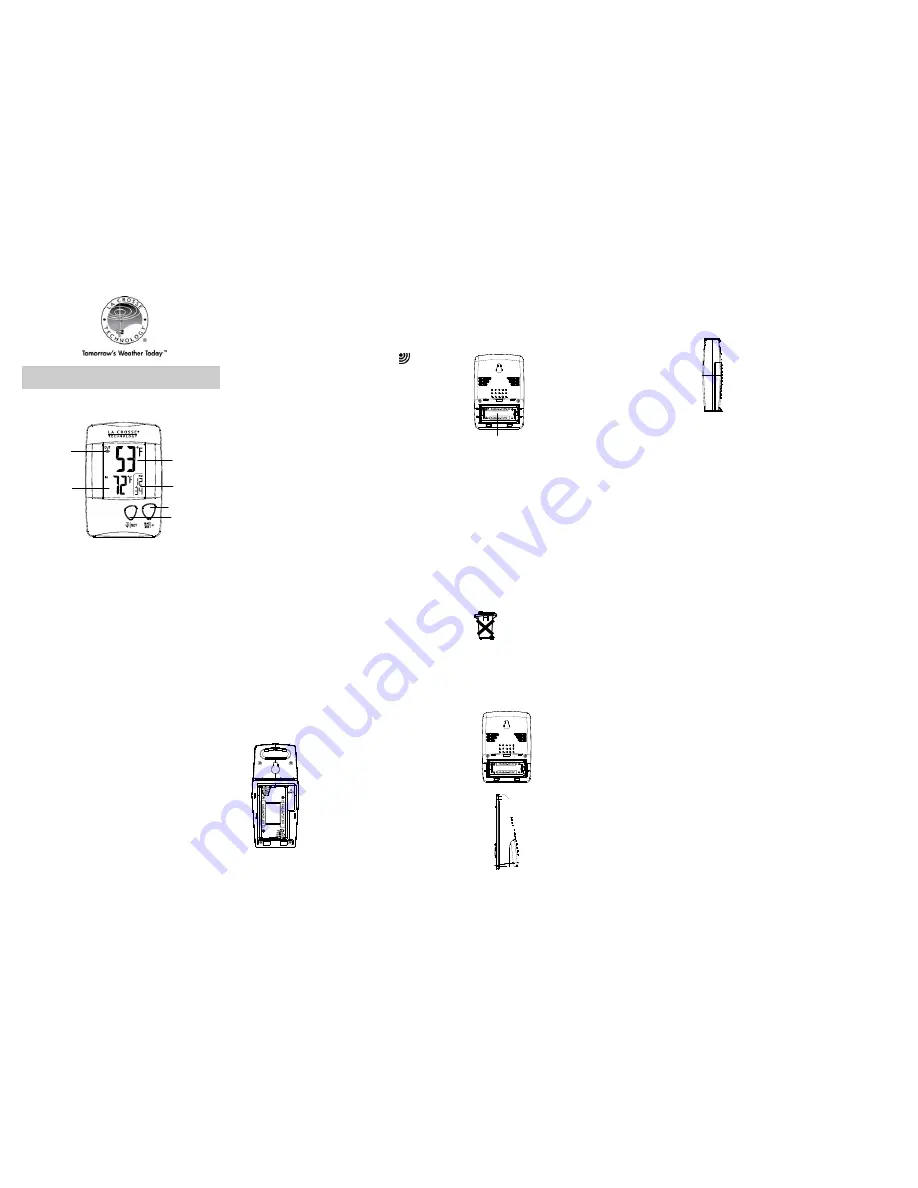
Battery
Compartment
WS-9006U
Wireless Temperature Station
Quick setup manual
FEATURES:
Four digit time display
12-hour or 24-hour selectable time
Indoor temperature (°F or °C)
Outdoor temperature (°F or °C)
Minimum and Maximum temperature
Four level RF strength indicator
Wall hanging or free standing
Low battery indicator for receiver and transmitter
100 foot wireless transmission range (open air)
SET UP:
IMPORTANT
:
Do not mix old and new batteries.
NOTE: This temperature station can receive one
transmitter only.
First, insert fresh alkaline batteries into the TX43U
transmitter, observing the correct polarity (see
marking inside battery compartment). Keep
transmitter 5-10 feet from the temperature station.
Within 30 seconds of powering up the transmitter,
insert batteries into the Temperature Station,
observing the correct polarity (see marking inside
battery compartment). Once the batteries are in
place, all segments of the LCD will light up briefly.
Following the indoor temperature will be displayed. If
the indoor temperature is not shown in the LCD after
60 seconds, remove the batteries and wait for at least
60 seconds before reinserting them. Once the indoor
data is displayed you may proceed to the next step.
After the batteries are inserted, the Temperature
Station will start receiving outdoor temp data from the
transmitter. The outdoor temperature should then be
displayed on the Temperature station. If this does not
happen after 2 minutes, remove the batteries from
both units and start again from the beginning.
In order to ensure sufficient 433 MHz transmission,
the outdoor transmitter should be placed a distance of
no more than 100 feet (30 meters) from the
Temperature Station and the transmitter.
TEMPERATURE SELECTION:
FAHRENHEIT/CELSIUS:
Press and release the CF/SET
button once to switch from Fahrenheit to Celsius.
FOUR LEVEL RF INDICATOR:
The temperature station
will indicate strength of signal reception from the outdoor
transmitter by the number of bars on the RF
indicator
icon.
4-bars
: Shows after initial set up and stays when reception
is at full strength.
3-bars
: Indicates one reception failure from the outdoor
transmitter.
2-bars
: Indicates two reception failures from the outdoor
transmitter.
1-bar
: Indicates three reception failures from the outdoor
transmitter.
0-bars
: Indicates four reception failures from the outdoor
transmitter.
The antenna symbol will flash on initial set while searching
for the signal. If it fails to receive a signal after 63 minutes
the temperature station will display dashes (“--.-“). The
temperature station will search again for a signal for 3
minutes every next hour.
SET TIME:
12/24-HOUR TIME
: Hold the CF/SET button until
12hr or 24hr flashes in the lower right hand corner.
Press and release the MIX/MAX/+ button to switch
between 12-hour and 24-hour time. Press the
CF/SET button once to continue.
HOUR:
The Hour will flash. Press and release the
MIX/MAX/+ button to change the hour. Press the
CF/SET button once to continue.
MINUTES
: The minutes will flash. Press and release
the MIX/MAX/+ button to change the minutes.
NOTE
: Hold the MIX/MAX/+ button to move quickly
through the numbers. Press CF/SET once and you
are done.
MIN/MAX RECORDING:
VIEW MIN/MAX
: Press the MIN/MAX/+ button view
indoor and outdoor MAX, MIN and Current
temperature.
RESET MIN/MAX:
Hold the MIN/MAX/+ button for 3
seconds to reset all MIN/MAX readings to current
temperatures.
INSTALL AND REPLACE BATTERIES IN THE
TEMPERATURE TRANSMITTER
The Temperature transmitter uses 2 x
AA, IEC LR6, 1.5V batteries. When
batteries will need to be replaced, the
low battery icon will appear on the LCD
in front of the outdoor temperature. To
install and replace the batteries, please
follow the steps below:
1.
Remove the battery compartment
cover. (Slide to the bottom, and
then lift straight off).
2.
Insert the batteries, observing the
correct polarity (see marking).
3.
Replace the battery cover to the
unit.
NOTE:
In the event of changing batteries in any of the units, all
units need to be reset by following the set up procedures.
This is because the transmitter at start-up assigns a
random security code and this code must be received and
stored by the Temperature Station in the first few minutes
of power supplying.
INSTALL AND REPLACE BATTERIES IN THE
TEMPERATURE STATION
The Temperature Station uses 2 x
AAA, IEC LR3 1.5V batteries. When
batteries will need to be replaced, the
low battery icon will appear in front of
the indoor temperature. To install and
replace the batteries, please follow
the steps below:
1. Remove
the
battery
compartment cover.
2.
Insert batteries observing the
correct polarity (see marking).
3.
Replace battery compartment
cover.
RESET BUTTON:
The Temperature Transmitter has a RESET button. Use a
small pointed object to gently press and release to send a
signal. Follow the instructions for in SET UP regarding the
display.
NOTE
: Removing power from the transmitter and display
negates the need for the RESET button.
LOW BATTERY:
It is recommended to replace the batteries in all units every
12 months to ensure optimum accuracy of these units. A
low battery icon will display next to the outdoor
temperature when the transmitter batteries are low and
next to the indoor temperature then the batteries in the
temperature station are low.
Please participate in the preservation of the
environment. Return used batteries to an
authorised depot.
POSITIONING THE TEMPERATURE STATION:
Stand the Temperature Station on a tabletop, counter or
desk, or mount on a wall. Ensure that the Temperature
Station continuously receives the 433MHz signal from the
Sensor before mounting it in the desired location.
WALL MOUNT
1.
Install a mounting screw (not
included) into a wall—leaving
approximately 3/16 of an inch
(5mm) extended from the wall.
2.
Place the Temperature Station
onto the screw, using the
hanging hole on the backside.
Gently pull the Temperature
Station down to lock into
place.
NOTE:
Always ensure that the
Temperature Station locks onto the
screw before releasing.
TABLE STAND
: The Temperature
Station has a wide base to stand on
a desk or table.
POSITIONING THE REMOTE TEMPERATURE
TRANSMITTER:
The remote temperature transmitter can be placed onto
any flat surface using the wide base or wall mounted using
the hole on the back of the sensor. Best location is under
the eave (12-18 inches) on the North side of
the home.
WALL MOUNT:
1.
Install a mounting screw (not included)
into a wall—leaving approximately 3/16
of an inch (5mm) extended from the
wall.
2.
Place the temperature transmitter onto
the screw, using the hanging hole on the
backside. Gently pull the transmitter
down to lock into place
NOTE:
Always ensure that the transmitter locks onto the
screw before releasing.
TABLE STAND
: This is not recommended as the
transmitter may be blown over and damaged.
NOTE
:
The mounting surface can affect the transmission
range. If, for instance, the unit is attached to a piece of
metal, it may reduce the transmitting range. For this
reason, we recommend not to place the unit on any metal
surfaces or in any position where a large metal or highly
polished surface is in the immediate vicinity (garage doors,
double glazing, etc.). Before securing in place, please
ensure that the Temperature Station can receive the
433MHz signal from the temperature Transmitter at the
positions that you wish to place them.
The remote temperature transmitter should be placed
outside in a dry, shaded area. The remote temperature
transmitter has a range of 100 feet (30 meters). Keep in
mind this distance is in open air with no obstructions and
that radio waves DO NOT curve to go around objects.
Real-world transmission range will vary depending on what
is in the path of the signal. Each obstruction (roof, walls,
floors, ceilings, thick trees, etc.) will effectively cut signal
range in half.
MAINTENANCE:
Keep the temperature station in a dry place.
Do not expose the display to extreme temperatures,
vibration or shock.
Clean it with a soft damp cloth. Do not use solvents or
scouring agents.
If the unit does not work properly, change the battery.
SPECIFICATIONS:
Indoor Temperature
:
Range:
32° F to 122° F (0° C to 50° C)
Resolution:
1° F/C
Interval:
57
seconds
Outdoor Temperature
:
Range:
-22° F to 140° F (-30° C to -60° C)
Resolution:
1° F/C
Interval:
57
seconds
Power:
Receiver:
2-AAA, IEC, LR3 alkaline batteries.
Transmitter:
2-AA, IEC, LR6 alkaline batteries.
Dimensions:
Receiver:
2 ½ ” W x 1” D x 3 ¾ ” H
Transmitter:
1 ¾” W x 1” D x 4” H
RF reception
indicator
Indoor
Temperature
Outdoor
Temperature
Time
MIN/MAX/+ Button
CF / SET Button


