KVM-TEC Matrixline 2000 Fiber User Manual Download Page 8

14    |    kvm-tec

kvm-tec    |    15

2. INSTALLATION Of The exTeNder

2. INSTALLATION Of The exTeNder

2.2 MoUNtING oPtIoNs

2.2.1 MoUNtING Pads aNd RUbbER fEEt

The mounting pads and rubber feet can be used to hold the extenders in place and prevents 
them from sliding and falling.
 

to attach the mounting pads or rubber feet:

1. Remove the protection layer from the 

mounting pads

 or 

rubber feet

 (G).

2. Attach the 

mounting pads

 or 

rubber feet

 (G) to the bottom the units.

2.2.2 MoUNtING KIts (oPtIoNal)

the following mounting kits are available:  

Rack Mounting Kit RMK-F - Part No. 6130
The rack mounting kit RMK-F is for mounting kvm-tec Marixline extenders. It consists of  a19“ 

rack shelf and an alu-faceplate.

Rack Mounting Kit RMK-FN - Part No. 6131
The rack mounting kit RMK-FN is for assembling kvm-tec Matrixline extenders. It consists of 19“ 

Rack Shelf, an alu-faceplate and a power supply.

Rack Mounting Kit RMK-FRN - Part No. 6132
The rack mounting kit RMK-FRN is used to mount kvm-tec Matrixline  extenders. It is equipped 

with rack shelf, faceplate and 2 power supply units, which are summarized in a redundancy 
module.

Under Desk Mounting Kit - Part No. 6135

The Under Desk Mounting kit is for underdesk mounting of the MX extender.

Din Rail Mounting Kit - Part No. 6136

The DIN rail mounting is used for space-saving installation in control cabinets or on DIN rails. 
The attachment to the MX extenders is possible in several ways. 

2.3 INstallING thE EXtENdER

WaRNING! 

Read and understand all safety information before installing the product.

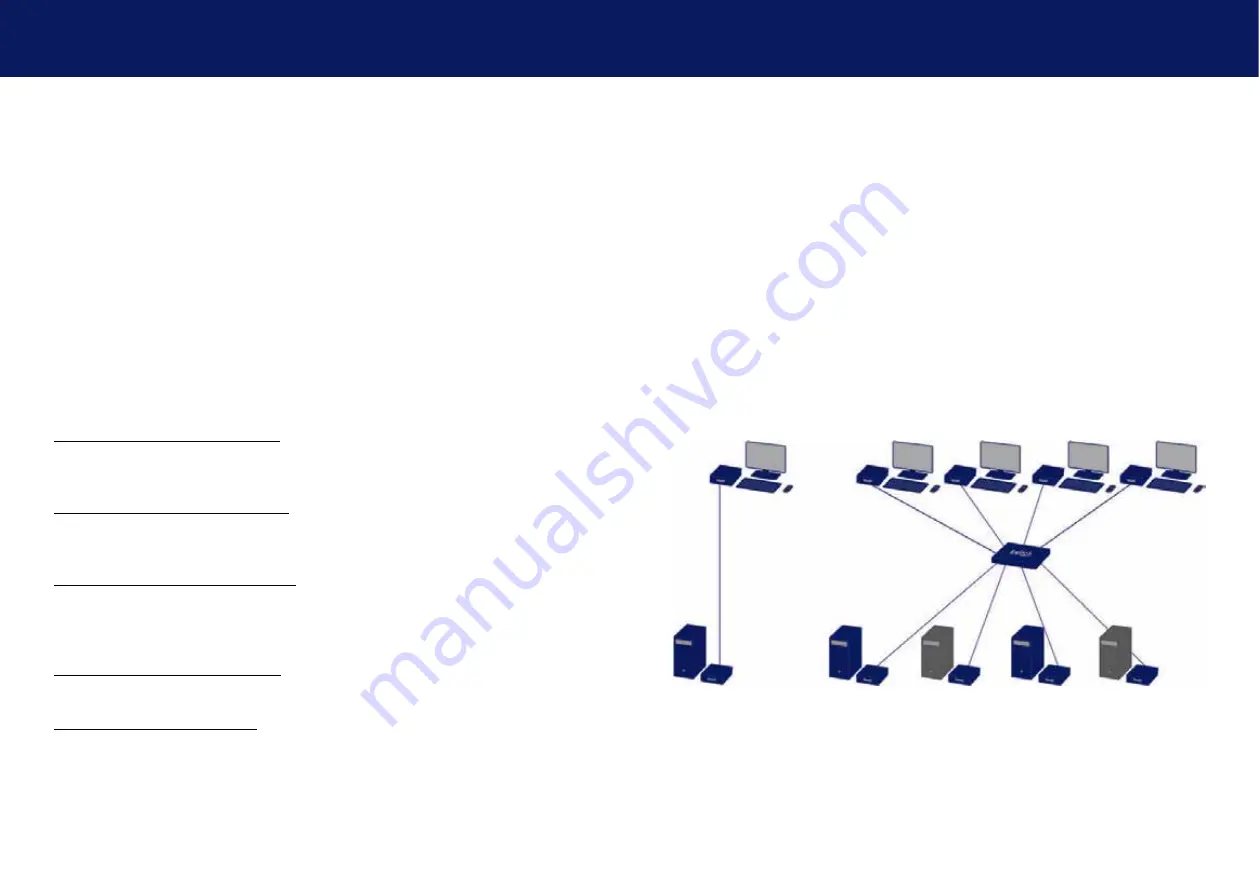
The units can be set up to access one host computer, or to access numerous host computers. 
In the case of the latter, an additional Network Switch must be installed. With a Network Switch, 
each user can gain quick access to any of the required computers.

point to point connection 

Summary of Contents for Matrixline 2000 Fiber

Page 1: ...annel www kvm tec com line matrix kvm tec User Manual Matrixline MX 6711 SET 6711L CPU LOCAL 6711R CON REMOTE Matrixline fiber MX2000 F 6811 SET 6811L CPU LOCAL 6811R CON REMOTE connect collaborate co...

Page 2: ...re with Switching Manager 24 3 5 Defining what DDC data your PC uses 25 3 6 Viewing available devices 26 3 7 Managing favorite devices 27 3 8 Share list 28 3 9 Changing the settings of your extender 2...

Page 3: ...edicine airports air traffic control industry public buildings The KVM Technology over IP benfits from the high security level in PC networks Another feature is the kvm tec feature USB save This featu...

Page 4: ...ngs and instructions Keep all safety information and instructions for future reference and pass them on to subsequent users of the product The manufacturer is not liable for cases of material damage o...

Page 5: ...e the product near heaters Do not drop or hit the product Unplug all connections before cleaning the product Do not use wipes or chemicals as these could damage the surface Wipe the housing with a dam...

Page 6: ...i out DVI connection to monitor 9 Power Status LED displays the status of the extender Remote Extender CON Nr Name Function 10 in audio In from microphone etc 11 RS232 RS232 connector 12 out audio Out...

Page 7: ...en Yes Green V fast Yes Main LED RJ45 Socket LEDs 2 1 Unpacking and checking the contents Before using the product for the first time it should be checked for damage In case of damage due to transport...

Page 8: ...ders It consists of 19 Rack Shelf an alu faceplate and a power supply Rack Mounting Kit RMK FRN Part No 6132 The rack mounting kit RMK FRN is used to mount kvm tec Matrixline extenders It is equipped...

Page 9: ...e included 12V 1A power supply 2 Connect the USB cable to a USB port on your PC and connect the other end of the USB cable to the CPU 3 Connect keyboard and mouse to CON 4 Connect the CPU and the CON...

Page 10: ...the USB cable to the CPU Local Unit 3 Connect keyboard and mouse to the CON Remote Unit 4 Connect the CPU Local and the CON Remote Unit with a fiber cable 5 Connect the DVI cable to the DVI socket of...

Page 11: ...een The monitor will displays your computer s desktop or any open applications 2 5 Replacing the SFP module The MVX1 F is delivered with a multimode SFP module To replace an SFP module with a differen...

Page 12: ...rview of all upgrades O DDC Option DDC Option Fixed ice position 1020 x 1080 W Network Settings Network Settings G ExtenderSettings Settings Extender L Switching List List of all extenders in the swit...

Page 13: ...ough 8 to use a predefined resolution which is saved 4 Press ESC to go back to the main menu In this view all extenders for which a firmware update is to be performed are displayed This function displ...

Page 14: ...Viewing available devices The devices you can connect to are listed on the device list screen In the main screen menu press the L key 3 7 Managing favorite devices A total of 8 favorites can be define...

Page 15: ...r The Extender Settings menu allows the user to change a range of further preferences Three of the selections VGA Audio and RS232 will take you to sub menus The other four can be enabled or disabled b...

Page 16: ...2 Press the V key The VGA menu appears Press F1 to move the display area up Press F4 to move the display area down Press F2 to move the display area to the left Press F3 to move the display area to th...

Page 17: ...ponding key 4 The Enter Parity menu opens 5 Press the appropriate button to select a parity 3 9 4 Setting the audio volume The volume of the audio input microphone on the remote unit can be changed Th...

Page 18: ...Parity No Odd Even Mark Space possible Stopbits 1 2 Remote Unit CON Pinout DTE Pin Function direction 2 RxD IN 3 TxD OUT 4 DTR OUT 5 GND 8 CTS IN RS 232 CONNECTOR PINING 3 Extender settings 3 9 6 Alte...

Page 19: ...the monitor shows the last image received before disconnection to activate or disactivate the function press 5 3 9 8 Using the power saving mode You can choose to enter power save mode if the remote u...

Page 20: ...ing a keyboard layout 1 Press R in the Extender Settings menu The Remote Settings menu appears 2 Press the K key The Keyboard Locale menu opens Press E to select English QWERTY Press D to select Germa...

Page 21: ...To edit the shortcuts 1 From the Extender Settings menu press the R key The Remote Settings menu appears 2 Press the H key The Keyboard Shortcuts menu opens 3 Use the arrows to select a command 4 Pre...

Page 22: ...locks after restart in one minute the time can be set flexibly between one minute and 60 minutes To unlock you have to restart the Extender C Set the password You have to create your own password and...

Page 23: ...n encoder with point to point mode In the main menu press P After logging in the user receives his personalized lists Devices Favorites List 4 1 Network settings and management Switching Systems All n...

Page 24: ...ish audio connection plug stereo jack to the audio output of the PC green connection with local IN remote headset OUT Establish microphone connection plug stereo jack to the microphone input of the PC...

Page 25: ...hat could otherwise be caused by improper treatment of waste equipment The recycling of materials contributes to the conservation of natural resources Therefore do not dispose of your old electrical a...

Page 26: ...he length The shield should be contiguous and connected to both ends A shielded patch cable is allowed for connection to the device Schema EIA TIA 568 B 8 2 Requirements fiber cables 8 2 1 Multi mode...

Page 27: ...mpany network The network switch must fulfil the following specifications 1 Gigabit Switch with true port to port transfer rates of 1 Gigabit second 9 Requirements network switch 9 requirements networ...

Page 28: ...2253 81 912 Fax 0043 0 2253 81 912 99 Email support kvm tec com Web www kvm tec com Find our newest updates and FAQs on our homepage http www kvm tec com support 10 adDress Phone email kvm tec Inc USA...

Reviews: