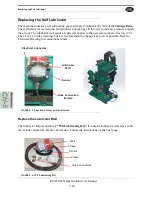
Replacing the Self Lubricator
5-25
KVAL MLX Operation/Service Manual
Process to Change an Auto-Lubricator
1.
Shutdown the machine and follow the Lockout Tagout procedure, in Chapter 1.
2.
Prepare to gain access to the X axis motor gear and gear applicator, by removing the
grate below the heads.
3.
If needed, cut the hose included in the kit to match the one on the machine.
4.
Attach the 2 hose connectors to the ends of the new hose.
5.
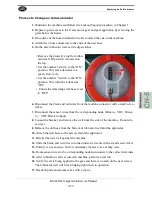
On the new lubricator well, set the dip switches.
6.
Disconnect the black and red wires from the machine connector with a small screw
-
driver.
7.
Disconnect the sensor wires from the corresponding node. (Blue to - VDC, Brown
to + VDC, Black to input)
8.
Loosen the bracket, and remove the well from the side of the machine. Do not dis
-
card yet.
9.
Remove the old hose from the bottom of lubricator well and the applicator.
10.
Attach the new hose to the new well and the applicator.
11.
Bracket the new well against the machine.
12.
Slide the black and red wires into the connector. Secure with a small screw driver.
13.
Polarity is not an issue, but for consistency replace wires as they were.
14.
Route sensor wires to the corresponding node and connect to the correct terminals.
15.
After lubricator well is secured on machine, perform a test run.
16.
Verify the oil is being applied to the gear and there is no alert on the user screen.
The lubricator well will have blinking light when in operation.
17.
Reattach grate and secure wires with a zip tie.
• Remove the protective top from lubri
-
cator well. Dip switch is located on
the top.
• Set the number 5 switch to the “ON”
position. This sets Lubricator to a
yearly flow cycle.
• Set the number 7 switch to the “ON”
position. This turns the Lubricator
“ON”
• Ensure the remaining switches are set
to “OFF”
ON
Summary of Contents for MLX
Page 59: ...About the Tool Config Tabs 2 29 KVAL MLX Operation Service Manual ...
Page 64: ...Description of the Light Tower KVAL MLX Operation Service Manual 2 34 ...
Page 90: ...System IT Administration KVAL MLX Operation Service Manual 4 4 ...
Page 117: ...Collet Torque Values 5 27 KVAL MLX Operation Service Manual ...
Page 118: ...Collet Torque Values KVAL MLX Operation Service Manual 5 28 ...
Page 141: ......
Page 142: ......
Page 143: ......


