background image

72,000 Cycle Maintenance Steps

KVAL MLX Operation/Service Manual

5-10

72,000 Cycle Maintenance Steps

Follow Lockout Tagout procedures, 

Inspect Nuts and Bolts

Inspect all nuts and bolts for tightnesses Tighten is necessary. Use appropriate tool to verify that 

the hardware is tight.

Electrical

Check all connections in each node box and electrical panel. Wires may become loose due to 

vibration. Check contactors for wear.

Computer Backup

Backup computer software.

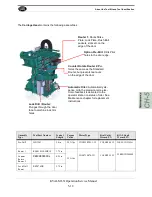
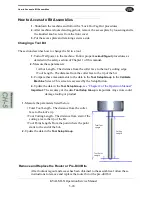
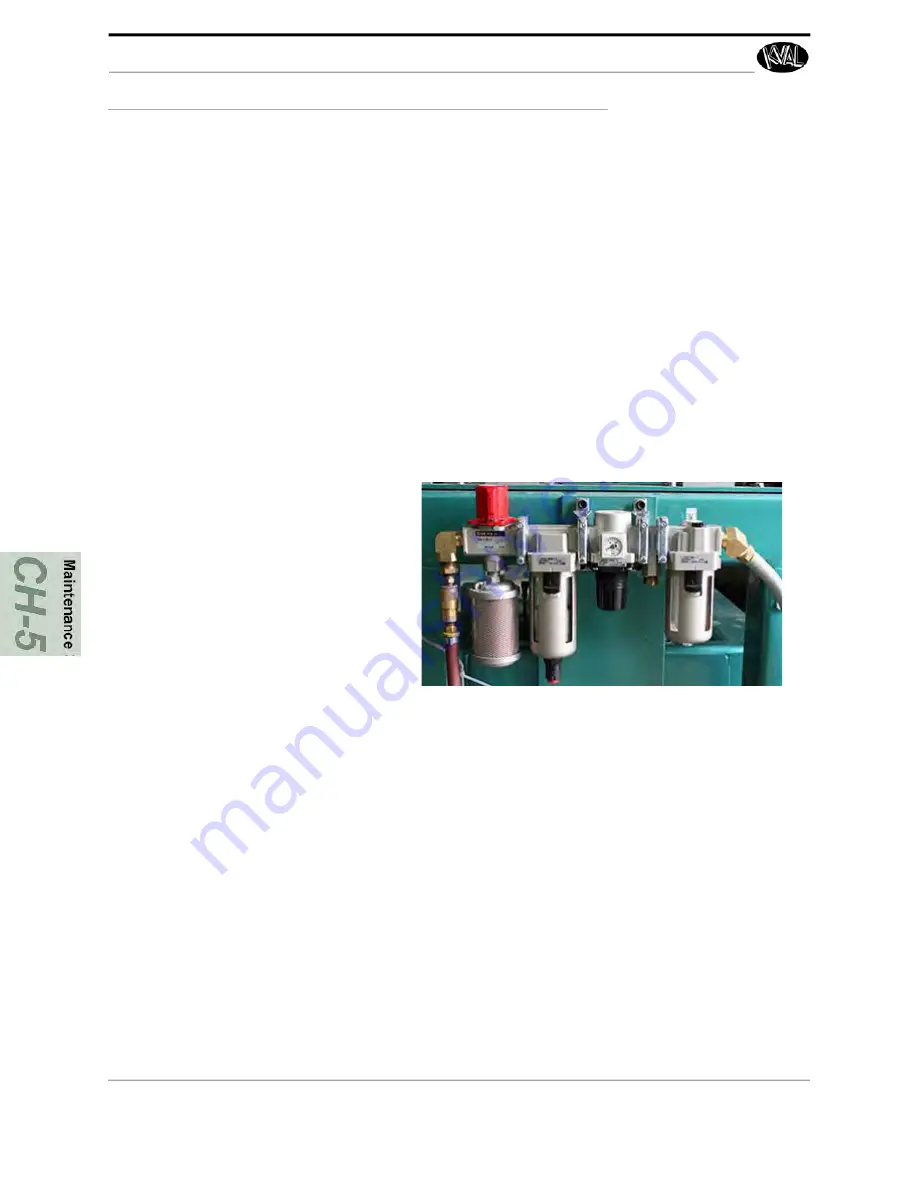
Wash Filter and Lubricator Bowls

Wash filter and lubricator bowls with 

soapy water. 

• Slide lock down to 

unlock. 

• Twist bowl to remove it.
• Remove filter from Air 

filter assembly. Inspect 

and clean or replace if 

necessary.

• Clean bowls and reas

-

semble.

Summary of Contents for MLX

Page 1: ...Innovation Quality Honesty Operation and Service Manual Published June 1 2021 MLX Multi Point Lock Router System With KvalCAM MLX Operation and Service Manual ...

Page 2: ... is a registered trademark of Microsoft Corporation KvalCAM is a registered trademark of Kvalinc All other products are trademarks or registered trademarks of their respective holders all rights reserved Reference to these products is not intended to imply affiliation with or sponsorship of Kval Incorporated Contacting Kval Customer Service For further information about this manual or other Kval I...

Page 3: ...r user experience with our product that is the manual the machinery the software etc What was easy or difficult to use or to learn If you could change something about the design what would it be Please email your comments and suggestions for improve ment to userexperience kvalinc com NOTE This is not a customer support email link For that please refer to the Customer Service contact information ab...

Page 4: ...ent generated through the KVALCAM Software are also the property of the Licensor and are protected by applicable law 1 Definitions a KVALCAM Software means the KVALCAM computer application installed in the KVAL Machinery and written documentation and materials provided to you as well as any res or updates of such computer application and documentation b Install means storing of the KVALCAM Softwar...

Page 5: ... Tagout 1 9 Lockout Tagout Power 1 9 Lockout Tagout Air Supply 1 10 Start Maintenance 1 10 Post Maintenance Steps 1 10 Zero Energy to Start Up 1 11 Getting Help from Kval 1 13 Kval Return and Warranty Policy 1 14 Send the Item 1 14 Acceptance of Return 1 14 Refund Turnaround Time 1 14 Kval Errors 1 14 Customer Errors 1 15 Shipper Errors 1 15 Warranty Replacement Parts 1 15 How to Download the Serv...

Page 6: ...ck the Stop 2 13 Step 5 Load and Align the Door 2 14 Step 6 Process the Door 2 15 Powering Operations for the MLX 2 16 How to Power Up the MLX 2 16 How to Power Down 2 17 About Emergency Stops 2 18 To Resume Normal Operation after an E Stop 2 18 Other Safety Controls 2 18 About the Computer Setting Option 2 18 About Machine Status Feedback 2 19 About the MLX Interface Screens 2 20 MLX Operator Scr...

Page 7: ... 3 Access to the Calibration Adjustments 3 3 Unlock the Calibration Option 3 4 Enter a Positive or Negative Number 3 5 Door Edge Axis Directions 3 5 Door Face Axis Directions 3 6 How to Enter Calibration Data 3 7 About The Calibration Box 3 7 About Restore Points 3 8 About the MLX Calibration Screen 3 9 MLX Calibration Screen 3 9 Calibration Selections 3 9 About Calibration Sequence 3 10 Step 1 Ca...

Page 8: ... 300 Cycle Maintenance Steps 5 4 Clean Clean Clean 5 4 600 Cycle Maintenance Steps 5 5 Check Air Gauges and Inspect Water Traps 5 5 Inspect Tooling 5 5 Empty Dust Collection Units 5 6 3 000 Cycle Maintenance Steps 5 7 Inspect all Photo Eyes 5 7 Inspect Limit Switches 5 7 Inspect Airlines 5 7 Refill Lubricators 5 8 Grease Ball Screw Bearings 5 8 Clean Bearing Shafts 5 8 12 000 Cycle Maintenance Ste...

Page 9: ...e and Replace the Router or Pre Drill Bits 5 20 Remove and Replace the Router or Pre Drill Bits 5 22 Replacing the Self Lubricator 5 24 Replace the Lubricator Well 5 24 Process to Change an Auto Lubricator 5 25 Collet Torque Values 5 26 Chapter 6 Troubleshooting the MLX Get Live Technical Help 6 1 About Motion Control 6 2 Basic Control Circuit 6 3 About a Typical Contactor Control 6 4 About Contac...

Page 10: ...bout Switches and Sensors 6 15 Using Sensors to Trouble Shoot 6 16 Troubleshooting Electrical Problems 6 17 If the Power Stops During Normal Operation 6 17 Description of the Light Tower 6 19 Network System Overview 6 20 Connections to Servo Drives 6 20 Connections to VFD s High Freq Panel 6 20 ...

Page 11: ...general description and a table of available options page 1 2 Safety First IMPORTANT safety information is described in this section page 1 4 Lockout Tagout Guidelines Procedures describing Lockout Tagout page 1 8 Zero Energy to Start Up Procedure to power up your machine for the first time page 1 11 Getting Help from Kval This section describes the method to contact the Kval Service Center for he...

Page 12: ...e of the door For the lock face machining the location and shapes are also computer controlled The feed table will use non marking plastic rolls that will allow the door to be rolled into and out of the machine Options Available Option Title Description Option A 2 1 4 Door Capacity Door clamp system will be set to accommodate doors up to 2 1 4 thick Option B Jamb Routing Adds Exterior Jamb routing...

Page 13: ...Title Description 1 Introduction Descriptions of Machine Line and Safety Information 2 Operation Inter face Descriptions of how to power machine line and operator inter face user screens 3 4 Maintenance Maintenance steps for the machine line 5 Troubleshooting Troubleshooting tips and theory of operation Chapter Title Description 1 KvalCAM reference Description of the Interface 2 KvalCAM Examples E...

Page 14: ...maged or illegible There are three types of warning labels or decals DANGER means if the danger is not avoided it will cause death or serious injury WARNING means if the warning is not heeded it can cause death or serious injury CAUTION means if the precaution is not taken it may cause minor or moderate injury Safety Guidelines In addition to the caution and warning labels affixed to this machine ...

Page 15: ...down Never perform any maintenance unless machine is at zero state Never clean the machine while it is running Never walk away from the machine while it is running When the Machine is ON The compressed air system connected to this machine should have a three way air valve for shut off and pressure relief All cylinders on machine are under high pressure and can be very dangerous when activated Befo...

Page 16: ...cated at different locations Before performing any repairs or mainte nance lockout and tagout must be installed at all locations All maintenance and repairs to electrical circuitry should only be per formed by a qualified electrician Still has power in OFF position Electrical Prior to performing any maintenance repairs cleaning or when clearing jammed debris you must disconnect tag out or lock out...

Page 17: ...ent If you believe any part or operation of this machine is in violation of any health or safety regulation STOP pro duction It is your responsibility to immediately protect your employees against any such hazard Additional detailed safety guidelines are included in the operating instructions of this manual Kval will be pleased to review with you any questions you may have regarding the safe opera...

Page 18: ...k and tag on each disconnect Only each operator may remove their own lock and tag Important When many people are all working on the same machine you will need a multiple lockout device such as the one shown here Follow the P R O P E R lockout rule of thumb P Process shutdown R Recognize energy type electrical pneumatic mechanical etc O OFF Shut off all power sources and isolating devices P Place l...

Page 19: ...s air supply and pressure spring tension weight shifts etc 2 Inform all affected personnel of the eminent shutdown and the duration of the shutdown 3 Obtain locks keys and tags from your employer s lockout center 4 Turn off machine See Chapter 2 for power down and power up procedures 5 Turn the disconnect switches on ALL electrical and frequency panels to the OFF position Then push the red tab to ...

Page 20: ...c are completely removed and that all guards and safety devices are installed 10 Before removing the locks and tags the person who attached them shall inspect the equipment to ensure that the machine will not be put in an unsafe condition when re energized 11 The lock and tag can now be removed only by the person s who placed them and the machine can be re energized 12 The tags must be destroyed a...

Page 21: ...lly when energy is restored Remove Locks Each operator must remove his or her own lock and tag This will ensure that all oper ators are in a safe place when the equipment is started Perform Visual Checks If the equipment is too large to see all around it station personnel around the area and sound the personnel alarm before starting the equipment If your operation is more complex your company s co...

Page 22: ...he key to your lock Proper lockout tagout can save lives limbs and money Help make your work environment safe for you and your fellow workers Be sure to follow the P R O P E R lockout tagout procedures and that those around you do also Close the Cage Gate Verify all cage gates are securely closed Ensure all safety protocols are in effect ...

Page 23: ... record the serial number 3 phase volts electrical print number and air print number 2 Contact our customer support team In the U S and Canada call 800 553 5825 or fax 707 762 0485 Outside the U S and Canada call 707 762 7367 or fax 707 762 0485 Email address is service Kvalinc com Hours 6 00 AM to 4 00 PM Pacific Standard Time Monday through Thursday 6 30 AM to 1 30 PM Pacific Standard Time Frida...

Page 24: ...on RMA _______________ Send the Item Return the item to this address Kval Inc RMA ______ Kval Parts 825 Petaluma Blvd South Petaluma CA 94952 USA Acceptance of Return We can only accept items for a return if they are still in their original packaging and in undam aged resalable condition Returns are accepted within 45 days of purchase and with an RMA number issued by Kval Inc Returns after 45 days...

Page 25: ... no more than one 1 year after delivery will the product be covered under Warranty The repair replacement or payment in the manner described above shall be the exclusive remedy of Buyer for breach of Kval s warranty or for claims based upon failure of or defect in the products regardless of when the failure or defect arises and whether a claim however described is based upon contract warranty inde...

Page 26: ...s with Windows 8 1 8 7 Vista XP and an internet connection our service team are able to connect run and troubleshoot your machine by way of the operator station Download Application 1 To download the application go the Kval website http www Kvalinc com 2 At the Kval website select the Support tab Follow the instruc tions on the Support web page 3 Click the Download button to download the applicati...

Page 27: ... programs Below are samples of i e Explorer and Google web browsers Sample of Google Browser Located at the bot tom left of the screen Sample of i e Explorer Located at the bottom of the screen select the arrow and choose Save and Run 5 A pop up window is displayed Accept the request to run the program Note Security settings may differ from plant to plant If issues occur con tact your IT departmen...

Page 28: ...Enter your name The Kval techni cian will use this field to identify this machine Description Enter machine Serial number and issue Indicator Green indicates there is a good connection to the service center If red there could be an issue with a LAN connection Check the connections in the plant 7 After the Kval Support App is loaded and completed call the Kval service center 1 800 553 5825 and have...

Page 29: ...How to Download the Service Application 1 19 KVAL MLX Operation Service Manual Page Intentionally Left Blank ...

Page 30: ...ollow my company s safety procedures I have read and understand these guidelines Machine Safety Concerns I have been given a tour of the machine and understand all the safety labels E Stops and the actions to take in case of an emergency I will make sure all guards are in place before operation I will turn off the compressed air before loading hardware staples screws etc I will turn off the electr...

Page 31: ...ter 2 at a Glance Section Name Summary Page Operator s Tour Descriptions of the operation of the parts and assemblies of the machine page 2 2 Quick Start A summary of the steps to machine a door page 2 12 Powering Operations Descriptions of power up power down hom ing and emergency stops page 2 16 Menu Map of the Interface Screens An overall description of the user interface page 2 19 Description ...

Page 32: ...ms as well as standard cylinder locks strike plates and simple top and bot tom flush bolts Below is a typical location of the MLX in a Door Processing Line ON 3D Feeds Doors into the Door Process ing Line Note the ON 3D can pull doors from a double stack DL NCD Machines door lite and lock pat terns MLX Routs multiple com binations of lock patterns strike plate patterns top and bottom flush bolts ...

Page 33: ... Foot Pedal controls Controls include Emergency Stop Door Stop and Door Clamp Electrical Panel There is a Electrical Panel located near the back section of the machine The Panel contains power inputs and outputs PLC and drivers to run the motors on the machine Door Clamps Nine pneumatic controlled clamps secure the door during machining Router Routs Strike Plate Lock Plate Flush Bolt pockets slots...

Page 34: ...erspectives Top View FIGURE 2 1 Top View of the Machine Horizontal Clamps Operators Station Electrical Panel Local Machine Controls Start Sequence Emergency Stop Retractable Back Fence X2 Foot Pedal Door Stop Door Clamp Fixed Fence Carriage Head Router Counter Rotate Router Lock Drill Opt Predrill Servo Motors Air Input Positioning Rollers Adjustable Door Stop Fixed Door Stop Cut Area ...

Page 35: ...After the door is secured the Carriage Head travels along precision rails and machines the edge and face of the door FIGURE 2 3 Back View of Machine Carriage Head Operators Station Local Machine Controls Start Sequence Emergency Stop Adjustable Door Stop Foot Pedal Door Stop Door Clamp Air Input Fixed Door Stop Fixed Fence Precision Rails Carriage Head Shown in the down position Retractable Back F...

Page 36: ...the door X Axis Servo Motor Pre cision Motor to drive the Head in the Left and Right Direction Automatic Oiler Automatically dis pense oil to the precision rails elec tronic feedback is delivered to the operator station on status of oiler See Maintenance chapter for replacement instructions Pneumatic Relay Assembly Directs Air flow to cylinder on Carriage Head Carriage Head Electrical Node Connect...

Page 37: ...the carriage head to drill pilot holes FIGURE 2 5 Pre Drill Option Face Lock Router Option This option adds a Face Lock Router assembly to rout face locks FIGURE 2 6 Face Lock Router Option Pre Drill Drills Pilot holes to the door edge Lock Router Option Plunges through the door face to machine lock trim holes ...

Page 38: ...on The Operator s Station includes a touch screen and keyboard to run KvalCAM and mechanical machine controls For information about KvalCam see the companion KvalCAM Reference Guide FIGURE 2 7 Operator s Station Keyboard Enter data and interact with Touch Screen Machine Controls Mechanical controls of the machine See Mechanical Controls on the Operator Station on page 2 9 Operator Interface Screen...

Page 39: ...n process About the Foot Pedal The Foot Pedal contains manual controls to clamp and extend the door stops Control Circuit Powers up and down the entire machine See Powering Operations for the MLX on page 2 16 E Stop Press to STOP all functions of machine inc case of emergency See About Emergency Stops on page 2 18 Start Stop Starts or Stops the machining process See Summary of Machining a Door on ...

Page 40: ...Operation Service Manual 2 10 About Controls on the Machine The Machine Control are l coated at the front edge of the machine The controls include Start Sequence Starts the machining process Emergency Stop Press if an emergency occurs to stop the machine ...

Page 41: ...escribed in Chapter 1 FIGURE 2 8 Overview of Main Electrical Panel The Main Electrical Panel Supplies voltages to the machine Contains the PLC Programmable Logic Controller Contains servo drives to interact with the servo motors VFDs Variable Frequency Drives to interact with routers Interconnects from E Box to machine PLC and Power Supplies 110 V 24 V Terminals High Voltage Section Input Output T...

Page 42: ...he MLX main air supply valve is turned on 2 Power up the MLX See How to Power Up the MLX on page 2 16 3 Select the KvalCAM shortcut 4 Home the MLX See See Description of the Light Tower on page 2 33 Home the MLX on page 2 16 Step 2 Create or Load a Door Job 1 Select the Libraries Tab at the upper left side of the screen 2 Select the Door Job Library Tab at the upper left 3 From the table double cl...

Page 43: ...creens on page 2 20 FIGURE 2 9 MLX Main Screen Step 4 Set the Movable Stop Set the Movable Stop to the value displayed in the Manual Stop Location box on the screen The figures below shows the stop being set to 13 0 Process to Move and Lock the Stop Tip Pull the kip lever out to freely move the handle to the best position to operate the handle 1 Unlock kip lever 2 Move the stop 3 Align the flat of...

Page 44: ...or 1 To extend the Door Stop and Drop Down Fence press the Door Stop foot pedal 2 Load the door onto the machine 3 Firmly align the door to the extended stop and the to the back fences 4 After door is snug against the fence and door stop press the Door Clamp pedal to secure the door for machining ...

Page 45: ...MLX will machine a hinge or lock depending on the active Door Job 3 After machining is completed either continue processing door or finish the process Note To verify type of cut check the illuminated lock or hinge indicator at the Operator Station See Mechanical Controls on the Operator Station on page 2 9 If ending processing a door and if shutting down see How to Power Down on page 2 17 Door Pro...

Page 46: ...on the user screen if an E Stop is pressed 3 Make sure the electrical disconnect in the electrical cabinet is turned to the ON posi tion 4 Switch the green Control Circuit switch to the ON position 5 Push the green Start Machine button to boot up the machine Note Boot up may take 2 to 3 minutes 6 When the machine is ready to operate all status lights will be illuminated Note See Description of the...

Page 47: ...the Stop Machine button if machine is running 2 Right click the Kval icon at the taskbar Select Exit from the drop down menu Important Make sure Windows is shutdown completely before turning off the machine Hard drive or data may be damaged if not turned off in this order 3 Switch the green Control Circuit switch to the OFF position 4 Kval also recommends that you turn the disconnect switch on the...

Page 48: ...n E Stop is activated use the following procedure to recover after the cause of the emergency stop is resolved 1 De activate the E Stop switch by pulling it out 2 Push the Start Machine button on the operator s station 3 Home the Machine Other Safety Controls Other safety controls can include Gate Latches Sensors are located on the gates surrounding the machine If a gate is opened the machine will...

Page 49: ...all machines is displayed The machines are constantly polled feeding back their state of operation This feedback is a great tool to instantly view the status of the machine This infor mation can be used to troubleshoot any issues that may occur When activated the tab will highlight Note At the top of the screen the revision of software is displayed ...

Page 50: ...his section Manual Servo Control Operate the machine manually by moving the servo motors See page 2 26 Tool Path Preview Observe the path of the tool during machining process See page 2 30 Calibration Description and instructions to fine tune the servo drives See Chapter 3 Tool Config Fine tune the tools parameters for an accurate cut See page 2 28 Status For information see About the Status Scree...

Page 51: ... Screen This section includes descriptions of the Main Control Screen The Main Control Screen is the most utilized screen Information to machine a door is displayed on this screen The illustration below displays a screen without a door loaded from the Door Job menu Select the Main Control Tab ...

Page 52: ...hat cannot be cleared press the Reset Machine button This button will reset the machine to the start position Important Press the Home button after resetting the machine Setup Mode On Off Select Setup Mode to toggle on or off In the On mode a safe mode is active The machine will go through normal sequences except the cutting motors will be inactive Use this mode to check the machine operation with...

Page 53: ...echanical switch but ton Door Finished Clears the job if user wants to finish before completing all cuts or at the end of the a portion of the Door Job About the Stop and Clamp Control Section Clamp and Door Stop control is accessed at this section Toggle Clamp Press to toggle the door clamps UP or DOWN This button is only available when a job is loaded in the machine Toggle Door Stop Press to tog...

Page 54: ...reen KVAL MLX Operation Service Manual 2 24 About Speed Control Adjust the speed of the cut Press buttons to use the graduated speeds or select box and enter a desired speed The speed can be changed during real time processing ...

Page 55: ...bleshooting checking cut specifications and maintenance 1 Under the desired axis select and hold the desired direction button 2 Release the button to stop the move ment 3 Select the Speed Percent box to adjust the speed of the Carriage Head FIGURE 2 10 MLX Manual Control Screen FIGURE 2 11 Direction of the Carriage Head Select the Manual Servo Control Screen Tab Y Forward Z Forward X Forward Z Rev...

Page 56: ... is a from a sample machine General Operating Controls The Tool Config Screen contains a sample of the following List of the available tools Pop up menus to enter information about each tool Specifications The ability to adjust the method of chisel operation during machining The ability to enable or disable specific tool slots The ability to name the tools to familiar names The ability to lock and...

Page 57: ...nu About the Tool Pop up Screens Each tool slot has versatility to choose between entering router or chisel information Click the Enable Check Box to clear the box and disable the tool Below are samples of the pop up windows available About the Tool Pop up Screens Sample Drill Configuration Pop Ups 1 Select Unlock 2 Enter Password Click OK 3 Ready to Enter Data Drill Pop up Drill Pop up Disabled D...

Page 58: ...or Drill Measuring Tool Length Important The accuracy of the data Tool Setup Group is important Any errors could damage tooling or product About Entering Data into the Pop up Menu Insert specifications of the tools being used to make the cuts Ability to name the tools to user defined descriptions Customize the tools to reflect the actual tool parameters making the most accurate cuts Ability to def...

Page 59: ...About the Tool Config Tabs 2 29 KVAL MLX Operation Service Manual ...

Page 60: ... can be viewed 1 Select a G Code routine form the drop down menu 2 Select the Render Button 3 View the path of the tool on the screen This sequence can be essential if troubleshooting calibrating or checking the wear of a tool Dis crepancies can be viewed before cutting into a door saving product and time The figure below displays a sample of a good Deep Mortise Cut Select the Tool Path Review Scr...

Page 61: ... includes a True flag if the assembly is in operation or a False flag if not in operation Also status can include data and motor states idle operation The data can be filtered to observe certain aspects of the operation of the machine This tool is great for troubleshooting to locate faulty assemblies FIGURE 2 12 Status Screen Select the Status Screen Tab Filter Data Status is listed by Location Li...

Page 62: ...chine sections or functions The top line will have the most current routine that is running The codes are color coded Red Error Green Report is a non issue Yellow Warning If the machine issue can not be resolved call Kval Inc 1 800 553 5825 Have any error code that is displayed ready to give the Kval representative This will aid in troubleshooting and shorten down time FIGURE 2 13 Log Screen Selec...

Page 63: ...tialize Red Machine Error Solid General Error 1 Flash EtherCat Device not Ready to Run 2 Flashes VFD Servo or Motor Error 3 Flashes 24 VDC Power Error Yellow External Error Solid General Error 1 Flash 3 Phase Voltage Error 2 Flashes Low Air Error Blue Operator Status Solid Waiting for Operator 1 Flash Reposition Door Green Machine is Operational Safety OFF Clear Safety Project not Running Red Safe...

Page 64: ...Description of the Light Tower KVAL MLX Operation Service Manual 2 34 ...

Page 65: ... Summary Page About Calibration Descriptions of the Calibration Menus Tips to look for before calibrating page 3 2 About the Calibration Tabs Descriptions of the Calibration Tabs page 3 3 How to Enter Calibration Data Descriptions of how to use the calibration screens page 3 7 About the Calibration Screen Descriptions of the calibration available page 3 9 ...

Page 66: ...ibration Reference Cut This chapter describes the Calibration Menus In the Calibration Menus offsets are entered to calibrate assemblies in the machine See About the Calibration Tabs on page 3 3 Before you Calibrate Before you start calibration check for the following common issues 1 Is the loaded setup correct for the current cut 2 Check tools for wear 3 Is the correct Calibration loaded 4 Are th...

Page 67: ... Log Screens for error reporting Finding errors from these screens will help localize problem areas Note If the machine issues can not be resolved call Kval Inc 1 800 553 5825 Have any error code that is displayed ready to give the Kval representative This will aid in troubleshooting and shorten down time Access to the Calibration Adjustments Buttons to unlock access to calibration save a calibrat...

Page 68: ...ation Option Access to the calibration is password protected Optional 1 Select the Unlock button 2 At the Password pop up enter the password and select OK to continue 3 The calibration message will change from a red Calibration is Locked to a green Calibration is Unlocked ...

Page 69: ... the door cut second finger and thumb at right angle to each other The first finger represents the positive direc tion of the Z Axis the thumb represents the positive direction of the Y Axis then second finger represents the positive the direction of the X Axis Door Edge Axis Directions Stand at the side of door point at the edge of the door with the left hand rule to determine axis direction X Ax...

Page 70: ...ration Manual 3 6 Door Face Axis Directions The Lock Router is an optional add on to the MLX Using the Left Hand rule point at the cut at the top to define the negative or positive offset See the figure below for the offset direction X Y Z X Y Z ...

Page 71: ...ions to perform a calibration 1 Check for deviations between the expected machining and the actual machining Determine the offset 2 Enter a positive or negative offset in the Offset box to adjust the servos in the X Y and Z directions Note Select the Combine Button to keep track of the offsets during the process 3 After every calibration change select the Save button to store the calibration Run a...

Page 72: ... a Restore Point 1 Select the Restore Points button 2 Select the Save Current button from the pop up window save current calibration 3 Name and enter to save To Load or Delete a Restore Point 1 Select the restore point from the menu 2 Select the Load button to use the calibration Select the Load button to load 3 Select the Delete button to delete the point ...

Page 73: ...ibration Data on page 3 7 Ensure Calibration is unlocked MLX Calibration Screen Calibration Selections The table below describes the available calibration routine Calibration Adjustments Performed Carriage Axes Adjust the axis offsets for the Edge and Face Carriage Head Edge X Z and Y axes Face X Z and Y axes Edge Tools Adjust each Tool Slot X Y Z axis and tool diameter offsets Face Tools Adjust t...

Page 74: ...on routines under the Calibration Tab Important It is crucial to calibrate or verify the settings in the order described in this section If the steps are not followed in the correct order all calibrations may suffer See Step 1 Calibrate the Carriage Stop on page 3 11 See Step 2 Calibrate the Carriage Axis on page 3 13 See Step 3 Calibrate the Edge Tools on page 3 16 See Step 4 Calibrate the Face T...

Page 75: ...p For this calibration make sure the distance from the cutting space to the first carriage stop is at 20 inches Important The Carriage Stop is the starting reference for the calibrations on the machine Always verify the carriage stop setting before continuing to cal ibrate Movable Stop Fixed Stop ...

Page 76: ...e the cut has been made check the locations of both Hinge and Lock cuts 6 Perform the Left Hand Rule at the edge of the door to determine axis direction If the location is out of specification on the Lock side and Hinge side is good adjust the Lock Stop Movable If the location is out of specification on the Hinge side and Lock side is good adjust the Hinge Stop Fixed If both the Lock and Hinge cut...

Page 77: ...tion of the tool being cal ibrated See About the Tool Config Tabs on page 2 26 2 Create a Edge Rectangle Door Job of your choice 3 Add Door Job to the Queue 4 Once the cut has been made check the location of the cut 5 Perform the Left Hand Rule at the edge of the door to determine axis direction See illus tration on the next page If the location is out of specification in the length of the door th...

Page 78: ...r Job of your choice 3 Add Door Job to the Queue 4 Once the cut has been made check the location of the cut 5 Perform the Left Hand Rule from the Face Router reference to determine axis direction See the figure on the next page If the location is out of specification in the length of the door the X Axis needs to be adjusted If the location is out of specification in the width of the door the Y Axi...

Page 79: ...Step 2 Calibrate the Carriage Axis KVAL Operation Manual 3 15 FIGURE 3 3 Face Cut X Y Z X Y Z Y ...

Page 80: ...of the process until a satisfactory final cut is in specification Edge Tool Locations Router Routs Strike Plate Lock Plate Flush Bolt pock ets slots etc on the edge of the door Counter Rotate Router Performs the same as the Standard Router but pre vents tear outs on the edge of the door X Axis Servo Motor Pre cision Motor to drive the Head in the Left and Right Direction Z Axis Servo Motor Pre cis...

Page 81: ...l Config Tabs on page 2 26To help identify tools that need to be calibrated view Tool Path Review See About the Tool Path Preview Test Tab on page 3 20 1 Create a Door Job of a Edge Lock Cut of your choice 2 Add Door Job to the Queue 3 Once the cut is machined measure the length width and depth positions of the cut If the cut is not in the specification determine which tool and axis needs to be ca...

Page 82: ...ibrate the Edge Tools KVAL Operation Manual 3 18 Predrill Check location of the predrill cut Measure and compare against the Door Job specifications If needed input the offset polarity as seen in the figure above ...

Page 83: ...satisfactory final cut is in specification Face Tool Locations Process to Calibrate the Face Tools Note It is recommended to verify the Tool Config settings before calibrating the plunge cut Z Axis This is a global calibration Therefore by calibrating other tools may be out of calibration For directions on how to use the configuration menus See About the Tool Config Tabs on page 2 26 Face Router ...

Page 84: ... the specification determine which tool and axis needs to be cali brated 4 Perform the Left Hand Rule pointed at the cut lock to determine axis direction See illustration below If diameters of the plunges are out of specification the Diameter Offset needs to be adjusted If the length of the cut is out of specification the X Axis needs to be adjusted If the width of the cut is out of specification ...

Page 85: ... to disable all tools except the router to be verified 2 Create a Door Job that has a rectangle with Width 1 5 Nominal Tool Diameter For Example If it is a 1 0 inch diameter router then set the Width 1 5 1 0 1 5 3 Set the Length large enough for the tool to fit in the Cut For Example If it is a 1 0 inch diameter router then set the Width 2 0 1 0 1 0 4 Set the depth deep enough to measure For Examp...

Page 86: ... the tool diameter calibration 1 5 1 6 2 0 05 If 1 45 is measured then adjust the tool diameter 1 5 1 45 2 0 025 2 Rerun the rectangle at another location and repeat the step above until there is no measurable difference between the input width and measured width of the rectangle 3 During this process measure the depth to calibrate the Z axis of the tool 4 Once the tool Diameter and Z axis calibra...

Page 87: ...face and controls the operation of the machine With the controller Kval can remotely help troubleshoot your machine Chapter 4 at a Glance Section Name Summary Page System IT Administration This chapter describes the basic parts of the opera tion of the PLC in the machine Such as About the PLC Connections on the PLC Backing up the Computer About Remote Connection to Kval Service page 4 2 ...

Page 88: ...e chipset the module also contains internal main memory The computer has a removable Compact Flash card from which it boots The controller uses a Windows operating system with TwinCAT 2 automation software to create the PLC and Motion Control method Interface modules include A smart power supply to connect to EtherCat terminals This supply contains a LCD to display system and user messages A DVI U...

Page 89: ...tool to help fix issues that occur with the MLX machine With the remote access our Kval Service Technician is able to observe your user screen in real time read and adjust programming code For MLX access a separate computer must have Beckhoff soft ware installed that is connected to the Intranet connection on the machine controller ...

Page 90: ...System IT Administration KVAL MLX Operation Service Manual 4 4 ...

Page 91: ...ollowing information is available in this chapter Maintenance Schedule This section describes the assemblies to schedule for maintenance page 5 2 Lubrication Requirements This section describes the lubrication requirements for the machine including types of lube to use This section includes Linear Bearings Flange Bearing and Pillow Blocks Gear Motor Lubrication Requirements Ball Screws Description...

Page 92: ... steps may not pertain to all machines 300 Cycles Clean Use pressured air to blow off dust and debris on entire machine Clean Blow out dust collection cans 600 Cycles Inspect Air Pressure Gages Adjust if necessary to the proper PSI located on the label Adjust only if Trained in Maintenance Inspect Inspect Air Filter Water Traps Empty if necessary Inspect Inspect the Tooling for wear Drill Bits Cut...

Page 93: ... clean dry cloth 12 000 Cycles Inspect Inspect all air cylinders for air leaks Replace if seal is leaking Inspect Inspect hydraulic lines for loose fittings leaks and cracks Inspect Inspect ball rail shafts for pitting or abrasions Lubricate Clean and lubricate all slides and cylinder rods with dry silicone spray Lubricate Lubricate all bearing shafts with silicone and clean rag 72 000 Cycles Insp...

Page 94: ...ild up can cause issues with the operation of the machine Use pressured air to blow off dust and debris on entire machine Use a clean rag to clean areas not affected by pressurized air Also blow out any dust collection units Check vertical bearings for loose screws Loose screws could cause bearing damage FIGURE 5 1 High Dust Accumulation Areas Dust Collection Unit ...

Page 95: ...spect Water Traps Inspect Tooling Air Pressure Gages Adjust if nec essary to the proper PSI located on the label Adjust only if Trained in Maintenance Inspect Air Filter Water Traps Empty trap if necessary Slide locking switch down to unlock twist trap to remove Reverse action when installing trap Inspect the Tooling for wear Drill Bits Cutting Tools ...

Page 96: ...st Collection Units Check and empty any dust collection units Clean any dust filters Dust collection systems vary from machine to machine Follow manufacturers directions to empty dust collection units FIGURE 5 2 Typical Dust Collection Unit Filters Dust Collection Con tainers ...

Page 97: ...ct the switch for cracks in the body and check that the switch arm actuates clicking sound when moved to the extreme Note Depending on the model of limit switch the amount of pre travel amount of movement from the arms resting position is either 5 or 20 degrees before the limit switch actuates Inspect all airlines for kinks rubbing and leaks Perform pull test on push on hose connectors Check all a...

Page 98: ...S LUBEG Grease Ball Screw Bearings Grease ball screw bearings if applicable For a table of lubrication types to use Lubrication Schedule For locations to lubricate See Grease Ball Screw Bearings Clean Bearing Shafts Clean all bearing shafts with clean dry cloth Spray shaft with silicone oil and clean build up grime and dirt Slide locking switch down twist bowl and remove Refill bowl Reverse action...

Page 99: ...Symptoms include a cylinder not extracting or retracting to the limits Cylinders not holding their position Inspect Ball Rail Shafts and Ball Screws Inspect ball rail shafts for pitting or abrasions Inspect ball screws for pitting or abrasions Clean and Lubricate Slides Cylinder Rods and Bearing Shafts Clean and lubricate all slides and cylinder rods with dry silicone spray Example of a Pitted Bal...

Page 100: ...ify that the hardware is tight Electrical Check all connections in each node box and electrical panel Wires may become loose due to vibration Check contactors for wear Computer Backup Backup computer software Wash Filter and Lubricator Bowls Wash filter and lubricator bowls with soapy water Slide lock down to unlock Twist bowl to remove it Remove filter from Air filter assembly Inspect and clean o...

Page 101: ...ese conditions are changed timing accuracy or damage may occur during the machine process Do not adjust air PSI above or below factory settings Do not adjust any and all flow controls from factory settings Do not remove shim stock Do not Change or Alter any safety assemblies E Stops Gate Locks etc Do not Change programs in PLC s or PC s Do not Alter Electrical Components ...

Page 102: ...ith Grease KVAL P N Lube EP 2 Pillow Block Bearing Idler Shaft Flange Block Bearing Air Line Lubricator One drop of oil every 2 or 3 cycles Check the lines every week to two weeks Note Some CNC Machines drop every 5 10 cycles Either lubricant listed below is approved to use KVAL P N SYSLUBG Chevron AW Hydraulic Oil 32 G C lubricants light AW R O Mobile DTE 24 Shell Tellus32 Gulf Harmony 32 Gear Bo...

Page 103: ...k fitting is basically a valve that opens under pressure to allow lubricant to pass through a channel and be forced into the voids of the bearing When the pressure stops the ball returns to its closed position The ball excludes dirt and functions as a check valve to prevent grease escaping back out of the fitting The ball is almost flush with the surface of the fitting so that it can be wiped clea...

Page 104: ...r reliable operation FIGURE 5 4 Flange Bearings Ball Rail Bearing Ball Rail Bearings are linear bearings that are attached to positioning rails In most cases the bear ings are attached to assemblies to move them in the X Y or Z direction FIGURE 5 5 Ball Rail Bearings Greasing Flange Bearing Bearing Housings Approximatively 1 Gram one pump from grease gun of Dura Lith Grease KVAL P N Lube EP 2 Ever...

Page 105: ...ese conditions are changed timing accuracy or damage may occur during the machine process Do not adjust air PSI above or below factory settings Do not adjust any and all flow controls from factory settings Do not remove shim stock Do not Change or Alter any safety assemblies E Stops Gate Locks etc Do not Change programs in PLC s or PC s Do not Alter Electrical Components ...

Page 106: ...k fittings and apply EP 2 grease 4 After lubrication is completed re install the cover 5 Reverse Lockout Tagout FIGURE 6 Carriage Bearings This machine is a powerful electro mechanical motion control system If servicing this machine fol low the safety guidelines Failure to do so can result in damage to equipment and or serious injury to person nel Shutdown the machine and follow the Lock Out Tag O...

Page 107: ... the bearings of the Tools from the front section viewpoint The bearings are color coded for easy identification 1 Some bearings may be difficult to get access to Use an extender to reach tight areas 1 Perform Lockout Tagout 2 Identify zerk fittings and apply EP 2 grease 3 After lubrication is completed re install the cover 4 Reverse Lockout Tagout FIGURE 7 Frame Bearings Movable Stop Bearings Ext...

Page 108: ... Tools in the Carriages This section describes the steps to change the pre drill bits router bits deep mortise and chisels The next Figures show the locations of the tools on the Hinge Carriages and the Lock Carriage This machine is a powerful electro mechanical motion control system If servicing this machine fol low the safety guidelines Failure to do so can result in damage to equipment and or s...

Page 109: ... Router RB7076DR 2 75 in The Carriage Head contains the following assemblies Router 1 Routs Strike Plate Lock Plate Flush Bolt pockets slots etc on the edge of the door Counter Rotate Router 2 Per forms the same as the Standard Router but prevents tear outs on the edge of the door Automatic Oiler Automatically dis pense oil to the precision rails elec tronic feedback is delivered to the operator s...

Page 110: ...the tip of the bit 3 Compare these measurements to the data in the Tool Setup Group in the Calibrate Machine Screen This screen is accessed by the Setup Button 4 Update the data in the Tool Setup Group see Chapter 2 of the Operation Manual Important The accuracy of the data Tool Setup Group is important Any errors could damage tooling or product Remove and Replace the Router or Pre Drill Bits Afte...

Page 111: ...Fig ure below FIGURE 5 1 Removing Pre Drill or Router Bit Inspect Collet 2 Inspect and clean collet assembly FIGURE 5 2 Collet Assembly Insert New Bit Important For a correct bit installation follow the instructions in the Tips Section on page 5 26 Collet Wrench Shaft Wrench Collet Spindle Collet Nut Verify that there is no damage or blu ing on the side of the collet ...

Page 112: ...m of the tool holder 6 Tighten the collet assembly 7 Inspect and verify the work Clean the work area Remove and Replace the Router or Pre Drill Bits Caution Before performing this process turn off all power to the machine Follow proper Lockout Tagout procedures as detailed in the safety section of Chap ter 1 of this manual 1 Use a 17 mm shaft wrench and a 3 8 collet wrench to remove the bit on the...

Page 113: ...Set the router bit to 1 3 4 and the drill bit to 2 0 from the base of the collet nut to the tip of the bit If available use Bit Depth Gauge PN 432 C to set the depth 6 Lightly tighten and torque to correct value For torque values See Collet Torque Values on page 5 26 Collet Spindle Collet Nut Verify that there is no damage or bluing on the side of the collet Drill Depth Set to 2 0 Router Depth Set...

Page 114: ...t to the user screen when oil is low 5 The alert is a 30 day warning but it is recommended to change it as soon as possible Refer to Electrical Drawing for connections labels FIGURE 5 5 Location of Gear and Lubricator Replace the Lubricator Well The lubricator kit part number is Wit Lubricating Kit It contains lubricator well hose with oil and its connectors bracket and sensor Follow the instructi...

Page 115: ...e old hose from the bottom of lubricator well and the applicator 10 Attach the new hose to the new well and the applicator 11 Bracket the new well against the machine 12 Slide the black and red wires into the connector Secure with a small screw driver 13 Polarity is not an issue but for consistency replace wires as they were 14 Route sensor wires to the corresponding node and connect to the correc...

Page 116: ...es KVAL MLX Operation Service Manual 5 26 Collet Torque Values Kval recommends torquing the collets Torquing adds consistency is important for repeatable machining Follow the torque tool manufacturers method of torquing ...

Page 117: ...Collet Torque Values 5 27 KVAL MLX Operation Service Manual ...

Page 118: ...Collet Torque Values KVAL MLX Operation Service Manual 5 28 ...

Page 119: ... circuits Includes dia grams of the control circuits page 6 2 Troubleshooting Basics This section includes basic troubleshooting infor mation Includes analyzing sub systems to des ignate a starting point for troubleshooting page 6 4 Troubleshooting Electrical Problems Includes voltages in the electrical panels using the Status Light panel to troubleshoot and VFD troubleshooting page 6 17 Troublesh...

Page 120: ...oor out 6 Wait for the next door Point to Point Point to point motion control involves moving a load from one fixed position to another fixed position at a constant speed and along one line axis X Y or Z A typical point to point would be a drill with a fixed depth The drill is either retracted or extended using a pneumatic cylinder Typically the drills travel is limited by physical stops Increment...

Page 121: ...mation into a form the positioning system can understand Listens to the machine s other subsystems waiting for the OK to move command Sends the positioning instructions to the positioning system Listens to the positioning system for position status if there is a feedback loop Tells the machine s other subsystems when the move process is completed Examples A PLC or a dedicated motion control board ...

Page 122: ...8 Block Diagram of a Common Contactor Circuit High Voltage may cause personnel injury or death Troubleshooting checks must be performed by a Qualified Electrical Technician PLC Output Fuse s Line Voltage Power Contactor Control Coil Input Power Input Power Output Control Circuit Common ON Should measure Control Voltage 120 VAC here Should measure Line Voltage here Should measure Line Voltage here ...

Page 123: ...p working 1 Open the Main Electrical Cabinet to find the Contactor Thermal Overload Assem bly 2 Press each Green Reset button on the Thermal Overload An audible click will be heard on the tripped circuit Take note of tripped circuit 3 Once the overloads are reset verify LED s are on 4 Rerun the machine and verify that motor runs without tripping the circuit 5 If the same overload keeps tripping ve...

Page 124: ... Voltage may cause personnel injury or death Troubleshooting checks must be performed by a Qualified Electrical Technician Common Motor Drive Control PLC Output Fuse s Line Voltage Motor Power Motor Power Input Output Power Control Circuit Common ON Measure Control Voltage 24 VDC here Measure Line Voltage here Measure Line Voltage here ON Drive STF Forward RL STR Revers 2 SD COMMON OFF OFF OFF Run...

Page 125: ...k diagram see Figure 6 10 on page 6 6 FIGURE 6 11 Sample of VFD VFD models vary in Kval machines depending on where it is used voltage requirements and type of PLC used This is a general view on the VFD See the machine s Electrical Print for detailed information Line Voltage IN Converted Signal OUT to Motor Operation Panel Access to manual operation VFD This panel can be used for trouble shooting ...

Page 126: ... be lit To reset a VFD 1 Push lighted button to reset the indicated motor b If the button light turns off continue with production c If the button stays lit identify the motor by way of the label on the button turn off that function at the switch panel Check the corresponding output on the PLC output If the output is on it will not let the motor reset Dis connect the output wire and verify that th...

Page 127: ...gram of a Pneumatic Circuit PLC Output High Pressure Air Cylinder Common Control Circuit ON Measure 24 VDC here Control Voltage Should have High Pressure air here Cylinder Control Control Coil Input Air Input Air Output Valve Should have High Pressure air on Activated Output Schematic Drawing of Pneumatic Circuit Note Pre 2006 machines may not contain the 24 Volt relay 120 Vac is directly fed into...

Page 128: ...d to the solenoid body Use this information to troubleshoot system if nec essary FIGURE 6 15 Solenoids in Manifold Air Input Cylinder Retract Cylinder Extend Electrical Wiring Box Contains inputs from PLC to Coils Solenoids Manifold Base to accept air input and output air Coil Solenoid Receives input 24V from PLC to open a port Solenoid type will vary with machine application Common controls inclu...

Page 129: ... describes the process to move a router to the extend and the retract position with a double valve Extend Process If PLC determines the conditions are right to extend the Router 1 The PLC applies the control voltage to the Control Valve which directs com pressed air to extend port of the Cylinder 2 The Cylinder and Router are extended deactivating the Retract Sensor 3 The Router fully extends acti...

Page 130: ...The Cylinder and Router retract deactivating the Extend Sensor 3 When the Cylinder and Router are fully retracted the Retract Sensor is activated 4 The PLC senses the voltage from the Retract Sensor completing the process Positioning System Load Force Translated Positioning PLC Instructions Position Feedback Extend Sensor Retracted Sensor Deactivated Activated 24 Volts Extended Cylinder 24 V Appli...

Page 131: ...embly Load Position Feed Back Air In Control Valve Retract Sensor Activated Air Pressure Retracts Cylinder and Router Assembly RETRACTED Positioning System Load Force Translated Positioning PLC Instructions Position Feedback Extended Sensor Retracted Sensor Activated Deactivated 0 Volts Retracted ...

Page 132: ... feed problems far marks in the corners of hinge pockets and flipping screws in Hoppers However sometimes machine settling mechanics be broken in may be cause to slightly adjust extend and retraction speed If more than 1 2 turn on adjustment knobs are needed call in a specialist or check with Kval customer service at 1 800 553 5825 Adjusting Cylinder Extend Speed Adjusting Cylinder Retraction Spee...

Page 133: ...to Eye 0VDC is sent to the PLC As a result any of the photo detectors output equals 0VDC when a door is sensed Some detectors have an emitter and receiver built in one unit such as an in feed sensor where a door blocks the light and reflects back to the unit Some detectors have an emitter and receiver built in separate units such as the through beam sensor set at a distance from each other If an a...

Page 134: ...tively equal 0 VDC Check the output voltages of the sensors in inactive mode The voltage should effec tively equal 24 VDC The distance from an eye to the door should be in range Typically the range should be 3 4 to 7 8 from the top of all eyes to the door The Limit Switch is activated by an assembly moving a switch arm Depending on the model of limit switch the amount of pre travel amount of movem...

Page 135: ...s are failing by watching the lights turn on or off Compare the lights on the IDEC or Beckhoff controllers to the electrical print to determine what systems are being affected If the Power Stops During Normal Operation 1 Check that the input power disconnect switch is not turned off 2 Check that all of the emergency stop buttons are in the normal position 3 Check the Light Tower See Description of...

Page 136: ...scription of the Light Tower for more information Note Most electrical problems are related to mechanical malfunction e g stuck motors jammed chain blocked photo sensors etc Note If a solenoid valve is suspected and not cleared in the air checks section see it can be electrically jumped to check operation 4 With the power off check for motor overloads by pressing each reset button usu ally at the ...

Page 137: ...tialize Red Machine Error Solid General Error 1 Flash EtherCat Device not Ready to Run 2 Flashes VFD Servo or Motor Error 3 Flashes 24 VDC Power Error Yellow External Error Solid General Error 1 Flash 3 Phase Voltage Error 2 Flashes Low Air Error Blue Operator Status Solid Waiting for Operator 1 Flash Reposition Door Green Machine is Operational Safety OFF Clear Safety Project not Running Red Safe...

Page 138: ...l See your machine s schematic package for detailed wiring information Connections to Servo Drives The Servo Drives are located in the Main Electrical Panel The outputs connect to the servo motors of carious assemblies They may include the Head X Y and Z motors feed motors back section location X Y and Z motors For detailed wiring information see your machine s electrical drawings Connections to V...

Page 139: ...ing lube 12 DVI USB module location 2 E electrical panels description 11 EtherCat smart power supply 2 terminals location 2 ethernet module connection to servo amplifiers 2 F flange block bearing maintenance schedule 12 G gear box maintenance schedule 12 H high voltage electrical panel 11 home the machine 16 I inductive proximity sensor 15 in feed section key assemblies 2 internet access location ...

Page 140: ...22 Restore Points create load delete 8 router bit replacing 18 S Safe Mode Enabled Disabled 22 safety guidelines 4 Safety Sign Off Sheet Safety Concerns 20 sensors troubleshooing 16 types 15 voltage levels 15 service connecting your machine to KVAL Service 3 servo drives connections location 20 location in main electrical panel 11 six light panel description 33 19 start machine button power up 16 ...

Page 141: ......

Page 142: ......

Page 143: ......

Page 144: ...partment Kval Incorporated 825 Petaluma Boulevard South Petaluma CA 94952 Contacting KVAL Phone and Fax In the U S and Canada call 800 553 5825 or fax 707 762 0485 Outside the U S and Canada call 707 762 7367 or fax 707 762 0485 Email service kvalinc com http www kvalinc com ...

Reviews: