


Replacing Bits in the Front Section
3-33
KVAL Commander III Service Manual
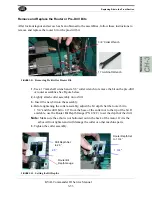
Remove and Replace the Router or Pre-Drill Bits
After lockout tagout and access has been obtained to the assemblies, follow these instructions to
remove and replace the router bit or the pre-drill bit.
FIGURE 3-21.
Removing Pre-Drill or Router Bit.
1.
Use a 17 mm shaft wrench and a 3/8 “collet wrench to remove the bit on the pre-drill
or router assemblies.See Figure below.
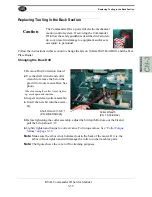
2.
Lightly attach collet assembly on to drill.
3.
Insert the new bit into the assembly.
4.
Before tightening the collet assembly, adjust the bit depth. Set the router bit to
1 3/4 “and the drill bit to 2.0” from the base of the collet nut to the tip of the bit. If
available, use the Router Bit Depth Gauge (PN 432 C) to set the depth of the drill.
Note:
Make sure the arbor is not bottomed out in the back of the motor. If it is the
arbor will not tighten and will damage the collet or other machine parts.
5.
Tighten the collet assembly.
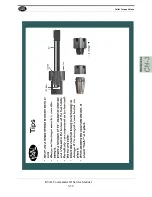
FIGURE 3-22.
Setting the Bit Depths
3/ 8 “Collet Wrench
17 mm Shaft Wrench
Drill Depth Set
to 2.0”
Router Depth Set
to 1 3/4 “
1 3/4 ““
2.0 “
Router Bit
Depth Gauge
Summary of Contents for Commander III
Page 5: ...KVAL Commander III Service Manual KVAL Commander III Service Manual ...
Page 10: ...Notes ...
Page 31: ...Safety Sign Off Sheet 1 21 KVAL Commander III Service Manual ...
Page 36: ...Notes ...
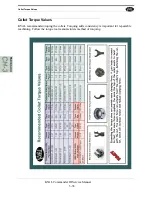
Page 75: ...Collet Torque Values 3 39 KVAL Commander III Service Manual ...
Page 76: ...Collet Torque Values KVAL Commander III Service Manual 3 40 ...
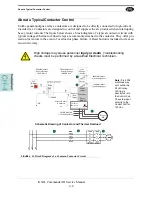
Page 100: ...Network System Overview KVAL Commander III Service Manual 4 24 ...
Page 103: ......