

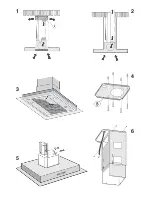


Installation is now complete and the grease filters can be reassembled.
OPERATION
DESCRIPTION OF THE KEYS AND FUNCTIONS
(Fig. 18):
The appliance is equipped with a completely automatic system (Advanced Sensor Control) capable to manage
all the functions of your hood. Thanks to the ASC, the air in the kitchen is costantly clean and odour free
without any manual intervention. The advanced sensor catches all sort of vapours, smokes and odours caused
by the cooking process. The ASC also captures an abnormal presence of GAS.
To access this function, press
the key “A” (see point 1 of the instructions).
The hood also features numerous other functions that you can choose according to your needs and preferences.
Using the “MENU” key, you can access the selection methods, and pressing the - and + keys you can search
for the function you want to activate (the function flashes on the display); once you have made your selection, activate
it by pressing “ok”. To exit from the Menu, press the “MENU” key again.
To activate/disactivate the hood motor, press the - key (or + key) and select the desired speed.
List of the functions on the Menu :
- MINUTE COUNTER WITH BUZZER: The hood is equipped with a minute counter that emits an acoustic signal when
the time has elapsed. To activate this function, see point 3 of the instructions.
- TIMER: The hood is equipped with a device for automatic stop after 5 (or 10) minutes. To activate this function, see
point 4 of the instructions.
- CLOCK: the time can be shown on the display. To activate this function or set the time, see point 5 of the instructions.
- SENSOR SENSITIVITY: You can adjust the sensitivity of the sensor according to your specific needs. To access
this function, see point 6 of the instructions.
- INSIDE TEMPERATURE INDICATION: The inside temperature of the room can be shown on the display. To activate
this function, see point 7 of the instructions.
- OUTSIDE TEMPERATURE INDICATION (optional): It is possible to have the outside temperature shown on the display.
To activate this function, see point 8 of the instructions.
- GREASE FILTER CLEANING INDICATION: The hood signals when it is time to clean the grease filters. See point 9
of the instructions.
- CHARCOAL FILTER REPLACEMENT INDICATION: The hood signals when it is time to replace the charcoal filters (for
appliances in the filtering version). See point 10 of the instructions.
1. Key “A” (ASC function) : To activate the sensor function, press key “A”. With the sensor activated, the hood switches
on automatically in the presence of any type of odour, steam, smoke, or heat from the cooking process, and also in the
presence of any anomalous gas leaks in the environment. When the sensor is active, the display shows the symbol
.
To disactivate the sensor, press the key A. With the sensor activated, pressing the - key or the + key takes you directly
to the manual function and the symbol
is shown.
2. Key
: Light On/Off.
3. Minute counter: To activate the counter, press the “MENU” key (the symbol
appears on the display), then press
“ok”. The display shows the number 00.00 blinking. Using the - and + keys you can set the desired number of minutes
(from 1 to 99); keeping the - or + key pressed, the number of minutes scrolls rapidly. Press “ok” to confirm, then press
“MENU” to exit. When the minutes have elapsed, an ACOUSTIC SIGNAL is emitted and the indication blinks on the display:
press “ok” to disactivate it (otherwise, it is disactivated automatically after 5 minutes).
To disactivate the counter at any moment, press the “MENU” and “ok” (reset) keys together.
4. Timer: When the timer is activated, the hood stops automatically after 5 minutes (or 10). To activate the timer, press
the “MENU” key and then the - and + keys until the blinking symbol appears on the display; confirm by pressing “ok”.
You can select the timer for 5 or 10 minutes by pressing the - and + keys, and then press “ok” to confirm. To exit from
the menu, press the “MENU” key.
5. Clock: To activate the clock function and set the time, press the “MENU” key and then the - and + keys until the 4
digits appear on the display blinking; set the time using the - and + keys, then confirm with “ok”. To exit from the menu,
press the “MENU” key. To disactivate the clock function, press the “MENU” and “ok” (reset) keys together.
6. Sensor sensitivity: To adjust the sensitivity of the sensor, press the “MENU” key and then the - and + keys until the
symbol
blinks on the display. Then press “ok”, select the sensitivity from 1 to 9 using the - and + keys and confirm
with “ok”. To exit from the menu, press the “MENU” key”.
7. Inside temperature indication: To view the inside temperature on the display, press the “MENU” key and then the - key
(or + key) until the display shows “In 18°C” or similar; then press “ok”. The inside temperature is measured by a measuring
device (included) which can be positioned anywhere in the room.
8. Outside temperature indication (optional): To view the outside temperature on the display, press the “MENU” key and
then the - key (or + key) until the display shows “Out 15°C” or similar; then press “ok”. The outside temperature is measured
by a measuring device (optional) that can be positioned outside the building, protected from water (maximum distance
Summary of Contents for IKD6700.0
Page 6: ...1 2 3 4 5 6 ...
Page 7: ...7 8 9 10 11 ...
Page 8: ...12 13 14 15 16 ...
Page 9: ...17 18 19 ...


