background image

53 / 109

Issued: 11.10.2013 Version: KST VisionTech 2.1 V1

10 Configuration

10.5.1

Installing the image processing environment

Precondition

The VisionTech software has been copied to a USB stick, or is accessible 
via the network.

Procedure

1. Copy the software to the service laptop.
2. Execute the file VisionTech.exe in the directory ..\INTERNAT\KRCSET-

UP\Vision. The image processing environment is installed.

10.5.2

Licensing the image processing environment in WorkVisual

10.5.2.1 Activating the license

Procedure

1. Select the menu sequence 

Editors

 > 

Option packages

 > 

VisionTech

 > 

License configuration

. The 

License configuration

 window is opened.

2. Click on 

Install license

.

3. Enter the license key in the 

License key

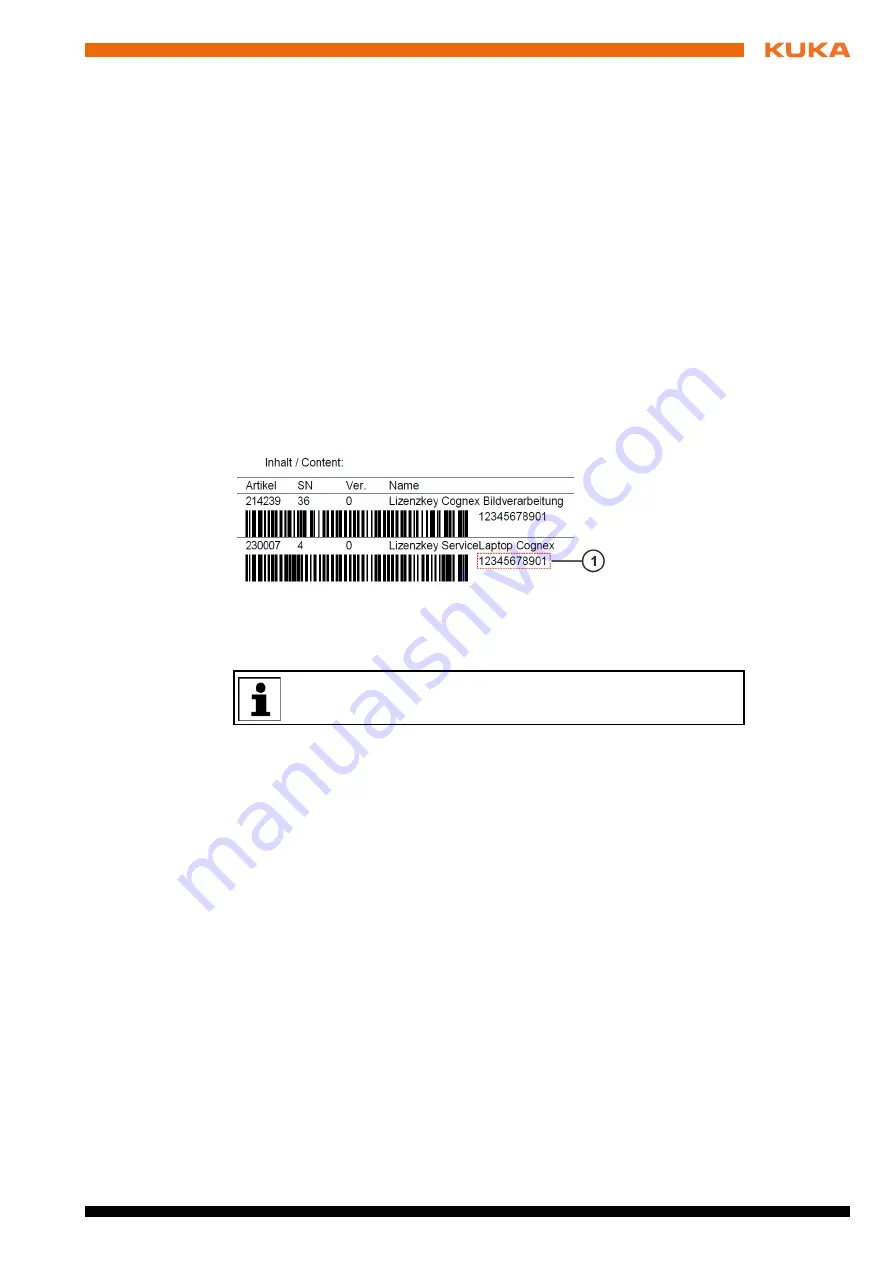
 box. The license key  is enclosed 

with the software.

4. Click on 

Create footprint

 and select a directory. A file is generated in the 

selected directory which links the image processing computer to the li-
cense. An encrypted signature for this computer is saved in the file.

5. Send the generated file to [email protected]. KUKA Service 

will use this to create a licensing file and send it to you.

6. Click on 

...

, select the received licensing file and confirm with 

OK

.

7. Restart WorkVisual.

10.5.2.2 Repairing the license

Description

If hardware components are modified, added or exchanged, this may invali-
date the license. A license becomes invalid if the current signature of the im-
age processing computer differs too greatly from the saved signature. In this 
case, the license can be repaired.

Procedure

1. Select the menu sequence 

Editors

 > 

Option packages

 > 

VisionTech

 > 

License configuration

. The 

License configuration

 window is opened.

2. Click on 

Repair license

.

3. In the list of installed licenses, select the license to be repaired.
4. Click on 

Create repair request

 and select a directory. A file is generated 

in the selected directory.

Fig. 10-1: Extract from the enclosed printout (example)

1

License key

It is not possible to take images with the license for the service laptop.

Summary of Contents for VisionTech 2.1

Page 1: ...KUKA System Technology KUKA VisionTech 2 1 For KUKA System Software 8 2 For VW System Software 8 2 KUKA Roboter GmbH Issued 11 10 2013 Version KST VisionTech 2 1 V1 ...

Page 2: ...he case of a replacement or service work We have checked the content of this documentation for conformity with the hardware and software described Nevertheless discrepancies cannot be precluded for which reason we are not able to guarantee total conformity The information in this documentation is checked on a regular basis how ever and necessary corrections will be incorporated in the subsequent e...

Page 3: ...nnecting cables 21 4 3 1 Connecting cables KR C4 21 4 3 2 Connecting cables KR C4 compact 22 4 4 Dimensions of the camera 23 4 5 Dimensions of the extension 24 4 6 Plates and labels 24 5 Safety 27 5 1 General safety measures 27 5 2 Standards and regulations 27 6 Planning 29 6 1 Connecting cables and interfaces 29 7 Transportation 31 7 1 Transportation 31 8 Installation and licensing 33 8 1 System ...

Page 4: ...ment task overview 51 10 3 Creating a task and taking images stationary 51 10 4 Creating a task and taking images moving 52 10 5 Setting up an image processing task in WorkVisual 52 10 5 1 Installing the image processing environment 53 10 5 2 Licensing the image processing environment in WorkVisual 53 10 5 2 1 Activating the license 53 10 5 2 2 Repairing the license 53 10 5 2 3 Activating an emerg...

Page 5: ...rogram DO_GETVTRESULT 75 11 17 Subprogram DO_GETVTRESULTS 76 11 18 Subprogram VT_DIRECT 77 12 Example programs 79 12 1 Example program 79 13 Messages 83 14 Maintenance 89 14 1 Maintenance symbols 89 15 Repair 91 15 1 Exchanging the switch 91 15 2 Exchanging the camera 91 15 3 Exchanging the motherboard 91 16 Troubleshooting 93 17 Decommissioning storage and disposal 95 17 1 Decommissioning 95 17 2...

Page 6: ...6 109 Issued 11 10 2013 Version KST VisionTech 2 1 V1 KUKA VisionTech 2 1 ...

Page 7: ...e hints serve to make your work easier or contain references to further information 1 3 Trademarks Windows is a trademark of Microsoft Corporation VisionPro is a trademark of Cognex Corporation These warnings mean that it is certain or highly probable that death or severe injuries will occur if no precautions are taken These warnings mean that death or severe injuries may occur if no precautions a...

Page 8: ...abit Ethernet GenICam Generic Interface for Cameras generic pro gramming interface for cameras used in industrial image processing Reference pose Robot position for image acquisition Tool block Image processing task created using WorkVi sual EKI Ethernet KRL interface PoE Power over Ethernet Power supply via network KONI KUKA Option Network Interface KLI KUKA Line Interface Connection to Ethernet ...

Page 9: ...be operated simultaneously with the system Only hardware components approved by KUKA Roboter GmbH may be used The hardware components must only be operated under the specified environmental condi tions Misuse Any use or application deviating from the intended use is deemed to be imper missible misuse This includes e g Operation outside the permissible operating parameters Use in potentially explos...

Page 10: ...10 109 Issued 11 10 2013 Version KST VisionTech 2 1 V1 KUKA VisionTech 2 1 ...

Page 11: ... can be used to correct the position of the robot relative to the position of a component Areas of appli cation Detecting the position of components Deracking Depalletizing Communication The robot controller communicates with one or more GigE cameras via the im age processing system The connection between the kernel system and the image processing system is established via the Ethernet KRL interfa...

Page 12: ... cameras 3 2 1 KUKA GigE switch Overview There are 5 RJ45 connections on the KUKA GigE switch Ports 1 to 4 are PoE capable KUKA MXG20 cameras can be connected to ports 1 to 3 Port 5 can be used to connect the KR C4 compact this port is not PoE capa ble The switch must be integrated into a housing with a protection rating of IP 54 and supplied with a direct voltage of 12 36 V The switch can be moun...

Page 13: ...itch for port 6 selection of SFP speed 3 RJ45 PoE connection for the robot controller 4 3 RJ45 PoE connections for cameras Designation Description DIP switch for Power Alarm Relay Output DIP switch 1 P1 error message DIP switch 2 P2 error message On Activated Off Deactivated Changeover switch for port 6 selection of SFP speed DIP switches 1 and 2 on 100 Mbps DIP switches 1 and 2 off 1000 Mbps ...

Page 14: ...tion 1 P1 Green Switch is on if powered via V1 2 P2 Green Switch is on if powered via V2 3 Gigabit LAN port Green GigE port is active data being transferred to the connected device 4 Gigabit LAN port Yellow 100 Mbps 5 Gigabit PoE port Green Port is active 6 Gigabit PoE port Green PoE is active 7 Fault Yellow Fault at P1 or P2 ...

Page 15: ...oduct description Power supply Interfaces Fig 3 5 KUKA GigE switch power supply 1 Power supply connection 12 36 V DC 2 Power supply connection 24 V DC 3 Output alarm relay 4 Power supply connection 12 36 V DC 5 Housing ground Fig 3 6 KUKA GigE switch interfaces ...

Page 16: ...ens hood depth 45 mm can be enlarged using extension rings 12 mm each The lens matches the sensor size 1 1 8 A protective cap is mounted on the connection for the process interface pow er supply This may only be removed if a cable is connected to the interface Connector pin allocation It is recommended to use no more than 3 extension rings Fig 3 7 KUKA MXG20 camera overview 1 LEDs 2 Data PoE inter...

Page 17: ...bration plates are available in the following sizes 24 x 24 inch 60 9 x 60 9 cm size of one square 20 mm 12 x 12 inch 30 5 x 30 5 cm size of one square 10 mm 11 5 x 8 inch 29 2 x 20 3 cm size of one square 6 35 mm 5 75 x 4 inch 14 6 x 10 2 cm size of one square 3 175 mm 2 875 x 2 inch 7 3 x 5 1 cm size of one square 1 5875 mm Fig 3 9 Contact diagram process interface power supply view from contact...

Page 18: ...18 109 Issued 11 10 2013 Version KST VisionTech 2 1 V1 KUKA VisionTech 2 1 ...

Page 19: ...ated current max 50 mA MTBF 335774 h 45 C Sensor size 1 1 8 Protection rating IP 67 Weight 185 g Conformity CE Storage and transpor tation 25 C to 70 C 248 K to 343 K Operation 5 C to 50 C 278 K to 323 K Device temperature max 50 C 323 K at the measurement point Air humidity 5 95 no condensation Data PoE interface Transmission speed 100 Mbit s Fast Ethernet 1000 Mbit s Gigabit Ethernet Connection ...

Page 20: ...3u for 100base TX and 100base X IEEE 802 3z for 1000base X IEEE 802 3ab for 1000base T IEEE 802 3x for flow control IEEE 802 3at PoE specification up to 30 watts per port for PoE Ports 4x with PoE 1x SFP 1x without PoE Packet size Up to 9 kB supports jumbo frames Auto functions Auto negotiation auto crossover PoE Conforms to IEEE 802 3at Protective function Against overload current Power infeed Up...

Page 21: ...uration 4x CAT6 elements acc to DIN EN 50288 5 2 Conductor Bare copper strand 4x2xAWG26 Outside diameter 8 3 0 2 mm Operating voltage 60 V Transmission charac teristics CAT6 ele ment in accordance with DIN EN 50288 5 2 Transmission range 50 m nominal Bending radius one time 3x cable diameter Bending radius mov ing 10x cable diameter Certification UL AWM Style 20963 80 C 30 V Connecting cable Conne...

Page 22: ...nit A13 1 X74 1 1 A13 2 X74 2 1 RJ45 connector Push Pull V4 connector Linear unit robot X74 1 1 X74 1 X74 2 1 X74 2 PushPull V4 coupling PushPull V4 connector Switch robot A13 1 X74 1 A13 2 X74 2 RJ45 connector Push Pull V4 connector Switch camera A13 1 B1 A13 2 B2 A13 3 B3 RJ45 connector M12 male connector 8 contact Type Not suitable for use on robots Configuration 4x CAT6 elements Conductor Bare...

Page 23: ...013 Version KST VisionTech 2 1 V1 4 Technical data 4 4 Dimensions of the camera Fig 4 1 Dimensions of the camera dimensions in mm 1 Rear view 2 Side view 3 View from below 4 Front view 5 Side view with protective lens hood ...

Page 24: ...r this depends on the interface to which the camera is connected Interface X64 1 A13 1 PoE 1 label B1 Interface X64 2 A13 2 PoE 2 label B2 Interface X64 3 A13 3 PoE 3 label B3 for stationary cameras only Switch The following plates and labels are attached to the switch Fig 4 2 Dimensions of the extension dimensions in mm 1 Front view 2 Side view Fig 4 3 Plates and labels on the camera Plate no Des...

Page 25: ...25 109 Issued 11 10 2013 Version KST VisionTech 2 1 V1 4 Technical data Fig 4 4 Plates and labels on the switch Plate no Designation 1 Switch identification plate ...

Page 26: ...26 109 Issued 11 10 2013 Version KST VisionTech 2 1 V1 KUKA VisionTech 2 1 ...

Page 27: ...s and regulations The Safety chapter in the operating and programming instructions of the KUKA System Software KSS must be observed Death to per sons severe injuries or considerable damage to property may other wise result If the position of the component is not correctly detected this may result in a collision Before operation check the result of the base correction using the subprogram VT_CHECKP...

Page 28: ...28 109 Issued 11 10 2013 Version KST VisionTech 2 1 V1 KUKA VisionTech 2 1 ...

Page 29: ...s 3 to 6 can be found in separate documentation Depending on the specific system configuration connecting cables are re quired in different lengths The following cable lengths are available The maximum length of the connecting cables must not exceed 45 m with moving robot guided cameras and 35 m with stationary cameras Thus if the robot is operated on a linear unit which has its own energy supply ...

Page 30: ...tailed specifications of the connecting cables see 9 3 6 De scription of the connecting cables Page 40 Interface X64 Interfaces X64 1 to X64 3 are situated on the connection panel of the KR C4 Fig 6 1 Interfaces X64 1 to X64 3 1 Connection X64 1 3 Connection X64 3 2 Connection X64 2 ...

Page 31: ... be mounted on the connection for the process interface power supply The cameras must be packaged for transportation in ESD protection foil Care must be taken to ensure that the cameras do not come into contact with hu midity Switch The switch must be packaged for transportation in ESD protection foil Care must be taken to ensure that the switch does not come into contact with hu midity ...

Page 32: ...32 109 Issued 11 10 2013 Version KST VisionTech 2 1 V1 KUKA VisionTech 2 1 ...

Page 33: ...in the Name column and drive E or K in the Path column If not press Refresh 4 If the specified entries are now displayed continue with step 5 If not the drive from which the software is being installed must be config ured first Press the Configuration button A new window opens Select a line in the Installation paths for options area Note If the line already contains a path this path will be overwr...

Page 34: ...G file A LOG file is created under C KRC ROBOTER LOG 8 4 Licensing VisionTech 8 4 1 Activating the license Procedure 1 In the main menu select VisionTech Licensing 2 Enter the license key in the License key box The license key is either on a sticker in the robot controller or is enclosed with the software 3 Press Create footprint and select a directory A file is generated in the se lected director...

Page 35: ...d 3 Press Create repair request and select a directory A file is generated in the selected directory 4 Send the generated file to VisionTech kuka roboter de KUKA Service will use this to create a new licensing file and send it to you 5 Press select the received licensing file and confirm with OK 6 Reboot the robot controller 8 4 3 Activating an emergency license Description It is possible to activ...

Page 36: ...36 109 Issued 11 10 2013 Version KST VisionTech 2 1 V1 KUKA VisionTech 2 1 ...

Page 37: ...the Ethernet KRL interface Page 43 4 Configure the camera network 9 5 Configuring the camera network Page 43 5 Configure the camera 9 6 Configuring cameras Page 44 6 Align the camera 9 7 Aligning camera stationary Page 45 7 Calibrate the camera 9 9 Calibrating camera stationary Page 46 Step Description 1 Connect camera to the robot controller 9 3 4 Networking KR C4 with interface X64 robot guided ...

Page 38: ...ligning cameras moving Page 45 7 Calibrate the cameras 9 10 Calibrating cameras moving Page 48 Step Description Variant Description KR C4 with interface X64 robot guided 9 3 4 Networking KR C4 with inter face X64 robot guided Page 39 KR C4 with cable inlet robot guided 9 3 5 Networking KR C4 with cable inlet robot guided Page 40 KR C4 with interface X64 stationary 9 3 1 Networking KR C4 with inter...

Page 39: ... X64 robot guided Procedure Carry out networking as illustrated below Fig 9 2 Networking KR C4 with cable inlet stationary maximum num ber of cameras 1 KR C4 2 KUKA MXG20 camera Fig 9 3 Networking KR C4 compact stationary maximum number of cameras 1 KR C4 compact 3 KUKA MXG20 camera 2 KUKA GigE switch Fig 9 4 Networking KR C4 with interface X64 robot guided 1 KUKA MXG20 camera 3 Linear unit option...

Page 40: ...near unit Connecting cable linear unit robot Connecting cable switch robot Connecting cable switch camera For the KR C4 compact Connecting cable KR C4 compact switch Connecting cable switch camera Interfaces KR C4 For connection of the connecting cables between the KR C4 linear unit robot and cameras the following connectors are available at the interfaces Fig 9 5 Networking KR C4 with cable inlet...

Page 41: ...ing cables are for a KR C4 with a cable inlet Connecting cable Connector des ignation Connections Switch linear unit A13 1 X74 1 1 A13 2 X74 2 1 RJ45 connector Push Pull V4 connector Switch robot A13 1 X74 1 A13 2 X74 2 RJ45 connector Push Pull V4 connector Switch camera A13 1 B1 A13 2 B2 A13 3 B3 RJ45 connector M12 male connector 8 contact Fig 9 6 Connecting cable KR C4 linear unit Fig 9 7 Connec...

Page 42: ...le at the interfaces Connecting cables KR C4 compact Fig 9 10 Connecting cable switch linear unit Fig 9 11 Connecting cable switch robot Fig 9 12 Connecting cable switch camera Connecting cable Connector des ignation Connections KR C4 compact switch KONI No PoE5 RJ45 connectors at both ends Switch camera PoE 1 B1 PoE 2 B2 PoE 3 B3 RJ45 connector M12 male connector 8 contact Fig 9 13 Connecting cab...

Page 43: ... execution of the interrupt program 3 Save and close the file 4 In the main menu select Configuration Inputs outputs I O drivers and click on Reconfigure The I O driver is reconfigured 9 5 Configuring the camera network Following installation of VisionTech the network card is configured as follows IP address 192 169 2 100 Subnet mask 255 255 0 0 Precondition The cameras are connected to the GigE s...

Page 44: ...tationary and moving cameras A station ary camera is fixed in its position e g mounted on a stand or on the ceiling A moving camera is mounted on the robot flange Procedure 1 In the main menu select VisionTech Sensor overview 2 Select the camera that is to be configured 3 On the General tab select the mounting type for the camera 4 Optionally Enter the name e g Camera on robot in the Description b...

Page 45: ...s of the camera with the fastening screws 11 Screw on the protective lens hood 12 Remove the protection foil from the protective lens hood 9 8 Aligning cameras moving Precondition The object to be measured e g component or calibration plate is mount ed The cameras are networked The network has been configured The cameras are either mounted on the robot flange or on a tool that is mounted on the ro...

Page 46: ... 1 In the main menu select VisionTech Live picture 2 Press on the live image of the camera The live image is displayed in en larged form 3 Enter the calibration exposure time or set it using the plus minus keys or the slider control 4 Save the settings by selecting Set calibration exposure 5 In the main menu select VisionTech Calibration A freeze frame image from the camera is displayed on the fix...

Page 47: ...n of the calibration plane in the Descrip tion box c Select an existing base in the Base ID box or choose Measure new base to measure a new base The base can for example be cali brated using the 3 point method Fig 9 16 Calibration plate with fiducial mark 1 Fiducial mark 2 Origin Recommendations The camera should be directly above the calibration plate The calibration plate should fill as much of ...

Page 48: ... networked The network has been configured The cameras are aligned A calibration plate is mounted and is located in the field of vision of the cameras The NULLFRAME tool is selected Procedure 1 In the main menu select VisionTech Calibration Freeze frame images from the cameras are displayed on the moving sen sors tab The freeze frame images of the cameras that have already been calibrated have a g...

Page 49: ...es from KUKA are available for selection Each calibra tion plate has a different size which is marked on the plate The calibration plate used can be determined on the basis of size 7 Press Calibrate The calibration process takes approx 5 to 10 minutes 8 Once the calibration process has been completed the result is displayed For an adequate degree of accuracy the result should be 1 mm 9 Press Save ...

Page 50: ...50 109 Issued 11 10 2013 Version KST VisionTech 2 1 V1 KUKA VisionTech 2 1 ...

Page 51: ...k and taking images stationary Page 51 10 4 Creating a task and taking images moving Page 52 3 Set up an image processing task in WorkVisual 10 5 Setting up an image processing task in WorkVi sual Page 52 4 Configure task 10 6 Configuring a 2D task Page 56 5 Generate model 10 7 Generating a 2D model Page 59 6 Test task 10 8 Testing a 2D task Page 61 7 Create KRL program Step Description 1 Teach re...

Page 52: ... in the Configurations area 4 In the task press the Settings icon and select Save The images are saved in the directory C KRC TP VisionTech Snap shots Name of the task Camera serial number The Snapshots folder is a shared network resource A maximum of 20 images can be saved per camera any further images overwrite the oldest existing image 10 5 Setting up an image processing task in WorkVisual Step...

Page 53: ...g computer to the li cense An encrypted signature for this computer is saved in the file 5 Send the generated file to VisionTech kuka roboter de KUKA Service will use this to create a licensing file and send it to you 6 Click on select the received licensing file and confirm with OK 7 Restart WorkVisual 10 5 2 2 Repairing the license Description If hardware components are modified added or exchang...

Page 54: ... Creating a tool block file in WorkVisual Procedure 1 Open the VisionTech plug in Select the menu sequence Editors Option packages VisionTech Image processing task Alternatively Click on the button 2 Select the menu sequence Toolblock New 2D or 3D 3 Select the menu sequence Image source File or Directory and se lect the image s that were taken using the controller 4 Click on the button The image s...

Page 55: ...e for parts which are defined by relatively coarse structures e g complete panels The search area is the entire image Further tools can be added only the result of PatMax is transferred however LocatePartsKnown Position Type 2D With this template a number of parts are searched for in the field of view The rough position of these parts must be known however The search area is limited to the known r...

Page 56: ...with a PatMax tool LineSegFeature Straight line feature normally represents points on a straight edge of the part that is to be located Has a start point and end point which are defined by the search area of the FindLine tool LineFeature Line feature without a start and end point CircleFeature Feature which describes a circle in 3D Note The PatMax tool and the FindLine tool must not be renamed The...

Page 57: ...n PartResults List CogTransform 2DLinear Positions of the found components in image coordinates Scores List Double Accuracy with which the compo nents were detected Graphic CogGraphicCollec tion Graphic showing the results of the image processing task Output Type Description Error Exception Exceptions or errors that occur dur ing execution of the image process ing task UserData Object User specifi...

Page 58: ...en Description Fig 10 3 Configuring a 2D task Item Description 1 Back to Overview 2 Name of the task The name is freely selectable 3 State of the task Green Task has been successfully configured Red Task is not configured 4 Generate model Green frame Model has been successfully generated Red frame No model has yet been generated 5 Test task Activated The task can be tested Deactivated The task can...

Page 59: ...is now known all deviations are relative to this position Description Once the model has been generated a result window with images and a table is displayed The result is the position of the component in the calibration base Areas detected by the cameras are indicated in green in the images Areas that have not been detected are marked in red 7 Camera icon Set exposure time 0 200 ms Select calibrat...

Page 60: ...ence pose 3 In the Task area press Model Confirm the request with Yes A model is generated and a result window is displayed 4 The images in the result window can be enlarged To do so press the de sired image once Generation of the model has been successfully completed when the Mod el button has a green frame The reference position of the component is now known all deviations are relative to this p...

Page 61: ...do so press the de sired image once If user data from the tool block have been transferred they are displayed beneath the enlarged image Description Once the test has been performed a result window with images and a table is displayed Areas detected by the cameras are indicated in green in the images Areas that have not been detected are marked in red The differences between the reference position...

Page 62: ...e processing Output Type Description Graphic CogGraphicCollec tion Graphic showing the results of the image processing task Features List Cog3DCrsp2D 3D List of features found by means of the image processing Output Type Description Error Exception Exceptions or errors that occur dur ing execution of the image process ing task UserData Object User specific data forwarded to KRL by VisionTech Any t...

Page 63: ...aking of images is displayed 10 Optionally Enter the exposure time or set it using the plus minus keys or the slider control 11 Press Save picture An image is made 12 Press Save The setting is saved Configuration of the task has been successfully completed when the icon in the Status column changes to green Description Fig 10 6 Configuring a 3D task Item Description 1 Back to Overview 2 Name of th...

Page 64: ...een generated a result window with images and a table is displayed Areas detected by the cameras are indicated in green in the im ages Areas that have not been detected are marked in red All configured 5 Test task Activated The task can be tested Deactivated The task cannot be tested No model has yet been generated or the task is not configured 6 Settings icon Select the number of parts Take image...

Page 65: ...ion 2 Move the robot to the reference pose 3 In the Task area press Test The test is carried out and a result window is displayed 4 The images in the result window can be enlarged To do so press the de sired image once If user data from the tool block have been transferred they are displayed beneath the enlarged image Description Once the test has been performed a result window with images and a t...

Page 66: ...A VisionTech 2 1 The value of Score is the mean square residual error after calculation of the object position relative to the nominal position If the position of the object can not be calculated Score has the value 1 Fig 10 8 Result of a 3D task test example ...

Page 67: ...tion and processing of the images The configuration file and the name of the image processing task are transferred VT_TASKTRIGGER triggers an advance run stop Syntax VT_TASKTRIGGER Configuration file Image processing task Explanation of the syntax VisionTech is programmed using not KRL commands but subpro grams The default configuration file has the name VisionTechConfig Element Description Config...

Page 68: ...tion file is transferred The subprogram is executed in the advance run Syntax RET GET_VTRESULT Configuration file Explanation of the syntax Example 11 7 Subprogram GET_VTCORRECTIONFRAME Description The return value of GET_VTCORRECTIONFRAME is the correction frame ex tracted from the image processing result The image processing result is trans ferred GET_VTCORRECTIONFRAME is executed in the advance...

Page 69: ...eviation in the Y direction relative to the nominal position Z mm REAL Translational deviation in the Z direction relative to the nominal position A degrees REAL Rotational deviation about the Z axis rela tive to the nominal position B degrees REAL Rotational deviation about the Y axis rela tive to the nominal position C degrees REAL Rotational deviation about the X axis rela tive to the nominal p...

Page 70: ... Program execution is then resumed VT_WAIT triggers an advance run stop Syntax VT_WAIT Flag Explanation of the syntax Element Description Image processing result The image processing result that is to be checked Type VTRESULT IN DECL VTRESULT RESULT RESULT GET_VTRESULT VisionTechConfig VTRESULT_CHECK RESULT VisionTechConfig Element Description RET Return value Type BOOL TRUE The image processing t...

Page 71: ... robot pose here P1 lies within the defined limit range The defined limit value specifies a range about the original robot pose here P1 The range is repre sented here by a circle The defined limit value specifies the radius of the circle in which the target robot pose must lie If e g a limit value of 100 mm is specified the target robot pose must lie within a radius of 100 mm about the original ro...

Page 72: ...ible for all defined points to be addressed by the robot in the NULLFRAME base and with the NULLFRAME tool If a point is located outside of the robot s workspace the robot stops Fig 11 1 Base correction with VT_CHECKPOSELIMIT 1 Base correction 2 Offset of point P1 due to the base correction 3 Radius limit value Element Description RET Return value Type BOOL TRUE The target robot pose lies within t...

Page 73: ...ping point Gripping point Tool VT_CHECKPOSE can only be used once the gripping point of the component has been taught Fig 11 2 Example Defined points and defined area 1 Defined point on the robot 2 Defined area green Fig 11 3 Example Defined points within and outside of the defined area 1 Defined point within the defined area 2 Defined point outside of the defined area ...

Page 74: ...he new sections as Group4 and Group5 6 Save and close the file Element Description RET Return value Type BOOL TRUE All points defined by the user lie within the defined limit values FALSE The limit value of at least one point has been exceeded Base of the area Number of the base within which the point to be checked must lie Type INT IN Limit value X Maximum limit value of the base in X direction T...

Page 75: ...he image processing and creates a result structure The result is written to the transfer parameter RESULT The flags are then set to TRUE and FALSE The subprogram is executed in the ad vance run DO_GETVTRESULT can also be used as an interrupt program This is called after the image processing task has been executed In this case the subpro gram is executed in the main run Syntax DO_GETVTRESULT Config...

Page 76: ...S Configuration file RESULTS PART COUNTER Flag True Flag False Explanation of the syntax Example Element Description Configuration file Name of the configuration file Type CHAR IN RESULT Result of image processing Type VTRESULT OUT Flag True Number of the flag to be set to TRUE once the result has been read Type INT IN Flag False Number of the flag to be set to FALSE once the result has been read ...

Page 77: ...e of the start point Base of the end point Tool of the start point Tool of the end point Explanation of the syntax Example If the status for the basic area or for axes 2 and 3 changes from the start point to the end point the program can no longer be used Element Description Start point Type E6POS IN End point Type E6POS IN Base of the start point Number of the base of the start point Type FRAME I...

Page 78: ...78 109 Issued 11 10 2013 Version KST VisionTech 2 1 V1 KUKA VisionTech 2 1 ...

Page 79: ...data 27 28 FOR Part 1 TO PARTCOUNTER STEP 1 29 30 Result_valid VT_RESULTCHECK2 RESULTS PART 31 32 CorrFrame Get_VTCORRECTIONFRAME RESULTS PART 33 Base_Data 11 BASE_DATA 16 Corrframe 34 CheckPose_ok VT_CHECKPOSE 12 700 950 950 11 xGrippingPos 1 35 36 halt 37 38 IF CheckPose_ok True then 39 40 IF Part 1 then 41 VT_DIRECT XStartPos XProGrippingPos nullframe base_data 11 nullframe tool_data 1 42 ELSE ...

Page 80: ... the configuration file 22 Opens an EKI connection to the server 23 Requests execution of the task with the name Demo The result is output in base 16 As an alternative the subprogram VT_Tasktrigger can be used 2D fixed The result is output in the calibration base 2D and 3D moving The result is output in the base of the image acquisition point or the model generation the base of the image acquisiti...

Page 81: ...efined area 40 45 Calculates the motion between 2 points in such a way that axis 4 and axis 6 are moved as little as possible The query determines whether only 1 component start point ProGrip pingPos or multiple components PostGrippingPos Pro GrippingPos have been detected Note The program also functions without this call 47 51 The point is addressed in the corrected component base Note The progra...

Page 82: ...82 109 Issued 11 10 2013 Version KST VisionTech 2 1 V1 KUKA VisionTech 2 1 ...

Page 83: ...ng module is not yet completely loaded Wait until the image process ing module is completely loaded The image processing module is not correctly installed Contact KUKA Service An unknown exception occurred while acquiring a pic ture from the sensor Serial number Error message The camera is not connected Connect the camera and restart the controller The camera is performing a different process Term...

Page 84: ...m eras Align the cameras so that the object is in the field of vision The following error occurred while loading the task Error message The task is not compatible with this version of Vision Tech Only use compatible tasks The task does not have the TASK file format Only use files with the TASK format The sensor Serial number has no connection The camera is not connected to the robot controller Est...

Page 85: ...bject could be detected because the object was not in the field of vision of the cam eras Align the cameras so that the object is in the field of vision Not enough features have been detected for calculating the position of the part It was not possible to detect features in the images because the lighting was too strong or too weak Set the lighting lower or higher Too few features were detected in...

Page 86: ...ool block the order of the numbering of the features differs for 2 or more cameras Check the tool block in the image processing environ ment The order of the num bering of the features must be the same for all cameras Different objects can be seen in the camera images Align the cameras so that the same objects are in the field of vision of all cameras The calibration contains errors Recalibrate th...

Page 87: ...ice No image buffer available Error message No image source has been ini tialized Contact KUKA Service Unable to write the data to the image buffer Error message Insufficient memory reserved for the image source Only use valid image formats An error occurred when changing the default exposure time The camera cannot be accessed Check the connection to the camera An error occurred when changing the ...

Page 88: ...ve the request file to the selected path No write access is enabled for the selected directory Request write access for the selected directory or select a different path An error occurred while acti vating the license The response file is not com patible with the system that is to be licensed Check whether the correct response file has been selected There is no emergency license available All the ...

Page 89: ...ent visual inspection Clean component Exchange battery Fig 14 1 Maintenance points Interval Item Activity Depending on the degree of fouling 1 Depending on the degree of fouling clean the lens and the protective lens hood with a dry dust free microfiber cloth 1 year at the latest 1 Check the screw fastenings of the camera the lens and the protective lens hood Locking varnish can be used to secure ...

Page 90: ...90 109 Issued 11 10 2013 Version KST VisionTech 2 1 V1 KUKA VisionTech 2 1 ...

Page 91: ...switch 4 Connect the new switch to the power supply 15 2 Exchanging the camera Precondition The robot controller is switched off and secured to prevent unauthorized persons from switching it on again The power cable is de energized Procedure 1 Unplug the connecting cables 2 Remove the camera 3 Install the new camera 4 Plug in the connecting cables on the new camera 5 Switch on the new camera 6 Cal...

Page 92: ...92 109 Issued 11 10 2013 Version KST VisionTech 2 1 V1 KUKA VisionTech 2 1 ...

Page 93: ... connecting cable are fitted securely Check the connecting cable for dam age Neither LED P1 nor LED P2 lights up Check whether voltage is present at the power connection V1 or V2 LED P1 or LED P2 lights up red on the switch Check that the DIP switches are set cor rectly Both switches must be in the ON position LED Gigabit PoE Port does not light up on the switch The connected device does not suppo...

Page 94: ...94 109 Issued 11 10 2013 Version KST VisionTech 2 1 V1 KUKA VisionTech 2 1 ...

Page 95: ...nto long term storage the following points must be observed The place of storage must be as dry and dust free as possible Avoid temperature fluctuations Avoid condensation Observe and comply with the permissible temperature ranges for storage Select a storage location in which the packaging materials cannot be dam aged Only store the cameras and switch indoors Procedure Cover the cameras and switc...

Page 96: ...96 109 Issued 11 10 2013 Version KST VisionTech 2 1 V1 KUKA VisionTech 2 1 ...

Page 97: ... Nm Strength class Screw size 8 8 10 9 12 9 M1 6 0 17 Nm 0 24 Nm 0 28 Nm M2 0 35 Nm 0 48 Nm 0 56 Nm M2 5 0 68 Nm 0 93 Nm 1 10 Nm M3 1 2 Nm 1 6 Nm 2 0 Nm M4 2 8 Nm 3 8 Nm 4 4 Nm M5 5 6 Nm 7 5 Nm 9 0 Nm M6 9 5 Nm 12 5 Nm 15 0 Nm M8 23 0 Nm 31 0 Nm 36 0 Nm M10 45 0 Nm 60 0 Nm 70 0 Nm M12 78 0 Nm 104 0 Nm 125 0 Nm M14 125 0 Nm 165 0 Nm 195 0 Nm M16 195 0 Nm 250 0 Nm 305 0 Nm M20 370 0 Nm 500 0 Nm 600 ...

Page 98: ...98 109 Issued 11 10 2013 Version KST VisionTech 2 1 V1 KUKA VisionTech 2 1 ...

Page 99: ...odifications Diagnostic package KrcDiag Additionally for KUKA Sunrise Existing projects including applications For versions of KUKA System Software older than V8 Archive of the soft ware KrcDiag is not yet available here Application used External axes used Description of the problem duration and frequency of the fault 19 2 KUKA Customer Support Availability KUKA Customer Support is available in ma...

Page 100: ...ernardo do Campo SP Brazil Tel 55 11 4942 8299 Fax 55 11 2201 7883 info kuka roboter com br www kuka roboter com br Chile Robotec S A Agency Santiago de Chile Chile Tel 56 2 331 5951 Fax 56 2 331 5952 robotec robotec cl www robotec cl China KUKA Robotics China Co Ltd Songjiang Industrial Zone No 388 Minshen Road 201612 Shanghai China Tel 86 21 6787 1888 Fax 86 21 6787 1803 www kuka robotics cn Ger...

Page 101: ...gaon Haryana India Tel 91 124 4635774 Fax 91 124 4635773 info kuka in www kuka in Italy KUKA Roboter Italia S p A Via Pavia 9 a int 6 10098 Rivoli TO Italy Tel 39 011 959 5013 Fax 39 011 959 5141 kuka kuka it www kuka it Japan KUKA Robotics Japan K K YBP Technical Center 134 Godo cho Hodogaya ku Yokohama Kanagawa 240 0005 Japan Tel 81 45 744 7691 Fax 81 45 744 7696 info kuka co jp Canada KUKA Robo...

Page 102: ...elangor Malaysia Tel 60 3 8061 0613 or 0614 Fax 60 3 8061 7386 info kuka com my Mexico KUKA de México S de R L de C V Progreso 8 Col Centro Industrial Puente de Vigas Tlalnepantla de Baz 54020 Estado de México Mexico Tel 52 55 5203 8407 Fax 52 55 5203 8148 info kuka com mx www kuka robotics com mexico Norway KUKA Sveiseanlegg Roboter Sentrumsvegen 5 2867 Hov Norway Tel 47 61 18 91 30 Fax 47 61 18 ...

Page 103: ...a n 50 Armazém 04 2910 011 Setúbal Portugal Tel 351 265 729780 Fax 351 265 729782 kuka mail telepac pt Russia KUKA Robotics RUS Werbnaja ul 8A 107143 Moskau Russia Tel 7 495 781 31 20 Fax 7 495 781 31 19 info kuka robotics ru www kuka robotics ru Sweden KUKA Svetsanläggningar Robotar AB A Odhners gata 15 421 30 Västra Frölunda Sweden Tel 46 31 7266 200 Fax 46 31 7266 201 info kuka se Switzerland K...

Page 104: ...damark co za Taiwan KUKA Robot Automation Taiwan Co Ltd No 249 Pujong Road Jungli City Taoyuan County 320 Taiwan R O C Tel 886 3 4331988 Fax 886 3 4331948 info kuka com tw www kuka com tw Thailand KUKA Robot Automation M SdnBhd Thailand Office c o Maccall System Co Ltd 49 9 10 Soi Kingkaew 30 Kingkaew Road Tt Rachatheva A Bangpli Samutprakarn 10540 Thailand Tel 66 2 7502737 Fax 66 2 6612355 atika ...

Page 105: ...36 24 501609 Fax 36 24 477031 info kuka robotics hu USA KUKA Robotics Corporation 51870 Shelby Parkway Shelby Township 48315 1787 Michigan USA Tel 1 866 873 5852 Fax 1 866 329 5852 info kukarobotics com www kukarobotics com UK KUKA Automation Robotics Hereward Rise Halesowen B62 8AN UK Tel 44 121 585 0800 Fax 44 121 585 0900 sales kuka co uk ...

Page 106: ...106 109 Issued 11 10 2013 Version KST VisionTech 2 1 V1 KUKA VisionTech 2 1 ...

Page 107: ...4 EN 60204 1 A1 27 Ethernet KRL interface configuring 43 Example programs 79 F Functions 11 G General safety measures 27 GenICam 8 GET_VTCORRECTIONFRAME subprogram 68 GET_VTRESULT subprogram 68 GET_VTUSERDATA subprogram 75 GigE 8 I Image processing environment installing 53 Image processing environment licensing 53 Image processing task setting up 52 Images taking moving 52 Images taking stationar...

Page 108: ...block 8 Tool block file creating 54 Trademarks 7 Training 9 Transportation 31 Troubleshooting 93 U Uninstallation VisionTech 34 Update VisionTech 33 V VT_CHECKPOSE subprogram 72 VT_CHECKPOSELIMIT subprogram 71 VT_CLEAR subprogram 71 VT_CLOSECONNECTION subprogram 71 VT_DIRECT subprogram 77 VT_INIT subprogram 67 VT_OPENCONNECTION subprogram 67 VT_RESULTCHECK2 subprogram 70 VT_TASKTRIGGER subprogram ...

Page 109: ...109 109 Issued 11 10 2013 Version KST VisionTech 2 1 V1 KUKA VisionTech 2 1 ...

Reviews: