background image

Kramer Electronics Ltd. 


VS-88UT 

– Routing VS-88UT Ports 

36 


Set the Step-in outputs to which the video signal will be routed in case the step-in 
button is pressed on the is input. 

4.  Click 

Save

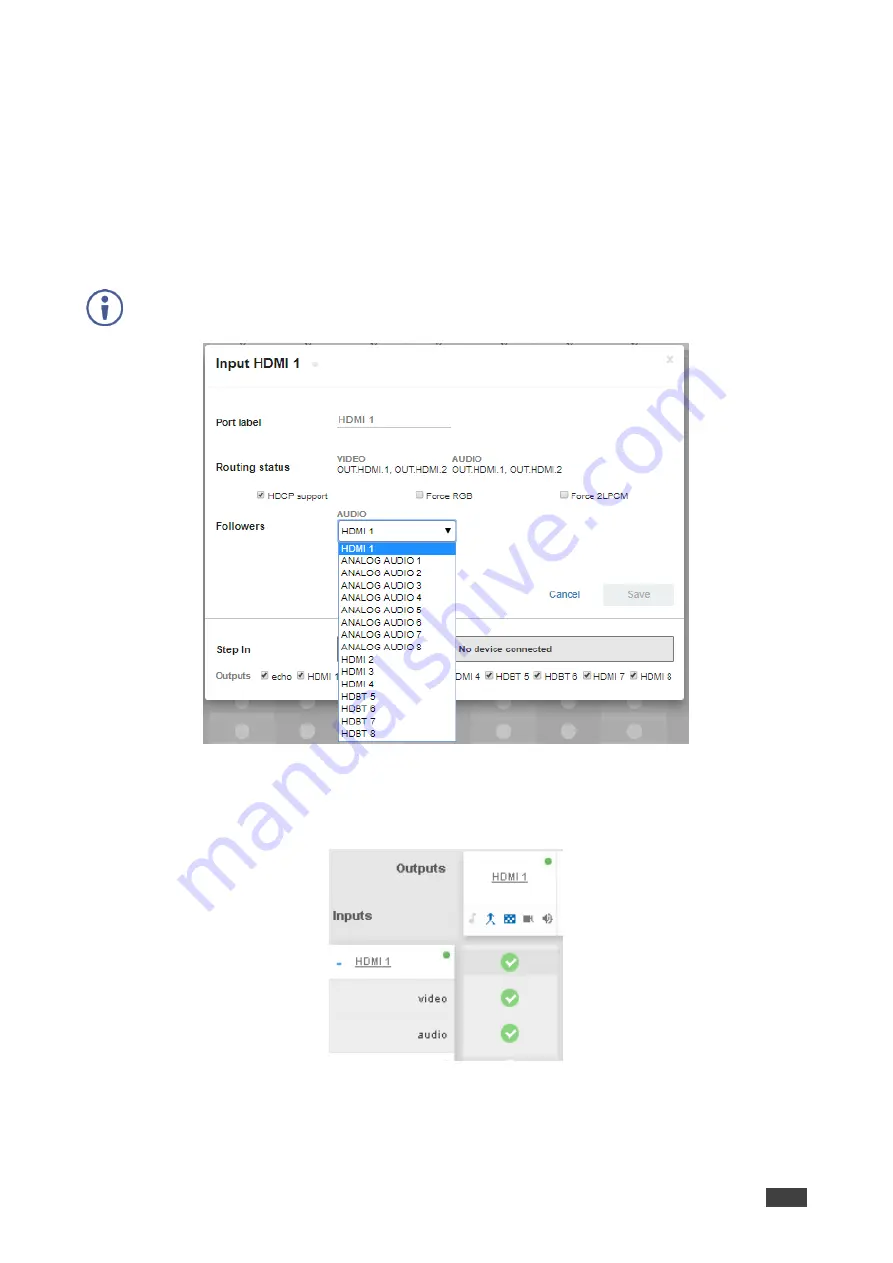
Selecting the HDMI Input Follower 

When selecting a follower to the input signal, this follower is routed together with the input 
signal, to the selected output. When routing HDMI signals, you can define the AUDIO signal 
to follow the video signal. 


The follower signal is applied in the next routing step. 


Figure 41: Routing Settings Page 

– HDMI 1 Input Audio Followers 

For example, when routing input HDMI 1 to the HDMI 1 output, HDMI 1 audio is routed to the 
output. 


Figure 42: Routing Settings Page 

– Input HDMI 1 Routed to Output HDMI 1 

Summary of Contents for VS-84UT

Page 1: ...P N 2900 300582 Rev 6 www kramerAV com USER MANUAL MODELS VS 88UT 8x8 HDMI HDBT Matrix Switcher VS 84UT 8x4 HDMI HDBT Matrix Switcher...

Page 2: ...io signals 22 Defining Global Settings 23 Routing VS 88UT Ports 29 Defining Port Settings 30 Managing EDID 60 Controlling Devices via the Controller 64 Room Controller Configuration via K Config 3 65...

Page 3: ...e deterioration in signal quality due to poor matching and elevated noise levels often associated with low quality cables Do not secure the cables in tight bundles or roll the slack into tight coils A...

Page 4: ...embeds the audio and outputs the signal to both HDMI and HDBaseT 2 0 with USB extension and PoE Outstanding audio support includes balanced stereo audio unbalanced stereo audio and de embedded audio...

Page 5: ...n and upload to room controller over customer IP network Kramer Network Compatible Remote control and management over customer IP network Programmable Step In over HDMI and HDBT When used in conjuncti...

Page 6: ...l ports Control devices via IR control protocols 4 GPI O control ports Control devices via general purpose I O ports individually configurable as digital input digital output or analog input interface...

Page 7: ...nd VS 84UT Figure 1 VS 84UT 8x4 HDMI HDBT Matrix Switcher Front Panel Figure 2 VS 88UT 8x8 HDMI HDBT Matrix Switcher Front Panel Feature Function ON LED Lights when receiving power STATUS LED Multi co...

Page 8: ...5 Terminal Block Connector Connect to the RS 485 port on a switcher or PC Pins B and A are for RS 485 Pin G may be connected to the shield if required K NET Terminal Block Connector Use with the K Con...

Page 9: ...ting Settings Web page by default the HDBT pair is active The HDBT Transmitter for example the Kramer TP 590Txr can pass audio and video signals as well as USB Ethernet power and serial commands HDBT...

Page 10: ...ect to a USB host 1 and 2 to pass data via the HDBT inputs or outputs ETH RJ 45 Ports CONTROL Connect to the PC or other controller through computer networking DATA 1G Connect to the PC or other contr...

Page 11: ...T before connecting any cables or power Warning Ensure that the environment e g maximum ambient temperature air flow is compatible for the device Avoid uneven mechanical loading Appropriate considerat...

Page 12: ...the HDMI and HDBT sources An HDMI source for example a laptop to the HDMI 1 IN connector An HDMI source for example a Blu ray player to the HDMI 4 IN connector An HDMI source for example a Blu ray pl...

Page 13: ...ntroller for example the Kramer RC 74DL to control a peripheral device such as Blu ray player that connects to the transmitter that is connected to HDBT IN 8 HDBT IR OUT 6 5 to 6 3 5mm mini jack to an...

Page 14: ...IN 8 RJ 45 port 2 Connect the audio sources An audio source for example the laptop audio output signal to the AUDIO INPUT 1 balanced stereo analog audio 5 pin terminal block connector 1 to 4 A microp...

Page 15: ...as Blu ray player that connects to the transmitter that is connected to HDBT IN 8 HDBT IR OUT 4 3 to 4 3 5mm mini jack to an IR controlled device for example a Blu ray player So that it can be control...

Page 16: ...n IR emitter and attach the emitter to a controlled device for example a display 3 Connect the GPI O 2 pin terminal block connector 1 to 4 to an input output device for example a motion detector 4 Con...

Page 17: ...use only the power cord that is supplied with this machine Connecting the Audio Inputs and Outputs The following are the pinouts for connecting balanced or unbalanced stereo audio sources to the audi...

Page 18: ...er using a straight through cable see Connecting the Ethernet Port via a Network Hub or Switch on page 18 If you want to connect via a router and your IT system is based on IPv6 speak to your IT depar...

Page 19: ...ure 12 Local Area Connection Properties Window 4 Highlight either Internet Protocol Version 6 TCP IPv6 or Internet Protocol Version 4 TCP IPv4 depending on the requirements of your IT system 5 Click P...

Page 20: ...epartment Figure 15 Internet Protocol Properties Window 7 Click OK 8 Click Close Connecting the Ethernet Port via a Network Hub or Switch You can connect the Ethernet port of the VS 88UT to the Ethern...

Page 21: ...ribed in the following sections The VS 88UT Web pages enable performing the following Globally Muting video and audio signals on page 22 Defining Global Settings on page 23 Routing VS 88UT Ports on pa...

Page 22: ...es 20 3 Enter the User Name and Password Admin Admin by default and click OK The Routing Settings page appears Figure 18 VS 88UT Routing Settings Page with Navigation List on Left Figure 19 VS 84UT Ro...

Page 23: ...Kramer Electronics Ltd VS 88UT Using the Web Pages 21 4 Click the desired Web page or click the arrow to hide the navigation list Figure 20 Routing Settings Page Navigation List Hidden...

Page 24: ...analog outputs are globally muted and a warning note immediately appears on the web pages heading Figure 21 Global Mute Warning This warning note notifies the administrator that the system is muted du...

Page 25: ...Navigation pane click Routing Settings The Routing Matrix page appears see Figure 18 2 Click Presets Settings next to Routing Matrix The Global Settings window appears Figure 22 Global Settings Window...

Page 26: ...nput Unplug Description When the cable is unplugged delay switching for x seconds Range default 0 to 90 seconds 0 by default Conditions Input Unplug timeout Output inactivity Input unplug timeout manu...

Page 27: ...1 to 4 select either ANALOG or MIC input The changes are immediately reflected the Routing Settings page Figure 23 VS 88UT Global Settings Window Switchable Ports Tab VS 84UT For audio input ports 1 t...

Page 28: ...lobal Settings on the top left side The Global Settings window appears 3 Click the PoE tab The PoE configuration tab appears 4 Do the following VS 88UT Click one radio button on each PO line to select...

Page 29: ...PoE You can select one port on each PO line for example HDBT 7 input for PO line 1 and HDBT 4 output for PO line 2 Figure 26 VS 84UT Global Settings Window HDBT POE Support Tab 5 Enable or disable HD...

Page 30: ...aestro configuration 1 In the Navigation pane click Routing Settings The Routing Matrix page appears 2 Click Global Settings on the top left side The Global Settings window appears 3 Click the Presets...

Page 31: ...e current routing status For example in Figure 28 the HDMI 4 input is currently routed to the HDMI 1 output as indicated by the green routing button Figure 28 Routing Settings Page Input to Output Exa...

Page 32: ...IR and USB in the matrix and define the port settings The Routing Settings page enables the following Setting Input HDMI Port Parameters on page 31 Setting Input HDBT HDMI or HDBT Input Port Paramete...

Page 33: ...two HDMI outputs The green indication indicates a valid signal on the input Figure 31 Port Settings HDMI Input Ports The following functions are available Viewing and Routing A V Signals Separately o...

Page 34: ...s the status of each signal separately The following example shows that the HDMI 1 input both audio and video signals is routed to output HDMI 1 and HDMI 2 Figure 32 Routing Settings Page HDMI Input P...

Page 35: ...e HDMI and HDBT Output Parameters on page 51 Click the AFV icon to toggle between AFV and Breakaway modes To route an input to an output in the breakaway mode Click Routing Settings page The Routing M...

Page 36: ...ettings Page Routing in the AFV Mode Once you toggle back to AFV the audio signal is immediately routed to the HDMI 3 output Figure 37 Routing Settings Page Routing in the Breakaway Mode In the breaka...

Page 37: ...ick Routing Settings page The Routing Matrix page opens 2 Click HDMI The following window appears Figure 40 Routing Settings Page Input HDMI Settings 3 Perform the following actions as required Change...

Page 38: ...nput signal this follower is routed together with the input signal to the selected output When routing HDMI signals you can define the AUDIO signal to follow the video signal The follower signal is ap...

Page 39: ...ngs on the HDMI 1 input When setting the HDMI 1 output to the breakaway mode upon the next routing step for example HDMI 2 routed to HDMI 1 the audio source remains HDMI 1 and the video source is HDMI...

Page 40: ...g Settings Page Routing HDMI 1 Routed to Several Outputs For the HDMI 1 HDMI 2 HDMI 3 and HDBT 5 ANALOG AUDIO 2 is the audio source Output Routing Status shows ANALOG AUDIO 2 as the source Figure 47 R...

Page 41: ...e HDMI 1 input to HDMI 2 output the audio source is ANALOG AUDIO 2 once again Setting Input HDBT HDMI or HDBT Input Port Parameters The HDBT ports on each device have a slightly different function VS...

Page 42: ...Viewing and Routing HDMI HDBT and HDBT A V Signals Separately To view the video and audio signals separately Click Routing Settings page The Routing Matrix page opens Click beside the port name For V...

Page 43: ...2 Click HDBT HDMI is described in Changing HDMI Input Port Settings on page 35 The following window appears Figure 53 Routing Settings Page Input HDBT Settings Each setting retains the switching state...

Page 44: ...ll be routed in case the step in button is pressed on this input see Setting the Step in Status on the HDBT Ports on page 57 4 Click Save POE Status POE on the HDBT ports is configured via global sett...

Page 45: ...s are applied in the next routing step Figure 54 Routing Settings Page Input HDBT 5 Followers Settings For example when routing input HDBT 5 to the HDBT 6 output HDBT 5 audio is routed to the output F...

Page 46: ...t for the video signal Figure 57 Routing Settings Page HDBT 6 Input to HDBT 6 Output Routing Status In the following example MIC 1 is set as the audio follower for input HDBT 5 Figure 58 Routing Setti...

Page 47: ...routing the HDBT 6 input to HDBT 5 output MIC 1 is still the audio source Figure 61 Routing Settings Page HDBT 6 Output Routing Status Then when setting HDBT 7 input as audio source MIC 1 is no longe...

Page 48: ...lanced analog inputs 1 to 4 can also function as microphone inputs MIC 1 to MIC 8 inputs 5 to 8 function as unbalanced analog inputs Figure 63 Port Settings Analog Audio Input Ports The following func...

Page 49: ...ider window appears 2 Set the volume set to 0dB by default Figure 64 Port Settings Setting Analog Audio Level 3 If required click to mute the input Changing the Analog Audio Port Settings To set the A...

Page 50: ...to function as an analog input or as two microphone inputs 1 Click next to the port name 2 Set ANALOG AUDIO 1 for example to MIC 1 MIC 2 desired port Figure 66 Port Settings Selecting Analog Audio or...

Page 51: ...49 To set a MIC port to function as an analog input 1 Click next to one of the MIC ports 2 Set MIC 1 for example to ANALOG AUDIO 1 Figure 68 Port Settings Selecting MIC to ANALOG AUDIO ANALOG AUDIO 1...

Page 52: ...wing window appears Figure 70 Routing Settings Page Input MIC Settings Each setting ANALOG or MIC retains the switching state followers are specific for the defined port 2 Perform the following action...

Page 53: ...only mode only audio is routed through the output a black pattern screen is displayed and 5V cut off is disabled Enabling Disabling audio follow video both audio and video are routed through the outp...

Page 54: ...ng Settings Page Output HDMI Settings Scroll down to view all inputs 2 Perform the following actions as required Change the Port Label name View the Routing Status Set AFV to ON or OFF Set Audio only...

Page 55: ...tings Scroll down to view all inputs 2 Perform the following actions as required Change the Port Label name View the Routing Status View the POE status see POE Status on page 42 Set AFV to ON or OFF S...

Page 56: ...ected When an input cable is removed there is a delay before automatic switching takes place In the Manual mode Video Lost timeouts are disabled To use Auto Switching 1 Open the HDMI HDBT settings win...

Page 57: ...numbers appear under output HDBT 6 Last Connected LC appears under outputs HDMI 3 and HDBT 5 where input HDMI 3 was removed from the Last Connected list Figure 76 Routing Settings Page Using Auto Swit...

Page 58: ...ix page Setting and Routing the RS 232 Ports RS 232 commands can be routed between HDBT inputs HDBT outputs and the RS 232 DATA port To route RS 232 signals 1 Click Routing Settings page The Routing M...

Page 59: ...ep in compatible switchers that are connected to the HDBT input ports on the device can be routed to the outputs by pressing the STEP IN button on the switchers To activate Step in on the HDBT input p...

Page 60: ...n the Outputs row enable connecting an external IR sensor emitter to send receive IR signals 5 6 7 and 8 via HDBT inputs 5 6 7 and 8 respectively IR 5 and IR 6 in the Inputs column enable connecting a...

Page 61: ...the routing button connecting them in the matrix Figure 81 Routing Settings Page USB Routing Click an input output or USB heading to view the USB routing status and other settings Click USB Type B on...

Page 62: ...ault EDID You can also load a customized EDID file from your PC The selected EDID can be copied to the selected input s View the currently selected EDID source Bytemap by clicking Bytemap on the right...

Page 63: ...the inputs If you are reading EDID from an output make sure that that output is connected to an acceptor Figure 83 EDID Management Page Select an EDID Input Read From 3 Select the input s or all the...

Page 64: ...d The following message appears Figure 86 EDID Management Page EDID Copy Success 5 Click OK To read the EDID from the default EDID 1 In the Navigation pane click EDID The EDID Management page appears...

Page 65: ...customized EDID file 1 In the Navigation pane click EDID The EDID Management page appears 2 In the File area click 3 Select the EDID file 4 Select the input s or all the inputs to which the EDID is c...

Page 66: ...to Controlling Devices via the Controller on page 64 Activating Macros on page 72 Scheduling Macros on page 73 Setting the Date and Time on page 75 By default the Controller page is empty since a conf...

Page 67: ...via the Controller page connect it to the network via TCP connection To create the room controller configuration 1 In K CONFIG select VS 88UT RC as the master device Figure 88 Controller Page Select...

Page 68: ...roject 6 Connect the VS 88UT to your PC via Ethernet 7 Click Connect in K CONFIG The following message appears Figure 90 Controller Page Login 8 Type in the VS 88UT webpage password for ADMIN Admin by...

Page 69: ...ser For Admin enter the password Admin by default 15 Click Login The Controller page appears see Figure 93 If the Controller page does not load correctly see Figure 87 you need to delete cached images...

Page 70: ...Devices The Device menu appears Figure 93 Controller Page Device Menu In this example the Device menu list shows the room controller section VS 88UT RC an auxiliary device Kramer RC 74DL and a virtual...

Page 71: ...81SIDN Figure 95 Controller Page Controlling a Peripheral Device 4 Expand the command types Figure 96 Controller Page Peripheral Device Available Commands The list of all the configured commands appe...

Page 72: ...iary Device To control an auxiliary device 1 In the Controller page click Devices 2 Click an Auxiliary device RC 74DL The Device menu appears Figure 97 Controller Page Controlling an Auxiliary Device...

Page 73: ...irtual device on the list for example VDevice with Knob The virtual device appears Figure 98 Controller Page Controlling a Virtual Device 3 Click a room controller device button The action list as def...

Page 74: ...s Macros include All Off and All On buttons configured in K CONFIG to easily activate or deactivate the controlled room with the press of a button 1 In the Controller page click Macros The Macros wind...

Page 75: ...cros Scheduled tasks lets you schedule All on All Off macros throughout the week 1 In the Controller page click Scheduled Tasks The Scheduled Tasks window appears Figure 100 Controller Page Scheduled...

Page 76: ...oller 74 3 Click The Add Macro window appears Figure 102 Controller Page Adding a Scheduled Task 4 Select a Macro All On or All Off set the exact activation time and click Add The scheduled macro appe...

Page 77: ...the Date and Time Set the date and time in one of the following methods Manually From a PC clock From a server address by clicking the IP address of the clock source the time zone and checking DST if...

Page 78: ...equence of actions commands which can appear in different scenarios that will be carried out via any defined ports Download the Kramer Maestro User Manual from the Kramer web site at www kramerav com...

Page 79: ...actions scripts and triggers as described in the Kramer Maestro User Manual Once the triggers are defined the trigger activates the scripts configured in the automation page For example when using th...

Page 80: ...the following functions Clicking Restart to restart the device Resetting to Factory Default Parameters on page 78 Changing the Device Name by typing the new name and saving it Performing Firmware Upgr...

Page 81: ...low the online instructions Setting Authentication By default the Web pages are secured username and password are both Admin To access web pages without using the password 1 In the Navigation pane cli...

Page 82: ...r shows the authentication details Figure 109 Password Settings Page Security Deactivated To access Web pages using the password 1 In the Navigation pane click Settings The General tab in the Settings...

Page 83: ...88UT Changing the Device Settings 81 3 Click Ok and add the password details Figure 111 Settings Page Security Activation Message 4 Click Save The following message appears Figure 112 Settings Page Pa...

Page 84: ...In the Navigation pane click Settings The General tab in the Settings page appears 2 Select the Communication tab Figure 113 Settings Page Communication Tab 3 If DHCP is set to OFF change any of the...

Page 85: ...o ON 5 Click Save 6 Type the device name in the address bar of your browser to reload the page You can read the new IP address from the Network Settings page Performing Firmware Upgrade To perform fir...

Page 86: ...s 5 Wait for the device to restart Setting the Date and Time To set the time and date 1 In the Navigation pane click Settings The General tab in the Settings page appears 2 Select the Time and Date ta...

Page 87: ...Kramer Electronics Ltd VS 88UT Viewing the About Page 85 Viewing the About Page The VS 88UT About page lets you view the Web page version and Kramer Electronics Ltd details Figure 118 About Page...

Page 88: ...male HDMI connectors 2 HDBT On RJ 45 female connectors 2 Balanced Stereo Audio On 5 pin terminal block connectors 1 Stereo Speaker Output 2x50W into 4 On a 4 pin terminal block connector 2 IR On 3 5mm...

Page 89: ...own for programming Video Max Bandwidth 10 2Gbps 3 4Gbps per graphic channel Max Resolution 4K 60Hz 4 2 0 24bpp resolution Compliance HDMI and HDCP 1 4 Analog Audio Max Level 1 Vrms THD NOISE 0 03 1kH...

Page 90: ...l and IR Kramer cables available at www kramerav com product VS 88UT Specifications are subject to change without notice at www kramerav com Default Communication Parameters RS 232 Protocol 3000 Baud...

Page 91: ...nn Command Parameter CR LF Command parameters Multiple parameters must be separated by a comma In addition multiple parameters can be grouped as a single parameter using brackets and Command chain se...

Page 92: ...e YYYY Year MM Month DD Day time Format hh mm ss where hh hours mm minutes ss seconds Get the device build date BUILD DATE CR CPEDID Copy EDID data from the output to the input EEPROM Destination bitm...

Page 93: ...EDID color space Get command might change the current EDID COMMAND EDID CS id CR FEEDBACK nn EDID CS id ColSpace CR LF The following attributes comprise the ID input_id Output number 1 Input 1 2 Inpu...

Page 94: ...R FEEDBACK Get nn GLOBAL POE state CR LF state On Off not case sensitive Set the power over Ethernet global state to on GLOBAL POE ON CR GLOBAL POE Get power over Ethernet state This is an Extended Pr...

Page 95: ...oubleshooting Helps find error root causes and gets details not displayed in the error code number COMMAND LOG TAIL line_num CR FEEDBACK Get nn LOG TAILnn CR LF Line content 1 CR LF Line content 2 CR...

Page 96: ...CK nn NET CONFIG id ip net_mask gateway CR LF id Network ID the device network interface if there are more than one Counting is 0 based meaning the control port is 0 additional ports are 1 2 3 ip Netw...

Page 97: ...t the gateway IP address NET GATE CR NET IP Set IP address For proper settings consult your network administrator COMMAND NET IP ip_address CR FEEDBACK nn NET IP ip_address CR LF ip_address Format xxx...

Page 98: ...CR FEEDBACK nn SIGNAL inp_id status CR LF inp_id Input number 1 Input 1 2 Input 2 3 Input 3 4 Input 4 5 Input 5 6 Input 6 7 Input 7 8 Input 8 status Signal status according to signal validation 0 Off...

Page 99: ..._type o IN o OUT port_type o ANALOG_AUDIO o AMPLIFIED_AUDIO o MIC port_index The port number as printed on the front or rear panel signal_type o AUDIO index Indicates a specific channel number when th...

Page 100: ...AUD ONLY direction_type port_type port_index signal_type index mode CR LF The following attributes comprise the signal ID direction_type o IN o OUT o BOTH port_type o HDMI o HDBT o ANALOG_AUDIO o AMPL...

Page 101: ...ction_type port_type port_index labe l_text CR LF The following attributes comprise the port ID direction_type o IN o OUT port_type o HDMI o HDBT o ANALOG_AUDIO o AMPLIFIED_AUDIO o MIC port_index The...

Page 102: ...IC port_index The port number as printed on the front or rear panel 1 Mic 1 2 Mic 2 3 Mic 2 4 Mic 4 5 Mic 5 6 Mic 6 7 Mic 7 8 Mic 8 mic_type Dynamic Condenser not case sensitive Get the microphone typ...

Page 103: ...1 CR X PATTERN Set a pattern on a specific output signal This command is designed to enable pattern on any signal commonly pattern makes sense for video but on some products audio pattern is also sup...

Page 104: ...can be usable into X PATTERN This is an Extended Protocol 3000 command COMMAND X PATTERNS LIST direction_type port_type port_index signal_type index CR FEEDBACK nn X PATTERNS LIST direction_type port_...

Page 105: ...direction_type o IN port_type o HDMI o HDBT o ANALOG_AUDIO o MIC port_index The port number as printed on the front or rear panel Get the selected ID of port ID IN AUDIO 1 X PORT SELECT IN AUDI O 1 C...

Page 106: ...ID EO 1 IN SDI 1 VIDEO 1 CR This is an Extended Protocol 3000 command COMMAND X ROUTE direction_type1 port_type1 port_index1 sig nal_type1 index1 direction_type2 port_type2 port_i ndex2 signal_type2 i...

Page 107: ...a specific channel number when there are multiple channels of the same type Set HDMI 1 audio signal and HDBT 7 IR signal to follow HDBT IN 7 X SET FOLLOWERS IN HDB T 7 VIDEO 1 IN HDMI 1 AUDIO 1 IN HDB...

Page 108: ...enough space for data firmware FPGA ERR_FS_NOT_ENOUGH_SPACE 11 Not enough space file system ERR_FS_FILE_NOT_EXISTS 12 File does not exist ERR_FS_FILE_CANT_CREATED 13 File can t be created ERR_FS_FILE...

Page 109: ...e insured during shipment with the insurance and shipping charges prepaid by you If this product is returned uninsured you assume all risks of loss or damage during shipment Kramer Electronics will no...

Page 110: ...nd a list of Kramer distributors visit our Web site where updates to this user manual may be found We welcome your questions comments and feedback The terms HDMI HDMI High Definition Multimedia Interf...

Reviews: